
Learn how to connect Shopify with OAuth, choose which historical records to import, configure future synchronization, understand what happens to legacy Custom App connections, and troubleshoot missing data or connection issues.
New Shopify connections and reconnections use OAuth. You do not need to create a Shopify Custom App, generate an Admin API access token, or configure developer credentials for a new connection.
If your store is already connected through the older Custom App method and the connection is working, no action is required. Avoid disconnecting a working legacy connection unless you are ready to reconnect using the current OAuth flow.
2. Key Benefits of the Shopify Integration
3. Shopify Connection Methods
4. How To Connect Your Shopify Store
5. Import Existing Store Data
6. Configure Automatic Sync
7. Understanding Import vs. Sync
8. Shopify Sync Limitations
9. Frequently Asked Questions
10. Need Help?
What is the Shopify Integration?
The Shopify integration connects a Shopify store to your account so supported ecommerce records and events can be used alongside your contacts, automation, products, orders, and payments.
The current connection experience uses Shopify OAuth. Authorization happens through Shopify's installation screen, which removes the need to manually create a Custom App or copy API credentials into the integration.
Key Benefits of the Shopify Integration
Connecting Shopify allows supported ecommerce information to be centralized and used for customer follow-up, automation, reporting, and ongoing store management.
- Simplified Setup: Connect through Shopify OAuth instead of manually generating API credentials.
- Historical Data Import: Import supported existing products, collections, contacts, orders, and transactions during setup.
- Ongoing Synchronization: Keep selected Shopify records synchronized after the initial connection.
- Automation Support: Use supported order and payment activity with ecommerce automation.
- Customer Visibility: Bring supported customer and order information into the same workspace used for follow-up.
- Automatic contact enrichment: Every contact synced from a connected Shopify store is enriched with purchase history data- lifetime spend, order count, first and last order date, and tax-exempt status. These fields are visible directly on the contact record, with no extra setup.
- Flexible Sync Control: Enable only the data types and supported events your team needs.
Shopify Connection Methods
Shopify connections may still exist under two different setup methods. Knowing which method applies prevents users from searching Shopify for older settings that are no longer required for new connections.
| Connection Method | Used For | Setup |
|---|---|---|
| OAuth App | All new connections and reconnections | Authorize through Shopify. No manual API token or Custom App creation is required. |
| Custom App | Existing legacy connections created before OAuth was available | Legacy connection method. Existing working integrations can remain connected. |
Do not follow older token-based setup instructions for a new connection. If Shopify no longer shows the Custom App option you expected to find, return to the integration settings and begin the current OAuth connection flow instead.
How To Connect Your Shopify Store
The OAuth setup starts from the integration settings, then redirects you to Shopify to approve the requested permissions. Review the store name, import selections, and sync settings carefully before installation.
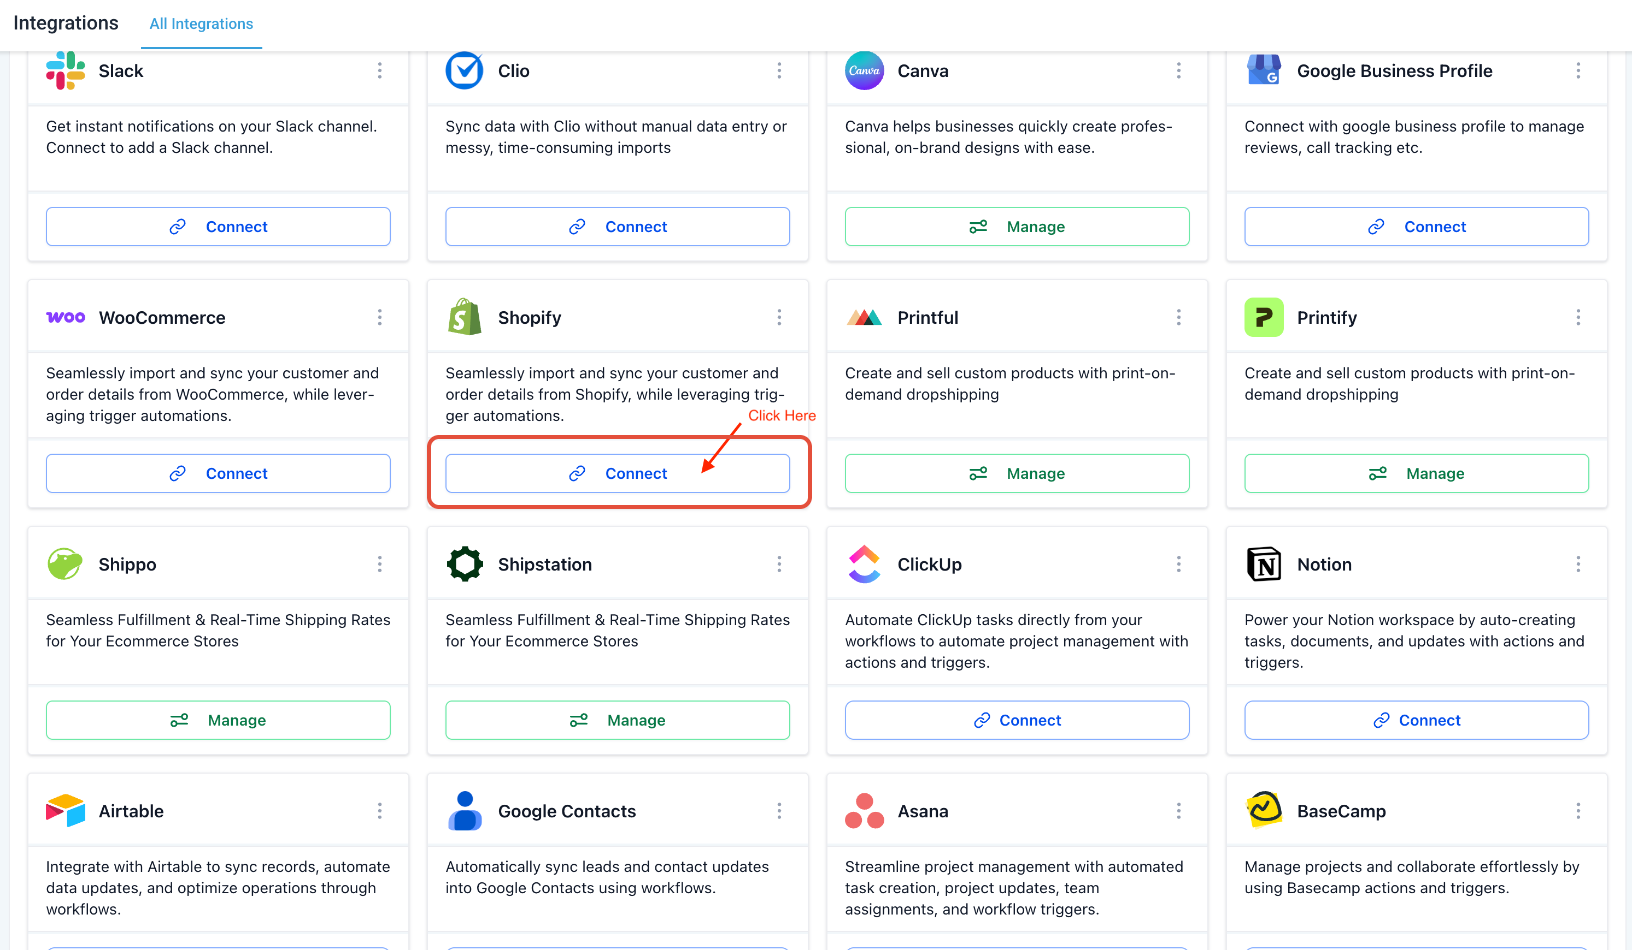
Go to Settings → Integrations, locate Shopify, and click Connect.
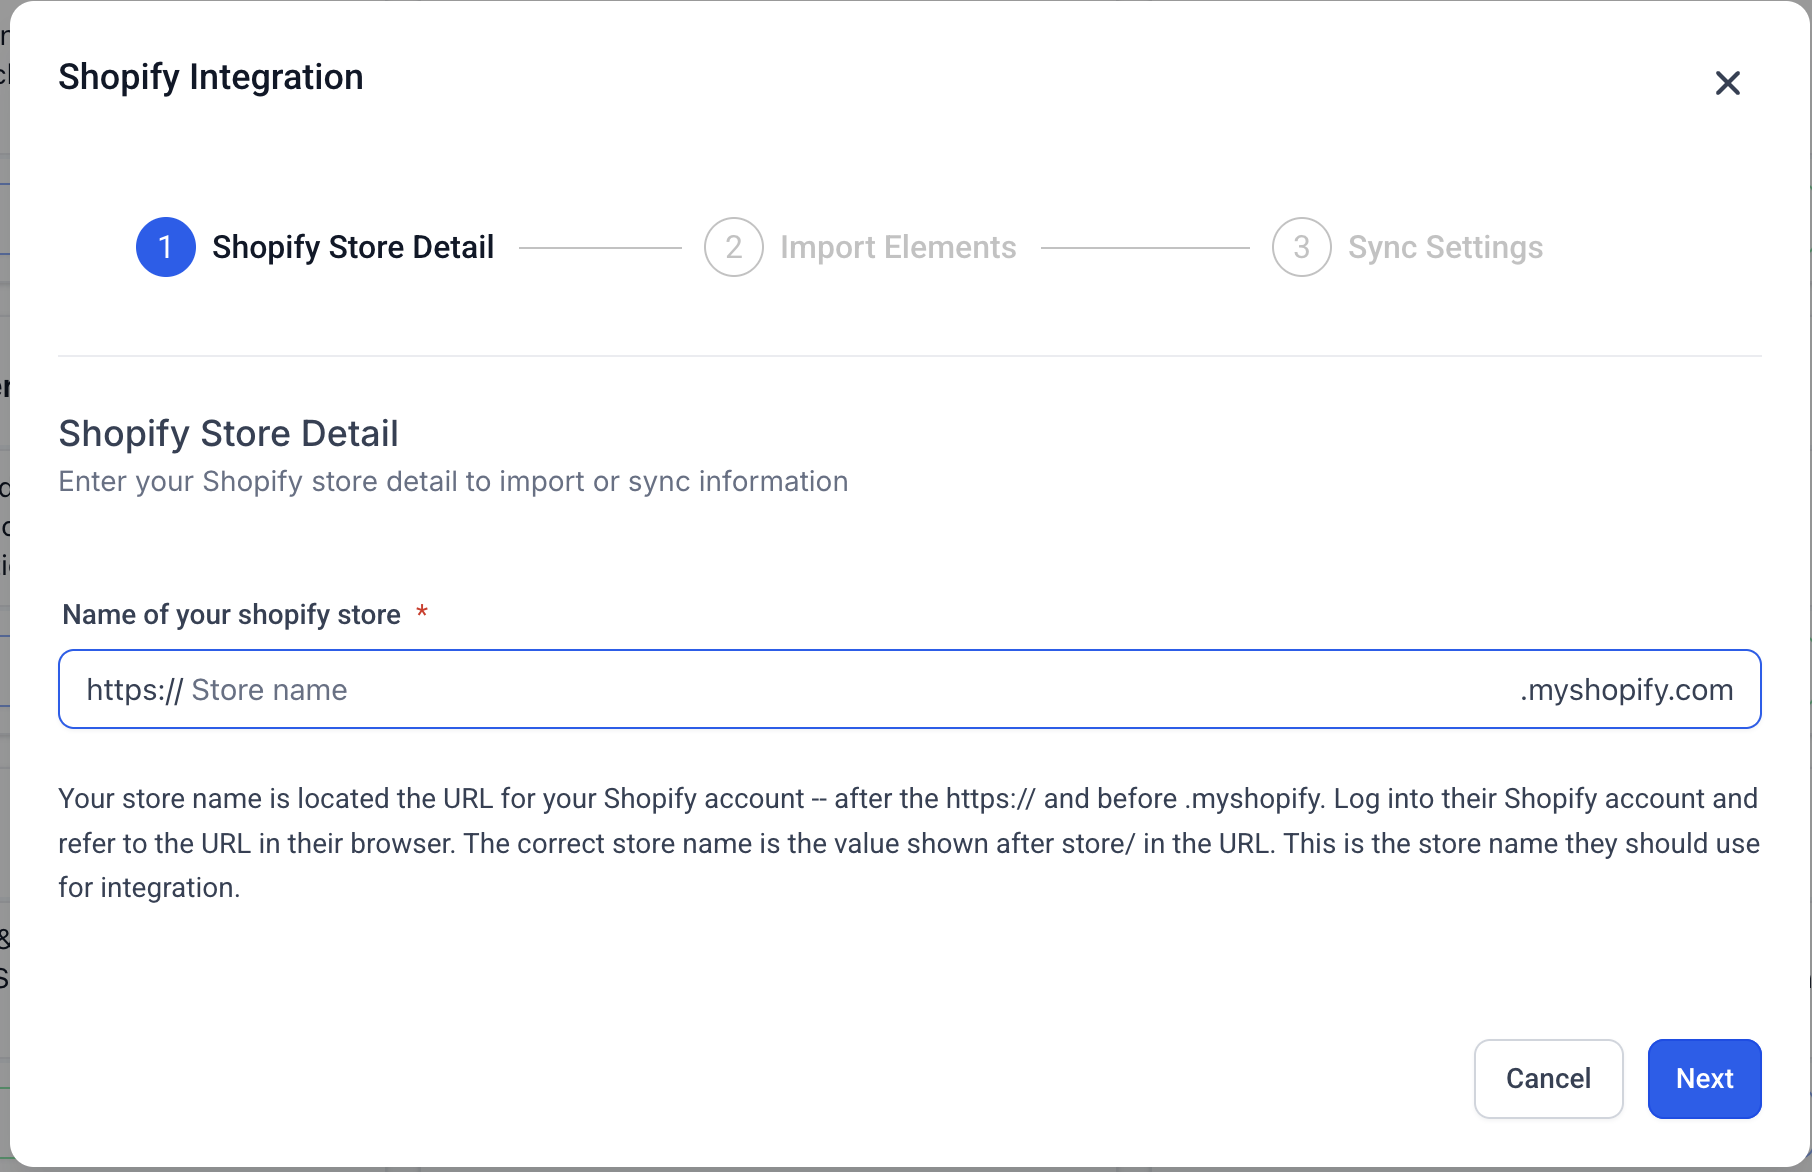
Enter the Shopify store name or store URL associated with the store you want to connect.
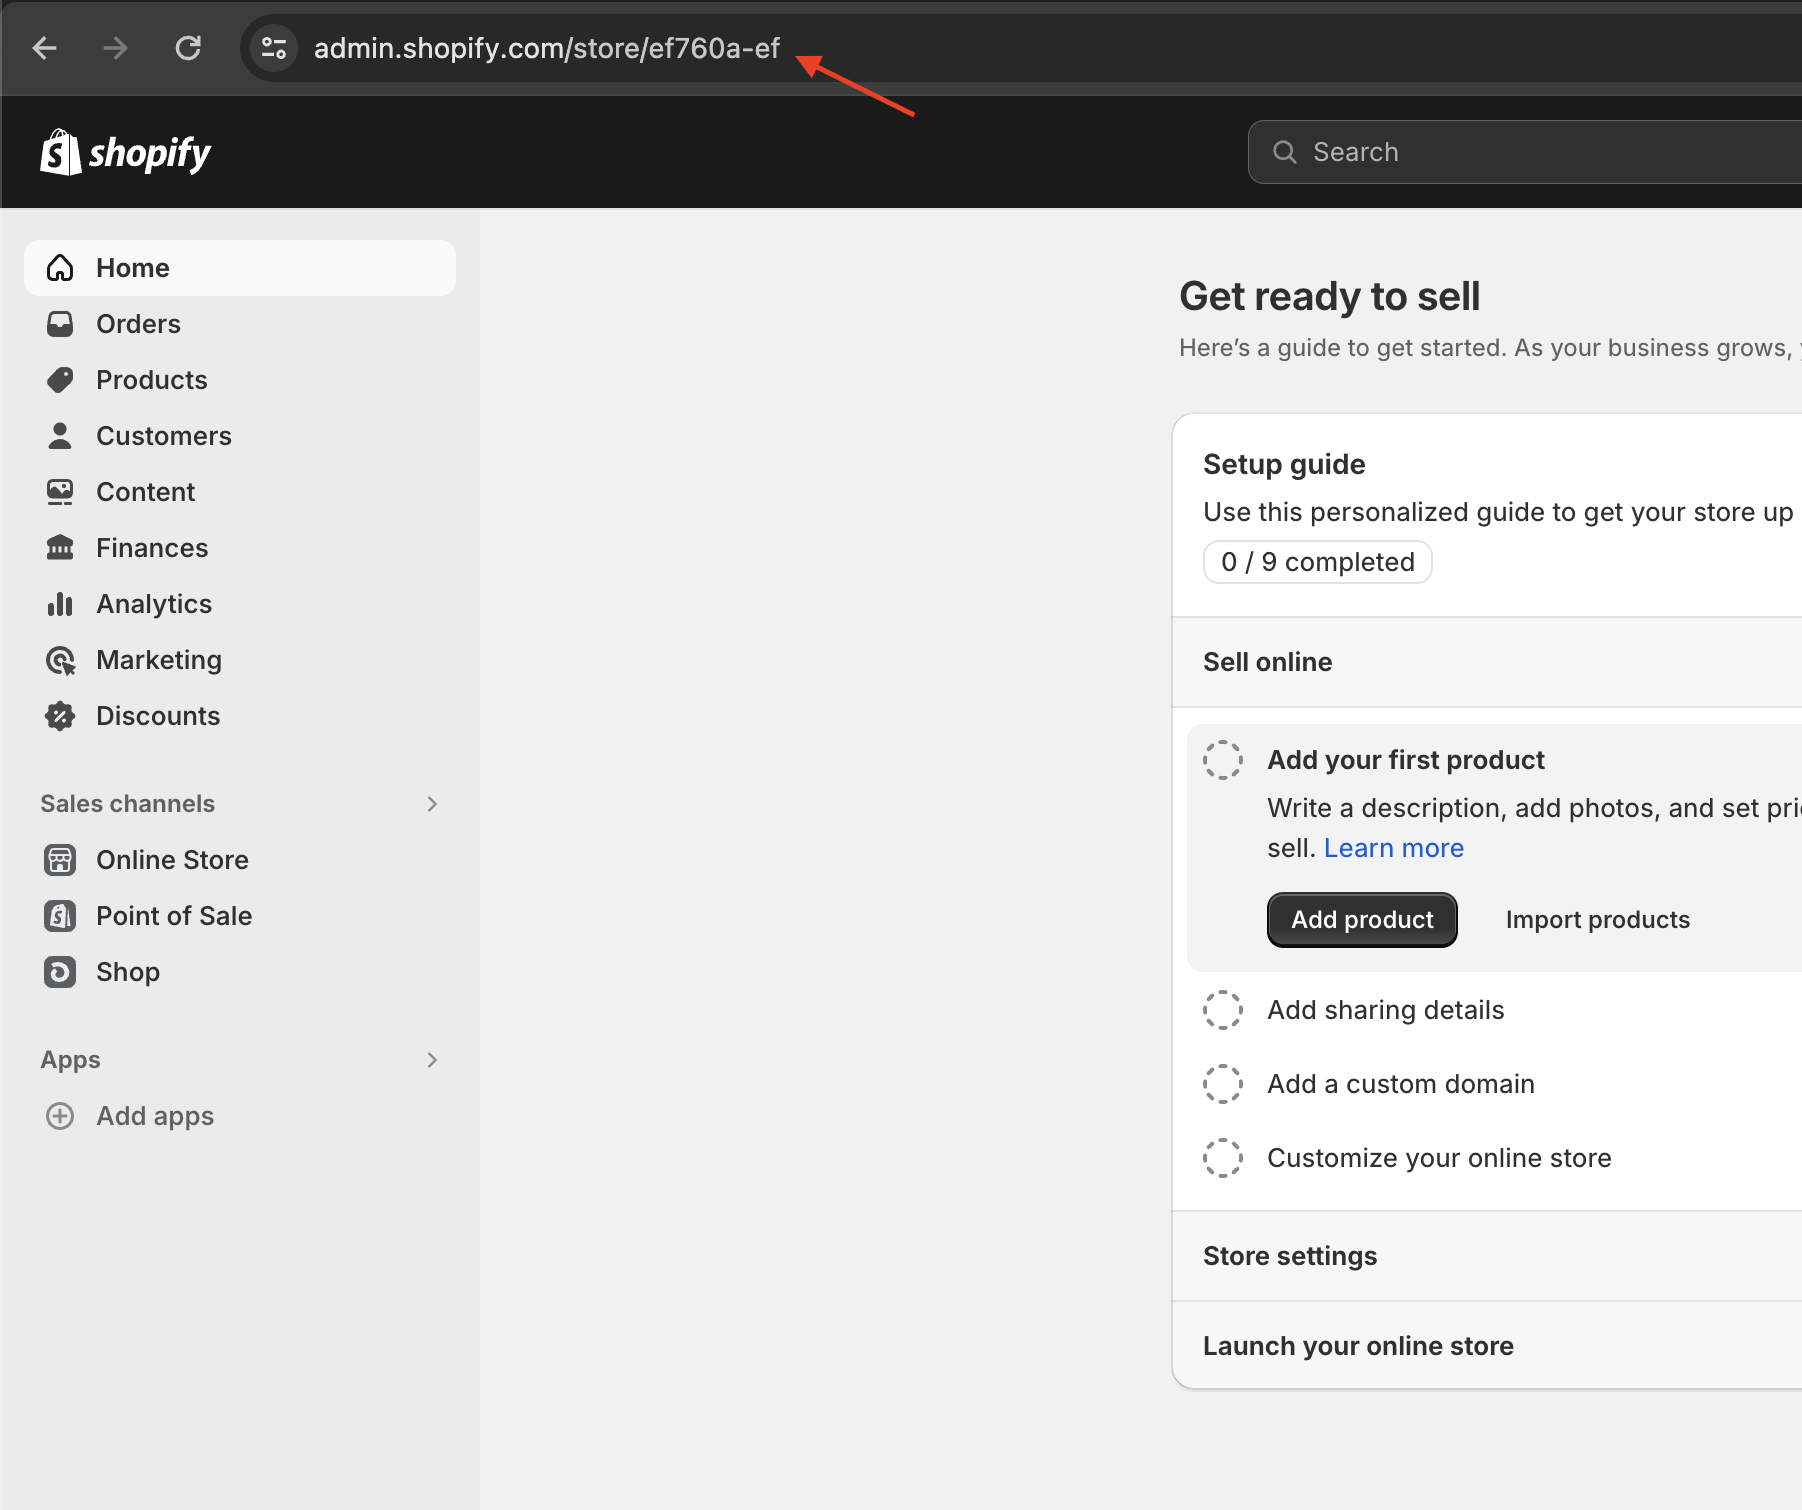
For a URL such as storename.myshopify.com, the store name is storename. In newer Shopify admin URLs, the same identifier may appear after store/.
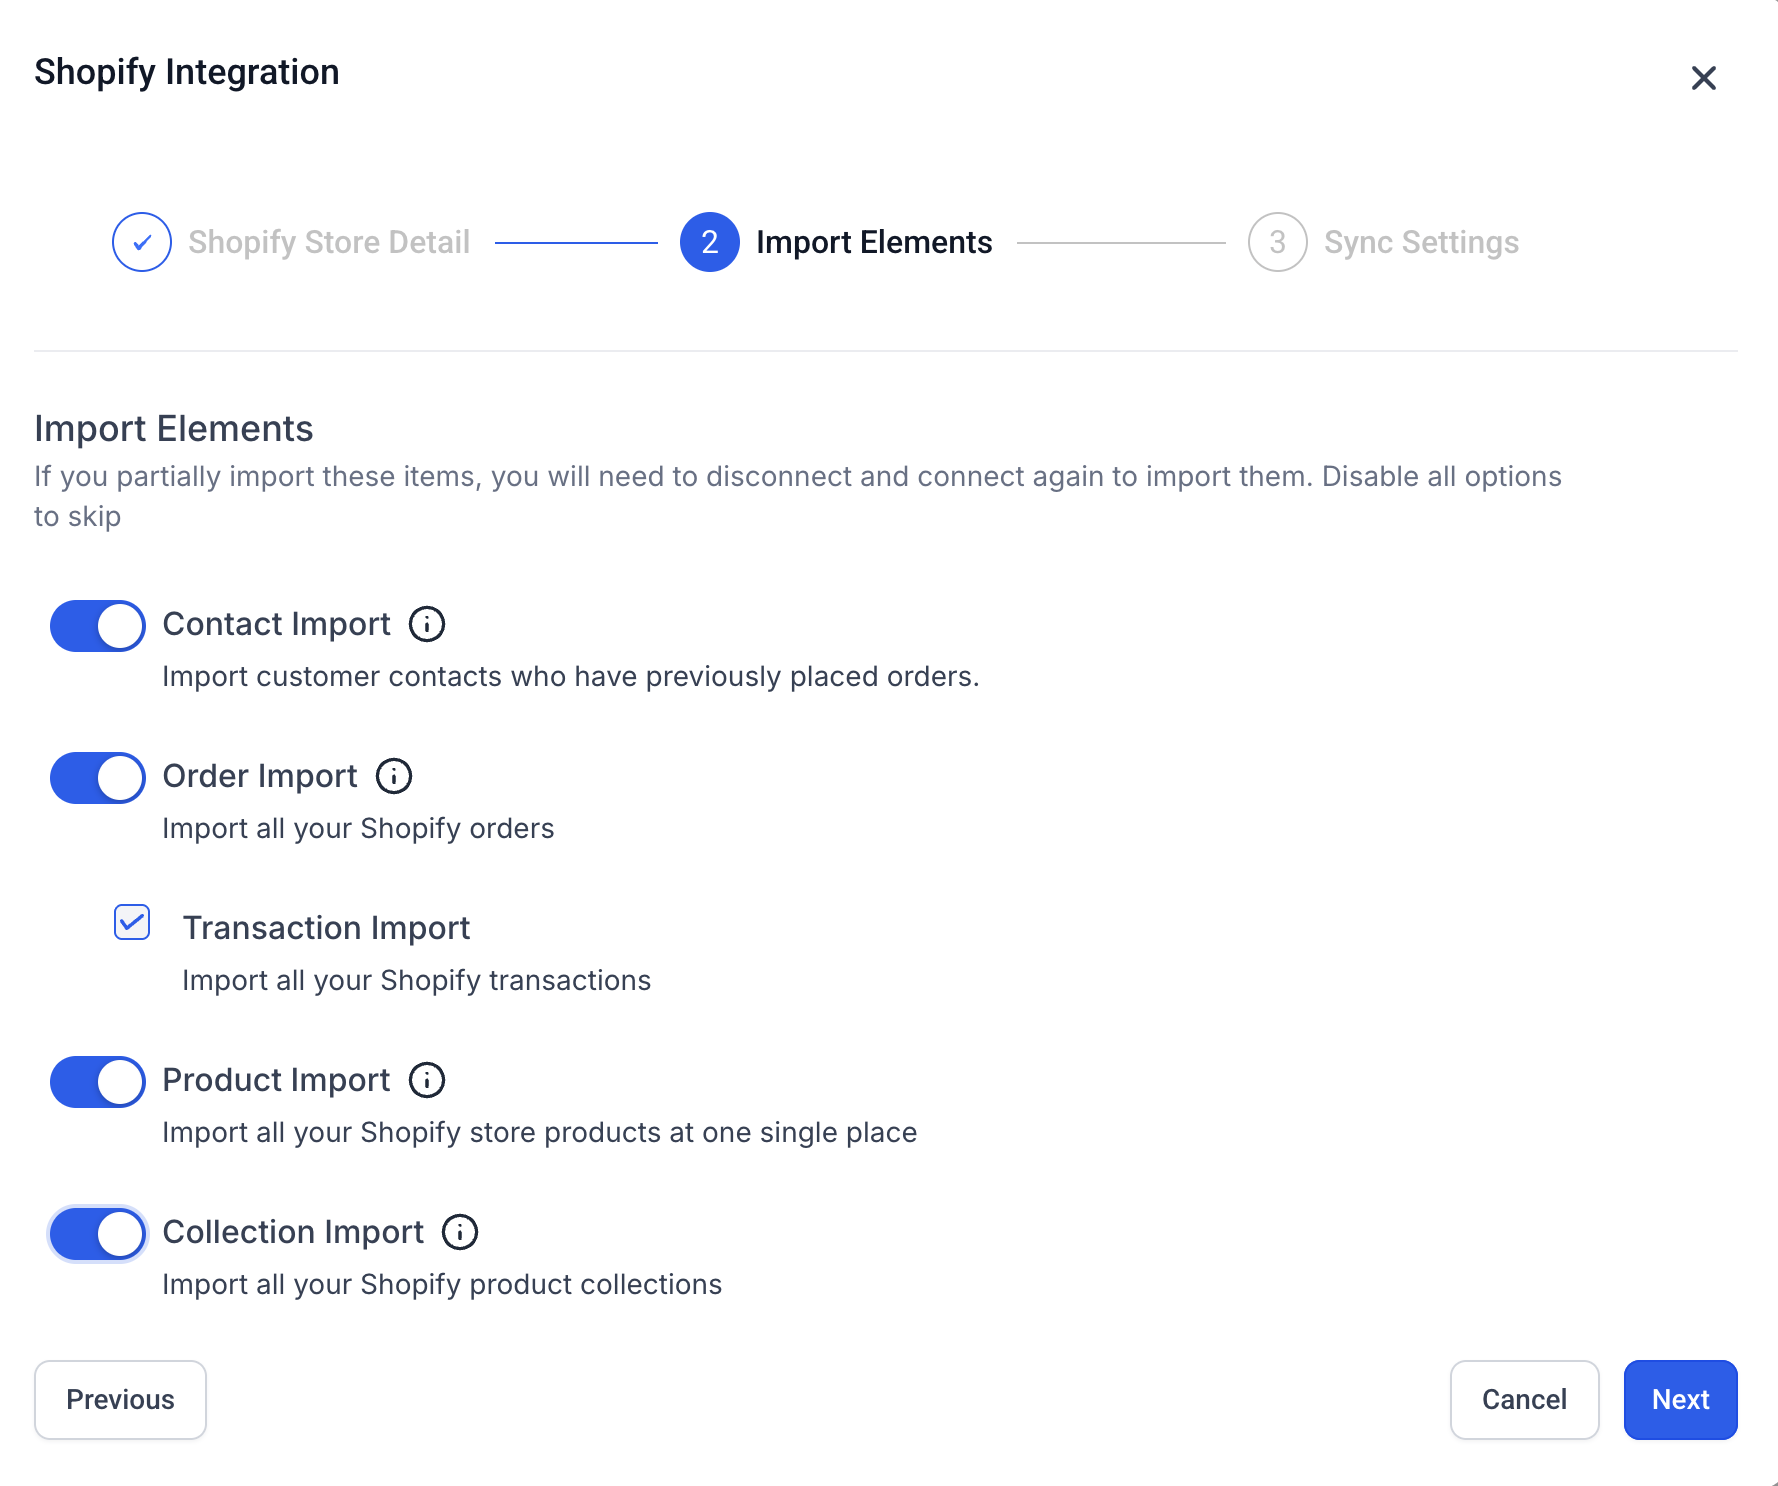
On the Import Elements screen, select the supported historical data you want to bring into the account, then click Next.
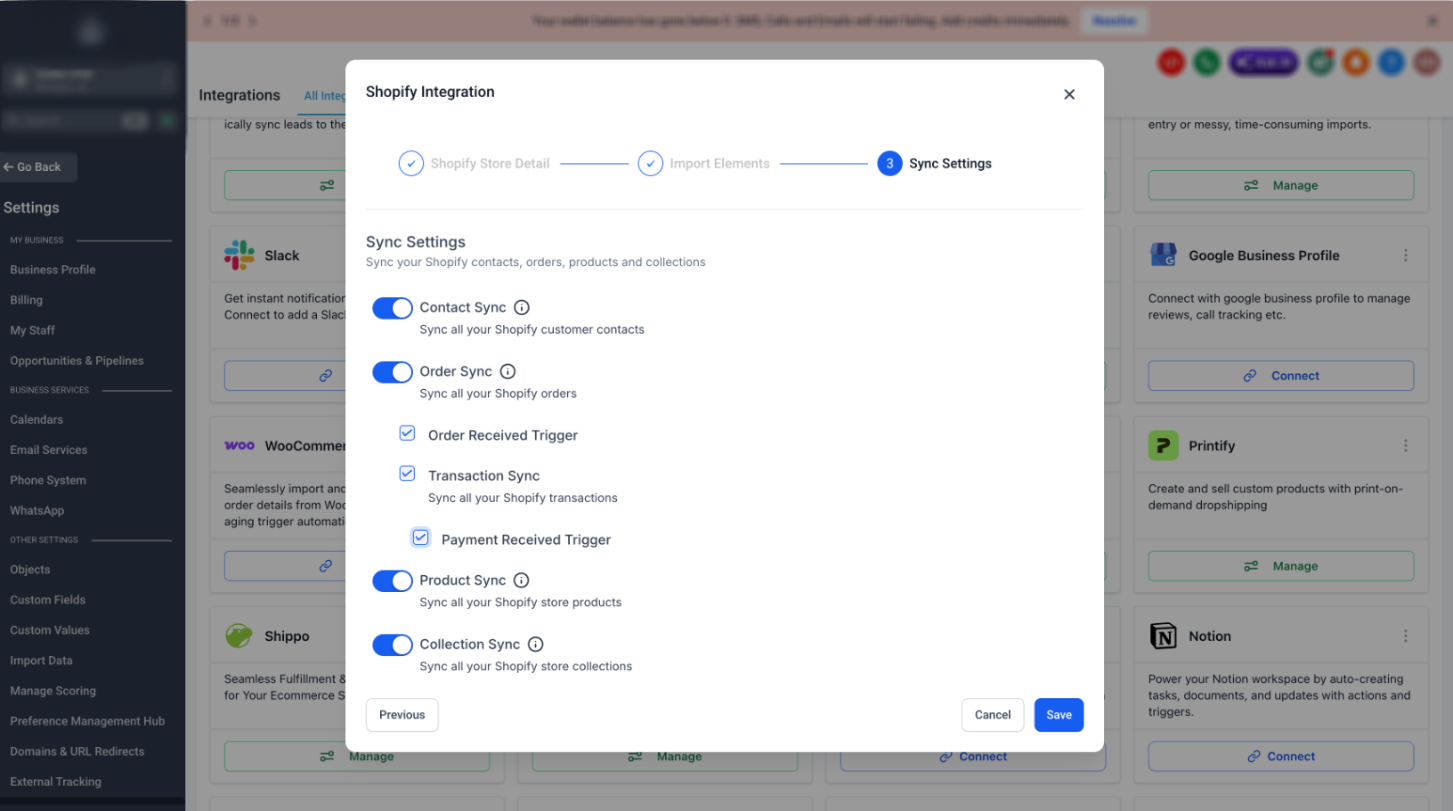
On the Sync Settings screen, enable the data and supported events that should continue syncing after setup.
Click Save. You will be redirected to Shopify through the OAuth authorization flow.
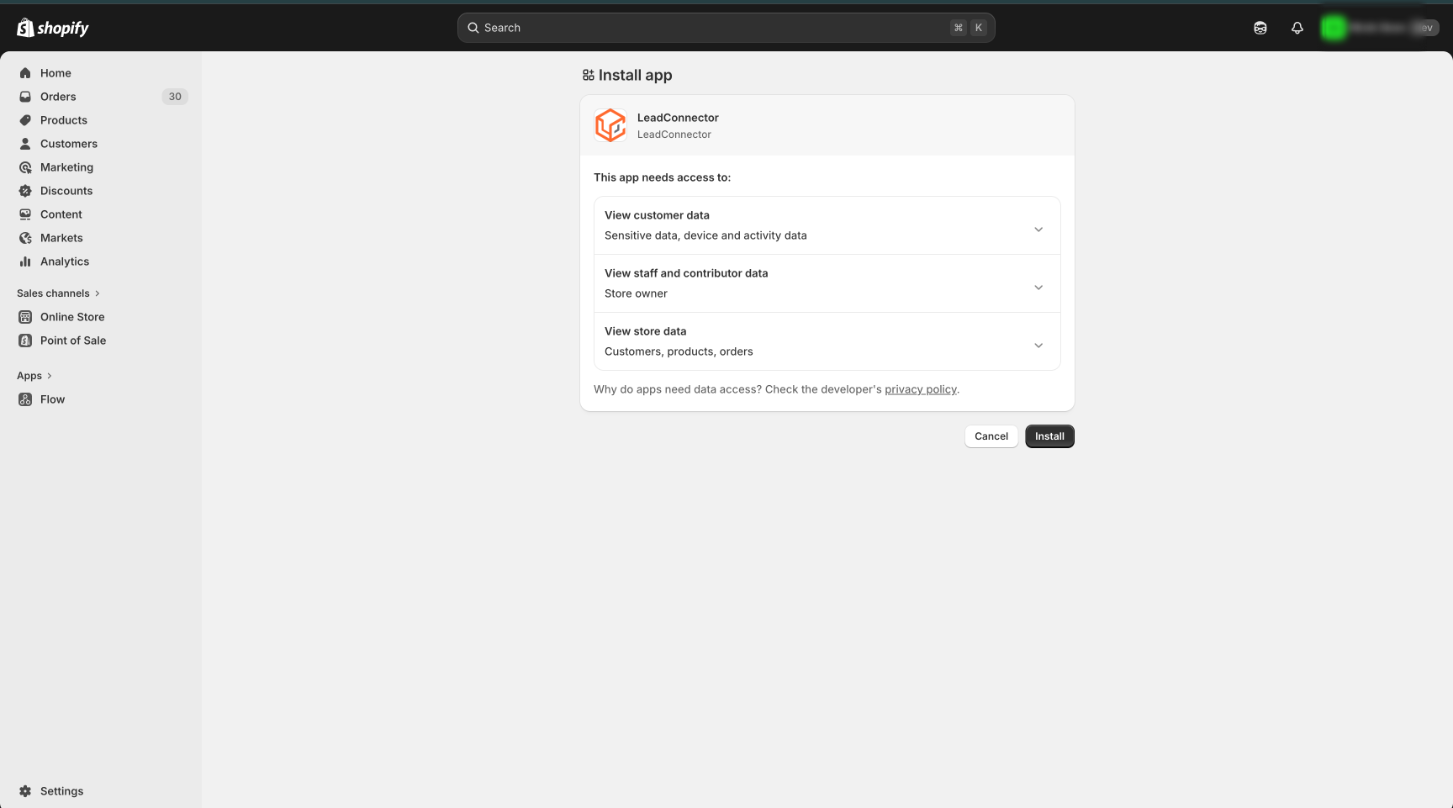
Review the permissions shown on Shopify's installation screen and click Install. After authorization completes, you will be redirected back and the store connection will be active.
Import Existing Store Data
Import Elements determine which supported Shopify records are copied into your account as historical data during the initial connection. This is separate from ongoing synchronization.
Available import options include:
- Contact Import
- Order Import
- Transaction Import
- Product Import
- Collection Import
Contact Fields Added from Shopify (New)
When a contact is imported or synced from a connected Shopify store, the integration automatically creates and keeps a set of fields updated on that contact's record. These fields update on their own after the initial sync- there's no per-field setup required.
Standard contact fields
These map to fields that already exist on every HighLevel contact. Shopify only fills them in if they're currently empty — it never overwrites a value you or another source already set.
| Field | Filled from Shopify |
|---|---|
| First name / Last name | Customer's name on Shopify |
| Customer's default email | |
| Phone | Customer's default phone number |
| Address | Customer's default address |
New Shopify custom fields
| Field | Shows | Updates when |
|---|---|---|
| Shopify Customer ID | Internal Shopify customer reference | Once, when the contact is first created |
| Shopify Store Name | Which connected Shopify store the contact came from | Once, when the store is connected |
| Shopify Lifetime Value | Total amount the customer has spent in that Shopify store | After each completed (paid) order |
| Shopify Order Count | Total number of completed orders | After each completed (paid) order |
| Shopify Last Order Date | Date of the customer's most recent completed order | After each completed order |
| Shopify Last Order Value | Value of the customer's most recent completed order | After each completed order |
| Shopify First Order Date | Date of the customer's first completed order | Once, after their first completed order |
| Shopify Tax Exempt | Whether Shopify has this customer marked as tax-exempt (a common signal for wholesale/B2B buyers) | Whenever the customer's Shopify record is updated |
| Shopify Email Consent (Coming soon) | The customer's email marketing consent status on Shopify | Whenever consent changes in Shopify |
| Shopify SMS Consent (Coming soon) | The customer's SMS marketing consent status on Shopify | Whenever consent changes in Shopify |
Shopify customer tags are synced to the existing tag field for a contact record. Use these fields as filters in Smart Lists (for example, "orders more than 90 days ago") or as conditions in Workflows to branch messaging by purchase behavior.
Note
- All Shopify contact fields sync automatically once a store is connected- there's currently no option to turn off or opt out of individual fields. For existing customers integrated with Shopify, updating the integration settings will sync these fields.
- A refund or cancelled order does not reduce Shopify Order Count, since the order was still placed; Shopify Lifetime Value updates automatically to reflect the refund.
- Draft orders in Shopify (for example, a manual quote) don't affect any contact field - only a completed, paid order does.
Historical import is a setup action: Importing is different from ongoing sync. If historical data was omitted or needs to be reimported later, reconnecting the integration may be required. Review the legacy-connection warning before disconnecting an older Custom App connection.
Configure Automatic Sync
Sync Settings control which supported Shopify data and events continue updating after the initial connection. Enable the options required by your ecommerce workflows and customer-management process.
Available settings include:
- Contact Sync
- Order Sync
- Order Received Trigger
- Transaction Sync
- Payment Received Trigger
- Product Sync
- Collection Sync
Sync settings can be reviewed after connection. Disabling a future sync option stops that category from continuing to synchronize, but records that were already imported or synced may remain in the account.
Understanding Import vs. Sync
Import and sync serve different purposes. Understanding the difference prevents confusion when historical records appear once while newer Shopify activity continues updating automatically.
| Type | Purpose | When It Runs |
|---|---|---|
| Import | Copies selected supported historical Shopify records into the account. | During the connection/import process. |
| Sync | Keeps selected supported Shopify activity updated after connection. | Ongoing while the integration and relevant sync options remain enabled. |
Tip: For a full migration, selecting all supported import and sync options generally provides the most complete transfer unless your migration plan intentionally excludes specific data types.
Shopify Sync Limitations
Shopify API access, plan restrictions, record type, and selected sync settings can affect which data is available. Review the limitations below when records do not appear as expected.
- Shopify Plan Access: Some Shopify plans may restrict access to customer personally identifiable information through Shopify's API. This can affect contact, order, and transaction imports or sync.
- Products and Collections: These data types may remain available even when customer-data API access is limited.
- Contact Import: Shopify customers who have previously placed an order are included in supported contact import behavior. Customers with no order history may not be included.
- Product Taxes: Product tax information is not mapped during product import or synchronization.
- Transactions: Each Shopify order creates one transaction in the connected account.
- Order Status: Synced Shopify orders are represented as Completed or Cancelled.
- Merged Customers: When customer records are merged in Shopify, the primary customer record is updated.
- SEO Data: Default Shopify SEO information may be received as empty when no custom SEO values have been configured.
- Processing Time: Large stores or large historical imports may take additional time to complete.
- Previously Synced Records: Turning off a sync option does not necessarily remove records that have already been imported or synchronized.
Frequently Asked Questions
Need Help?
If the Shopify connection fails or expected data is missing, use the checks below to determine whether the issue is related to the connection method, store identifier, authorization, Shopify access, or sync configuration.
- You cannot find the old Shopify Custom App option: Do not create a new manual integration. Start from Settings → Integrations → Shopify and use the OAuth connection flow.
- The store is not connecting: Confirm the Shopify store name or URL is correct and that you are authorizing the intended store.
- You are not redirected back after authorization: Confirm the Shopify installation completed successfully and retry the connection if necessary.
- Historical records are missing: Review which Import Elements were selected during connection. Historical import selections are separate from ongoing sync settings.
- New records are not syncing: Confirm the relevant Contact, Order, Transaction, Product, or Collection sync option is enabled.
- Contacts, orders, or transactions are unavailable: Review the Shopify subscription plan and API access for customer information.
- A legacy Custom App connection still works: Leave it connected unless you intentionally plan to migrate it. Disconnecting may require reconnecting through OAuth.
- You need to reimport historical data: Reconnection may be required. Review the current connection type before disconnecting an existing integration.
- Imported records are still visible after disabling sync: Disabling future synchronization does not necessarily remove records that were already imported or synced.
- Issue continues: Collect the Shopify store name, current connection type, selected import options, selected sync settings, Shopify plan, screenshots of the integration, and any visible error message before contacting support.
