TABLE OF CONTENTS
- What is “Domain Transfer In”?
- How the transfer works (at a glance)
- Before you begin (checklist)
- Step 1: Enter Domain
- Step 2: Eligibility Check
- Step 3: Review DNS Records (critical to avoid downtime)
- Step 4: Finalize Transfer
- Step 5: Approve at Your Current Registrar
- After approval: what you’ll see
- Troubleshooting & common blockers
- FAQs
- Related help
- Need more help?
What is “Domain Transfer In”?
Domain Transfer In lets you move a domain registered at another registrar (e.g., GoDaddy, Namecheap, IONOS, Cloudflare Registrar) into our platform. Once transferred, you can manage DNS, billing, renewals, and security from one place, no more jumping between providers.
Why bring your domain in?
Centralized management, fewer renewal surprises, smoother troubleshooting, and better retention/continuity for your business.
How the transfer works (at a glance)
Enter Domain → tell us the domain to transfer
Eligibility Check → confirm it can be transferred
Review DNS Records → upload/scan and verify all DNS settings
Finalize Transfer → unlock, get auth (EPP) code, pay
Approve at Current Registrar → confirm the transfer to complete
Timeframe: Most transfers complete in 1–5 days after you approve them at your current registrar.
Before you begin (checklist)
You can sign in to the current registrar account for the domain
The domain is older than 60 days and not recently transferred
You can disable DNSSEC and privacy/whois protection temporarily
You can unlock the domain and obtain the authorization (EPP) code
You have access to your DNS provider (may be different from your registrar)
Important: Your registrar owns the domain record; your DNS provider hosts your DNS records. If you changed nameservers in the past (e.g., to Cloudflare), your DNS provider is where those nameservers point, not necessarily the registrar.
Step 1: Enter Domain
In the Transfer a Domain flow, type the domain you want to transfer (e.g., example.com) and continue.

Step 2: Eligibility Check
We automatically verify your domain against both registrar rules and technical readiness.
If eligible, you’ll see:
Domain name and current registrar
Current expiration and new expiration (transfers extend by 1 year)
Transfer fee (applied toward extending the expiration date)
A domain is not eligible if:
The current registrar or TLD isn’t supported
It was purchased here originally
It was registered/transferred within the last 60 days
The domain’s EPP status blocks transfer (e.g.,
pendingDelete,redemptionPeriod,serverHold)The transfer would exceed the maximum allowed term
Other policy conflicts found during checks
Ineligible domains show a disabled Continue button and a message describing why.
Step 3: Review DNS Records (critical to avoid downtime)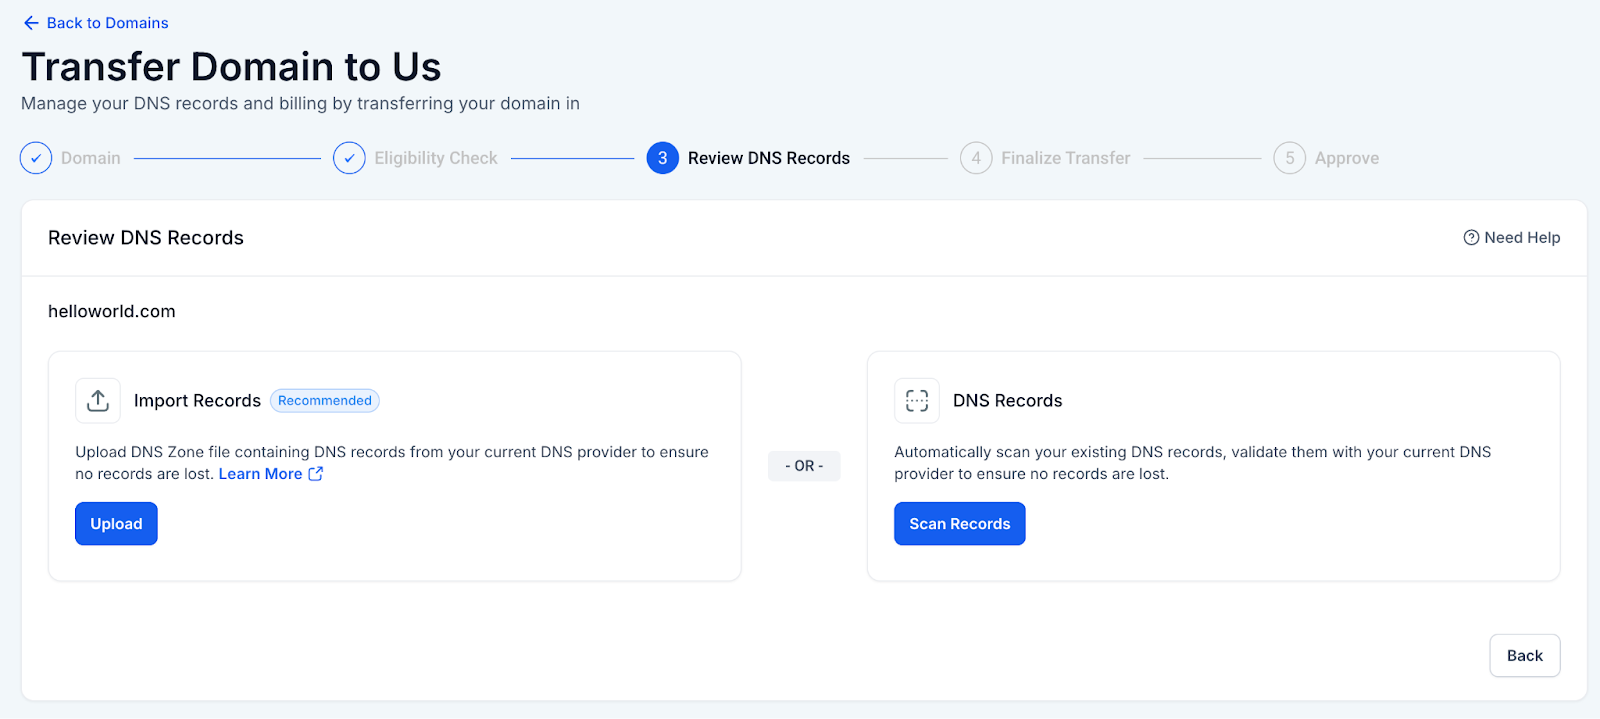
Transferring a domain does not automatically migrate your DNS records. You must ensure every needed record is present so your website, email, and integrations keep working.
You have two ways to retrieve records:
Option A: Upload a DNS Zone File (recommended)
Best for a complete, loss-free import.
Sign in to your DNS provider (could be the registrar or another host like Cloudflare if you changed nameservers).
Export/download the zone file for your domain.
Upload the file in our DNS review step.
Tip: If you can’t find an export option, contact your provider’s support and ask for a zone file export for your domain.
Option B: Auto-Scan DNS Records
We’ll scan your live DNS. This is fast, but some records may be missed (e.g., internal/hidden records or special provider types).
Always cross-check scan results against your DNS provider’s records.
Add any missing A, AAAA, CNAME, MX, TXT, SRV, CAA records manually.
Review & Edit
In the DNS table, you can:
View all entries grouped by type
Add, edit, or delete records
Search by name/type/value

Warning: Missing or incorrect DNS records can cause website downtime and email delivery issues. Manually verify before proceeding.
Step 4: Finalize Transfer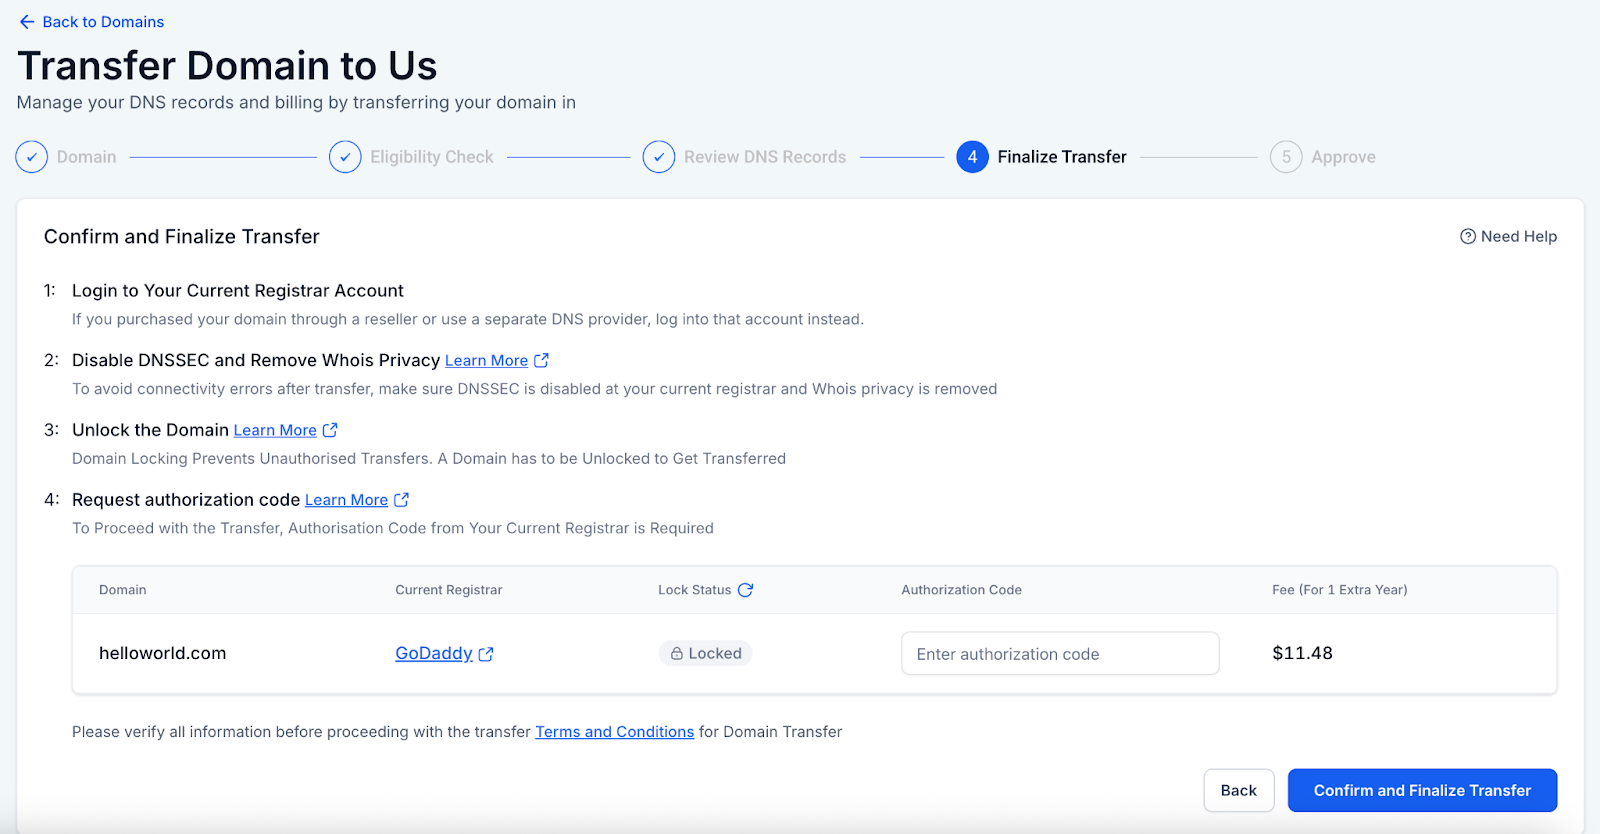
In this step you’ll complete authorization and payment.
4.1 Disable DNSSEC & Privacy (Whois)
Sign in to your current registrar
Go to Domain or DNS settings
Disable DNSSEC
Turn off Whois/Privacy protection
Save changes
Note: DNSSEC removal can take a few minutes to propagate.
4.2 Unlock Domain & Get Auth Code (EPP)
In your registrar account, open Domain Management
Disable domain lock (a.k.a. Registrar Lock)
Locate and copy the Authorization / EPP / Transfer code
Some registrars display it; others email it to the registrant address
4.3 Validate & Submit
Back in our flow, we will:
Validate unlock status, auth code, and registry-level statuses
Charge your wallet for the transfer fee (applies to the 1-year extension)
Submit the transfer request
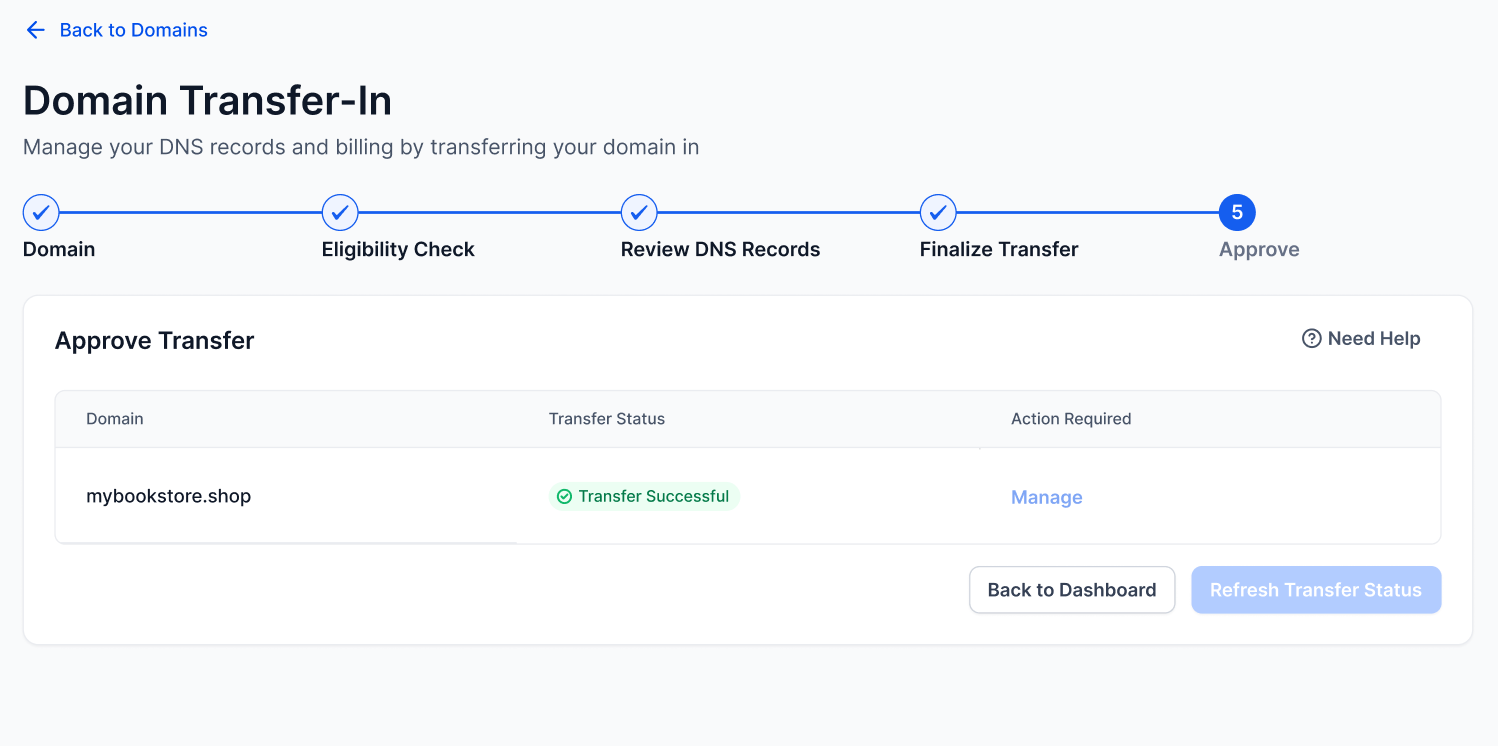
Step 5: Approve at Your Current Registrar ()
Transfers remain pending until you approve them with your current registrar.
How to approve:
Email approval: Click the link sent by your registrar
Dashboard approval: Approve from the registrar’s transfer center
If you take no action: Many registrars auto-approve after 5–7 days. Approving immediately usually speeds it up.
After approval: what you’ll see
The domain moves under our registrar partner (Cloudflare)
It appears under Internal Domains in your account
Manage becomes available for DNS, SSL, renewals, and more
Troubleshooting & common blockers
I can’t unlock my domain
Look under Security/Transfer settings, or contact registrar support.Wrong/invalid EPP code
Request a fresh code from your registrar; make sure the domain is unlocked.Transfer rejected
Possible causes: you canceled it, 60-day lock enforced, or you didn’t approve in time.
Result: status shows Rejected, and Transfer to Us is available to retry.Downtime after transfer
Most often due to missing/mismatched DNS records. Compare our DNS table against your DNS provider’s records and fix any differences.
FAQs
1. Will transferring cause downtime?
Not if DNS records are verified and complete before finalizing. Always cross-check.
2. My registrar and DNS provider are different what do I do?
Sign in to your DNS provider (where your nameservers point) to export/compare DNS records. The registrar won’t have the full DNS list.
3. How long does a transfer take?
Typically 1–5 days after you approve it at the current registrar.
4. Can I transfer again later?
Yes, but ICANN typically requires waiting 60 days after a transfer.
5. What gets extended by 1 year?
The domain’s expiration date (subject to max term rules) when the transfer completes.
Related help
Need more help?
Click the Help icon in your account to contact support. Include your domain, current registrar, and (if relevant) your DNS provider so we can assist faster.