
TABLE OF CONTENTS
- Overview
- About the Integration
- How to Set Up Jira
- List of Triggers
- List of Actions
- Example: Setting Up a Trigger (New issue)
- Example: Setting Up an Action (Create issue)
- How to Test Triggers and Actions
- Common Use Cases
- Frequently Asked Questions
Overview
Jira is Atlassian’s issue-tracking platform, used by engineering, product, support, and operations teams to manage issues (bugs, tasks, stories, epics) inside projects, with support for sprints, boards, workflows, and rich issue relationships. The Jira integration brings issue-lifecycle events and issue-management capabilities directly into the Workflow Builder so scheduling activity in Jira can fire customer-facing automations, and any workflow can create and manage issues without leaving the builder.
About the Integration
The integration ships with two halves:
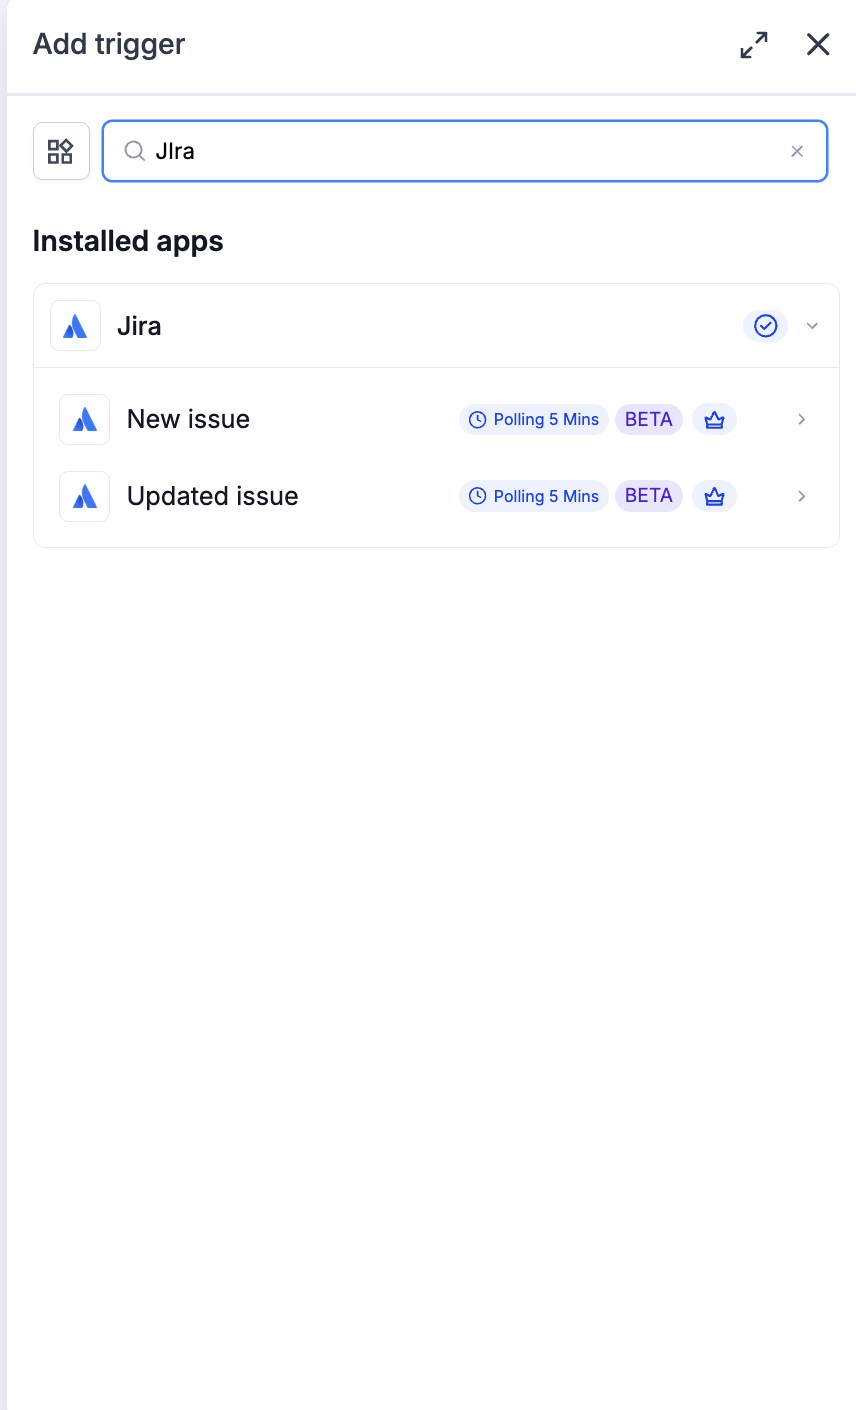
Triggers (Jira → Workflows): Two polling triggers — New issue and Updated issue — both polling every 5 minutes.
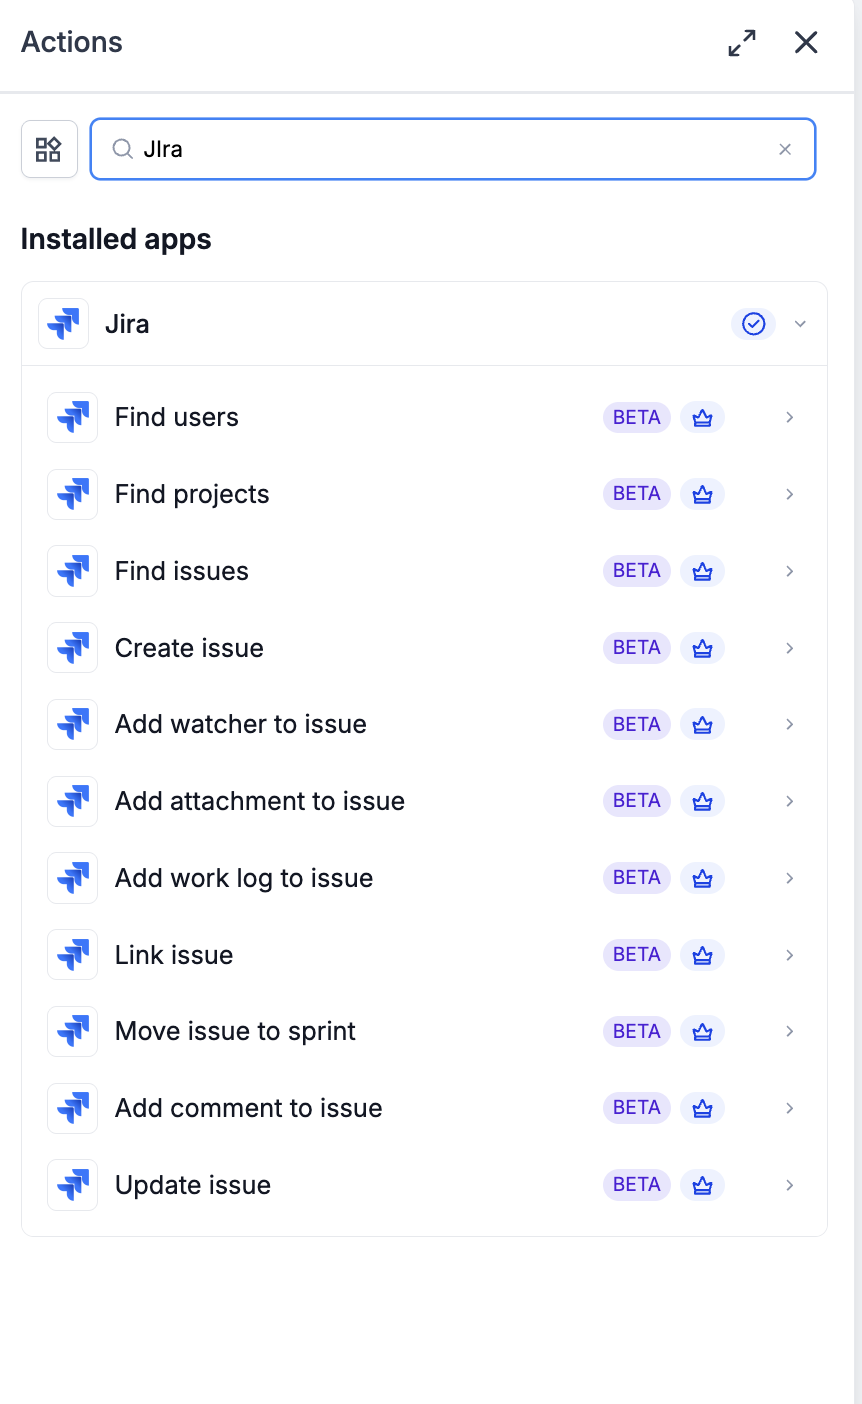
Actions (Workflows → Jira): Eleven actions across discovery (find users, projects, issues), issue creation and updates (create, update), issue enrichment (comment, watcher, attachment, work log), and issue relationships (link, move to sprint).
All triggers and actions are flagged as premium workflow components — premium action credits apply at the standard automation rate. Jira plan usage (users, projects, storage, Advanced Roadmaps) is billed by Atlassian directly.
How to Set Up Jira
Before any Jira trigger or action can run, the integration has to be connected via OAuth.
Connect via the Workflow Builder (recommended)
Open Automation → Workflows and pick (or create) a workflow.
Add a Jira trigger or action — search for Jira in the Apps tab.
Select any Jira trigger or action.
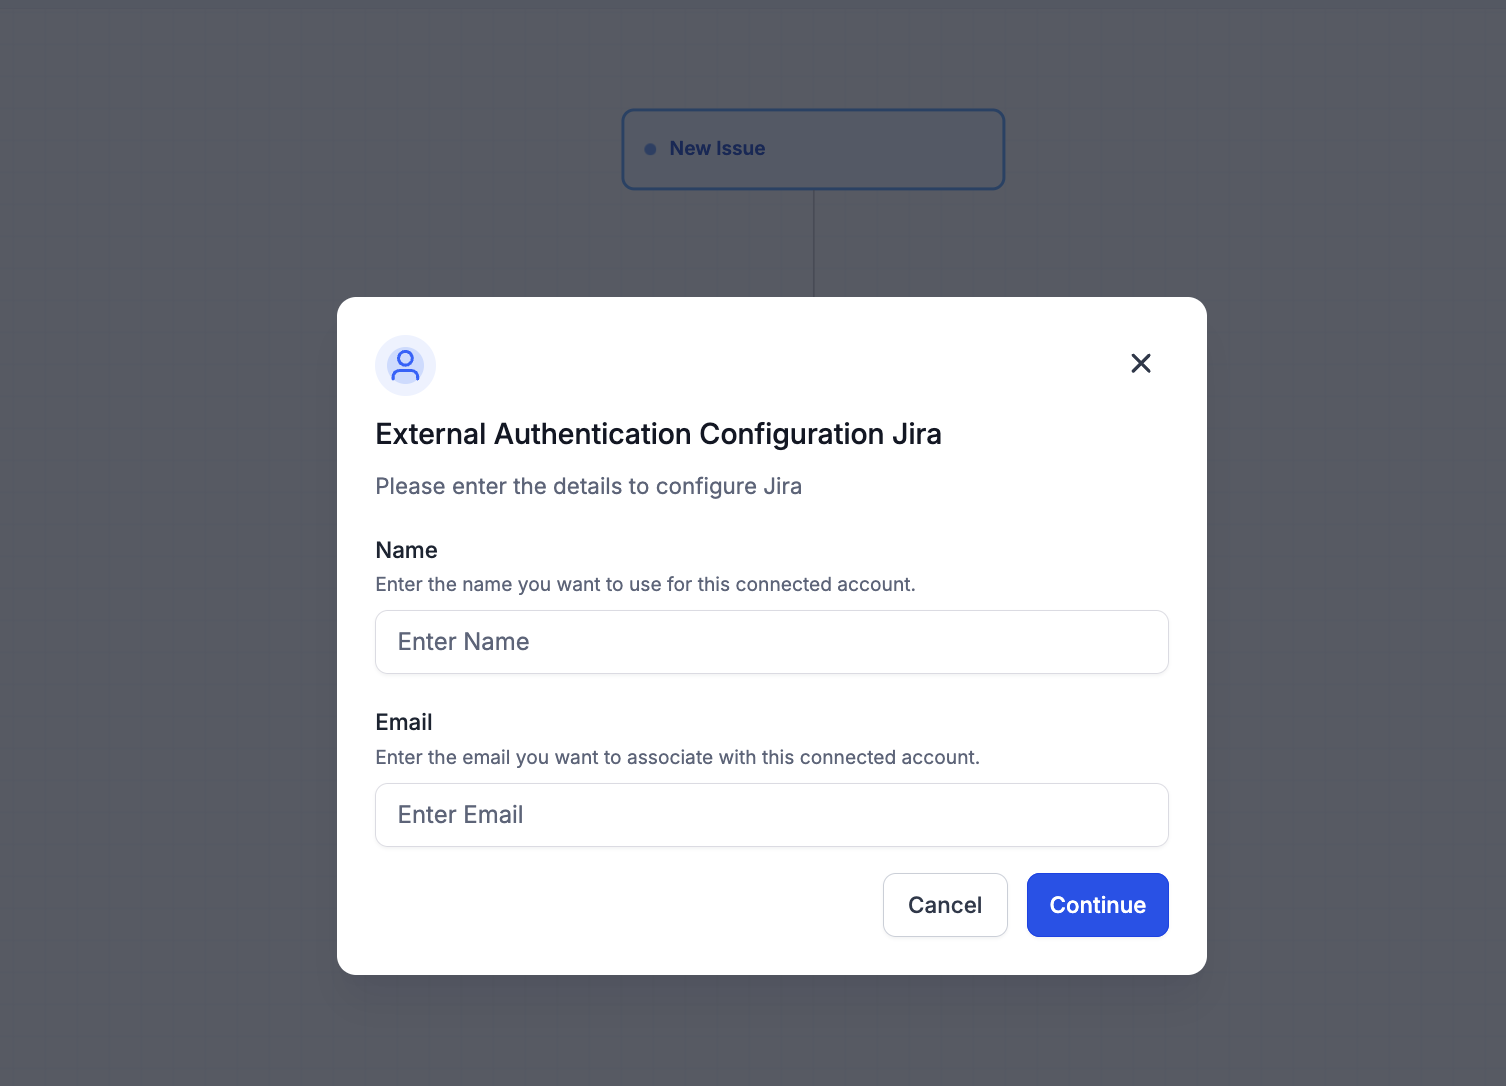
On the panel, click Connect your account.
The External Authentication Configuration modal opens. Enter:
Name — a friendly label for this connection (e.g. ‘Engineering Jira’, ‘Support Jira’, ‘Client Acme Jira’).
Email — the Atlassian account email being connected.
Click Continue.
You will be redirected to Atlassian’s OAuth authorization screen. Review the requested Jira scopes and click Allow.
You will be returned to the Workflow Builder; the panel will update to show Connected.
Connect via Settings (alternative path)
Go to Settings → Integrations.
Locate Jira and click Connect.
Complete the External Authentication Configuration step and the Atlassian OAuth flow.
List of Triggers
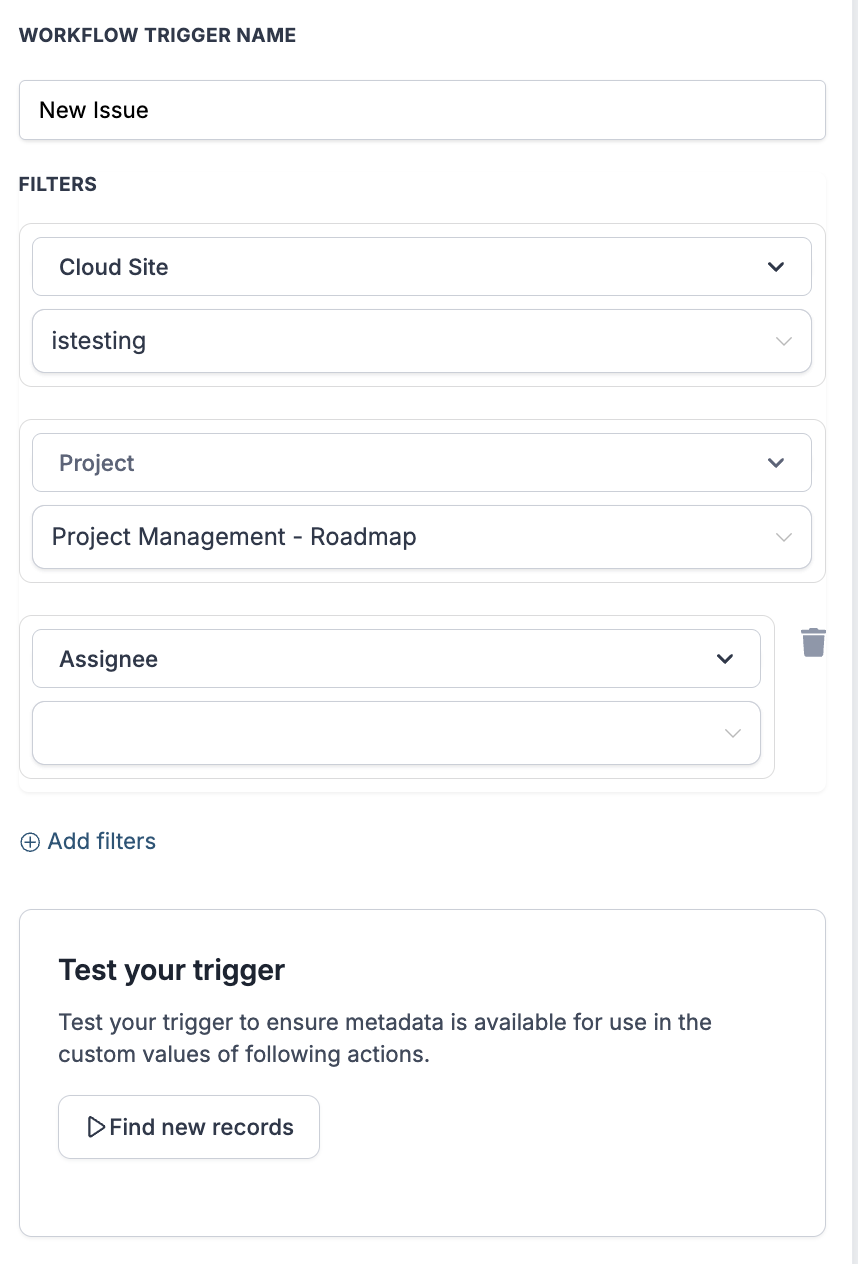
Both triggers poll Jira every 5 minutes and surface matching records since the last poll. Filters include Cloud Site, Project, and Assignee, with Add filters for additional issue properties.
List of Actions
Actions are grouped by what they manage.
Discovery
Issue creation and updates
Issue enrichment
Issue relationships
Example: Setting Up a Trigger (New issue)
This walkthrough wires up a workflow that fires when a new issue is created in a specific Jira project. The same configuration shape applies to Updated issue — only the trigger selection and typical use case differ.
Step 1: Add the trigger
Open the workflow and click Add trigger.
Switch to the Apps tab and search for Jira.
Select New issue.
Step 2: Configure the trigger
Connected Account — pick the Atlassian account this trigger should use.
Workflow Trigger Name — a meaningful label, e.g. ‘New Bug in Engineering’.
Filters → Cloud Site — pick the target Cloud Site (e.g. yoursite.atlassian.net). Do not leave blank if the account has access to more than one site.
Filters → Project — scope to a specific Project on the selected Cloud Site.
Filters → Assignee (optional) — fire only for issues assigned to a specific user.
Add filters — layer on more constraints (issue type, priority, label, or any other field).
Step 3: Test the trigger
Click Find new records inside the Test your trigger panel.
If no matching records appear, create a test issue in Jira and wait one polling cycle (5 minutes), then re-fetch.
Select the returned record as the mapping reference to lock the issue schema for downstream steps.
Click Save trigger.
Example: Setting Up an Action (Create issue)
This walkthrough creates a Jira issue from an upstream workflow event — the most common outbound-to-Jira pattern.
Step 1: Add the action
Inside the workflow, click Add to insert a new step.
Open the Apps tab and select Jira.
Choose Create issue from the action list.
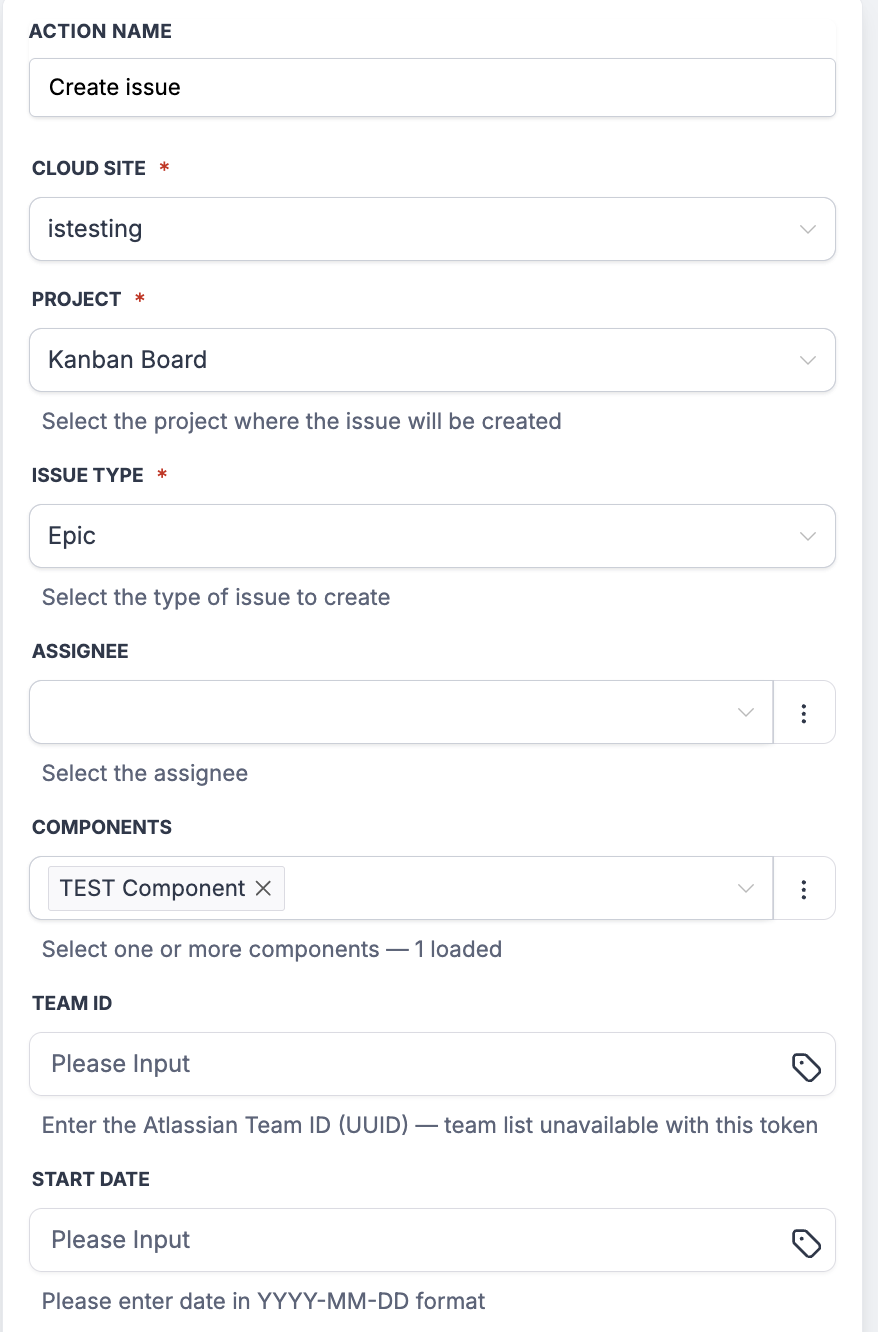
Step 2: Configure the action
Connected Account — pick the Atlassian account.
Action Name — e.g. ‘Create Bug Issue from Support Report’.
Cloud Site (required) — pick the Atlassian Cloud site (e.g. yoursite.atlassian.net). This is the first field to set; the downstream dropdowns (Project, Issue Type, Components) repopulate based on the selected site.
Project (required) — pick from the dropdown of Projects on the selected Cloud Site. Helper text: ‘Select the project where the issue will be created.’
Issue Type (required) — pick from the project’s configured issue types (Bug, Task, Story, Epic, etc.). Helper text: ‘Select the type of issue to create.’
Summary (required) — the issue title. Keep it concise (< 200 chars) so it renders cleanly in Jira’s issue lists.
Description (optional) — the issue body. Supports formatted text via Jira’s Atlassian Document Format.
Assignee (optional) — pick from the users dropdown. If you only have an email, use Find users upstream to resolve the account ID.
Components (optional, multi-select) — pick one or more components from the selected project. The dropdown loads components dynamically from the project (the panel shows ‘N loaded’ as it populates). If the project has no components configured, this field is empty.
Team ID (optional) — an Atlassian Team UUID. Note: at the current OAuth scope the team list is unavailable in the dropdown (‘team list unavailable with this token’), so paste the Team UUID directly. Copy it from Atlassian → Settings → Teams → the team’s detail page.
Start Date (optional) — YYYY-MM-DD format. Used by Jira Software boards and Advanced Roadmaps for scheduling.
Reporter (optional) — defaults to the connected user if blank.
Priority, Labels, Custom Fields (optional) — pass workflow variables. Custom fields must exist on the project’s screen scheme first — unknown field names are silently dropped.
Step 3: Test the action
Click Test action.
Confirm — this creates a real issue in Jira. Use a clearly-marked summary (e.g. ‘TEST — DELETE’) if testing against a production project so you can clean up afterwards.
The response payload includes the new issue key. Store it on the upstream contact/record for cross-system reference in downstream steps.
Save the action and run a full Test workflow before publishing.
How to Test Triggers and Actions
Always test before publishing. Testing locks the payload schema and gives downstream steps a real record to map against.
Test a trigger
Inside the trigger panel, click Find new records.
If no matching records appear, create or update an issue in Jira and wait one polling cycle (5 minutes), then re-fetch.
Select the returned record as the mapping reference.
Test an action
Inside the action panel, click Test action.
The action runs against the live Jira site using the configured inputs — a real issue is created or modified.
Confirm the result in Jira. Clean up test issues if working against a production project.
Common Use Cases
Use Case 1: Customer-reported bug → Jira issue with full context
Goal: Turn a customer bug report into a well-annotated Jira issue automatically.
Workflow Setup:
Trigger: Support conversation flagged as a bug
Action: Find projects (resolve the engineering project key)
Action: Find users (resolve the on-call engineer)
Action: Create issue (project = engineering, issue type = Bug, assignee = on-call engineer, summary from support summary)
Action: Add attachment to issue (screenshots, logs)
Action: Add comment to issue (verbatim customer report)
Example: A customer reports a crash. Within seconds, an on-call engineer sees a Bug issue in Jira with the screenshot attached, the reproduction steps as a comment, and their name on Assignee — no manual copy-paste from the support conversation.
Use Case 2: Issue resolved → notify the customer
Goal: Close the loop when an engineer resolves an issue that started from a customer report.
Workflow Setup:
Trigger: Updated issue (filter: status = Done)
Branch: Was this status change from a non-Done state?
Action: Find the originating contact (cross-reference via a custom field or issue label)
Action: Send resolution message with the fix summary from the issue’s resolution comment
Example: An engineer flips ENG-4523 to Done and adds a resolution comment describing the fix. Within 5 minutes, the customer who originally reported the bug gets an SMS: ‘We’ve fixed the crash you reported. Details: [resolution excerpt].’
Use Case 3: Duplicate detection and cross-issue linking
Goal: Reduce duplicate work by linking related issues on creation.
Workflow Setup:
Trigger: New issue
Action: Find issues (search by shared reference — support ticket ID, error signature, feature request ID)
Branch: If a matching issue exists → Link issue (‘duplicates’ or ‘relates to’)
Example: A new bug issue comes in from a customer report. The workflow searches for existing issues with the same error signature; if one exists, it links the new issue as ‘relates to’ so engineering can see the pattern rather than fixing the same bug twice.
Frequently Asked Questions
Q: What is a Cloud Site?
An Atlassian Cloud Site is a single Jira instance identified by a subdomain (e.g. istesting.atlassian.net, acme.atlassian.net). One Atlassian account can have access to many Cloud Sites. Every trigger and action in this integration exposes a Cloud Site selector — it’s required on Create issue and available as a filter on the triggers. Always set it explicitly if your account has access to more than one site.
Q: What is Jira?
Jira is Atlassian’s issue-tracking platform. Teams organize work as issues (bugs, tasks, stories, epics) within projects, run agile ceremonies through sprints and boards, and link work across issues via typed relationships. Editions include Jira Software (engineering), Jira Service Management (support), and Jira Work Management (business teams).
Q: Are Jira triggers and actions premium workflow components?
Yes. Both triggers and all eleven actions are flagged as premium and consume premium action credits at the standard automation rate. Jira plan usage (users, storage, Advanced Roadmaps) is billed by Atlassian directly.
Q: Are the triggers instant or polled?
Polled. Both New issue and Updated issue poll Jira every 5 minutes and return matching issues since the last poll.
Q: What is the difference between Create issue and Update issue?
Create issue creates a brand-new issue in the specified project. Update issue modifies fields on an existing issue by key. Use Create for net-new work; use Update to reflect state changes back into an issue that already exists.
Q: What does Add comment to issue support in the comment body?
Jira comments use the Atlassian Document Format (ADF) — a structured JSON representation that supports formatting, mentions, code blocks, and links. Plain-text comments work as-is; formatted comments require ADF-shaped input.
Q: How do I use custom fields?
Define the custom field in Jira first (Jira Settings → Issues → Custom Fields). Confirm it’s added to the project’s screen scheme. Then map workflow variables to it in Create issue or Update issue. Custom field values pass through as their raw type (string, number, option, user reference); check Jira’s API docs if a specific custom field type needs a specific format.