
Automatically create relationships between records using workflow automation. The Associate Records workflow action finds matching records based on rules you define, then creates associations without requiring manual updates. This feature is currently available through Labs and must be enabled before it can be used.
TABLE OF CONTENTS
- What Is the Associate Records Workflow Action?
- Key Benefits
- Common Use Cases
- How to Set Up the Associate Records Action
- Important Notes
- Frequently Asked Questions
- Need Help?
What Is the Associate Records Workflow Action?
Many business processes involve records that are related to one another, such as contacts, companies, opportunities, or custom objects. Maintaining these relationships manually can become time-consuming as your data grows.
The Associate Records workflow action automatically searches for matching records using filters you define and creates associations between them during workflow execution.
Whether you’re linking buyers to properties, companies to opportunities, or contacts to custom objects, this action helps keep your CRM organized and relationships up to date without manual intervention.
Key Benefits
The Associate Records action helps automate record management while improving data accuracy across your CRM.
- Automatically create record associations during workflow execution.
- Reduce manual data management by linking records based on matching criteria.
- Support Contacts, Companies, Opportunities, and Custom Objects.
- Match records dynamically using fixed values or merge fields.
- Apply association labels to categorize relationships.
- Build scalable automations without relying on external tools or custom code.
Common Use Cases
The Associate Records action can support many different business processes where records need to be linked automatically.
Common examples include:
Associating buyers with matching properties.- Linking companies to opportunities.
- Connecting contacts with projects or service records.
- Associating customers with memberships or subscriptions.
- Building relationships between contacts and custom objects.
- Automatically organizing CRM records based on business rules.
How to Set Up the Associate Records Action
The Associate Records action is configured directly inside your workflow. During setup, you’ll choose the object to associate, define matching rules, select a matching strategy, and apply an association label.
Enable the Feature
Before using the Associate Records action, enable the Labs feature.
Navigate to:
Settings → Labs
Enable Associate Records – Workflow Action.
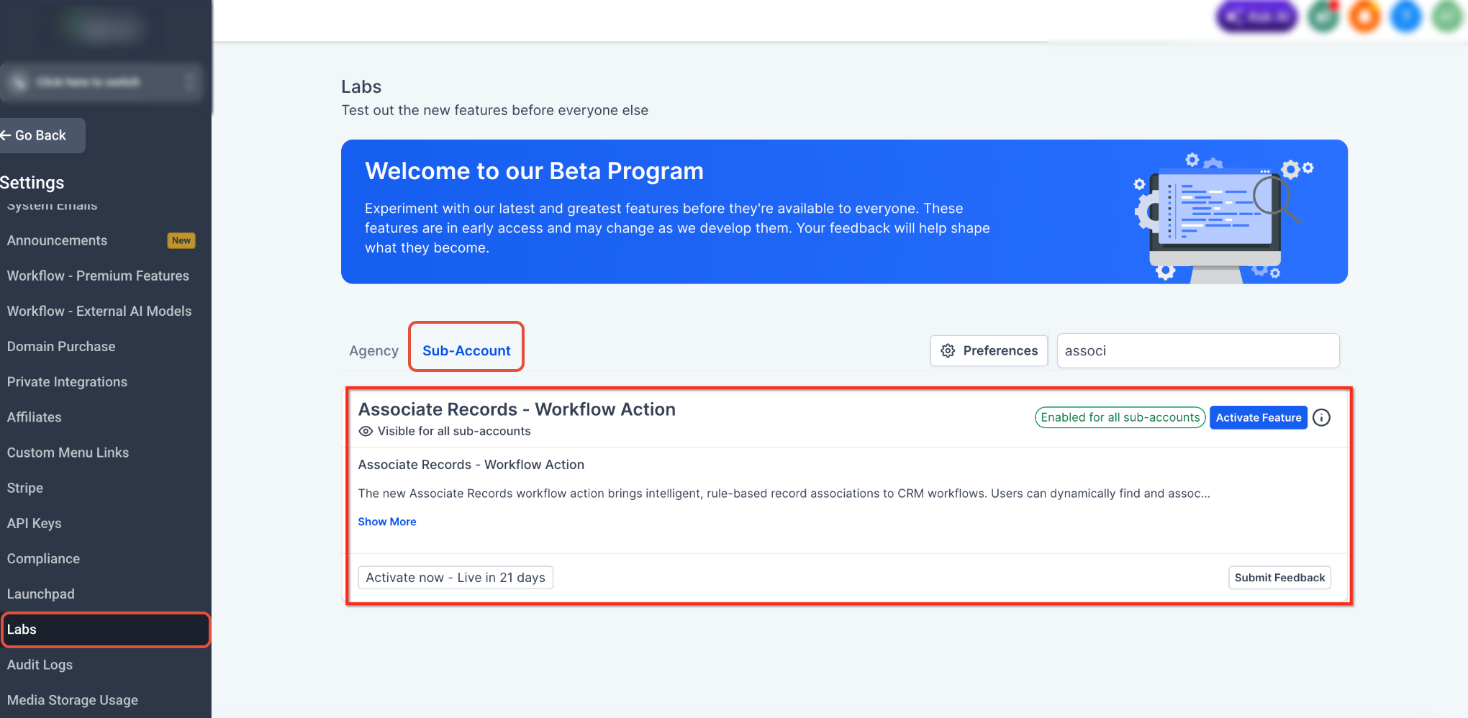
Enable the Associate Records Workflow Action from the Labs page before configuring your workflow.
Open Your Workflow
Create a new workflow or open an existing Contact, Company, Opportunity, or Custom Object workflow.
Add the Associate Records Action
Click the + button to add a workflow action.
Search for Associate Records, then select the action from the Associations category.
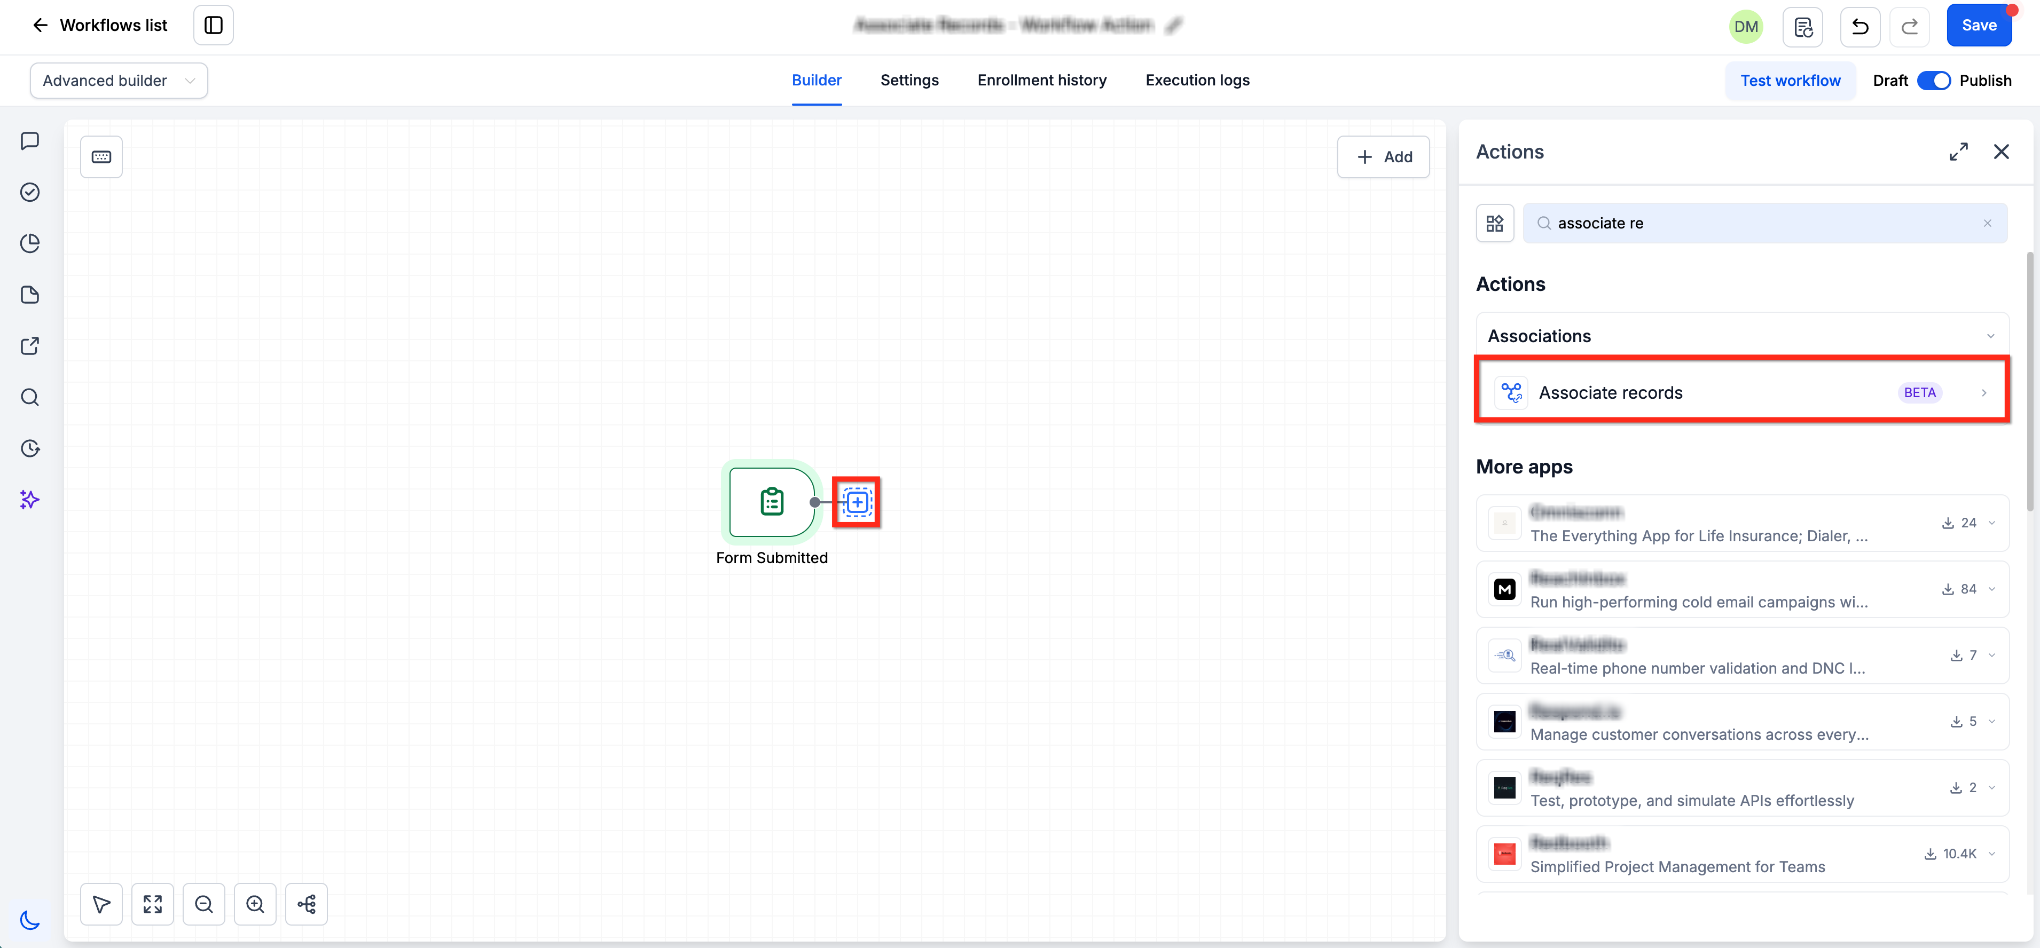
Add the Associate Records workflow action from the Associations category.
Name the Action
Optionally rename the action to better describe its purpose within your workflow.
For example:
- Associate Matching Properties
- Link Buyer to Property
- Associate Service Record
Using descriptive names makes larger workflows easier to manage.
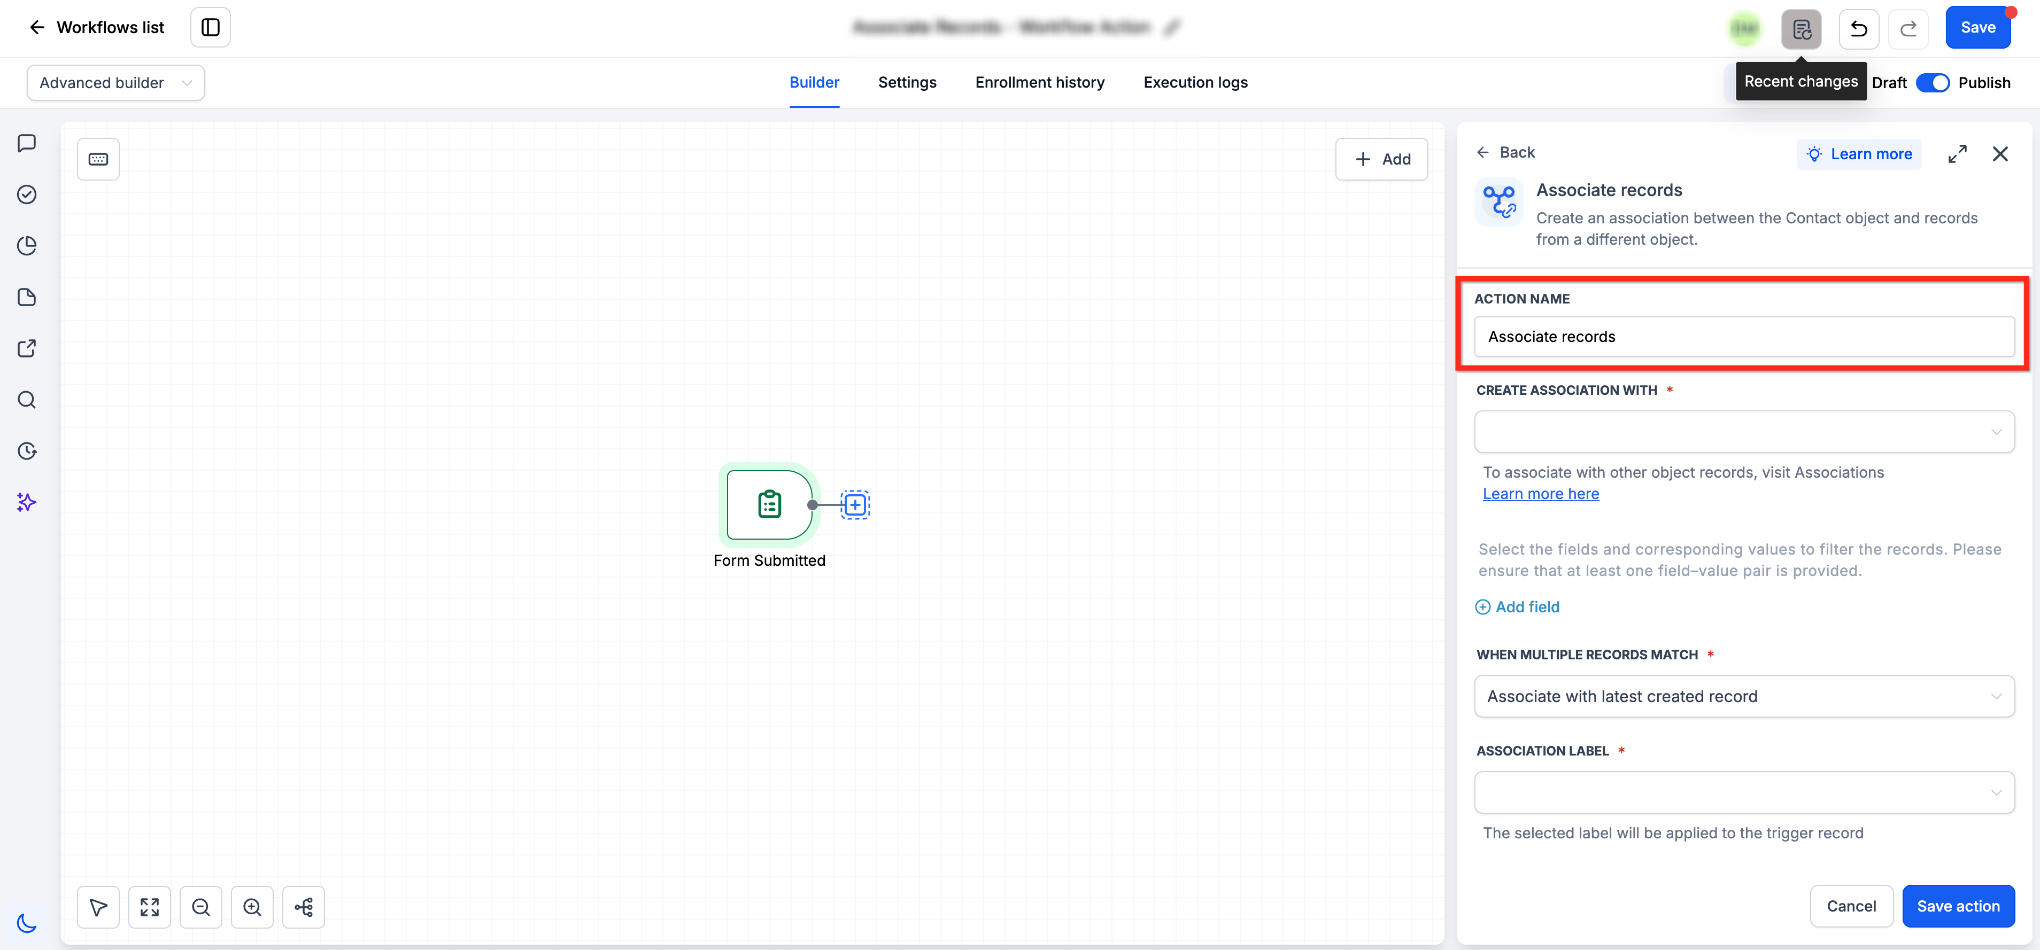
Optionally customize the action name to reflect its purpose.
Select the Object to Associate
Choose the record type you want the workflow to search.
Available objects depend on the associations configured for your account.
Examples include:
- Companies
- Opportunities
- Custom Objects
- Projects
- Properties
- Memberships
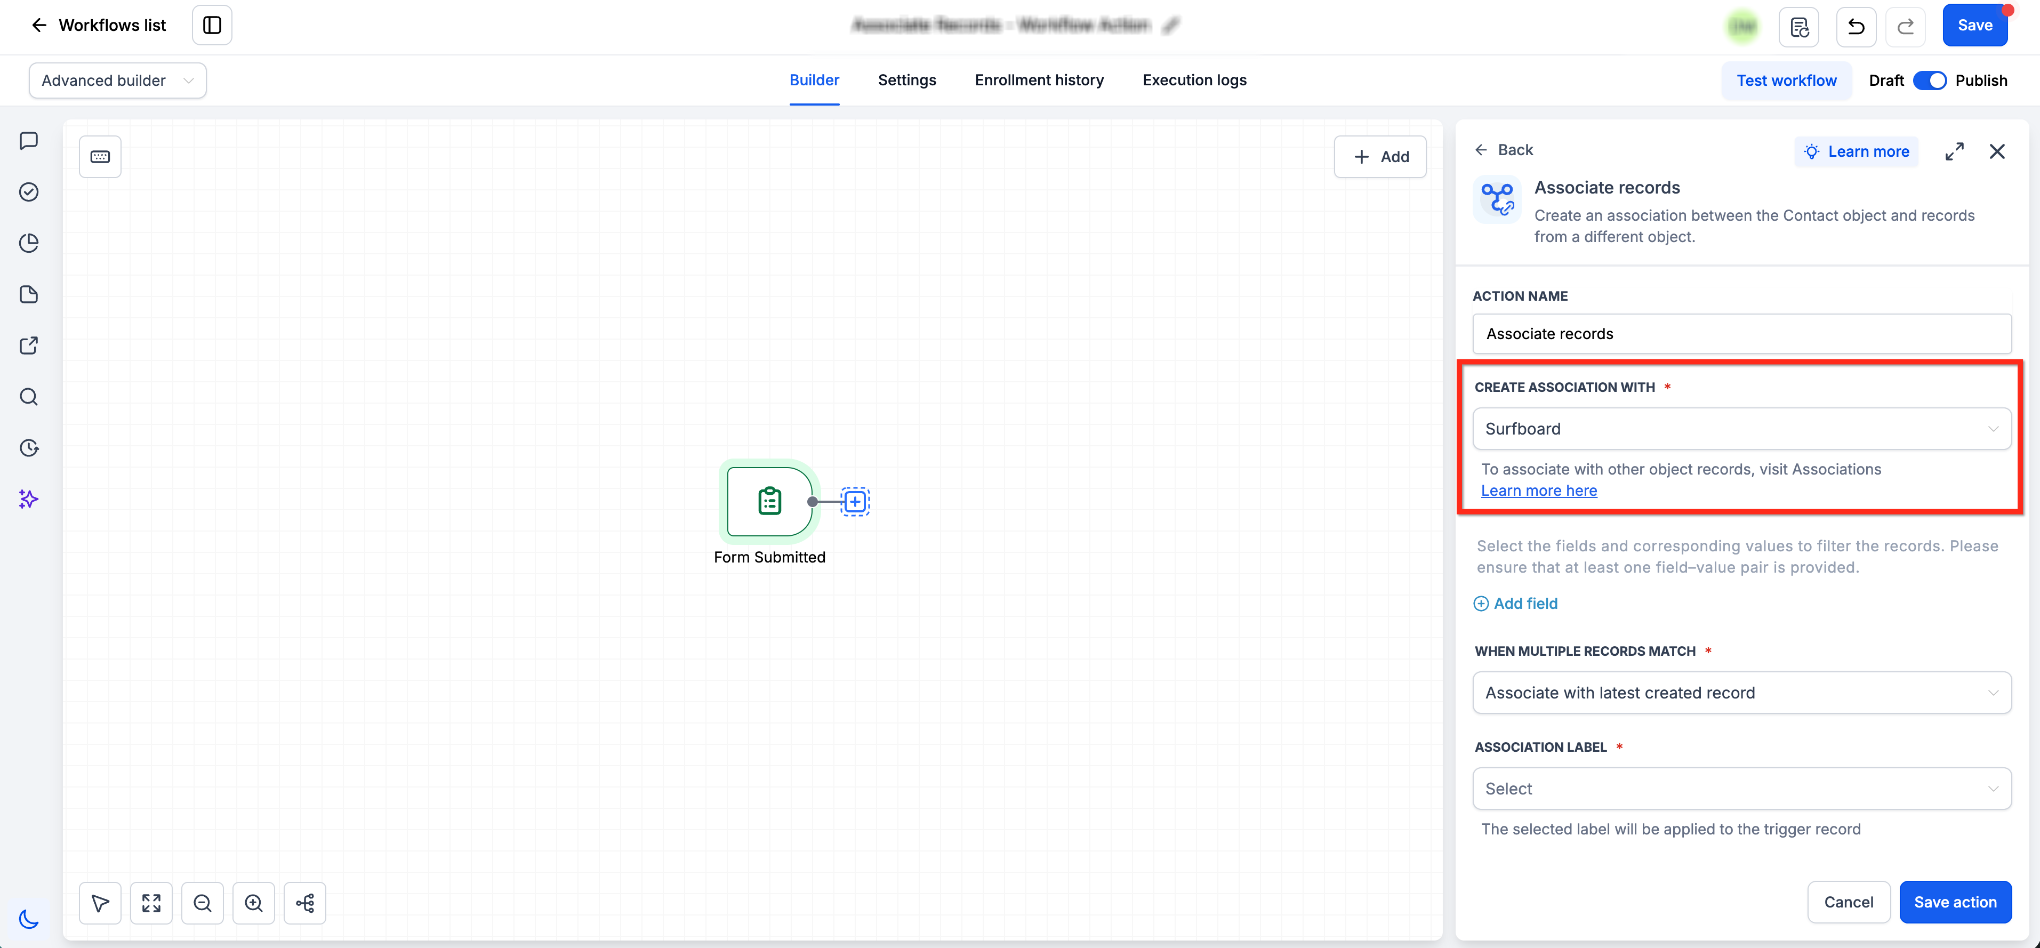
Choose the object containing the records you want to associate.
Configure Matching Rules
Matching rules determine which records qualify for association.
Select:
- The field to evaluate.
- The comparison operator.
- The matching value.
You can use:
- Fixed values
- Merge fields from the enrolled record
For more precise matching, click Add Field to include additional conditions.
All conditions use AND logic, meaning every condition must be satisfied before an association is created.
At least one matching rule is required.
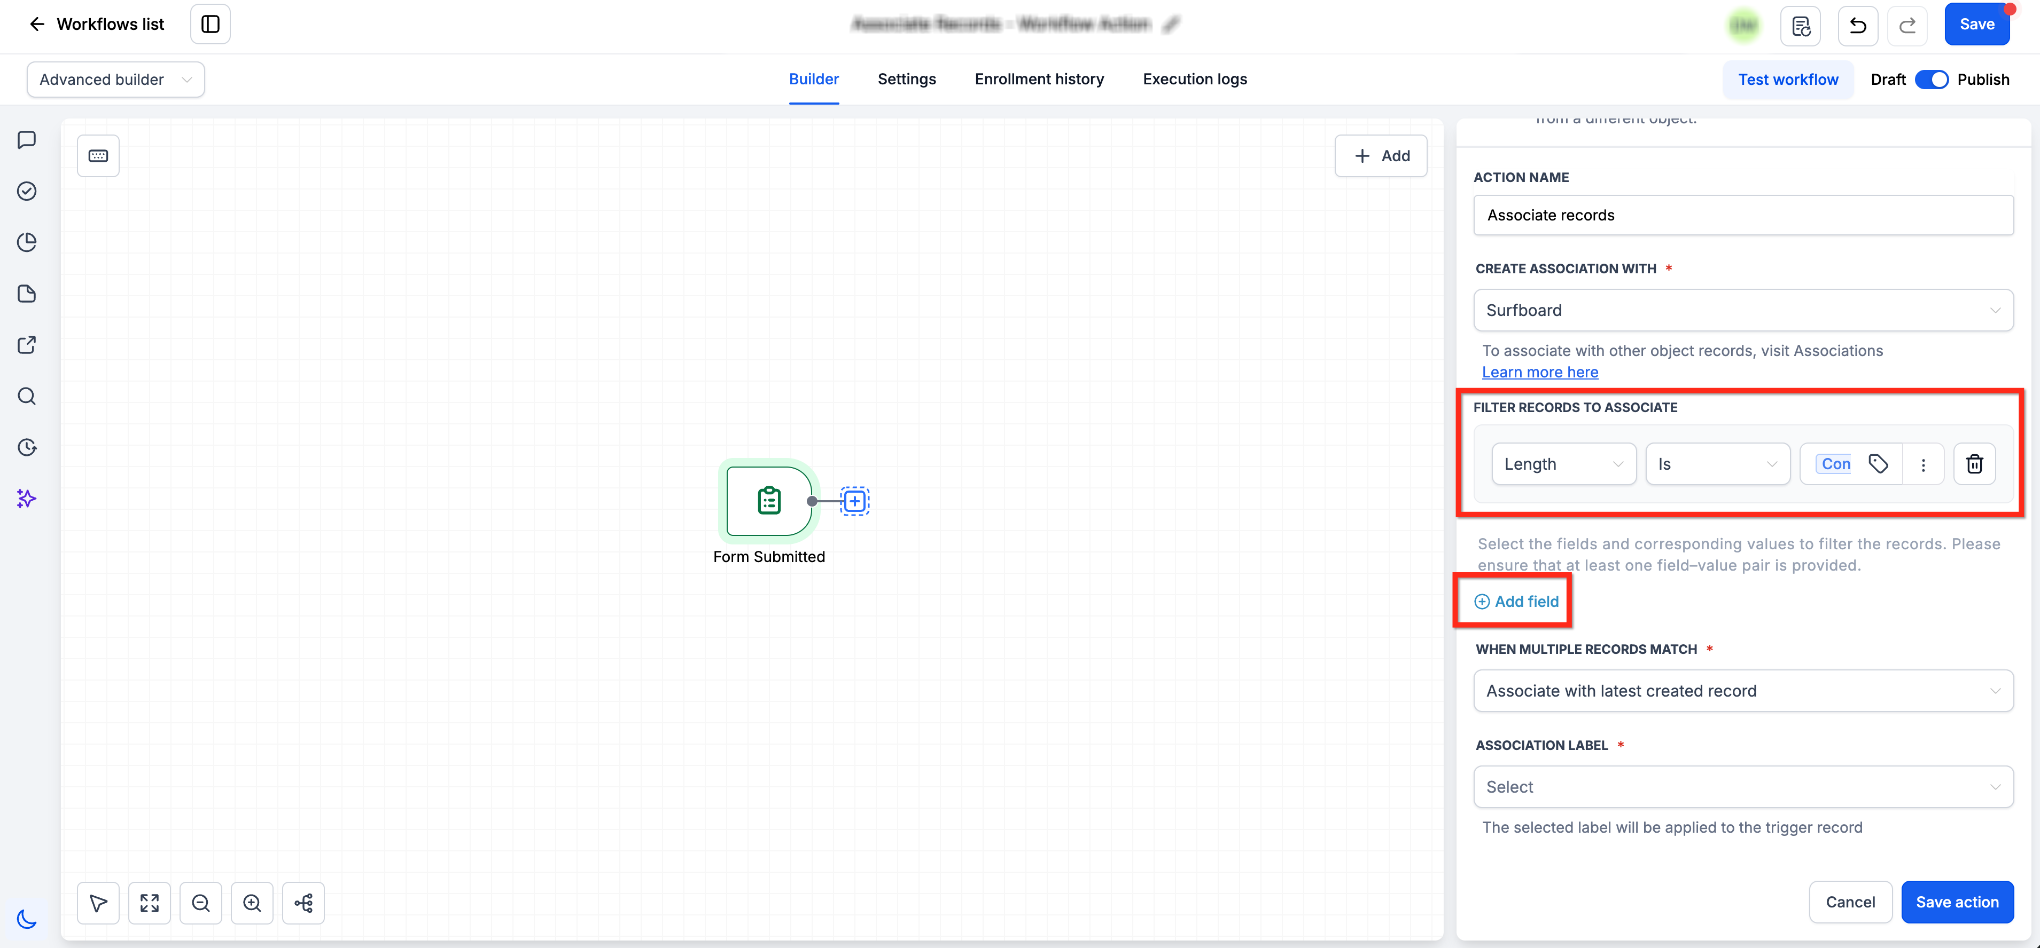
Define the criteria used to locate matching records.
Choose How Multiple Matches Are Handled
If more than one record matches your criteria, choose how the workflow should proceed.
Available options include:
- Associate with All Matching Records
- Associate with the Earliest Created Record
- Associate with the Latest Created Record
Choose the option that best fits your business process.
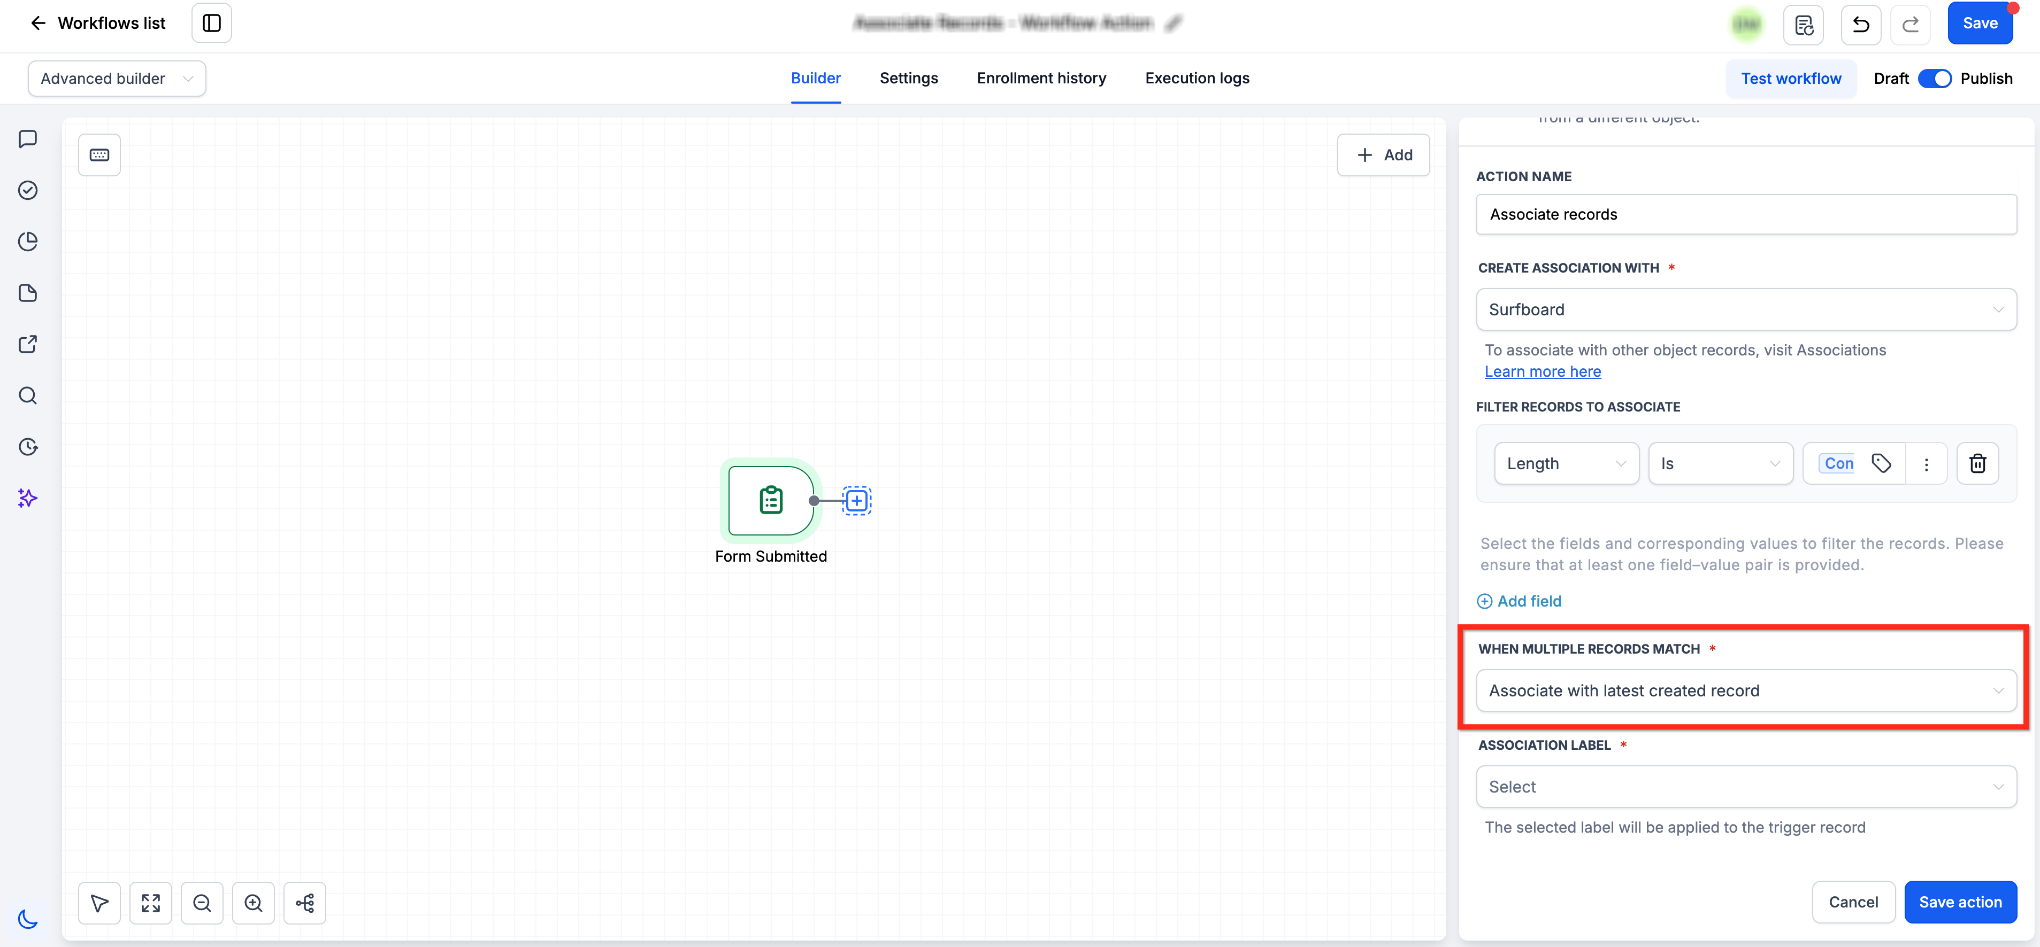
Choose how the workflow should handle multiple matching records.
Apply an Association Label
Select the relationship label that should be applied when the association is created.
Association labels help organize related records and make relationships easier to understand throughout the CRM.
Examples include:
- Buyer
- Seller
- Client
- Vendor
- Property Owner
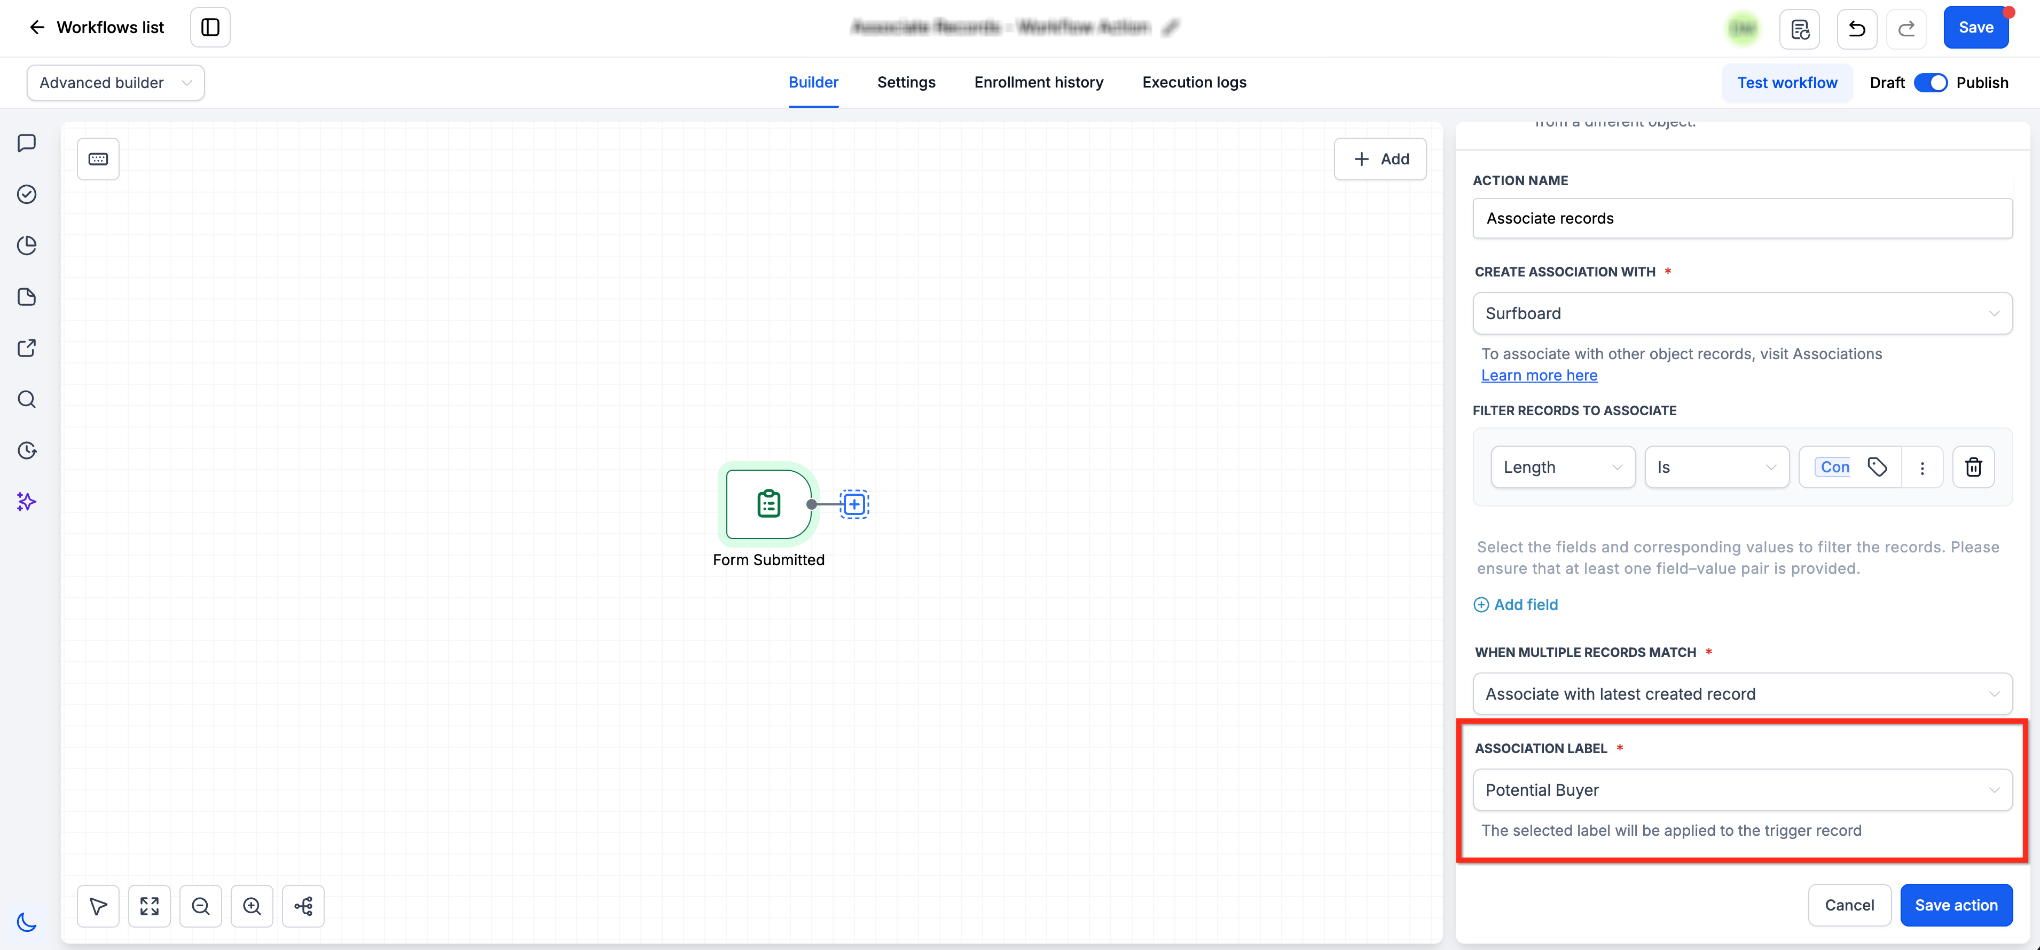
Choose the relationship label applied to the association.
Save the Action
After reviewing your configuration, click Save Action.
Publish the workflow to begin creating associations automatically whenever records meet the configured conditions.
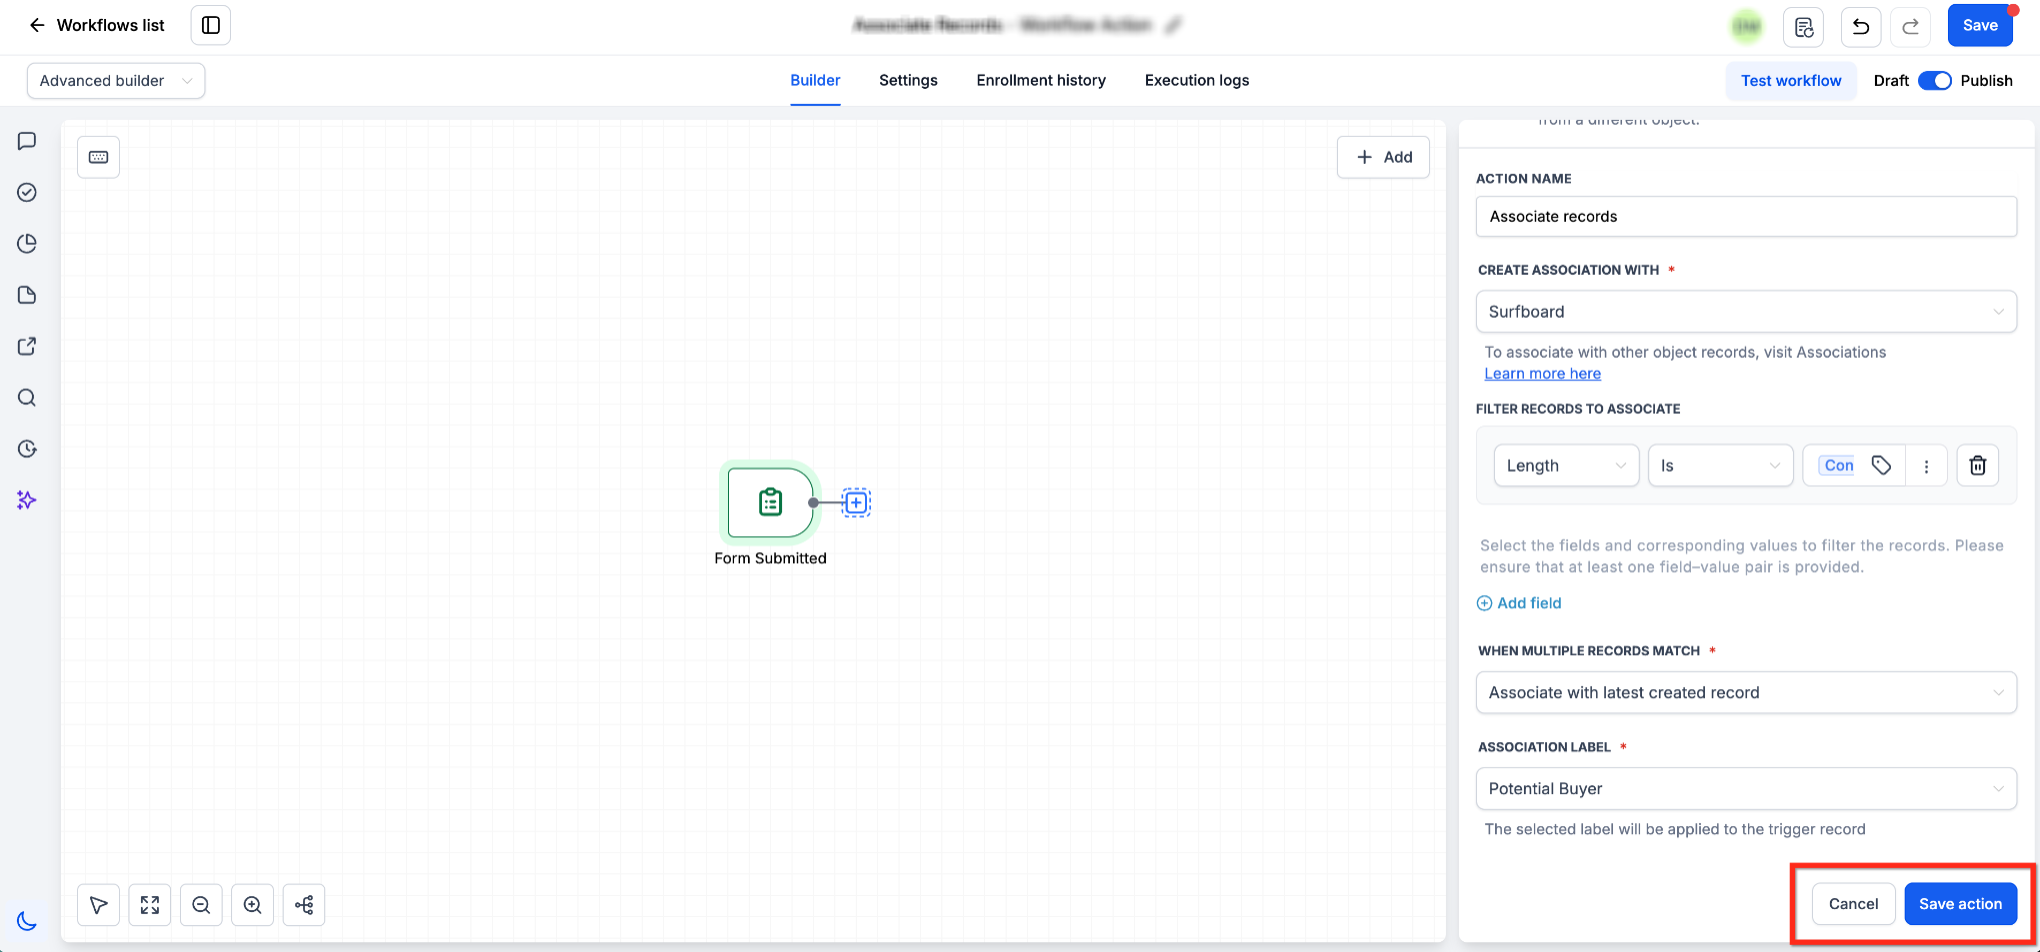
Save the action and publish the workflow to activate the automation.
Verify the Association
After the workflow runs, open the record that triggered the workflow and review the Associations panel.
The newly associated record will appear under the corresponding object type.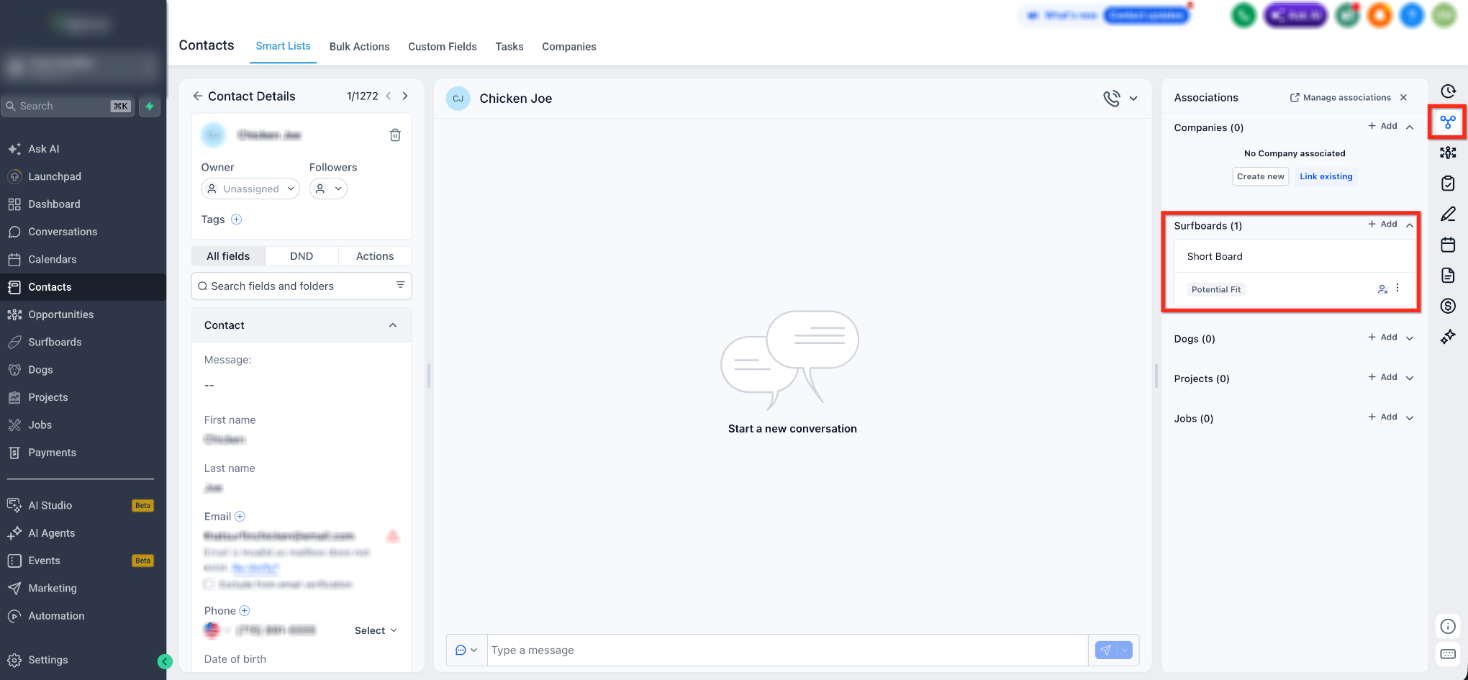
Verify that the workflow successfully created the record association.
Important Notes
Understanding how the Associate Records action behaves helps ensure associations are created as expected.
- The feature must be enabled through Labs before it becomes available.
- At least one filter condition is required.
- Multiple filter conditions use AND logic only.
- Merge fields can be used to dynamically match records.
- Available objects depend on the associations configured in your account.
- Association Labels are required.
- When multiple records match, the selected matching strategy determines which records are associated.
- If no records match the configured filters, no association is created and the workflow continues normally.
Frequently Asked Questions
Q: Which record types can be associated?
The action supports Contacts, Companies, Opportunities, and Custom Objects. Available options depend on the associations configured in your account.
Q: Can I use merge fields when matching records?
Yes. Merge fields allow the workflow to dynamically compare values from the enrolled record against other records.
Q: What happens if no records match my filters?
No association is created, and the workflow continues to the next action without generating an error.
Q: Can I associate multiple matching records?
Yes. Select Associate with All Matching Records when configuring the matching strategy.
Q: Can I use multiple matching conditions?
Yes. Add multiple filter conditions using Add Field. All conditions must be satisfied for a record to qualify.
Q: Are Association Labels required?
Yes. Every association created by this action must include an Association Label.
Q: Can I use OR logic in my filters?
No. The Associate Records action currently supports AND logic only.
Q: Will existing associations update automatically if data changes later?
No. Associations are created when the workflow runs. If your data changes later, create another workflow or trigger to evaluate the records again.
Need Help?
If associations aren’t being created, first confirm that the Labs feature is enabled, the workflow is published, and the selected object supports associations.
Before troubleshooting further, verify that:
- The Associate Records Labs feature is enabled.
- The workflow is active and published.
- The selected object type supports associations.
- Your filter conditions correctly identify matching records.
- Merge fields contain valid values.
- An Association Label has been selected.
- The matching strategy is appropriate for your workflow.
If you’re still experiencing issues, capture screenshots of your workflow configuration, matching rules, and association settings before contacting support. Providing this information will help speed up troubleshooting and resolution.