
Learn what the TypeScript/JavaScript SDK does, how it simplifies OAuth 2.0 authentication, how token storage works, how public APIs are accessed, and how to configure and test the SDK in your development environment.
SDK package names, exported classes, configuration properties, and installation syntax may change as the developer tooling evolves. Always use the exact package name and current code examples provided in your developer documentation when installing or upgrading the SDK.
2. Key Benefits of the TypeScript/JavaScript SDK
3. Automated OAuth 2.0 Management
4. Database-Agnostic Token Management
5. Public API Integration and Code Samples
6. Automated SDK Generation
7. How To Set Up the TypeScript/JavaScript SDK
8. Frequently Asked Questions
9. Need Help?
What is the TypeScript/JavaScript SDK?
The TypeScript/JavaScript SDK is a developer library designed to simplify OAuth 2.0 authentication and interaction with supported public APIs. Instead of manually building authorization, token exchange, refresh, storage, and API-request logic from the ground up, developers can use SDK components that handle much of this infrastructure.
The SDK is designed for TypeScript and JavaScript applications and supports flexible token-storage implementations. This allows development teams to integrate OAuth authentication into their existing architecture while reducing repetitive authentication and API-access code.
Key Benefits of the TypeScript/JavaScript SDK
The SDK reduces authentication boilerplate and provides reusable components for common integration requirements. This allows developers to spend more time building application functionality instead of recreating OAuth and API-access infrastructure.
- OAuth 2.0 Automation: Simplifies supported installation, authentication, token-management, and uninstallation workflows.
- Automatic Token Refresh: Reduces the need to manually build access-token refresh logic.
- Flexible Token Storage: Allows applications to connect an appropriate database or storage implementation.
- Public API Access: Provides SDK services for working with supported public API endpoints.
- Implementation Samples: Gives developers examples that can reduce setup and testing time.
- Generated SDK Releases: Helps keep SDK releases aligned with changes to supported API definitions.
Automated OAuth 2.0 Management
OAuth 2.0 involves more than obtaining an initial access token. Applications must manage authorization, token persistence, refresh behavior, requested scopes, installation events, and cleanup when an application is removed. The SDK reduces the amount of custom logic developers must build for these common authentication tasks.
| Capability | What It Helps Manage |
|---|---|
| Application Installation | Supports OAuth authorization during supported application-installation flows. |
| Token Storage | Works with the configured storage implementation to persist authentication information. |
| Token Refresh | Helps obtain refreshed authentication when access credentials require renewal. |
| Uninstallation | Supports cleanup associated with removing an application installation. |
Database-Agnostic Token Management
OAuth applications require persistent storage for authentication data. The SDK uses a database-agnostic approach so developers can connect a storage implementation that fits their existing application architecture rather than being restricted to one database technology.
- Flexible Storage: Connect an appropriate storage implementation that fits your application environment.
- Existing Infrastructure: Keep authentication data within your established application architecture where appropriate.
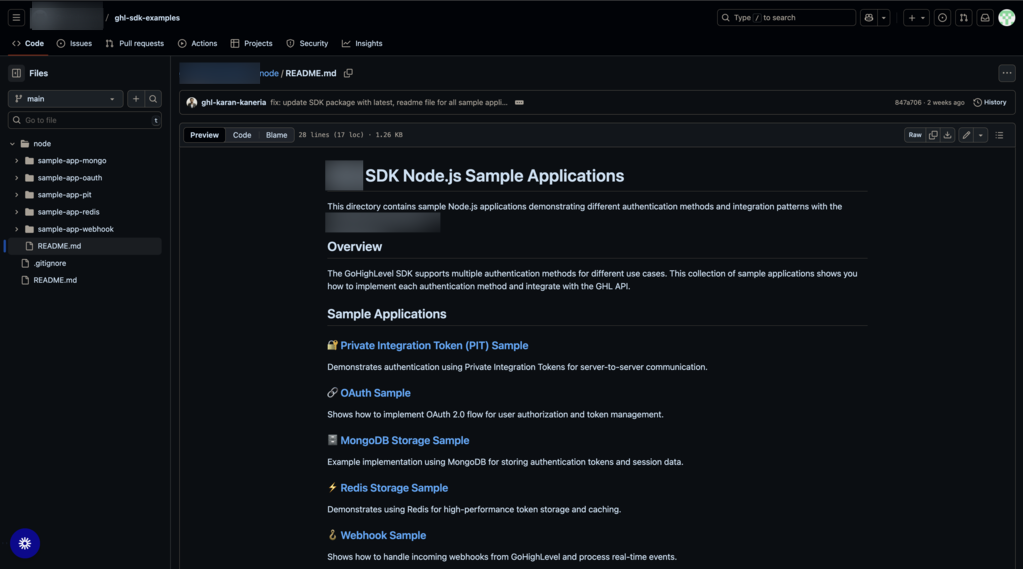
- Reference Implementations: Use available database examples to understand how token persistence can be implemented.
- Scalable Architecture: Select storage technology based on the requirements of your application rather than the SDK itself.
Important: Database-agnostic does not mean token storage is optional. Your application still needs a reliable storage implementation so authentication information can be retrieved and updated throughout the OAuth lifecycle.
Public API Integration and Code Samples
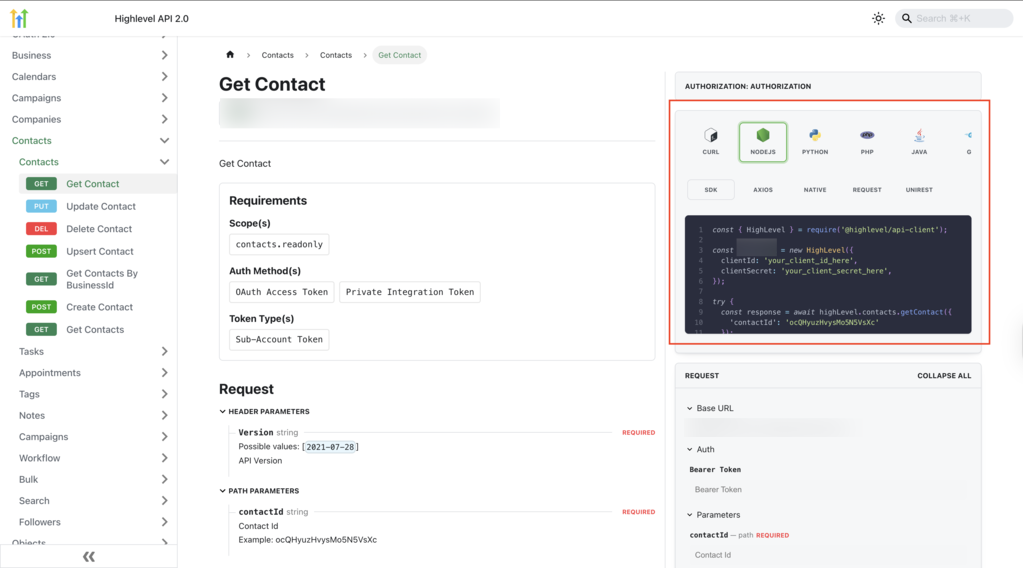
The SDK provides generated services for interacting with supported public APIs and reduces the amount of request-building code developers need to maintain manually. Available examples can also help clarify expected request patterns and SDK usage.
Automated SDK Generation
The SDK is generated from supported API definitions so SDK releases can remain aligned with changes to endpoints, request models, and response schemas. Automated generation reduces manual SDK maintenance and helps expose newer API capabilities through consistent client methods.
- API Alignment: SDK releases can be regenerated as supported API definitions change.
- Consistent Client Structure: Generated services provide predictable patterns across API resources.
- Controlled Upgrades: Development teams can adopt newer SDK releases through their normal package-management and testing process.
Note: Automated SDK generation refers to how newer SDK releases are produced. It does not mean a package already installed in your application automatically upgrades itself.
How To Set Up the TypeScript/JavaScript SDK
A complete SDK implementation includes the current SDK package, OAuth application credentials, the correct redirect URI and scopes, persistent token storage, and a successful test API request. Verify each component independently before using the integration in production.
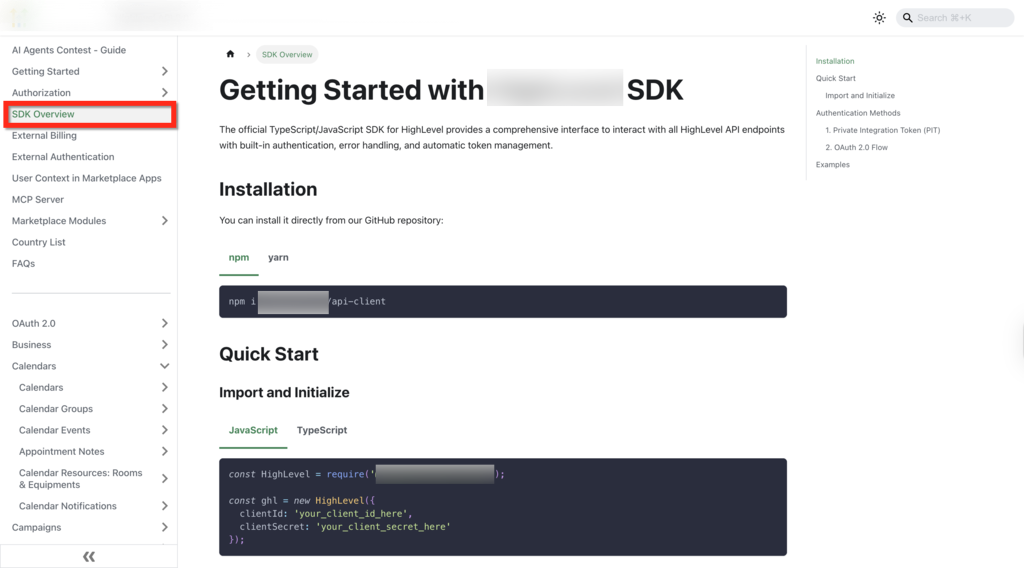
Open your developer documentation and locate the TypeScript/JavaScript SDK installation instructions. Copy the current NPM installation command exactly as documented and run it from the root of your project.
Use the current import and initialization example from the developer documentation. Copy the documented exported class, package identifier, and configuration properties exactly rather than relying on older implementation examples.
Configure the OAuth application before attempting authenticated API requests.
- Create or open the application used by your integration.
- Configure the OAuth scopes required by the application.
- Configure the application's redirect URI.
- Add the Client ID and Client Secret to your application's secure configuration.
- Confirm the selected scopes provide access to the API resources your application needs.
Connect the storage implementation used by your application so OAuth token information can be persisted, retrieved, and updated. Use the available SDK storage examples as references when implementing this layer.
Run the application through an OAuth authorization flow using a test account. Confirm that the redirect succeeds, authentication information is stored, and the granted scopes match the permissions required by your integration.
Use a documented SDK method to make a test API request. Confirm the request succeeds using the application's OAuth credentials and verify that your token-storage implementation can retrieve and update authentication information as expected.
Frequently Asked Questions
Need Help?
If the SDK does not behave as expected, first determine whether the failure occurs during installation, OAuth authorization, token storage, token refresh, or the API request itself. Isolating the failing stage makes troubleshooting significantly easier.
- Installation or Import Error: Compare the package name, installed version, import syntax, and exported class with the current developer documentation.
- OAuth Redirect Error: Confirm the redirect URI sent by your application exactly matches the URI configured for the OAuth application.
- Permission Error: Confirm the application requested and received the scopes required for the API operation.
- Token Error: Verify your storage implementation can create, retrieve, update, and persist the expected authentication data.
- API Request Error: Review the current API reference for the endpoint, HTTP method, required parameters, scopes, and supported API version.
- Reproducible Platform Error: Capture the request details, response status, response body, affected endpoint, timestamp, SDK version, and steps required to reproduce the issue before contacting support.