
The Hair Salon Snapshot helps agencies reduce repetitive setup by importing a prebuilt collection of salon-focused account assets. The snapshot can be used when creating a new sub-account or loaded into an existing sub-account.
A snapshot is a configuration template, not a finished live account. Business details, staff, calendars, domains, communications, integrations, workflows, and customer-facing pages must be reviewed and tested before they are activated.
Learn what the Hair Salon Snapshot contains, how to import and install it, what is not transferred, which settings require customization, and how to test the account before launch.
Do not publish pages, activate workflows, send messages, or assign live phone traffic immediately after installation. Review and test every imported asset first. Loading a snapshot is not an account backup or one-click undo process.
2. Key Benefits of the Hair Salon Snapshot
3. What Is Included in the Hair Salon Snapshot
4. Supporting Implementation Resources
5. What Is Not Included
6. Before You Install the Hair Salon Snapshot
7. How To Install and Set Up the Hair Salon Snapshot
8. What To Customize After Installation
9. How To Test the Hair Salon Snapshot Before Launch
10. Troubleshooting the Hair Salon Snapshot
11. Frequently Asked Questions
What Is the Hair Salon Snapshot?
The Hair Salon Snapshot is a reusable account template designed to accelerate the setup of sub-accounts for hair salons. It packages selected configuration assets so agencies can begin with a consistent salon-focused structure instead of building every calendar, field, page, template, pipeline, and workflow from scratch.
The current snapshot appears in the agency snapshot library as V2 Industry - Beauty & Fashion - Hair Salon. After installation, each imported asset should be customized to match the salon's services, staff, branding, booking rules, communications, and operating processes.
Key Benefits of the Hair Salon Snapshot
The snapshot reduces repetitive configuration while giving agencies a consistent foundation that can be adapted to each salon's services and customer journey.
- Faster Account Setup: Begin with prebuilt salon-focused assets instead of creating the complete sub-account manually.
- Consistent Client Onboarding: Use the same structure across multiple salon clients while customizing business-specific details.
- Prebuilt Scheduling Foundation: Start with service calendars and a calendar group that can be assigned to staff and updated for salon services.
- Lead Capture and Follow-Up: Use the included form, funnels, pipelines, templates, and workflows as a starting point for salon lead generation.
- Reusable Marketing Assets: Customize imported email templates, message templates, offer pages, and nurture automation.
- Flexible Deployment: Create a new sub-account from the snapshot or load selected assets into an existing account.
What Is Included in the Hair Salon Snapshot
Reviewing the asset inventory before installation helps you understand what will be added and which areas require customization. The current V2 Industry Beauty & Fashion snapshot contains 60 assets across 11 categories.
| Asset Category | Quantity | Primary Area |
|---|---|---|
| Calendar Groups | 1 | Calendars |
| Calendars | 6 | Calendars |
| Custom Fields | 29 | Custom Fields |
| Custom Values | 3 | Custom Values |
| Email Builder Templates | 5 | Marketing |
| Forms | 1 | Sites |
| Funnels & Websites | 3 | Funnels & Websites |
| Pipelines | 2 | Opportunities |
| Review Settings | 1 | Reputation Management |
| Text & Email Templates | 2 | Marketing |
| Workflows | 7 | Automations |
| Total | 60 | 11 asset categories |
Supporting Implementation Resources
The snapshot is accompanied by implementation guidance that extends beyond the imported asset inventory. These resources help configure the account but should not be treated as automatically deployed snapshot assets.
- Account Setup Guidance: Business Profile, users, phone, email, domains, social connections, payments, and reputation settings.
- Salon Advertising Example: An advertising mockup and campaign guidance for promoting a salon offer.
- Voice AI Guidance: Prompt suggestions for common salon questions, lead qualification, and appointment booking.
- Quick-Win Recommendations: Mobile app, chat widget, missed-call text-back, payment requests, snippets, and review requests.
- Launch Checklist: Guidance for updating the form, funnel, website, calendars, pipelines, workflows, email templates, and Link-in-Bio page.
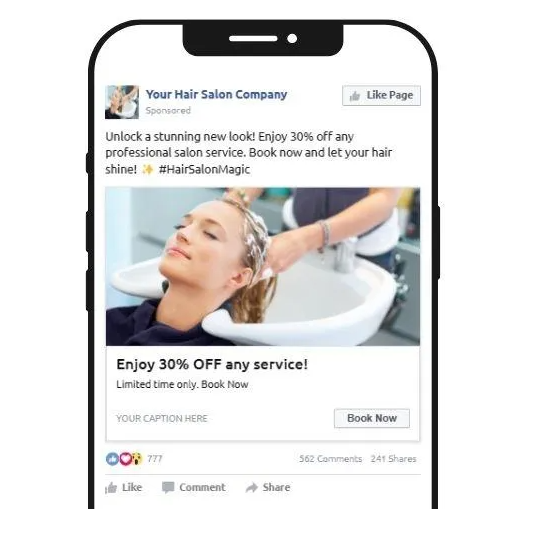
Resource clarification: The current snapshot inventory does not list an imported Ad Campaign, Social Planner post, or Voice AI Agent category. Treat the advertising mockup, social guidance, and Voice AI prompts as supporting setup resources unless those assets are verified inside the destination account.
What Is Not Included
Snapshots transfer reusable configuration assets, not the salon's live customer history or authenticated third-party services. Understanding these exclusions prevents the imported account from being mistaken for a fully connected production account.
- Contacts and imported customer databases
- Conversations, messages, emails, and conversation history
- Appointments and historical calendar activity
- Live reputation data or existing customer reviews
- Stripe connections or other payment-provider authentication
- Phone-number ownership, routing, or carrier registration
- Email-domain authentication and DNS records
- Facebook, Instagram, Google Business Profile, or other external integrations
- Staff login credentials or connected external calendars
- Published website domains or live funnel deployment
Before You Install the Hair Salon Snapshot
Preparing the agency and destination account before installation reduces import errors, duplicate assets, and accidental replacement of existing configuration.
- Confirm you have Agency Admin access or the required Snapshot permissions.
- Decide whether the snapshot will create a new sub-account or be loaded into an existing one.
- Review the snapshot's 60-asset inventory before choosing what to install.
- Review existing assets in the destination sub-account if it is already active.
- Export or document important existing configuration before overriding conflicts.
- Collect the salon's business name, logo, contact details, address, website, time zone, currency, services, staff, pricing, and availability.
- Collect access to required domains, email DNS, phone services, social accounts, Google Business Profile, and payment provider.
- Plan a testing period before imported assets are activated for live customers.
How To Install and Set Up the Hair Salon Snapshot
Choose the installation path that matches the destination. Importing a shared snapshot adds it to the agency library, while creating or loading applies its assets to a specific sub-account.
Step 1: Locate or Import the Snapshot
First, check whether the Hair Salon Snapshot is already available in the agency snapshot library. If your snapshot provider supplied a secure share link, use that link to import the snapshot before continuing.
- Sign in to the agency account that should receive the snapshot.
- Open Agency View → Account Snapshots.
- Check My snapshots and Imported snapshots.
- Search for V2 Industry - Beauty & Fashion - Hair Salon.
- If the snapshot is not listed, open the secure share link supplied by your snapshot provider and import it.
- Wait until the import completes before creating or loading a sub-account.
Snapshot availability: If the snapshot is not visible in the library, confirm that the import finished and that the current user has permission to view, import, and load snapshots.
Option A: Create a New Sub-Account from the Snapshot
Creating a new account from the snapshot is the cleanest option when the salon does not already have an active sub-account containing important assets.
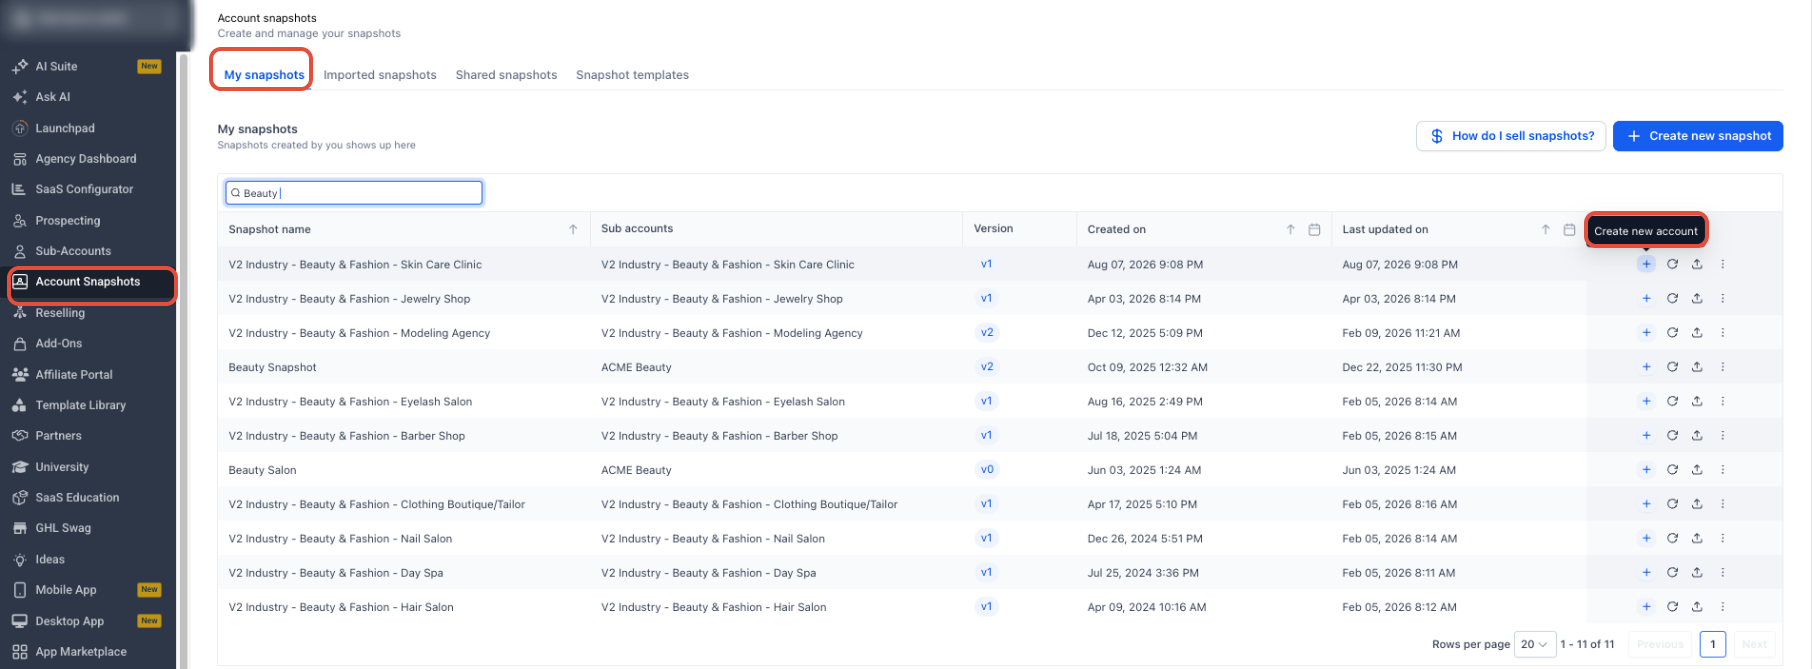
- From Agency View, open Account Snapshots.
- Open My snapshots or Imported snapshots, depending on where the snapshot is stored.
- Search for V2 Industry - Beauty & Fashion - Hair Salon.
- Click the blue + icon labeled Create new account.
- Enter and verify the salon's business information.
- Create the sub-account.
- Wait for the snapshot assets to finish loading.
- Open the new sub-account and begin the customization checklist below.
Option B: Load the Snapshot into an Existing Sub-Account
Loading into an existing account preserves the account's live customer data while adding or updating selected snapshot assets. This path requires careful conflict review.
Conflict warning: Do not automatically override every conflict. Review the current asset and imported version before choosing Override or Skip. Loading the same snapshot more than once can create conflicts or duplicate assets.
- From Agency View, open Sub-Accounts.
- Locate the destination sub-account.
- Open the three-dot menu in the Actions column and select Manage Client.
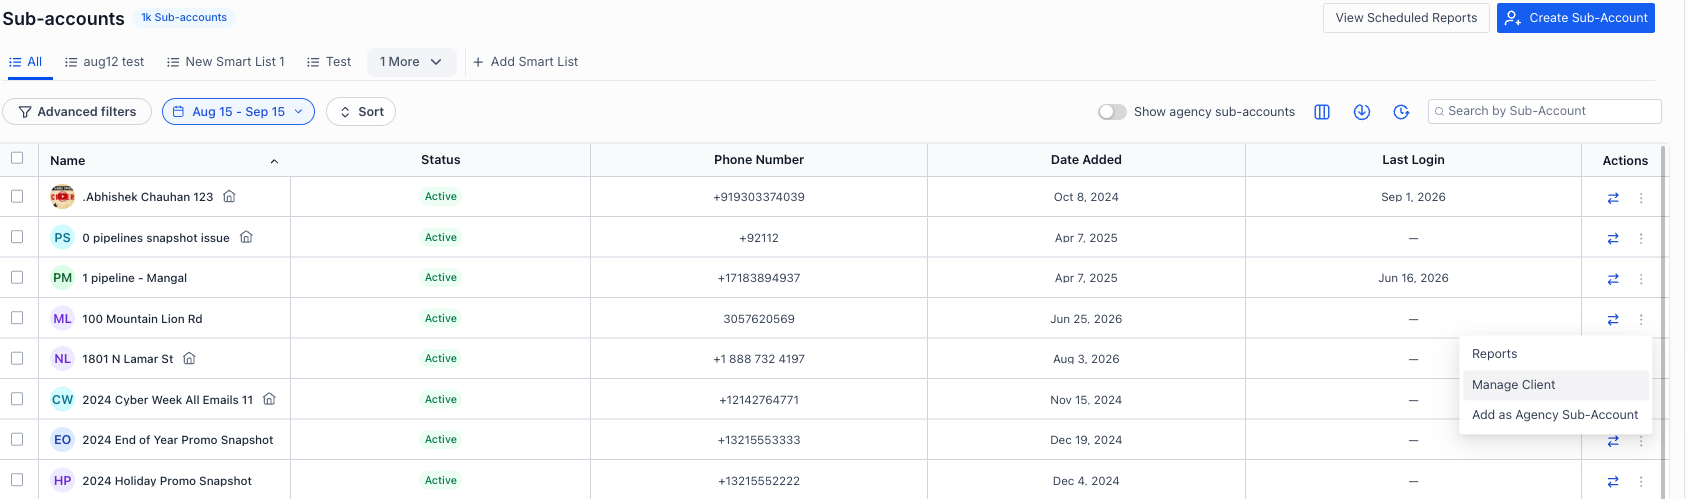
- From the Manage Client view, click Actions → Load Snapshot.
- Select the Hair Salon Snapshot.
- Select all assets or only the categories required for the account.
- Review every detected conflict.
- Choose whether each conflicting asset should be skipped or overridden.
- Confirm the load.
- Wait for the load to finish before editing imported assets.
What To Customize After Installation
Customization converts the imported template into a functioning account for the specific salon. Complete the highest-impact account settings first so downstream pages, calendars, messages, and workflows use accurate information.
Priority 1: Business Profile and Custom Values
- Business and legal names
- Logo and brand identity
- Phone number, email address, physical address, time zone, language, and currency
- Website and branded links
- Promotion name
- Website booking-page URL
- Booking thank-you-page URL
Priority 2: Staff and Calendars
- Create or review user profiles for salon staff.
- Assign staff members to the correct service calendars.
- Update service names, descriptions, duration, pricing, buffers, availability, and booking rules.
- Connect each staff member's supported external calendar.
- Configure linked and conflict calendars to prevent double-booking.
- Test the booking experience on desktop and mobile.
Priority 3: Form, Funnel, Website, and Link-in-Bio Page
- Update salon name, logo, colors, fonts, images, and contact information.
- Replace placeholder services, descriptions, prices, offers, and FAQs.
- Review the claim-offer form and consent language.
- Update every button, navigation item, calendar link, phone link, and social link.
- Review page titles, descriptions, and SEO metadata.
- Connect the intended custom domain.
- Preview each page before publishing.
Priority 4: Pipelines, Templates, and Workflows
- Review both pipelines and update stages to match the salon's process.
- Review all five Email Builder Templates.
- Review both Text & Email Templates.
- Review all seven imported workflows.
- Confirm each trigger, filter, sender, action, link, delay, branch, and internal notification.
- Keep workflows in draft while testing.
- Publish only the workflows the salon is ready to use.
Priority 5: Communications and Integrations
- Purchase or connect the appropriate phone number and configure routing.
- Complete messaging registration where required.
- Set up a dedicated sending domain and branded links.
- Connect Facebook, Instagram, Google Business Profile, and Social Planner as needed.
- Connect Stripe or another supported payment provider before collecting payments.
- Configure review-request destinations and message templates.
- Choose and configure the appropriate chat widget.
- Build and test an optional Voice AI Agent before assigning live phone traffic.
How To Test the Hair Salon Snapshot Before Launch
End-to-end testing confirms that the imported assets work together and use the correct salon information before real leads and customers enter the account.
- Create an internal test contact.
- Submit the imported salon offer form.
- Confirm the contact record contains the expected custom-field data.
- Confirm the correct opportunity is created in the intended pipeline and stage.
- Book a test appointment through each relevant calendar or Service Menu.
- Review workflow enrollment and execution history.
- Verify every email, SMS, internal notification, link, and custom value.
- Test website, funnel, and Link-in-Bio buttons on desktop and mobile.
- Confirm the connected domain and published pages resolve correctly.
- Test payment collection only after the payment provider is configured.
- Test the chat widget and conversation routing.
- Test any Voice AI Agent before assigning a live business number.
Troubleshooting the Hair Salon Snapshot
Most snapshot issues can be traced to permissions, an incomplete import, asset conflicts, missing account-specific configuration, or unpublished assets.
| Issue | What To Check |
|---|---|
| The share link does not open the import screen | Sign in to the intended agency, reopen the link, and confirm the user has snapshot permissions. |
| The snapshot is greyed out or still importing | Wait for the import status to complete. Review the displayed error and retry if needed. |
| Load Snapshot is missing | Confirm snapshot permissions are enabled for the agency user. |
| Duplicate assets appeared | Check whether the snapshot was loaded more than once or a conflict was imported instead of skipped. |
| Website or funnel is not live | Imported pages are drafts. Connect a domain, review the content, and publish. |
| Calendars show no availability | Confirm assigned staff, schedules, service settings, and conflict calendars. |
| Workflows do not run | Review publication status, triggers, filters, senders, custom values, and execution history. |
| Pages or messages show placeholder information | Update the Business Profile, Custom Values, page content, templates, and workflow actions. |
Frequently Asked Questions
Need Help?
If the snapshot cannot be found, imported, or loaded, confirm the agency permissions and destination account before changing any existing assets.
- Confirm the user can view, import, share, and load snapshots.
- Check both My snapshots and Imported snapshots for V2 Industry - Beauty & Fashion - Hair Salon.
- Review the snapshot import or load status for failed or skipped assets.
- Confirm whether an existing asset conflict was skipped or overridden.
- Keep workflows and customer-facing pages inactive until setup and testing are complete.
If the issue continues, collect the agency ID, destination sub-account ID, snapshot name and version, failed asset names, timestamps, error messages, and screenshots before contacting support. Do not include passwords, API keys, access tokens, or other sensitive credentials.