
Learn how Listings fits into a SaaS plan, who pays for bundled Listings, how to add it through the SaaS Configurator, what clients need to complete after provisioning, and how to locate sub-accounts with Listings enabled.
When Listings is included as an add-on inside a SaaS plan, the add-on cost is billed to your agency rather than separately to the subscribing sub-account. Review the add-on cost and include the appropriate amount and margin in your SaaS plan pricing before selling the plan.
2. Key Benefits of Including Listings in a SaaS Plan
3. Before You Add Listings
4. How Listings Add-On Billing Works
5. How To Add Listings to a SaaS Plan
6. What Happens After a Client Purchases the Plan?
7. How To Find Sub-Accounts With Listings
8. Frequently Asked Questions
9. Need Help?
What Is Listings in a SaaS Plan?
Listings is an online directory-management service that helps businesses keep important information such as their business name, address, phone number, hours, and other profile details consistent across supported publishers.
Adding Listings to a SaaS plan lets you bundle the service with the client's broader subscription instead of requiring the client to purchase Listings separately. When an eligible new SaaS sub-account is provisioned with the plan, the selected add-on is deployed as part of that package.
Automatic provisioning gives the sub-account access to Listings, but the business still needs to provide and verify the information required for its Listings profile.
Key Benefits of Including Listings in a SaaS Plan
Bundling Listings with a SaaS subscription creates a more complete service package while allowing the agency to control how the add-on cost is incorporated into plan pricing.
- Simplified Packaging: Include Listings alongside the other features and services offered through a SaaS plan.
- Automatic Provisioning: New qualifying sub-accounts created through the plan receive the selected add-on automatically.
- Flexible Plan Positioning: Include Listings in selected plans to differentiate service tiers and premium packages.
- Recurring Revenue Potential: Account for the Listings cost plus your desired margin when determining the SaaS subscription price.
- Centralized Configuration: Add or remove supported add-ons while managing the SaaS plan from the Configurator.
Before You Add Listings
Confirm that your SaaS billing architecture and plan configuration are ready before adding paid add-ons. Proper billing setup ensures subscription and add-on charges are associated with the intended agency configuration.
- You need access to Agency View → SaaS Configurator.
- Create the SaaS plan first or select an existing plan you want to edit.
- Complete the applicable payment-provider setup for the SaaS architecture you are using.
- For SaaS V1, Stripe is the billing system of record and must be configured for the agency.
- For SaaS V2, billing is tied to the configured Agency Sub-Account and its supported payment-provider setup.
- Review the cost of Listings before determining the final price of the SaaS plan.
How Listings Add-On Billing Works
Add-ons included directly inside a SaaS plan use a different billing model from an add-on purchased separately by a client. Understanding this distinction helps prevent unexpected agency charges and protects your plan margin.
| Billing Item | How It Works |
|---|---|
| Listings add-on cost | The agency is responsible for the bundled add-on cost when Listings is included directly in a SaaS plan. |
| Sub-account charge | The subscribing sub-account is not separately charged for that bundled add-on. |
| Your SaaS price | Set the SaaS plan price high enough to account for the add-on cost and your desired margin. |
| Future bundle changes | Changes to bundled add-ons apply to future qualifying sub-accounts and do not automatically reconfigure existing clients. |
Plan your margins before saving: Review the add-on cost shown in the SaaS Configurator and incorporate that cost into your subscription price. Bundling Listings without adjusting your SaaS pricing can reduce the margin on every client subscribed to that plan.
How To Add Listings to a SaaS Plan
Adding Listings through the SaaS Configurator attaches the add-on to the selected SaaS package. Review both the add-on selection and your resulting plan cost before saving the changes.
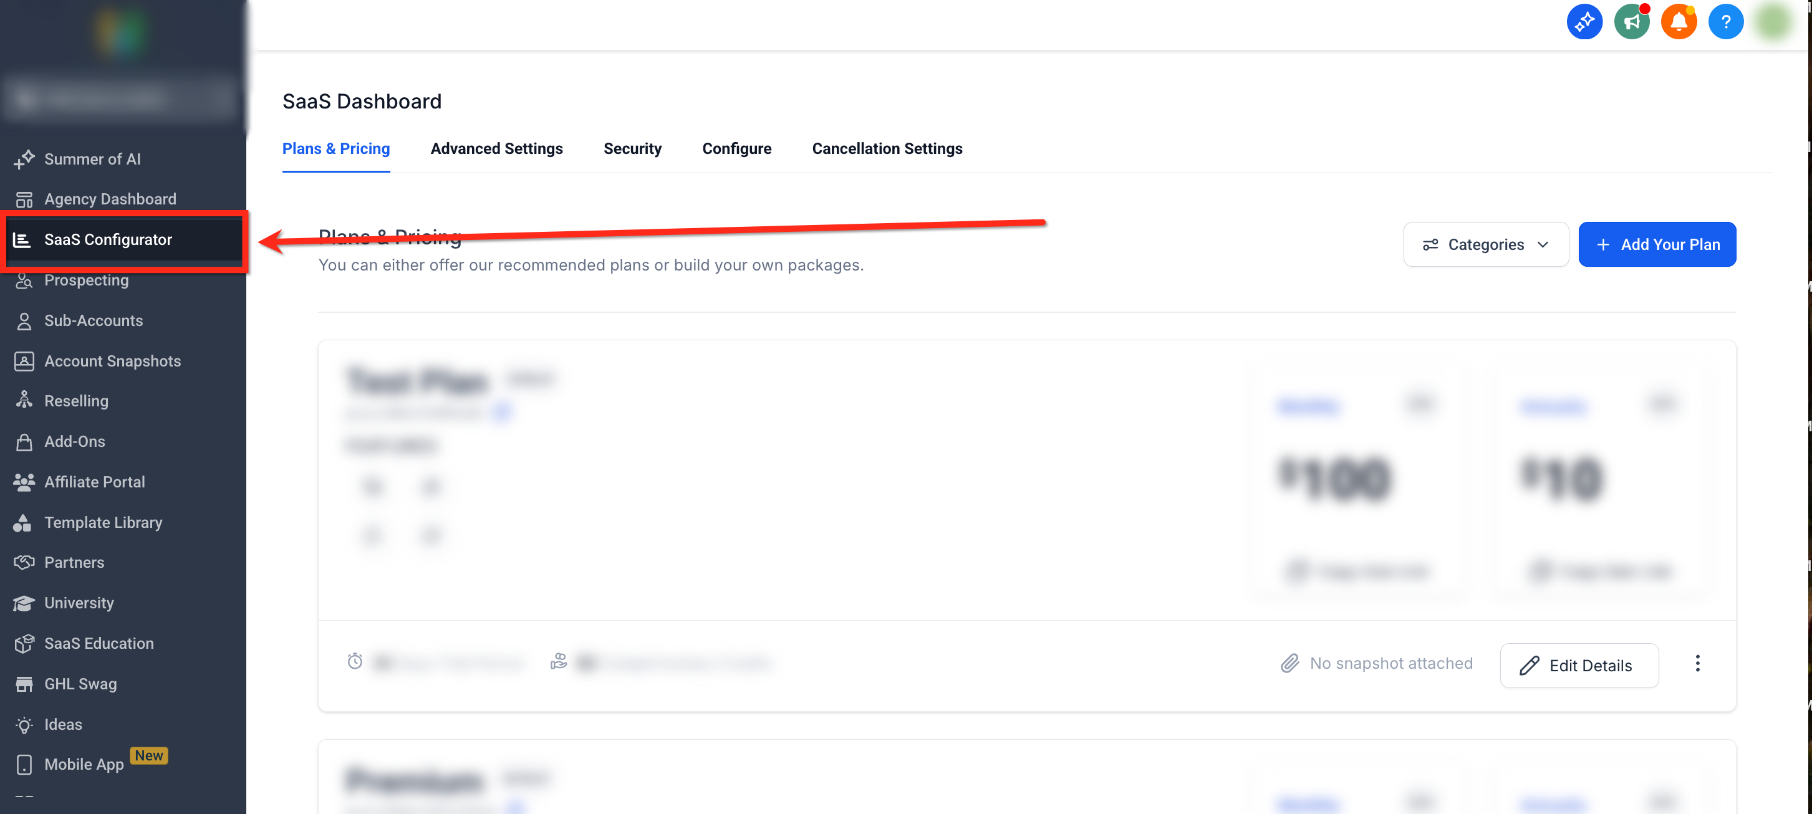
- From Agency View, select SaaS Configurator.
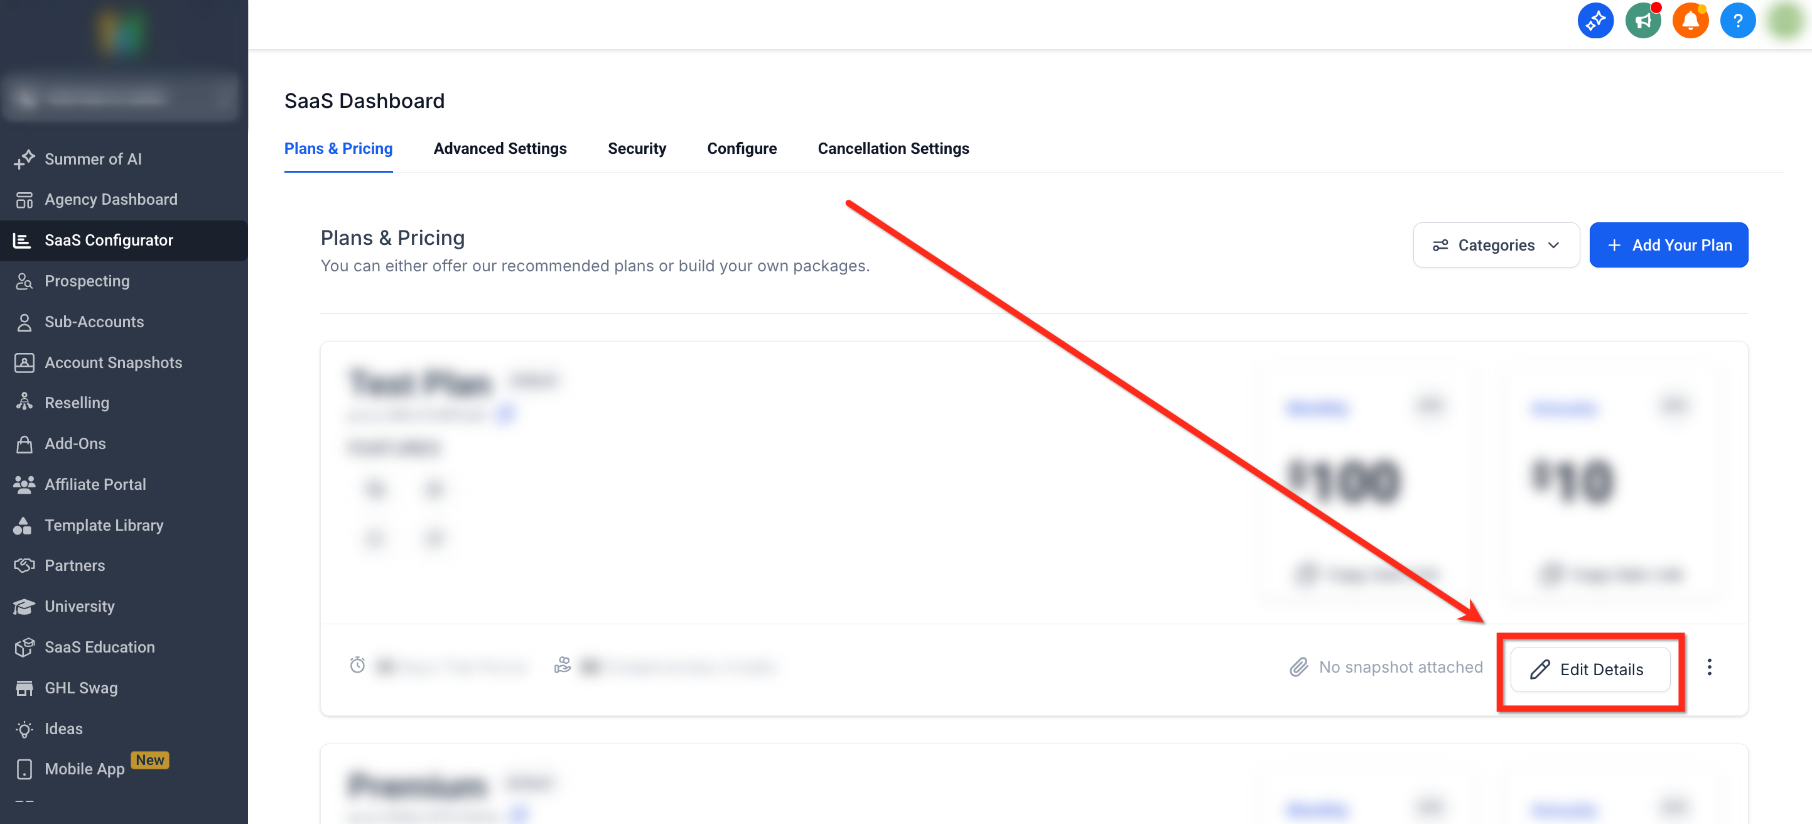
- Locate the SaaS plan you want to update and click Edit Details.
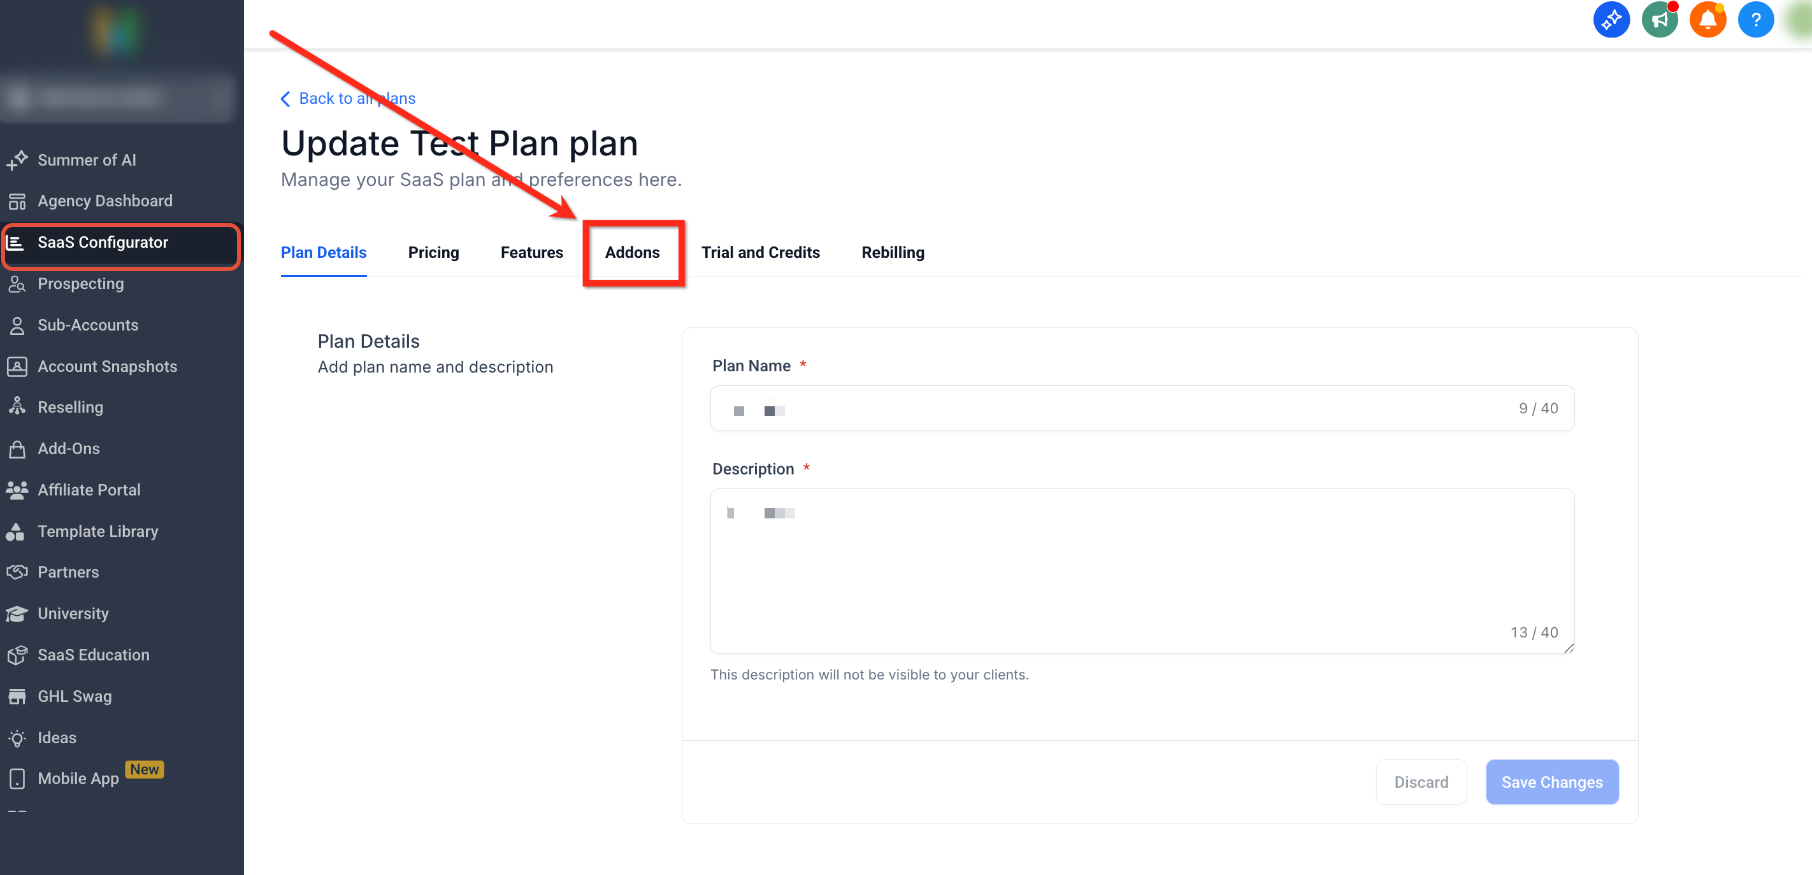
- Open the Add-Ons section of the plan configuration.
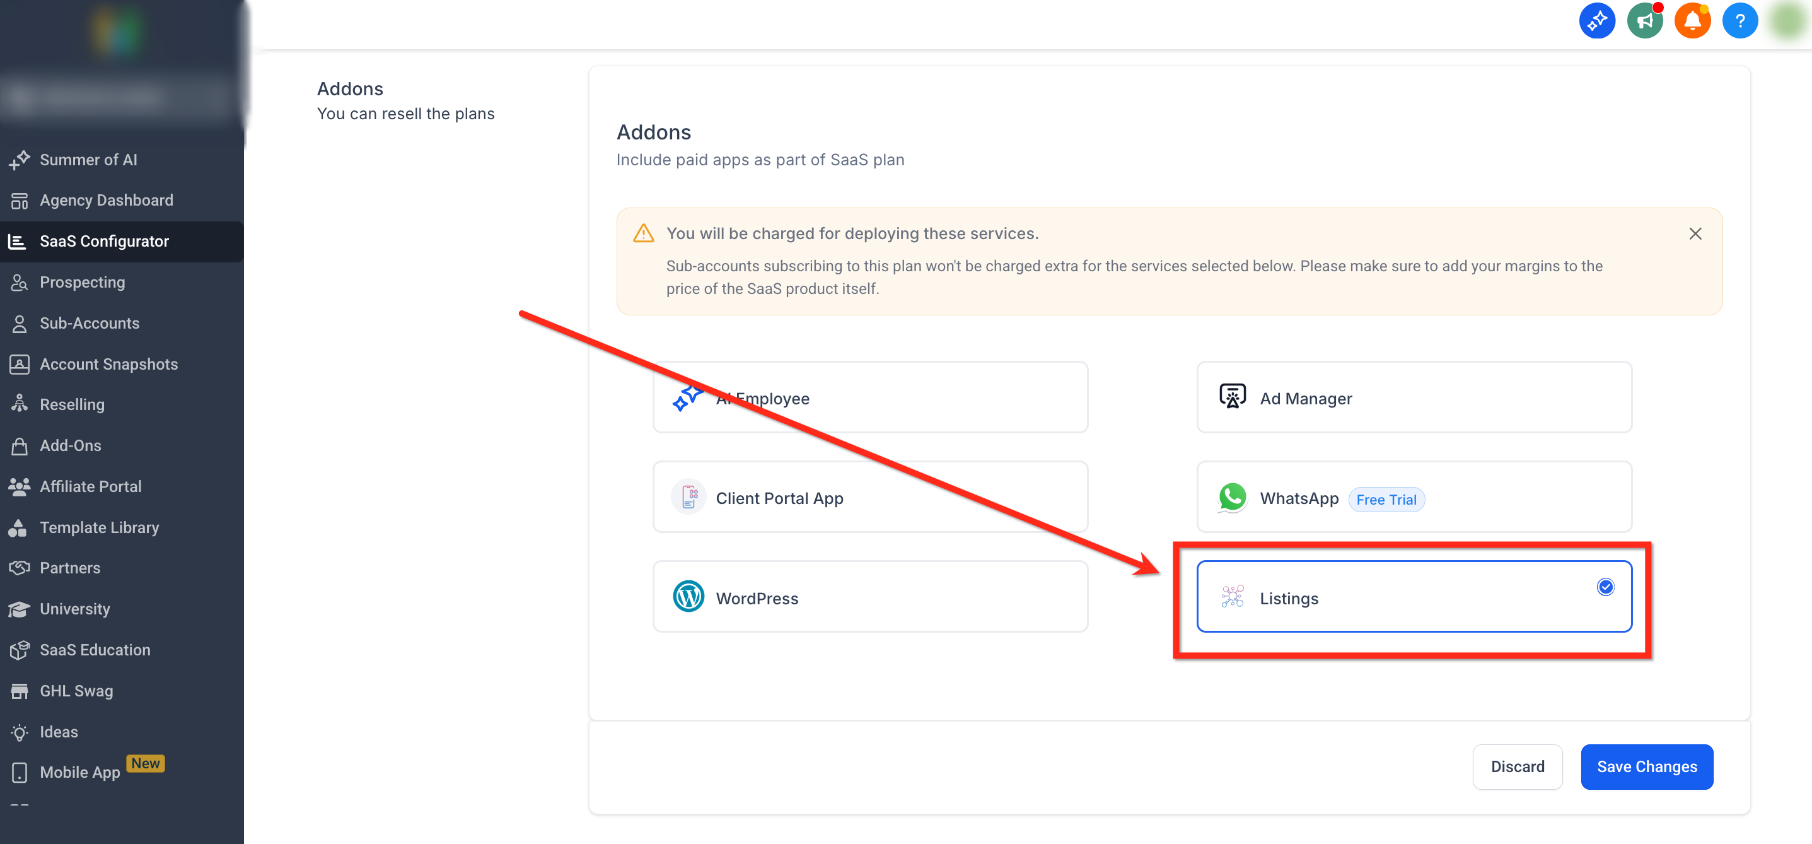
- Locate Listings and select it to include the add-on in the plan.
- Review the add-on cost displayed in the Configurator.
- Confirm that your SaaS subscription price accounts for the Listings cost and your desired margin.
- Click Save Changes.
What Happens After a Client Purchases the Plan?
Bundling Listings handles access and provisioning, but the client must still complete the business information required for Listings to distribute accurate data to supported publishers.
- The qualifying SaaS sub-account is provisioned with Listings as part of the selected plan.
- Inside the sub-account, navigate to Reputation → Listings.
- Complete any required business information shown during Listings onboarding.
- Review the business name, address, phone number, operating hours, website, and other required profile information for accuracy.
- Complete any additional connection or verification steps shown in the Listings experience.
Existing clients: Changing the add-ons attached to a SaaS plan does not automatically apply that new bundle configuration to existing sub-accounts. The updated configuration is used for qualifying new sub-accounts going forward.
How To Find Sub-Accounts With Listings
Filtering sub-accounts by Listings status gives you a quick way to identify which clients currently have the service enabled without reviewing each account individually.
Current Sub-Accounts Filter
- From Agency View, open Sub-Accounts.
- Click Advanced Filters.
- Open the Reselling filter category.
- Select the Listings filter and choose the applicable status.
- Apply the filter to review matching sub-accounts.
Why this method is preferred: The current Sub-Accounts experience includes Listings under its Reselling filters, allowing you to identify enabled accounts directly from the account list.
Agency Billing View Reference
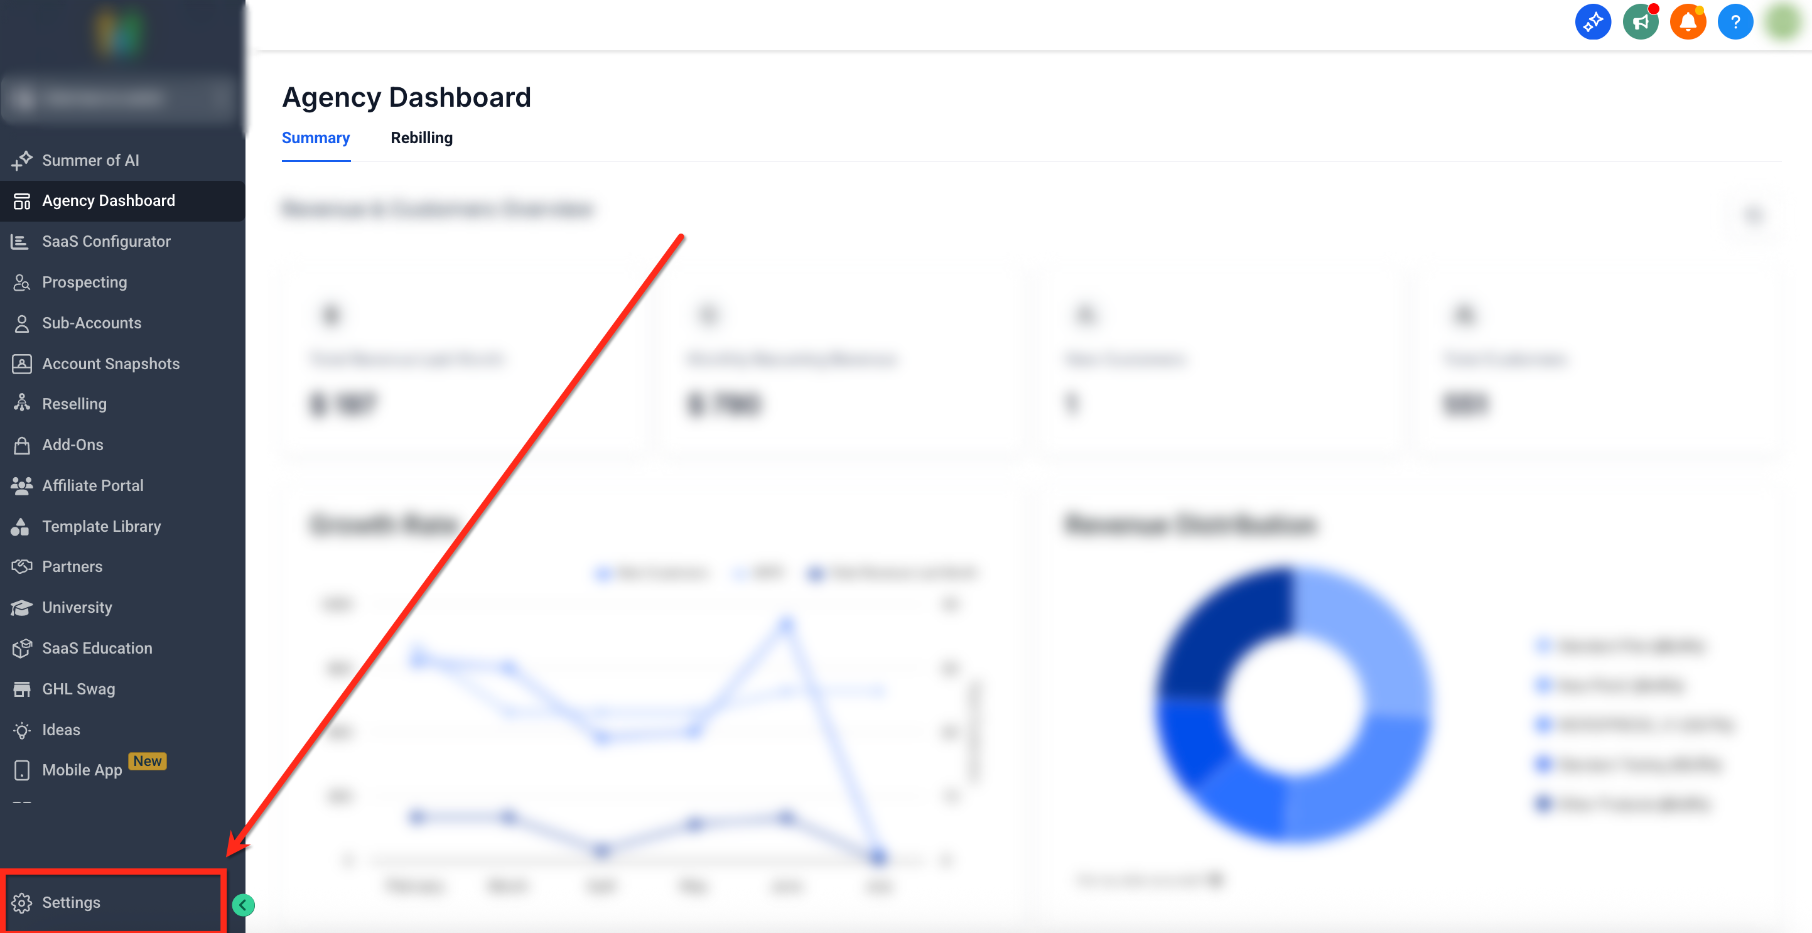
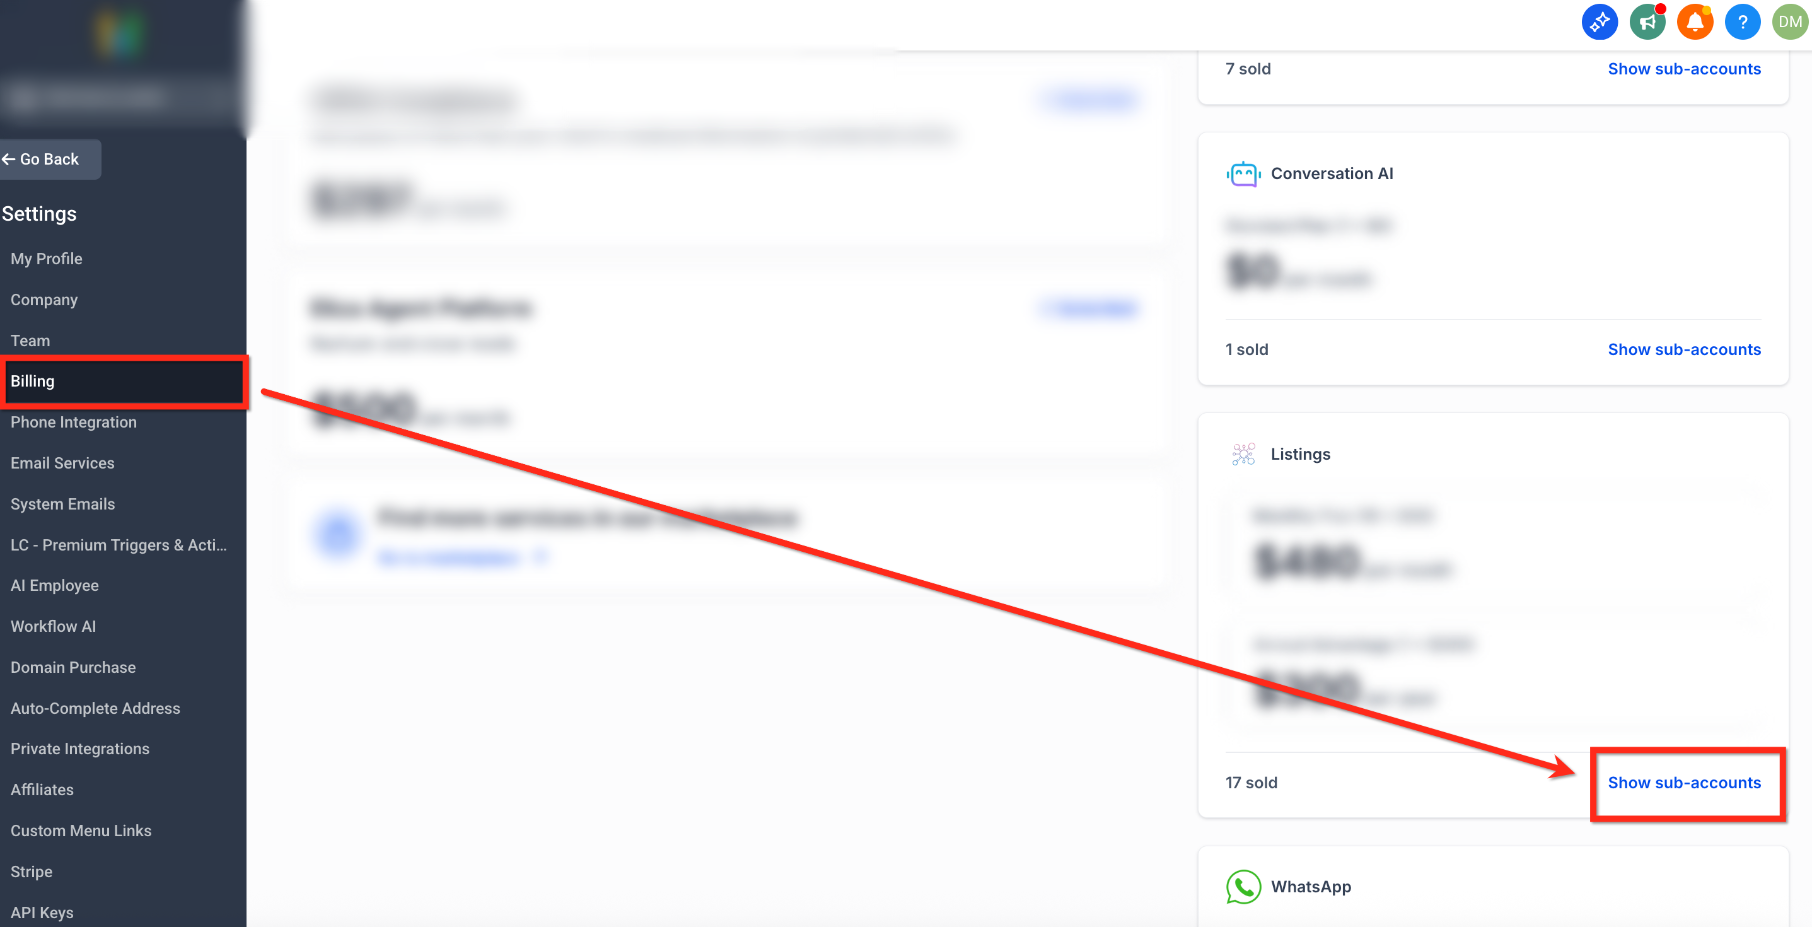
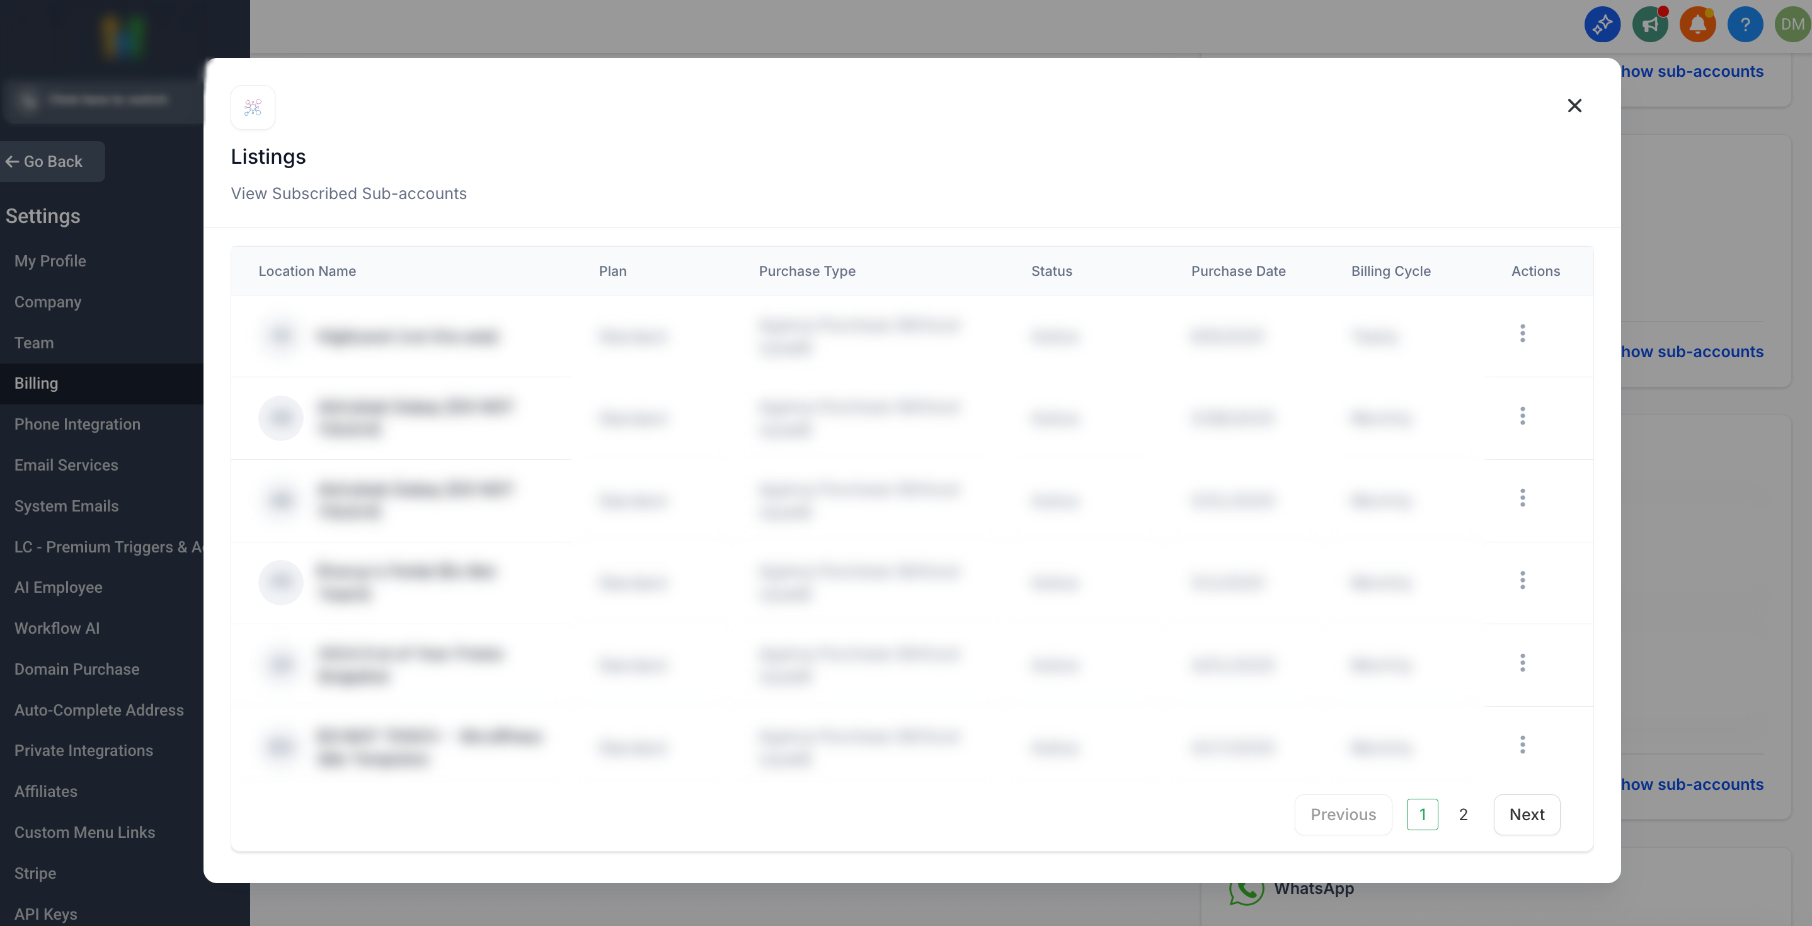
Some agency interfaces may also expose Listings subscription information through the agency Billing area. The following screenshots are retained as a reference for that view. Use the Sub-Accounts Advanced Filters method above as the primary current workflow.
1. From Agency View, open Settings.
2. If available in your interface, open Billing and locate the Listings subscription area.
3. The subscription view can display the applicable sub-accounts and billing information when that Billing experience is available.
Frequently Asked Questions
Need Help?
If Listings is not appearing or provisioning as expected, use the point where the setup stops working to narrow down the cause.
- Listings is missing from the plan editor: Confirm that you are editing the intended SaaS plan and reviewing its Add-Ons configuration.
- The plan was updated but an existing client did not receive Listings: Changes to bundled add-ons apply to qualifying future sub-accounts and do not automatically reconfigure existing clients.
- A newly provisioned client cannot complete setup: Open the affected sub-account and review Reputation → Listings for required business information, connection steps, or verification tasks.
- You need to confirm which accounts have Listings: From Agency View → Sub-Accounts → Advanced Filters, use the Listings option under Reselling.
- The agency charge is unexpected: Review the Listings add-on cost in the SaaS Configurator and confirm that the SaaS plan price includes the intended cost and margin.
- Still unresolved: Record the SaaS plan name, affected sub-account, add-on configuration, billing details shown in the account, and screenshots of the issue before contacting support. Do not include passwords, payment credentials, or other sensitive information.