
Learn how to promote a mobile app to sub-accounts, customize branding and navigation, add custom modules, prepare store information, connect Apple and Google accounts, and generate app builds for testing and release.
Building and publishing a Whitelabel Mobile App requires the applicable Custom Agency App subscription and properly configured Apple and Google developer accounts. Keep your package and bundle identifiers stable after your first Production release to preserve the existing app update path.
2. Key Benefits of Mobile App Promotion and Customization
3. Prerequisites and Limitations
4. How To Promote Your Mobile App to Sub-Accounts
5. How To Customize Your Whitelabel Mobile App
6. How To Prepare, Build, and Publish Your Whitelabel Mobile App
7. Frequently Asked Questions
8. Need Help?
What Are Mobile App Promotion and Whitelabel App Customization?
Mobile app tools help agencies control the mobile experience they provide to their sub-accounts. Promotion controls determine which supported mobile app experience is made available to users, while the Whitelabel Mobile App Customizer provides a workspace for creating and maintaining a branded iOS and Android app.
The customizer supports branding, navigation, custom modules, store information, store connections, app builds, and releases from one guided workflow.
Agencies can save customization changes and generate new builds when they are ready to test or release those updates.
Key Benefits of Mobile App Promotion and Customization
Mobile app promotion and customization help agencies create a consistent mobile experience while maintaining control over app configuration, navigation, testing, and releases.
- Promote the Appropriate App: Choose the supported mobile app experience you want to make available to your sub-accounts.
- Maintain Consistent Branding: Configure supported branding such as the app name, logo, primary color, font, and splash screens.
- Control Navigation: Choose and organize supported modules across the app's primary navigation and App Drawer.
- Add Custom Destinations: Create custom modules that open inside the app or in a mobile browser.
- Manage Releases: Build and test app changes before preparing them for public release.
- Manage Updates: Save customization changes and generate a new build when you are ready to push updates into the app.
Prerequisites and Limitations
Preparing developer accounts, policy URLs, permissions, and app identifiers before you begin helps reduce store-connection problems, build failures, and publishing delays later in the process.
- A Custom Agency App subscription is required to enable building and publishing.
- Apple publishing requires an Apple Developer Program Organization account with App Store Connect access.
- Google publishing requires an applicable Google Play Console Organization account.
- Apple requires a valid D-U-N-S number for organization enrollment.
- Prepare publicly accessible Privacy Policy and Terms & Conditions URLs.
- Make sure the required users have appropriate permissions in App Store Connect and Google Play Console.
- Keep package and bundle identifiers stable after the first Production release to preserve the existing update path.
Customization scope: Not every part of the mobile interface is freely editable. Available customization is limited to the branding, navigation, module, login-screen, and related controls supported by the current Mobile App Customizer.
How To Promote Your Mobile App to Sub-Accounts
App promotion controls determine which supported mobile app experience is presented to your sub-accounts and provide access to your branded app and its download options.
Step 1: Open Mobile App
Begin from Agency View so you can access the agency-level mobile app promotion and customization controls.
- Open Agency View.
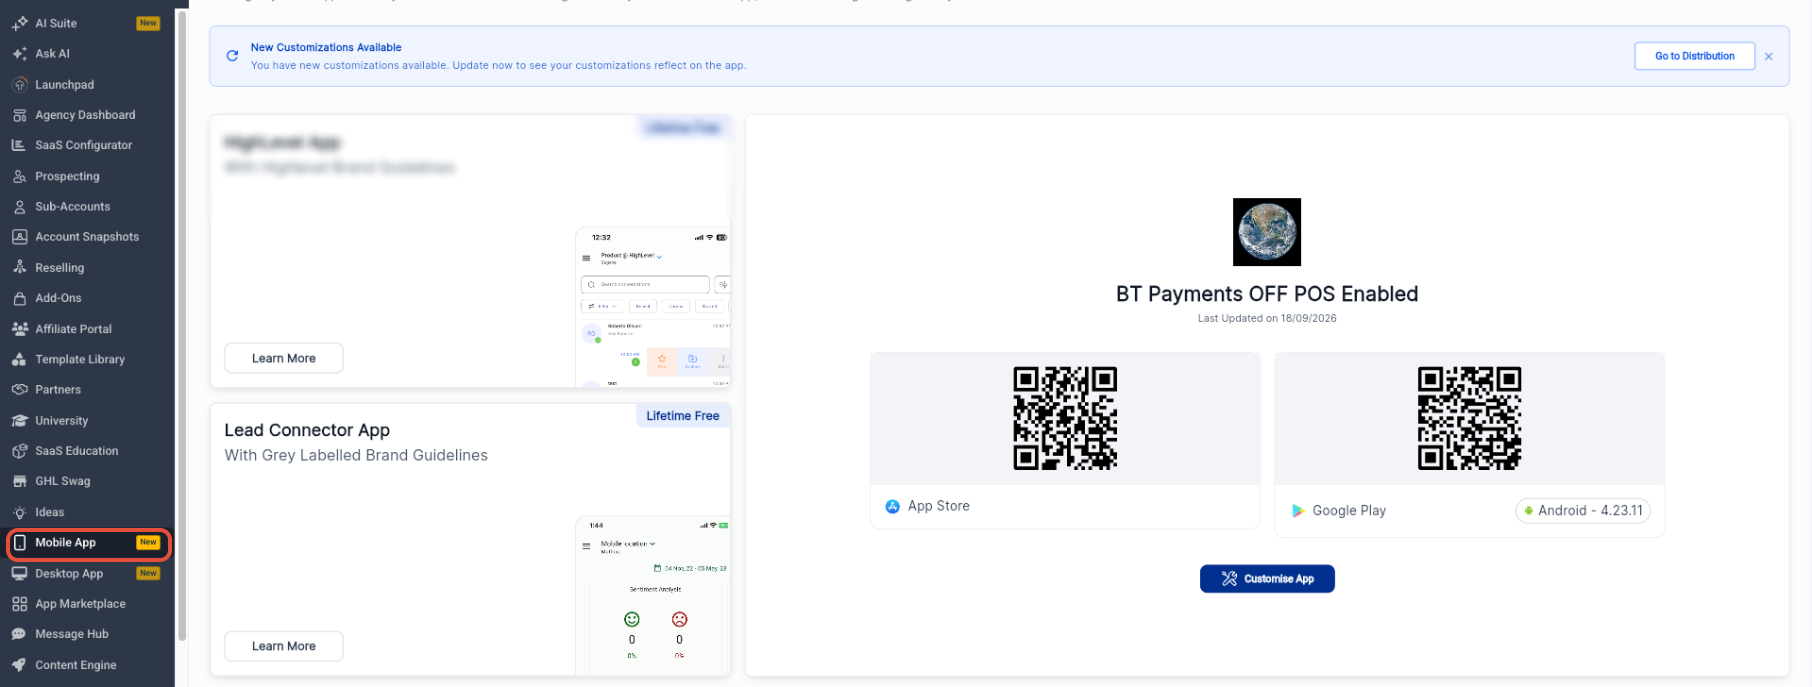
- Select Mobile App from the left navigation.
Step 2: Review Your Mobile App Options
The Mobile App workspace shows the supported mobile app experiences available to the agency along with the agency's customized Whitelabel Mobile App.
- Review the available mobile app choices.
- Review the App Store and Google Play download options for your Whitelabel Mobile App.
- Click Customise App when you are ready to edit your branded app.
How To Customize Your Whitelabel Mobile App
The Mobile App Customizer provides supported branding, login-screen, navigation, App Drawer, and custom-module controls. Complete and save these settings before generating a new app build.
Access the Mobile App Customizer
App customization begins from the agency-level Mobile App workspace where your Whitelabel Mobile App configuration is managed.
- From Agency View, select Mobile App.
- Click Customise App.
- Open App Customization.
Configure Branding
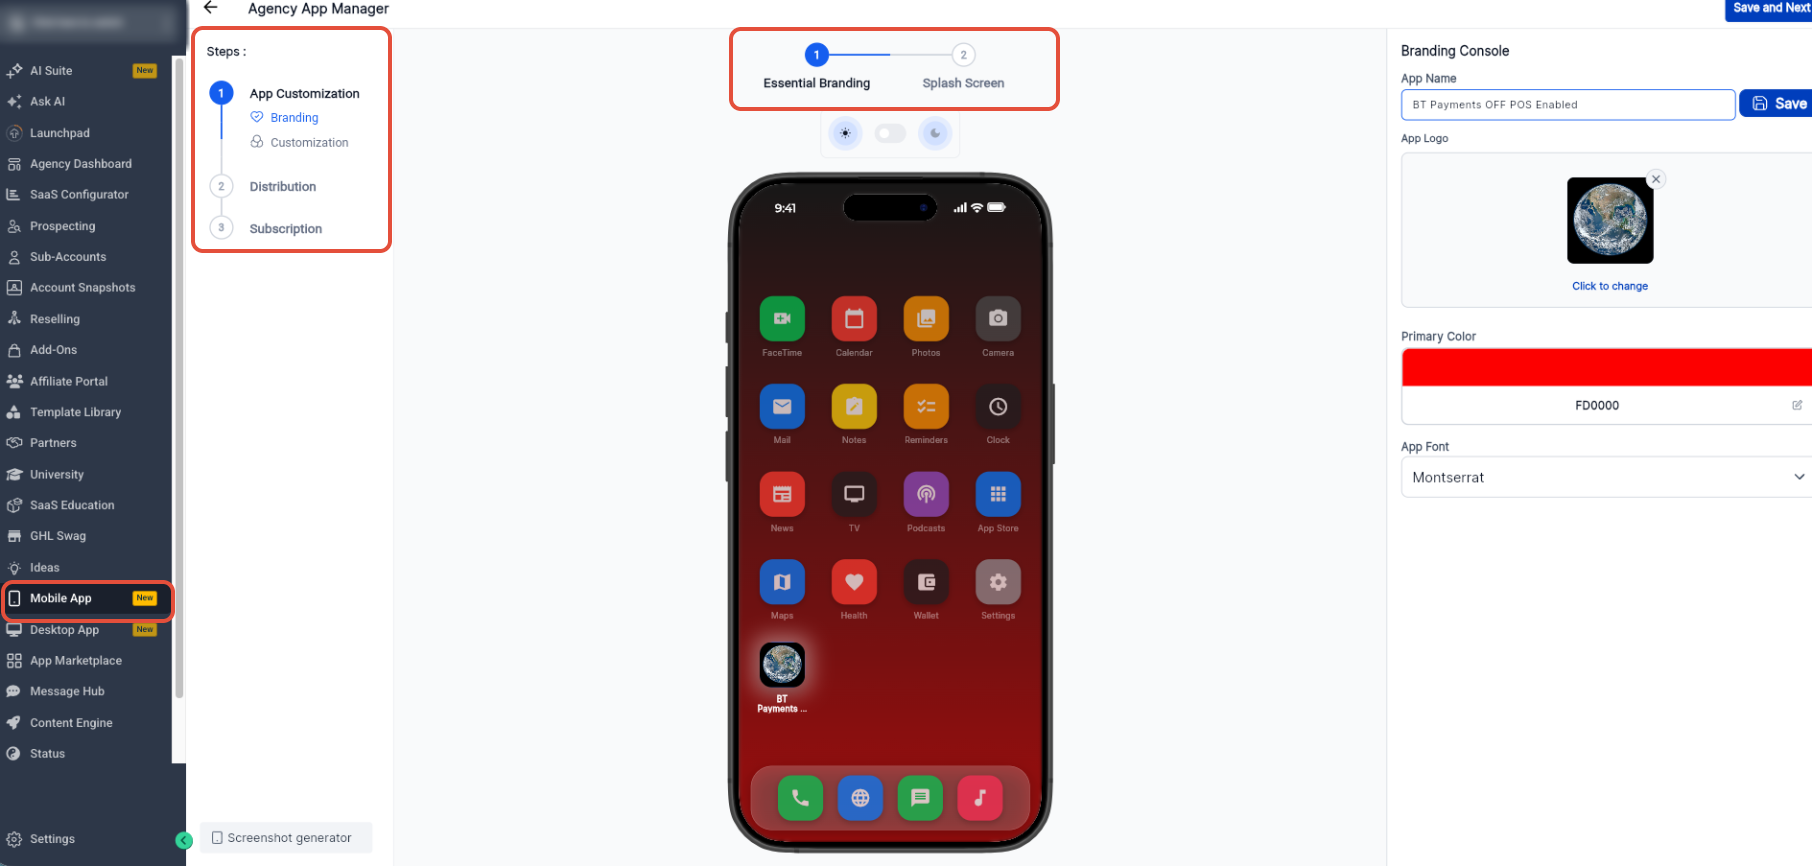
Branding controls define the core visual identity of the app, including its name, icon, primary color, font, and launch imagery.
- Under App Customization, open Branding.
- Configure the App Name.
- Upload the App Logo.
- Select the Primary Color.
- Select the App Font.
- Click Save and Next.
- Open Splash Screen.
- Upload the Light Mode and Dark Mode splash screens.
- Click Save and Next.
Customize the Login Screen
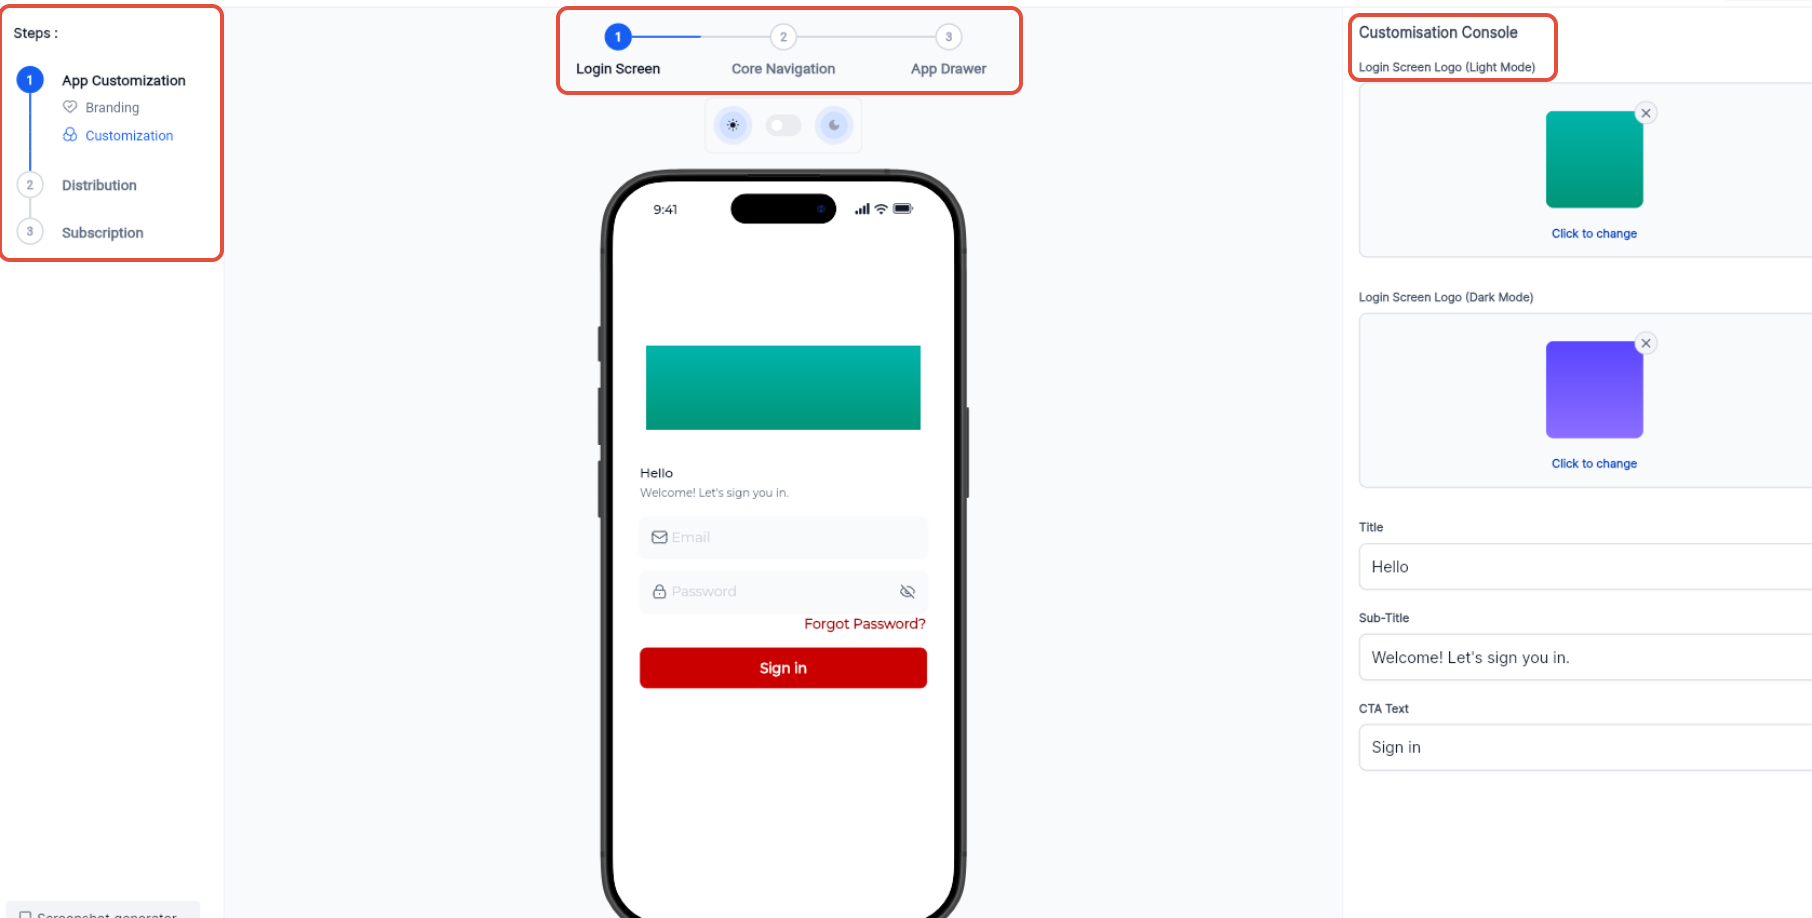
Login-screen controls let you align the user's first app interaction with the rest of your supported branding.
- Under Customization, open Login Screen.
- Configure the Light Mode login logo.
- Configure the Dark Mode login logo.
- Configure the Title.
- Configure the Sub-Title.
- Configure the CTA Text.
- Click Save and Next.
Configure Core Navigation
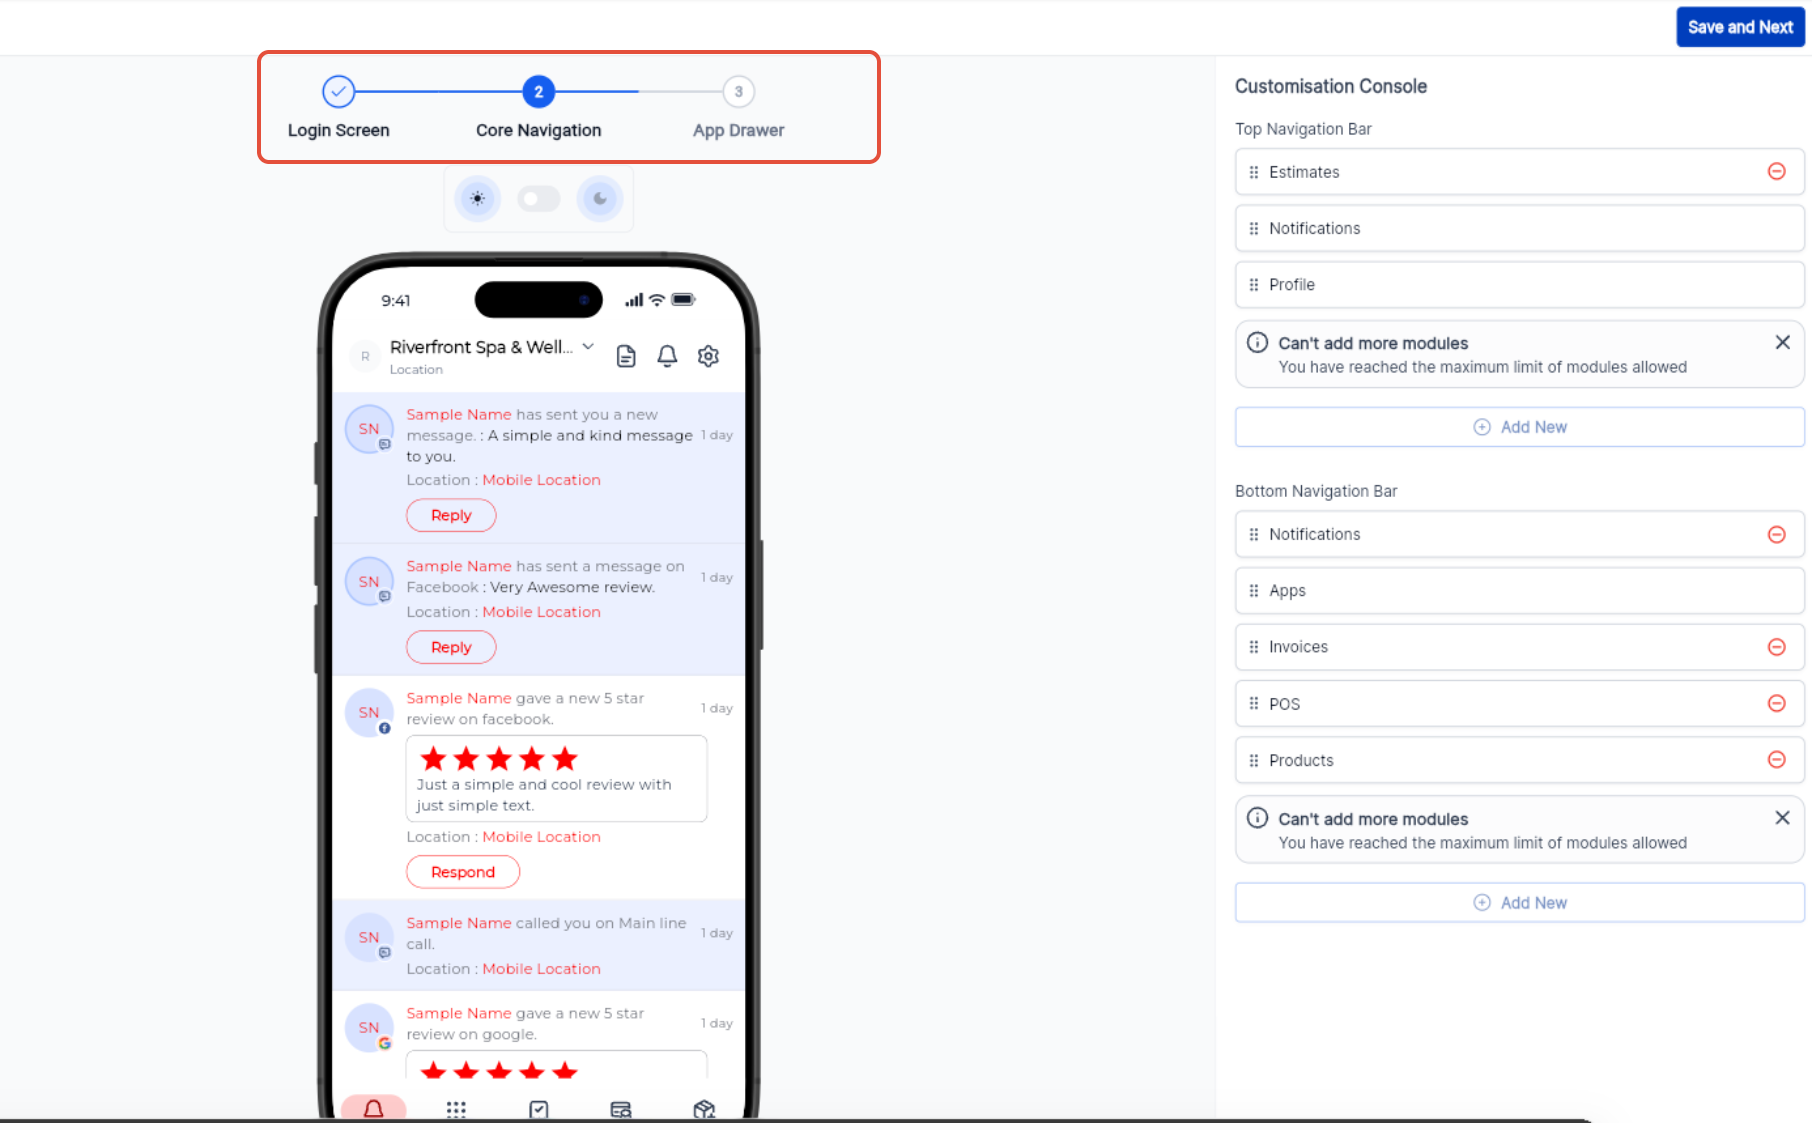
Core Navigation determines which supported destinations are most prominent and how users move between the primary areas of the app.
- Under Customization, open Core Navigation.
- Review the Top Navigation Bar.
- Add or edit supported top-navigation items as needed.
- Review the Bottom Navigation Bar.
- Add, remove, or reorder supported modules.
- Move additional modules to the App Drawer when needed.
- Click Save and Next.
Configure the App Drawer
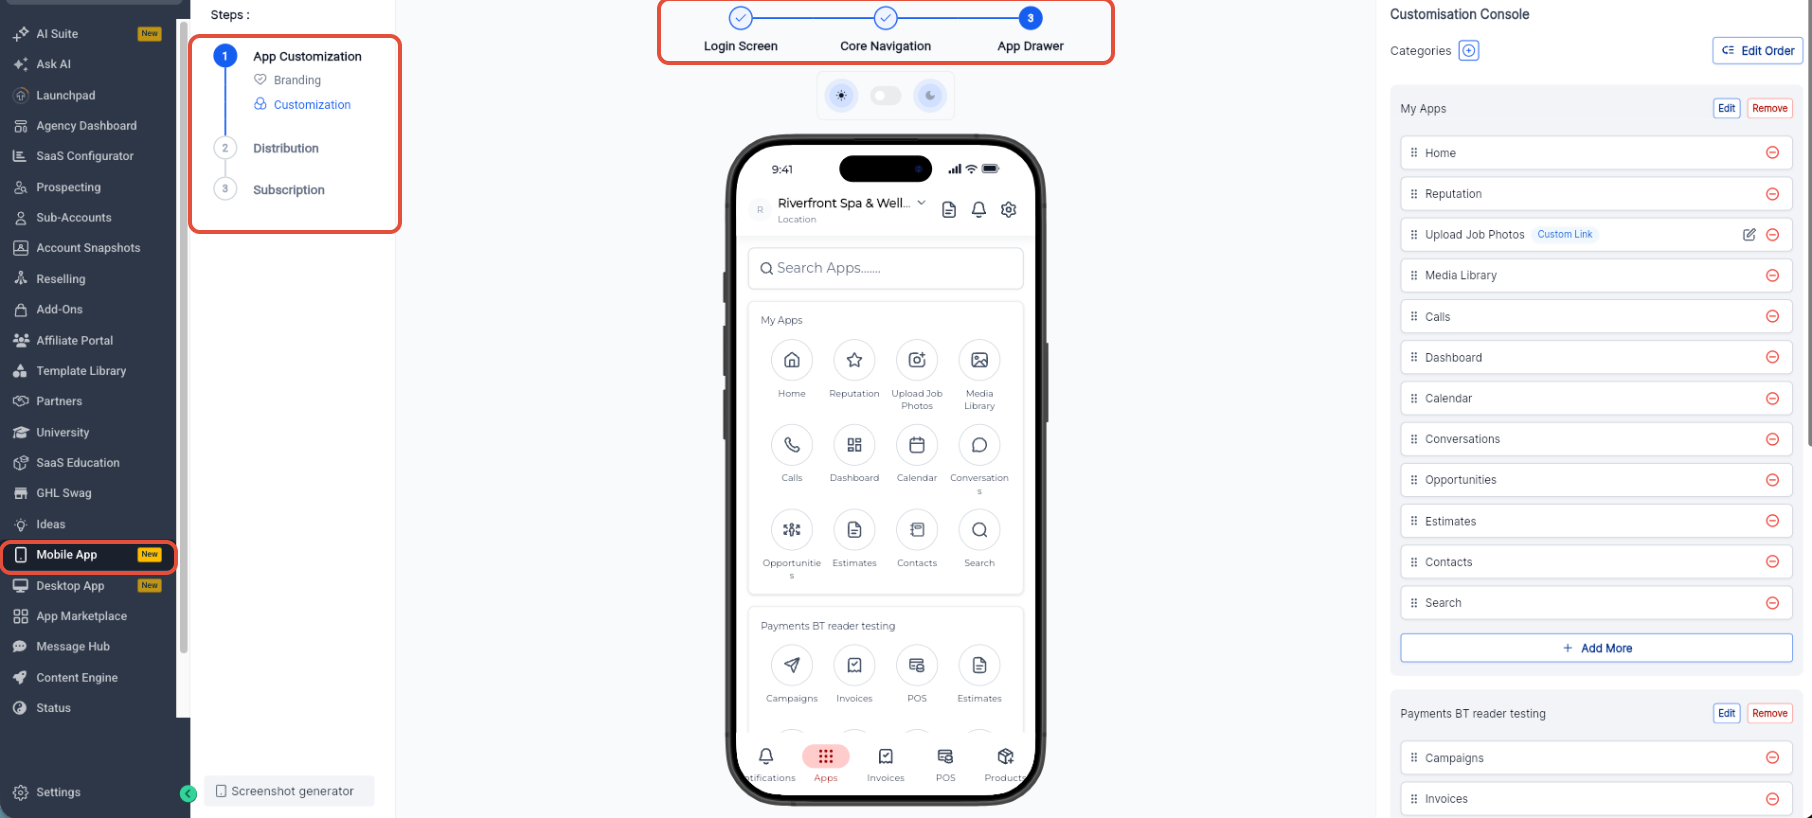
The App Drawer provides access to additional supported modules beyond the primary navigation and lets you organize those modules into supported categories.
- Under Customization, open App Drawer.
- Add or remove supported modules.
- Reorder modules as needed.
- Create or edit supported categories.
- Save your changes.
Add a Custom Module
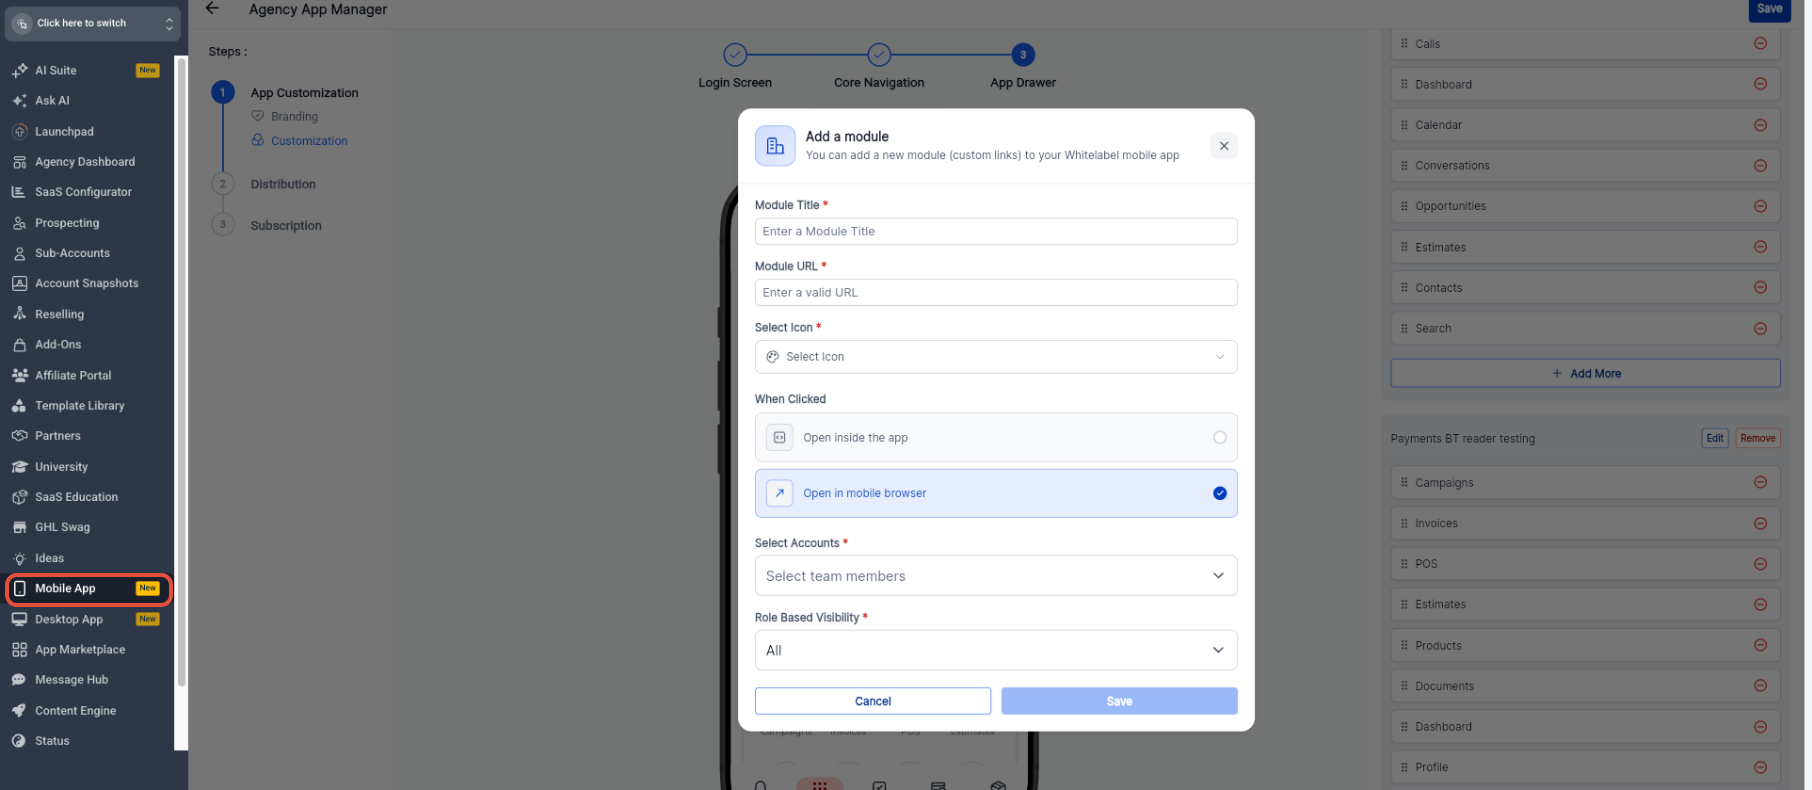
Custom modules let you add a supported external or embedded destination and control how users access that destination from the app.
- From the applicable App Drawer category, click Add More.
- Enter the Module Title.
- Enter the Module URL.
- Select an icon.
- Choose Open inside the app or Open in mobile browser.
- Configure the applicable account selection and role-based visibility.
- Click Save.
Before building: Confirm that all branding, navigation, login-screen, App Drawer, and custom-module changes have been saved before generating a new app build.
How To Prepare, Build, and Publish Your Whitelabel Mobile App
The self-service publishing workflow connects your app customization to store listing information, Apple and Google account connections, app builds, testing, and public releases.
Complete the Store Profile
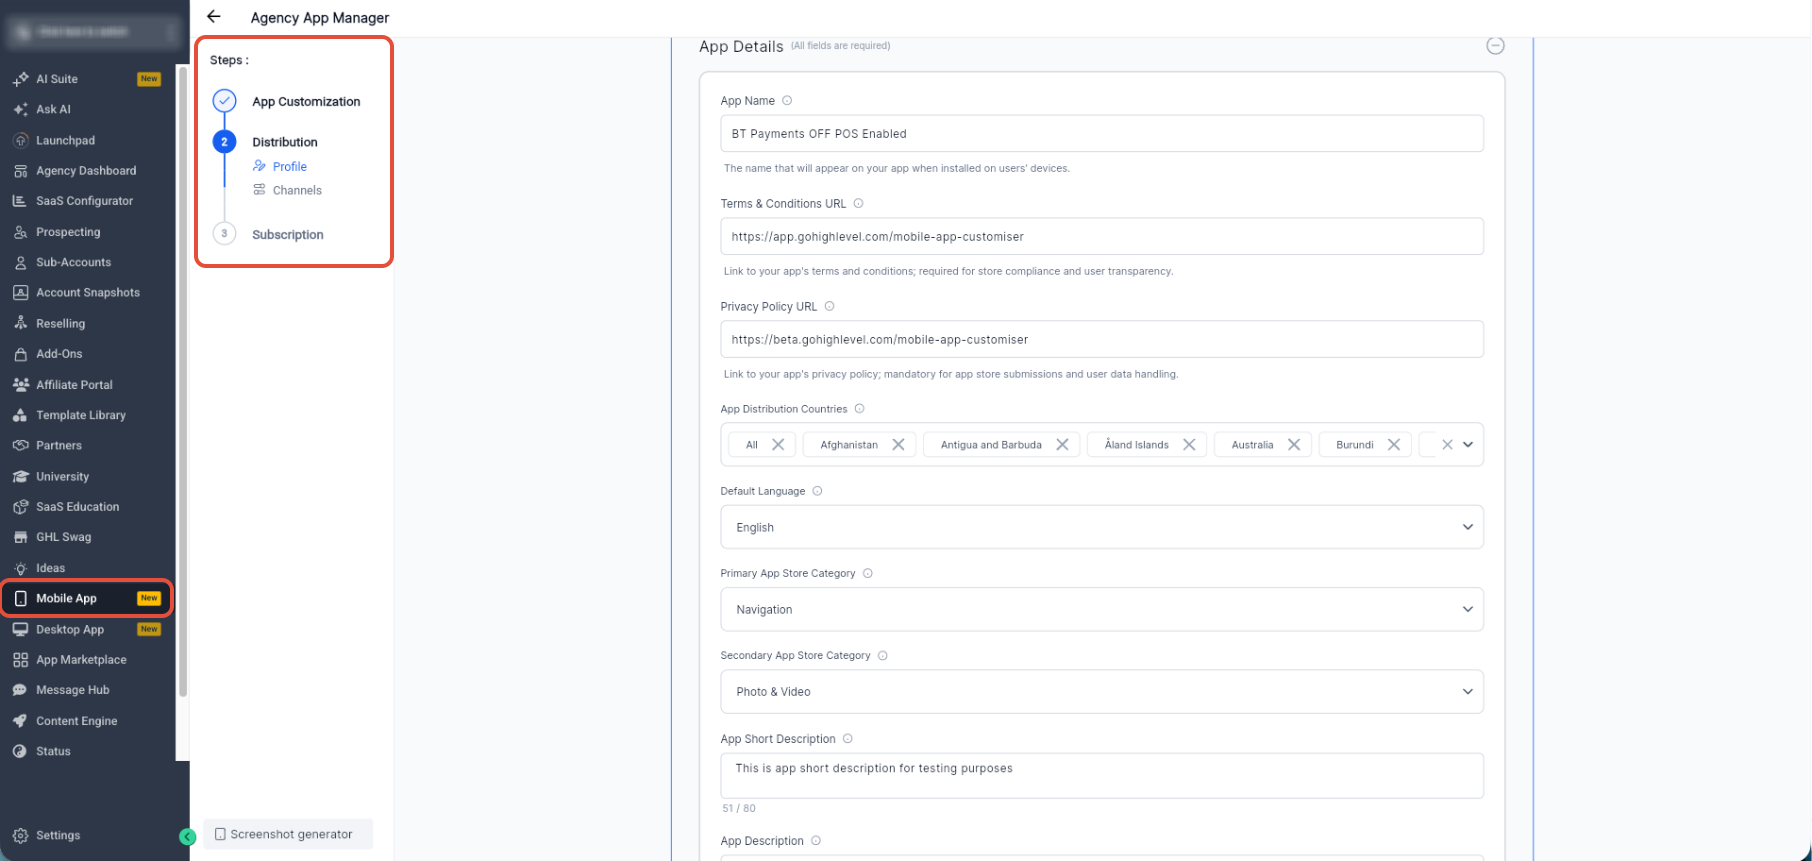
Store-profile information supplies the app details, policy links, distribution settings, and listing information needed to prepare the app for its public store presence.
- From Agency View, select Mobile App.
- Open your Whitelabel Mobile App.
- Go to Distribution → Profile.
- Enter the App Name.
- Add the Terms & Conditions URL.
- Add the Privacy Policy URL.
- Select the applicable app distribution countries.
- Select the default language.
- Configure the applicable app-store categories.
- Complete the short description and remaining required store information.
- Save the profile.
Connect Your App Stores
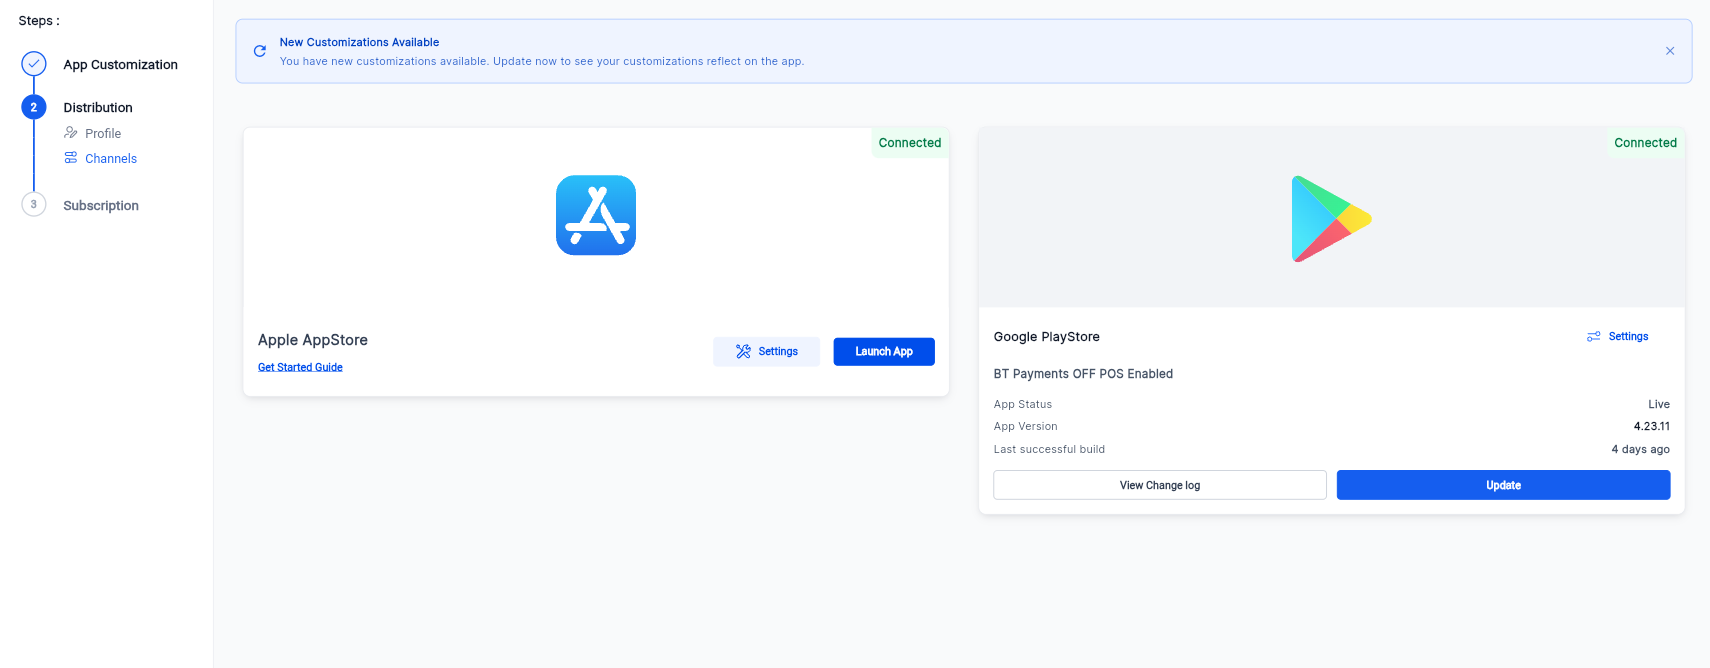
Store connections give the customizer access to the Apple and Google accounts used to prepare, submit, and maintain your app releases.
- Go to Distribution → Channels.
- Start or review the connection for Apple AppStore.
- Complete the required Apple connection workflow.
- Start or review the connection for Google PlayStore.
- Complete the required Google connection workflow.
- Confirm that the applicable store connections show as Connected.
Store requirements: Apple and Google have additional account, identifier, credential, and publishing requirements. Complete the applicable store-connection requirements before starting a release.
Build and Launch Your App
The release workflow prepares the configured app for the selected store and provides progress details while the app package is being created.
- Open Distribution → Channels.
- Select the applicable store release action, such as Launch App or Update.
- Start the app build workflow.
- Monitor each build stage as the system prepares the app.
- Use Continue in background when you do not need to remain on the build screen.
- After the build is ready, continue through the applicable store upload and review workflow.
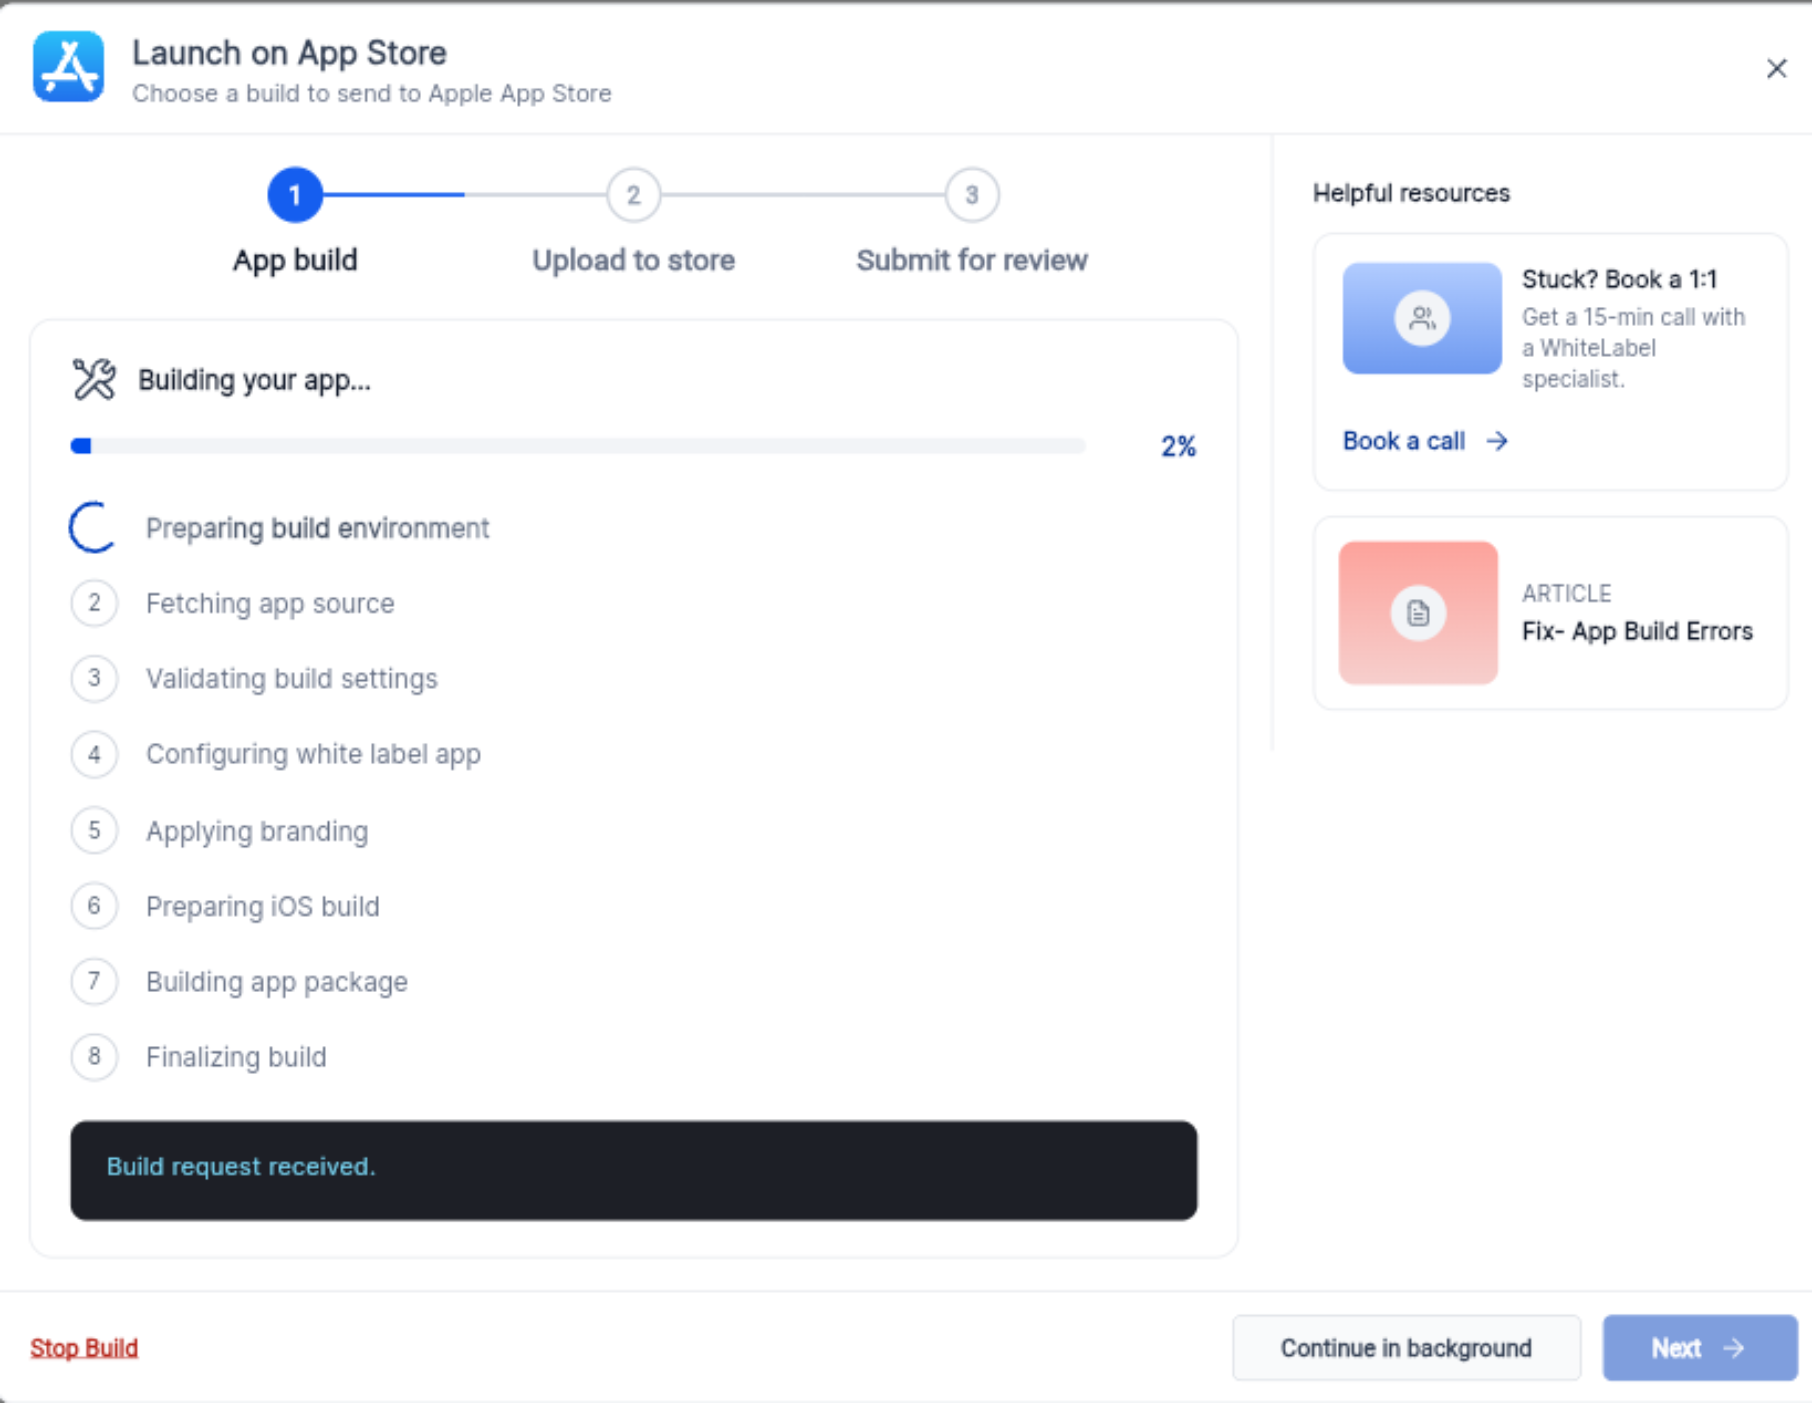
If a build fails: Review the build-progress information and available troubleshooting resources, correct the identified issue, and retry the build when ready.
Frequently Asked Questions
Need Help?
- Customise App is unavailable: Confirm that the applicable Custom Agency App subscription is active and that you are working from the correct agency-level Mobile App area.
- Branding changes are not visible in the released app: Confirm the changes were saved, then use the applicable build or update workflow to push the updated configuration.
- You cannot add another navigation module: Review the current Top or Bottom Navigation configuration. The interface can prevent additional modules after the supported maximum has been reached.
- A custom module is not visible to the expected users: Review the selected accounts and Role Based Visibility settings for that module.
- A store does not show as Connected: Review the applicable Apple or Google developer-account connection, required permissions, and store configuration before starting a release.
- A build stops or fails: Review the current build stage and available troubleshooting details, correct the identified configuration issue, and retry the build.
- The build completed but the app is not publicly available: Confirm that the applicable store upload, review, and release steps have also been completed. Building the app does not by itself complete the store publication process.