
Learn how to create a course, organize content with the Course Editor, publish an offer, deliver course access through the Client Portal, automate enrollment, and access additional course training.
Course upload limits vary by file type. Supported Course video formats currently allow files up to 5GB, while other file types can have lower limits. Check the applicable media-storage limits before uploading large course files.
2. Key Benefits of Courses
3. Prerequisites and Limitations
4. How To Set Up and Launch a Course
5. Build and Organize Your Course Content
6. Create and Publish a Course Offer
7. Course Access and the Client Portal
8. Access Additional Course Training
9. Frequently Asked Questions
10. Need Help?
What Are Courses and Membership Sites?
Courses provide the tools to build and deliver structured online learning content. Course creators can organize content into modules and lessons, add videos and other learning materials, create offers, and provide free or paid access to learners.
Course creation and management are available under Memberships → Courses in the sub-account.
Learners can access membership courses through the customer-facing experience, including the Client Portal.
Courses can also be made available through the Learning experience in Communities when applicable.
Key Benefits of Courses
Course creation, monetization, and customer access work together so businesses can manage learning experiences without separating course content from the rest of the customer journey.
- Flexible Course Creation: Build structured courses with modules, lessons, videos, quizzes, assignments, and downloadable learning materials.
- Focused Course Editing: Use the Course Editor's course map and editing workspace to navigate and organize course content efficiently.
- Flexible Monetization: Create free, one-time, or recurring course offers based on how you want customers to access your content.
- Automated Access: Connect purchases to course offers or use workflows to grant course access automatically.
- Centralized Learner Experience: Customers can access courses alongside other supported resources through the Client Portal.
- Community Learning Options: Courses can also be made available through the Learning area in Communities.
Prerequisites and Limitations
Preparing your course content, access model, and payment configuration before building helps reduce setup changes later in the launch process.
Before creating a course, make sure:
- You have access to Memberships → Courses in the appropriate sub-account.
- Your course content is prepared, including videos, lessons, PDFs, quizzes, assignments, or other resources you plan to use.
- You have a course thumbnail available if you want to add one.
- A supported payment provider is connected if you plan to sell paid course access.
- You know whether learners will receive free, one-time, or recurring access.
Current considerations include:
- UI labels and button names can vary by account rollout.
- Supported Course video formats have a maximum file size of 5GB.
- Other Course file limits vary by file type.
- Advanced access methods, Client Portal configuration, Communities, and workflow-based enrollment have separate configuration options and may require additional setup.
How To Set Up and Launch a Course
Creating the course establishes the learning product that contains your modules, lessons, and educational content. Build the course structure before publishing an offer so learners receive the intended experience.
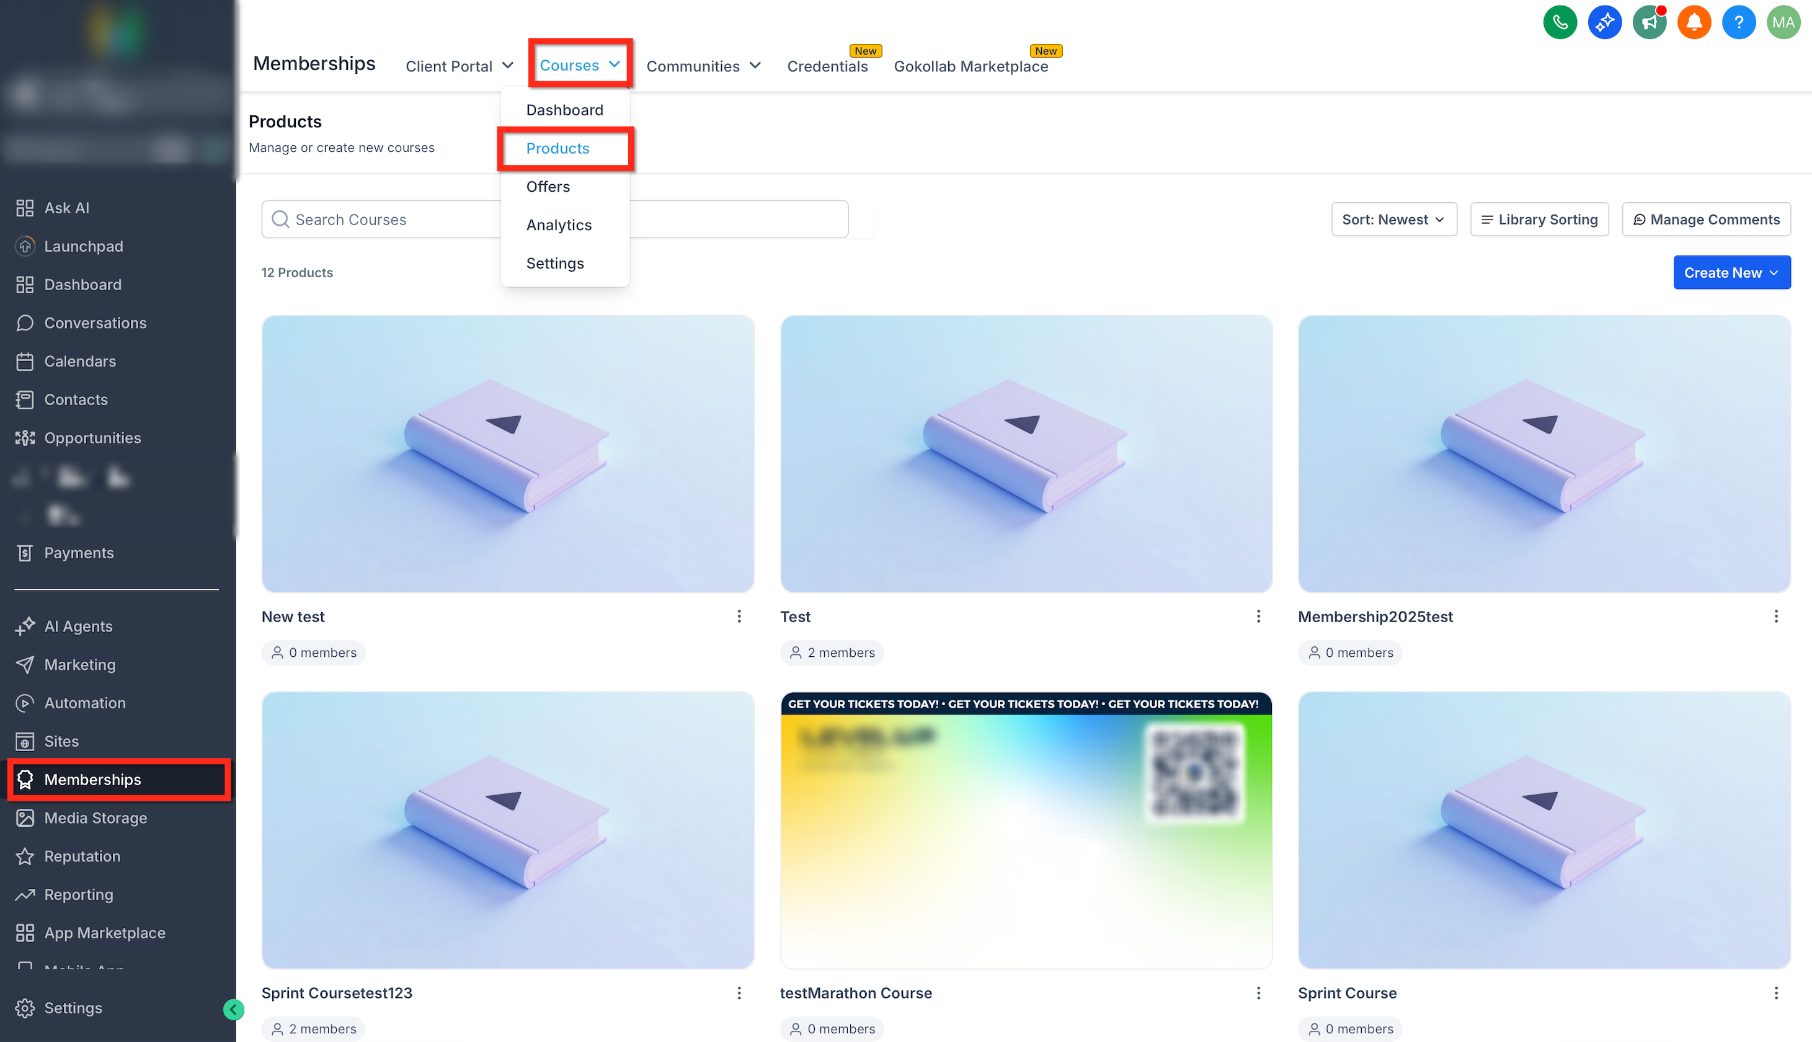
Step 1: Open Courses
Start from the Courses product area so the new course is created inside the correct sub-account.
- From the Sub-Account View, click Memberships.
- Select Courses.
- Open Products.
Step 2: Start a New Course
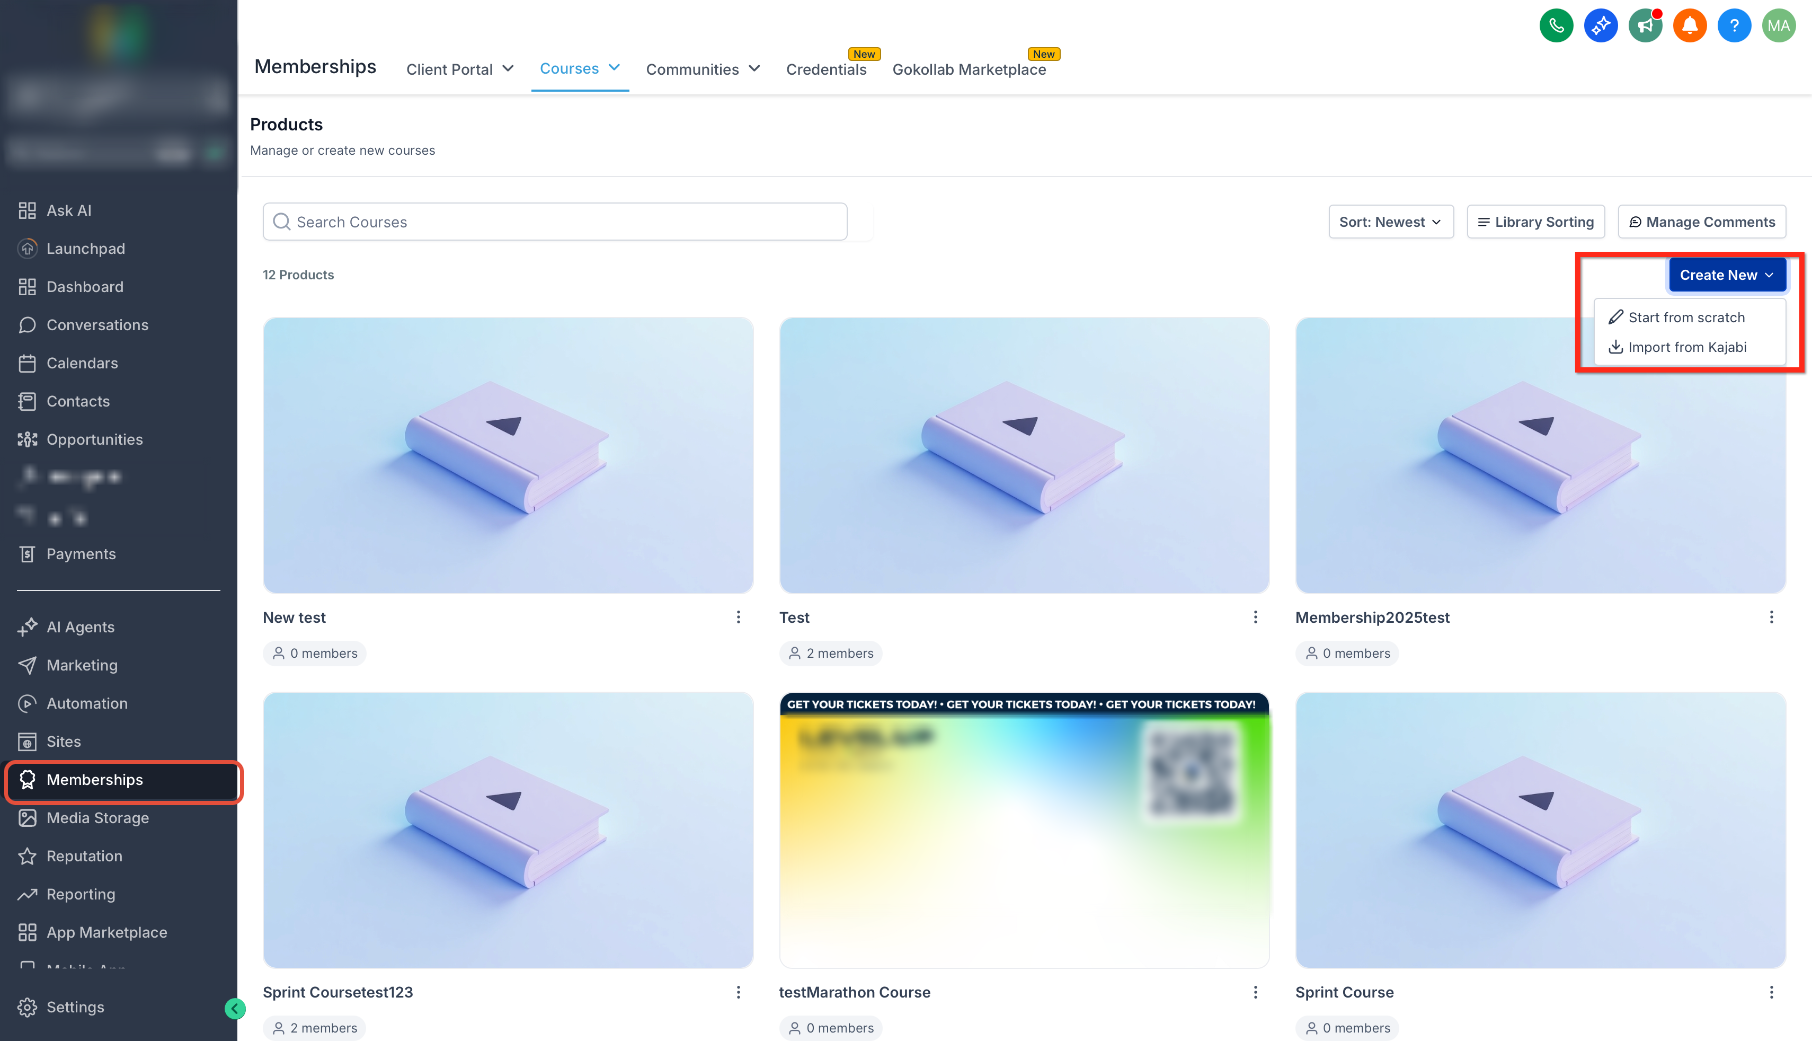
Starting from scratch gives you a new course structure that you can configure with your own title, description, pricing, thumbnail, and learning content.
- Click Create New.
- Select Start from scratch.
Step 3: Enter the Course Details
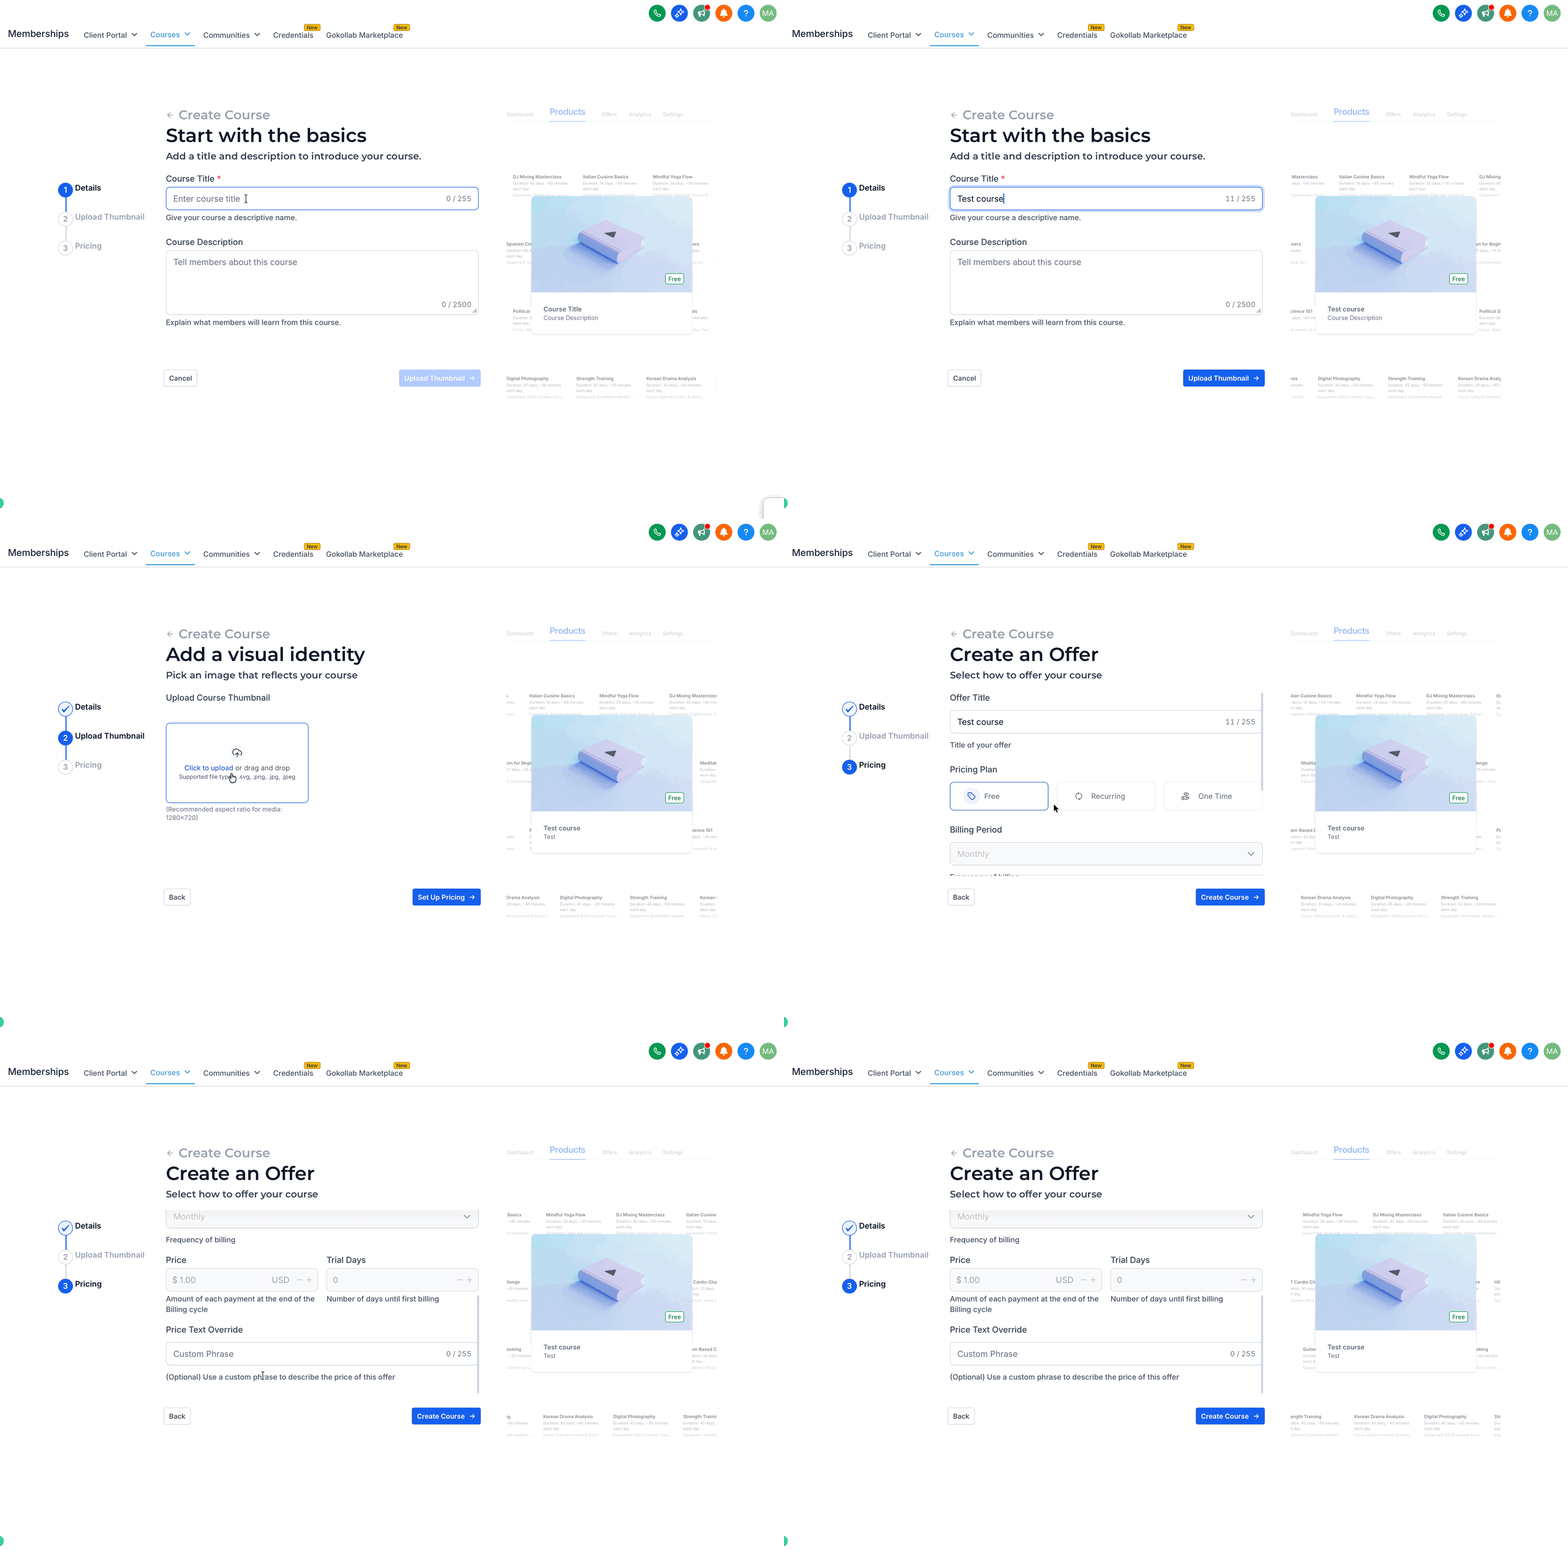
Course details identify the learning experience and establish the initial configuration learners will see when accessing the course.
- Enter the Course Title.
- Enter the Course Description.
- Upload a course thumbnail if desired.
- Complete the available pricing and course settings.
- Click Create Course.
Build and Organize Your Course Content
A clear course structure helps learners move through your material in a logical order. The Course Editor keeps the course map and selected content visible in one workspace, reducing the need to move between separate screens.
Open the Course Editor
Opening the editor gives you access to the course structure and individual content items from the same focused workspace.
- Go to Memberships → Courses → Products.
- Select the course you want to edit.
- Open the course editor.
Use the Course Map
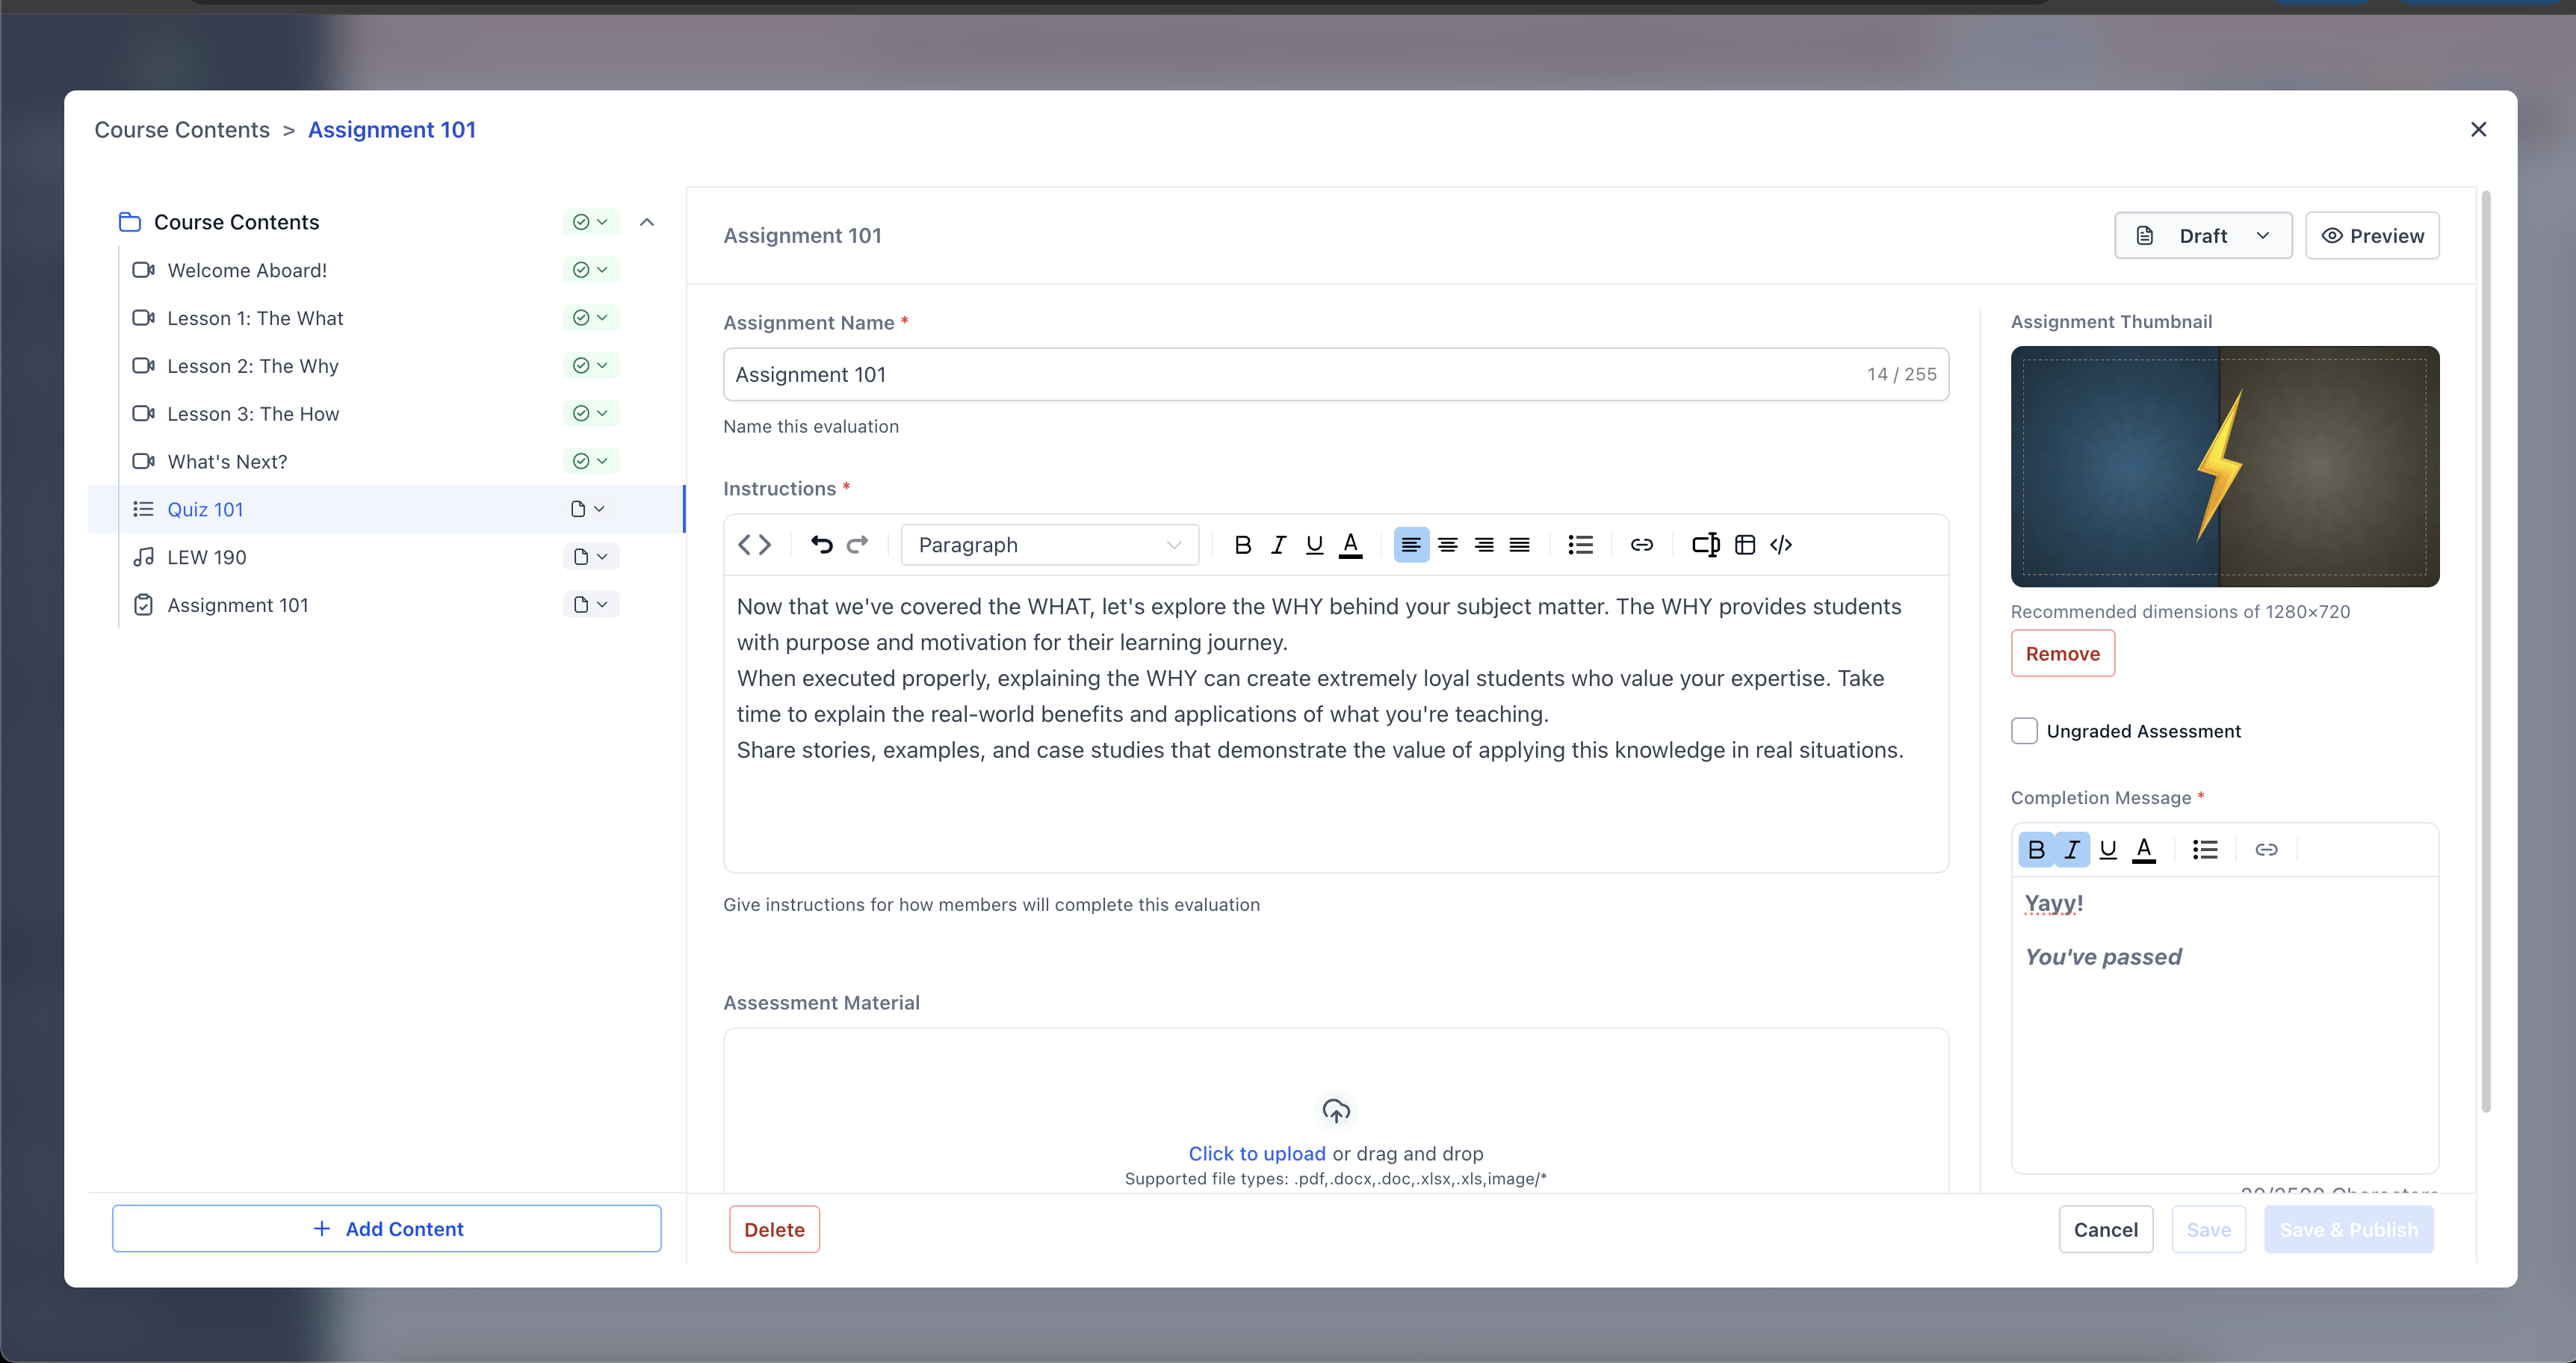
The Course Map acts like a table of contents for the course and helps you move between content, reorganize items, and review supported status information.
- Use the Course Map on the left to review the course structure.
- Select lessons, quizzes, assignments, or other supported content to edit them.
- Use drag-and-drop controls to reorganize supported content.
- Expand or collapse modules to focus on a specific portion of the course.
- Review supported content status information and quick actions.
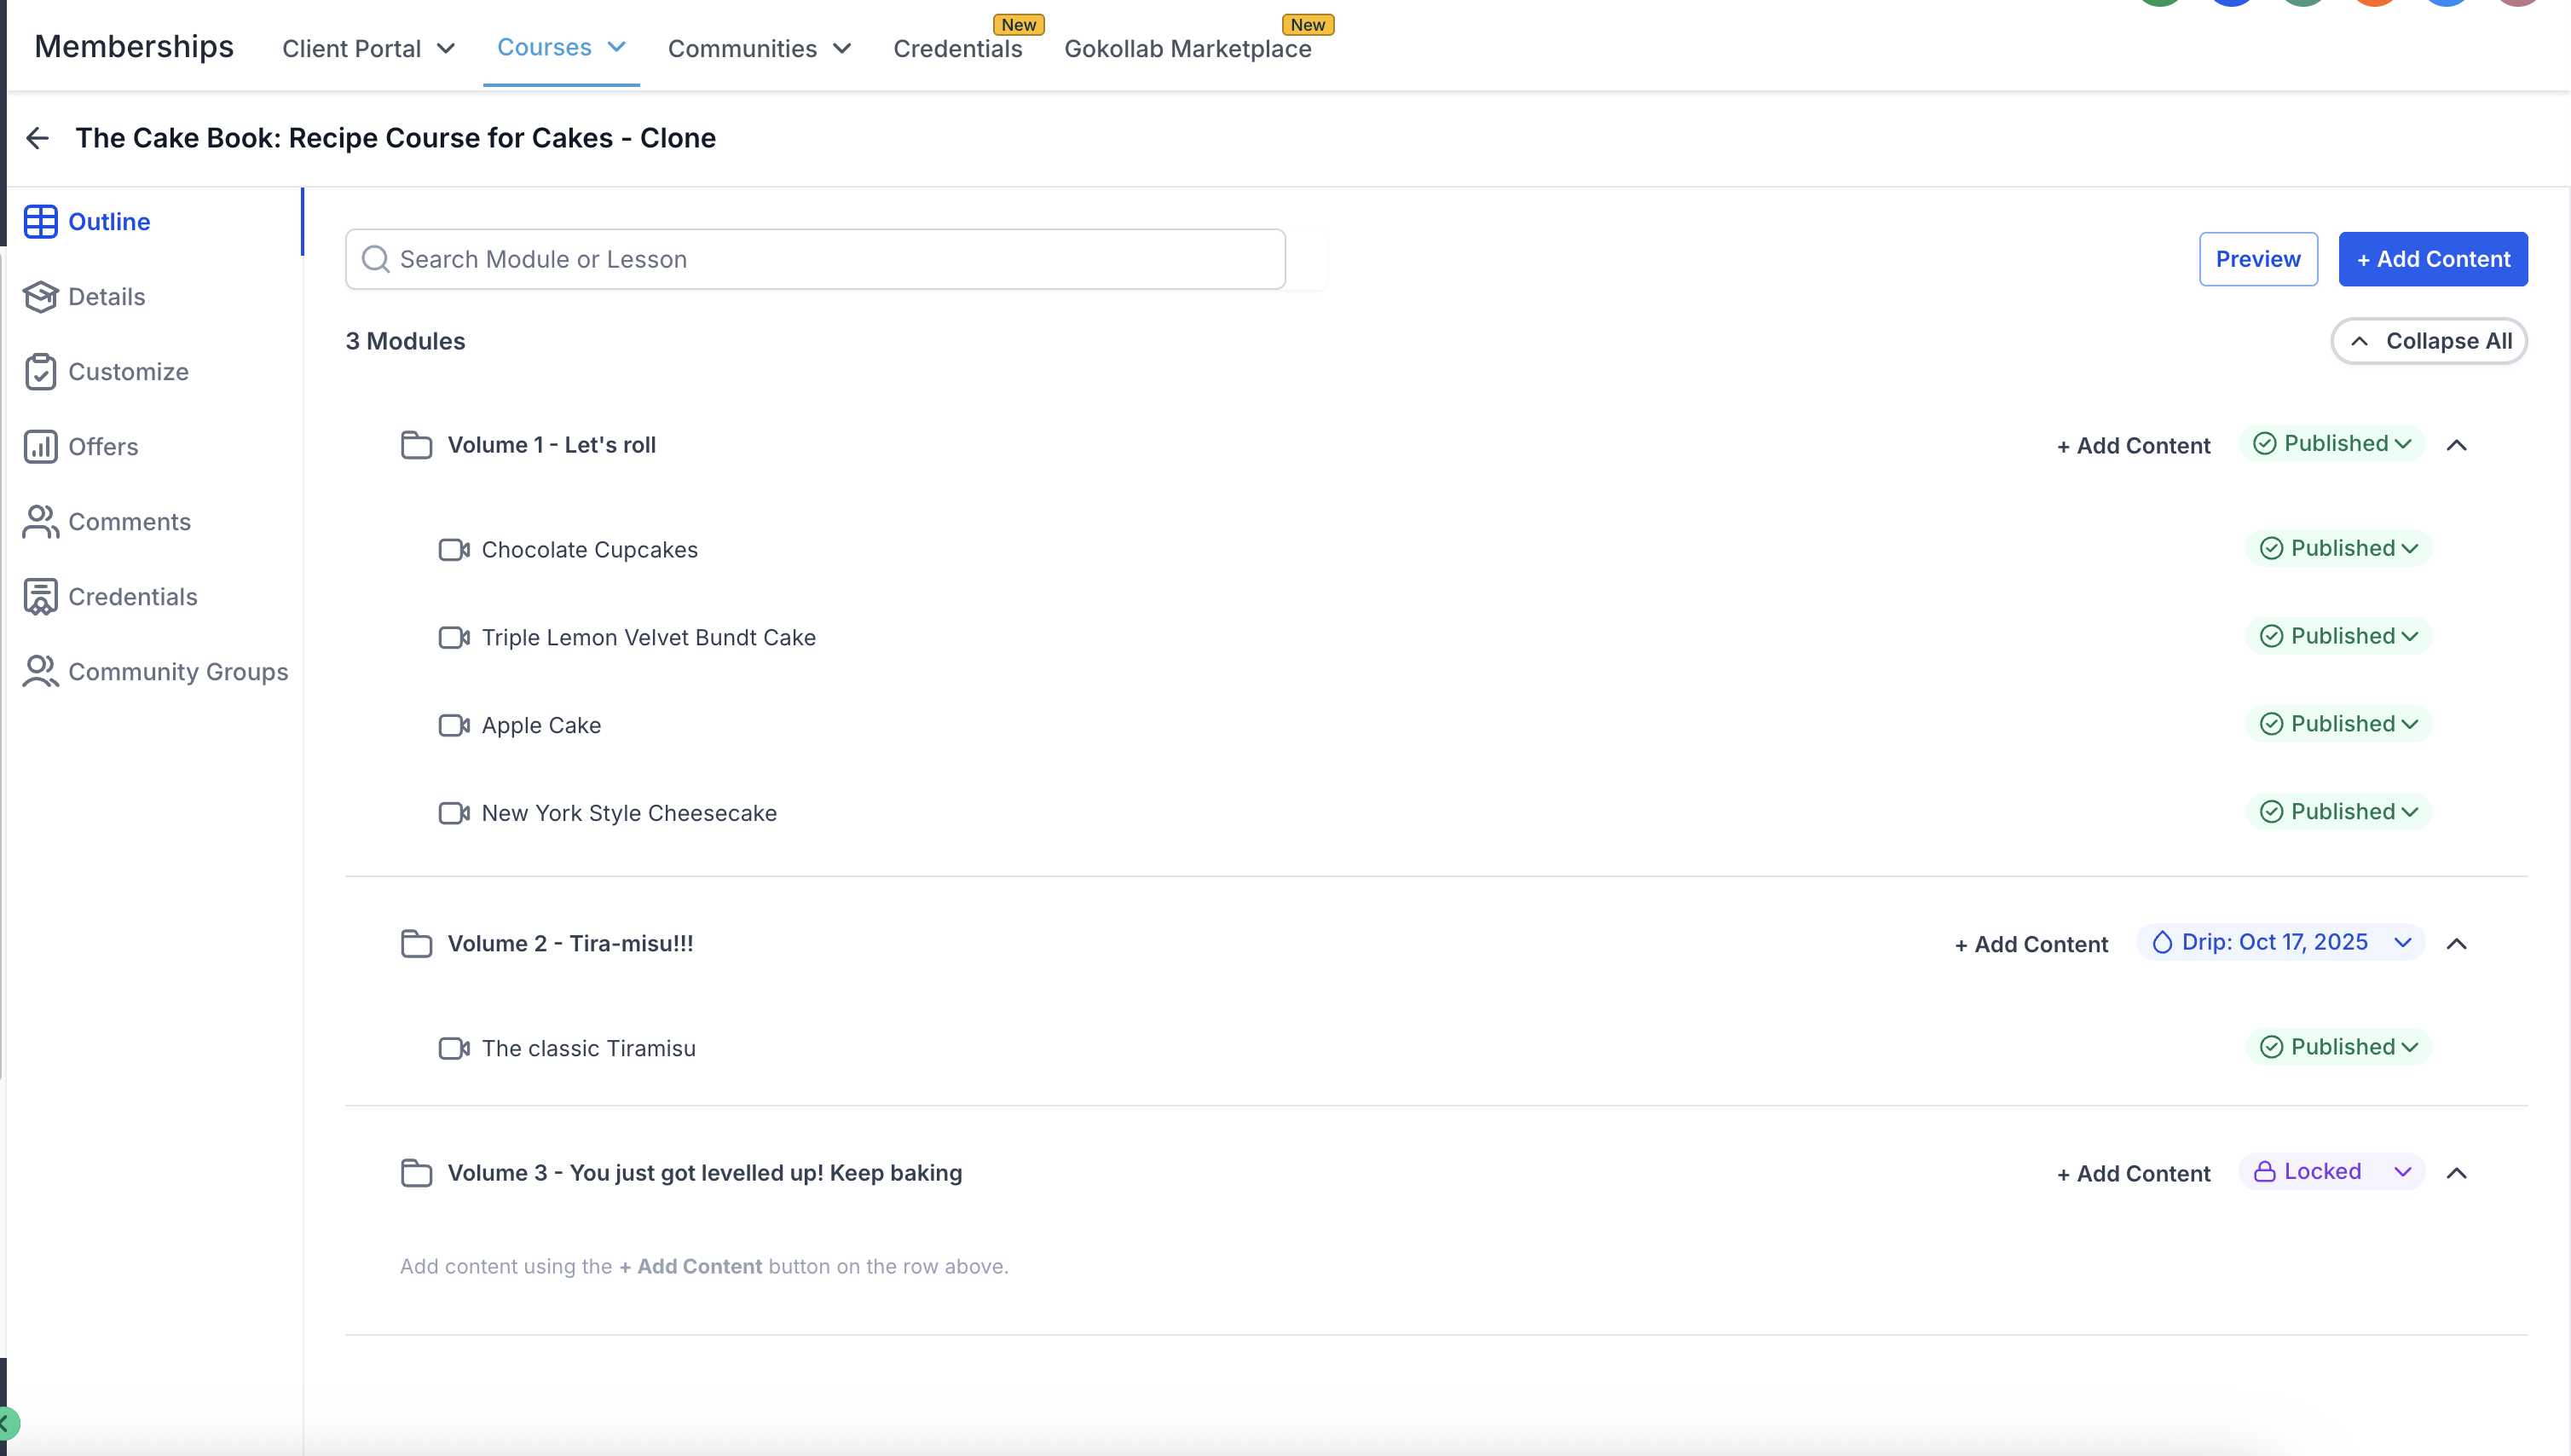
Course media: Supported Course video formats currently allow files up to 5GB. Other Course file types can have different upload limits.
Create and Publish a Course Offer
An offer determines how learners receive access to your course. After the course content is ready, create an offer to package one or more courses for free or paid distribution.
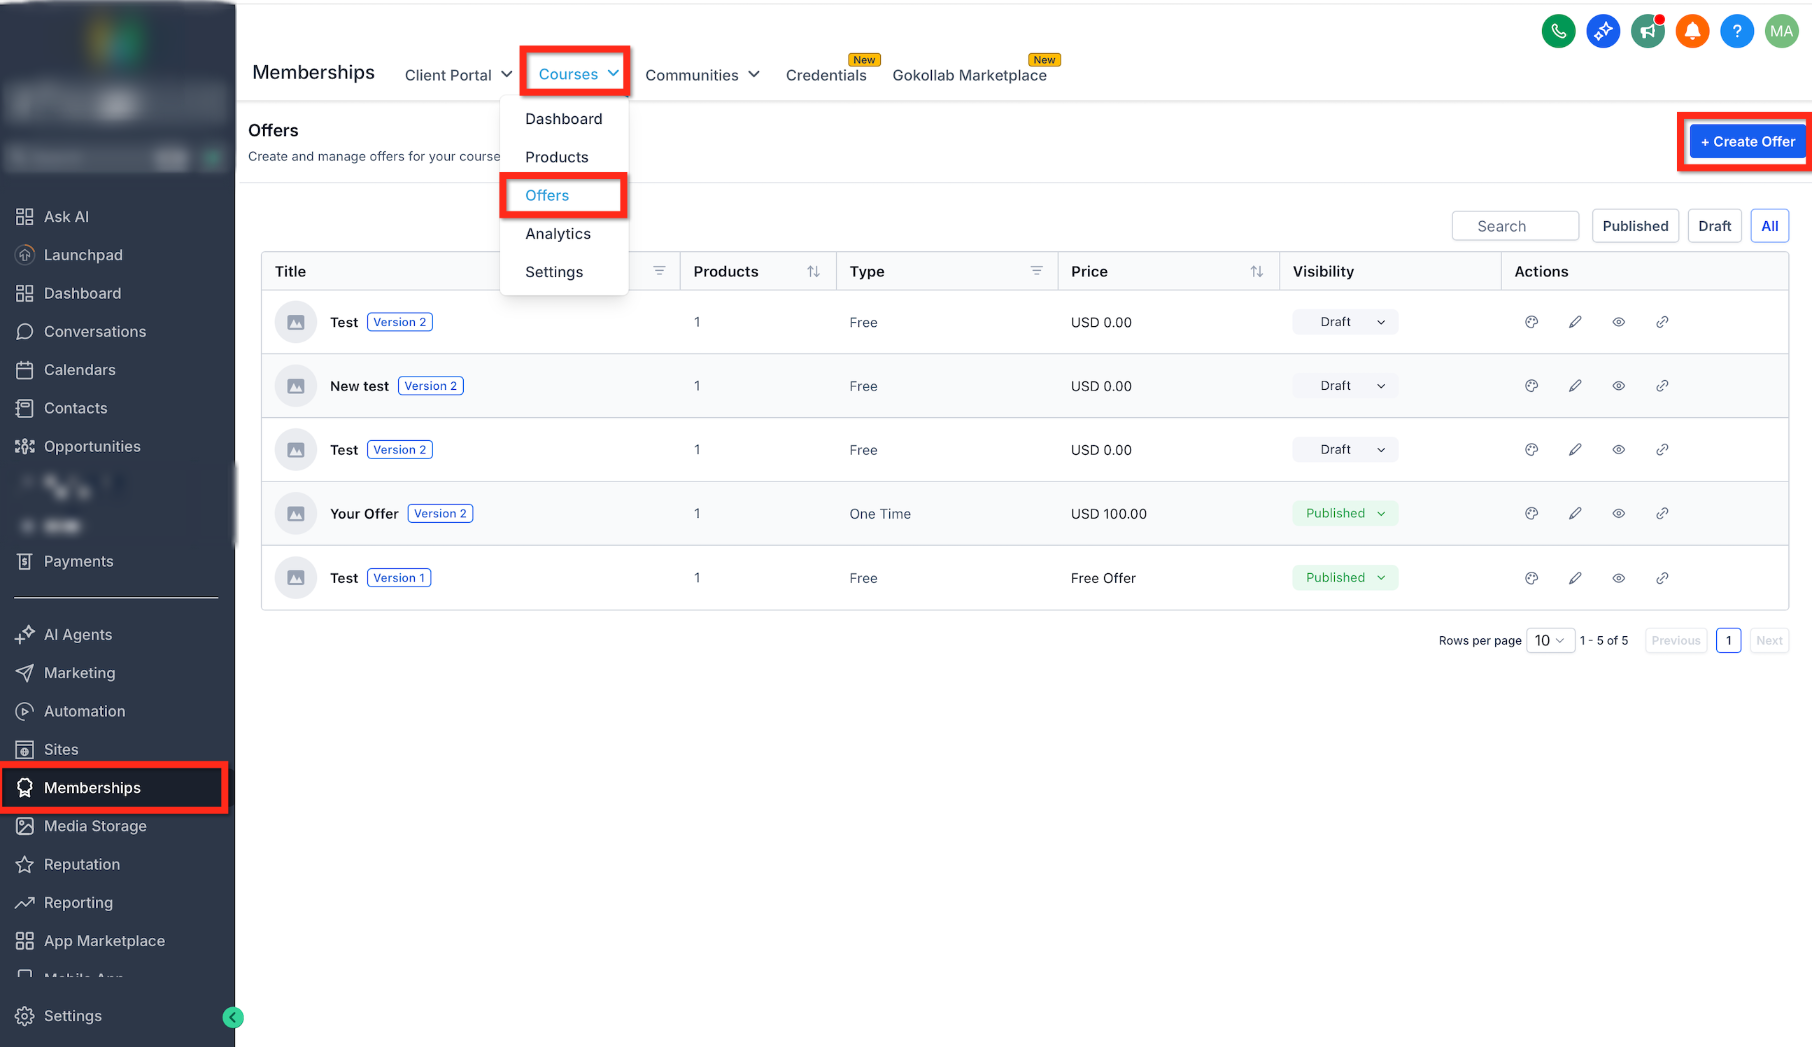
Step 1: Open Offers
Offers package your course content into the access option that learners will receive.
- Go to Memberships → Courses.
- Open Offers.
- Click + Create Offer.
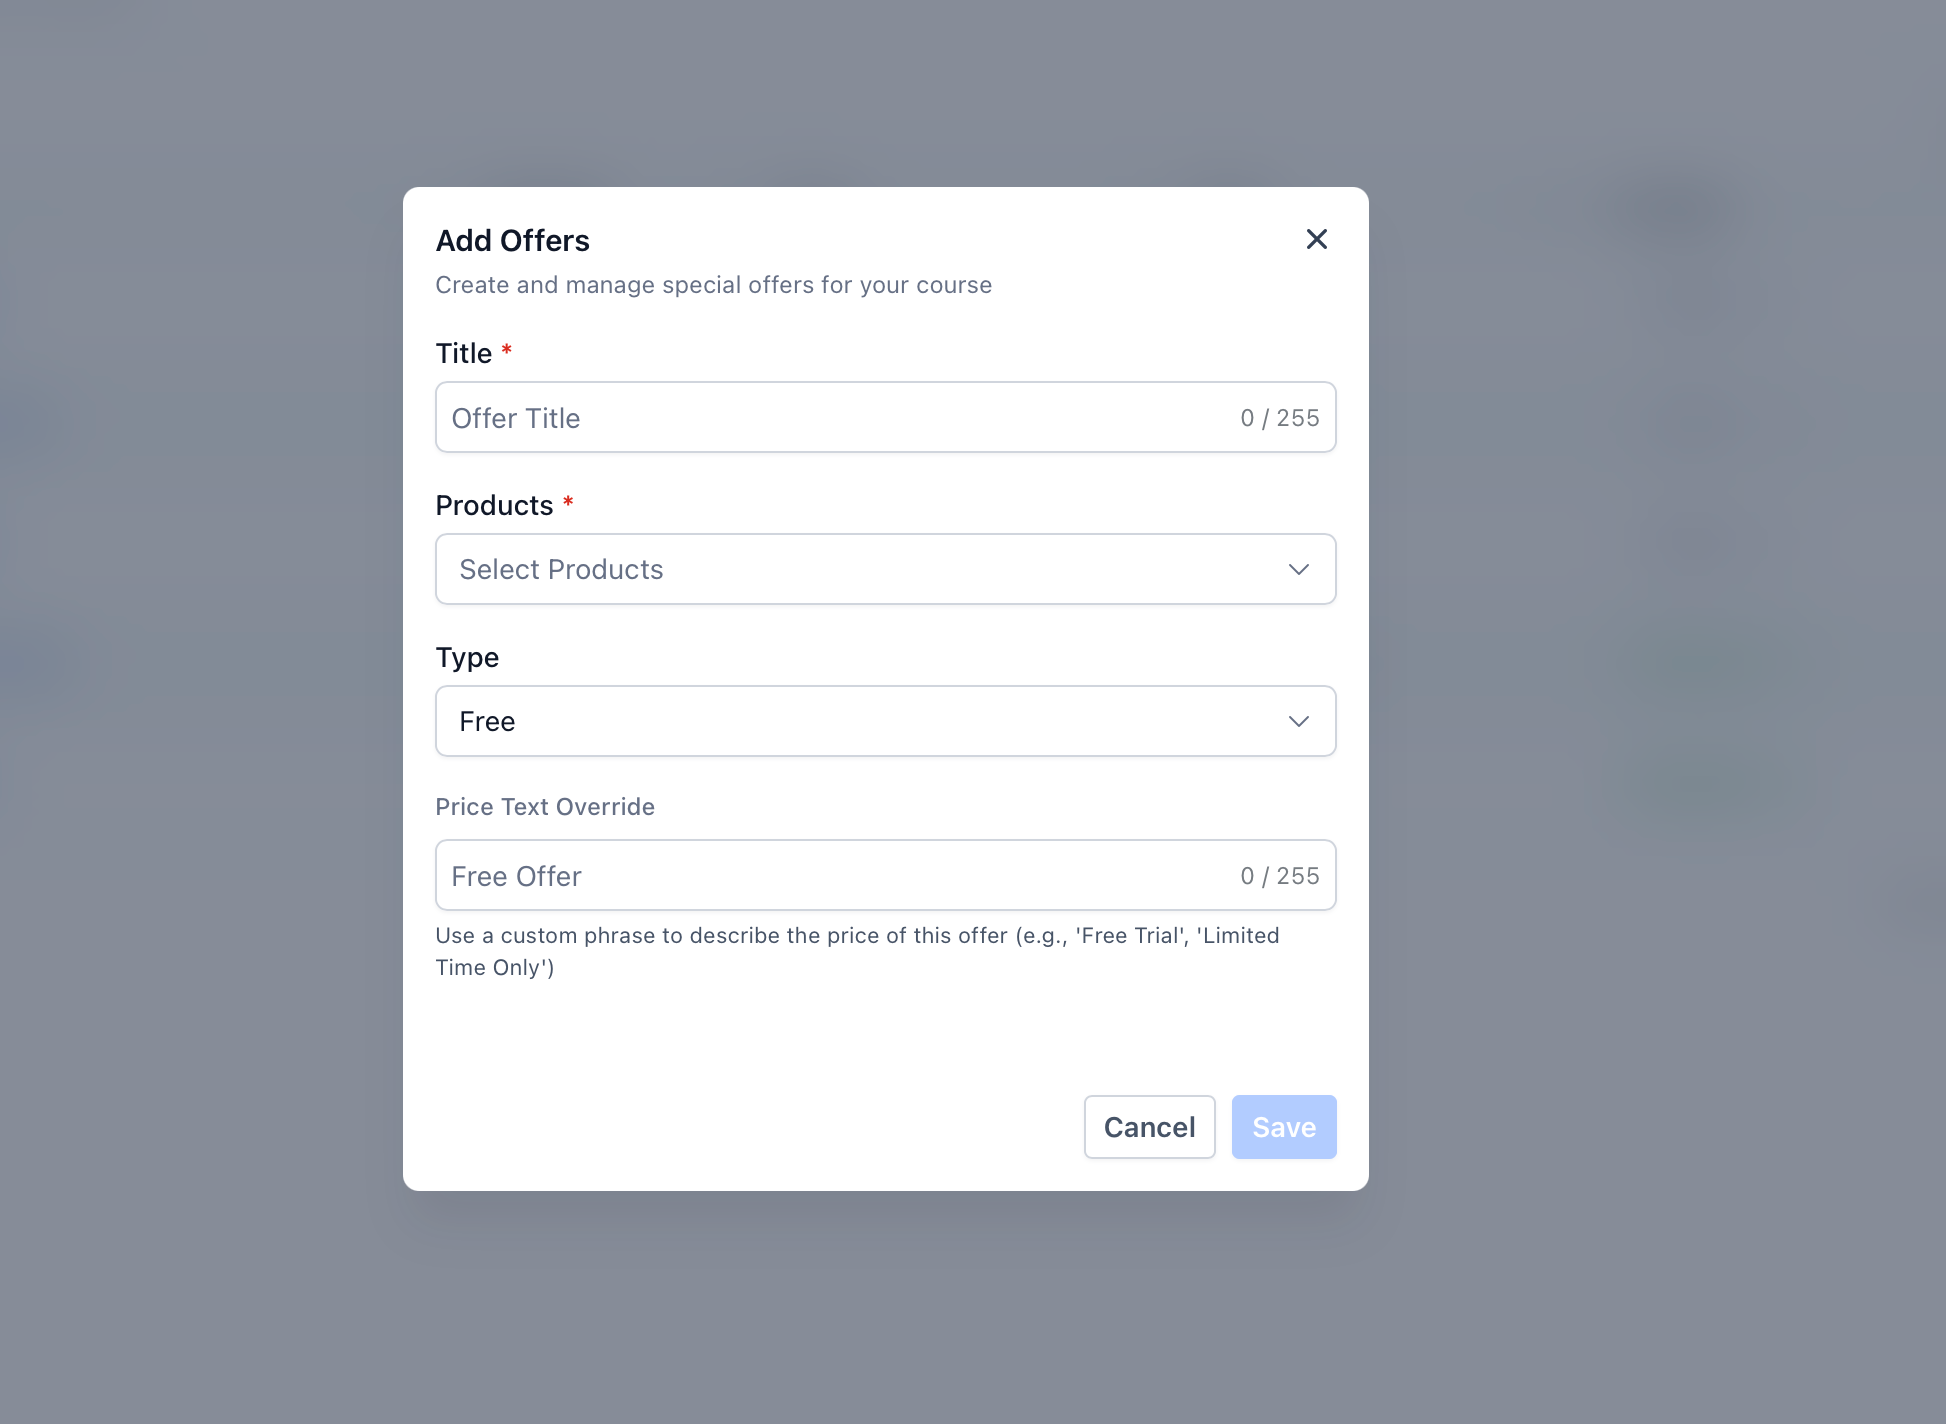
Step 2: Configure the Offer
Offer configuration determines which course products are included and how learners are charged for access.
- Enter the offer details.
- Select the course product or products you want to include.
- Configure the available pricing for the offer.
- Click Create or Save, depending on the current interface.
Step 3: Publish the Offer
Publishing makes the configured offer available for supported sales and access workflows.
- Open the offer after creating it.
- Review the attached course products and pricing.
- Change the offer from Draft to Published.
- Save the offer.
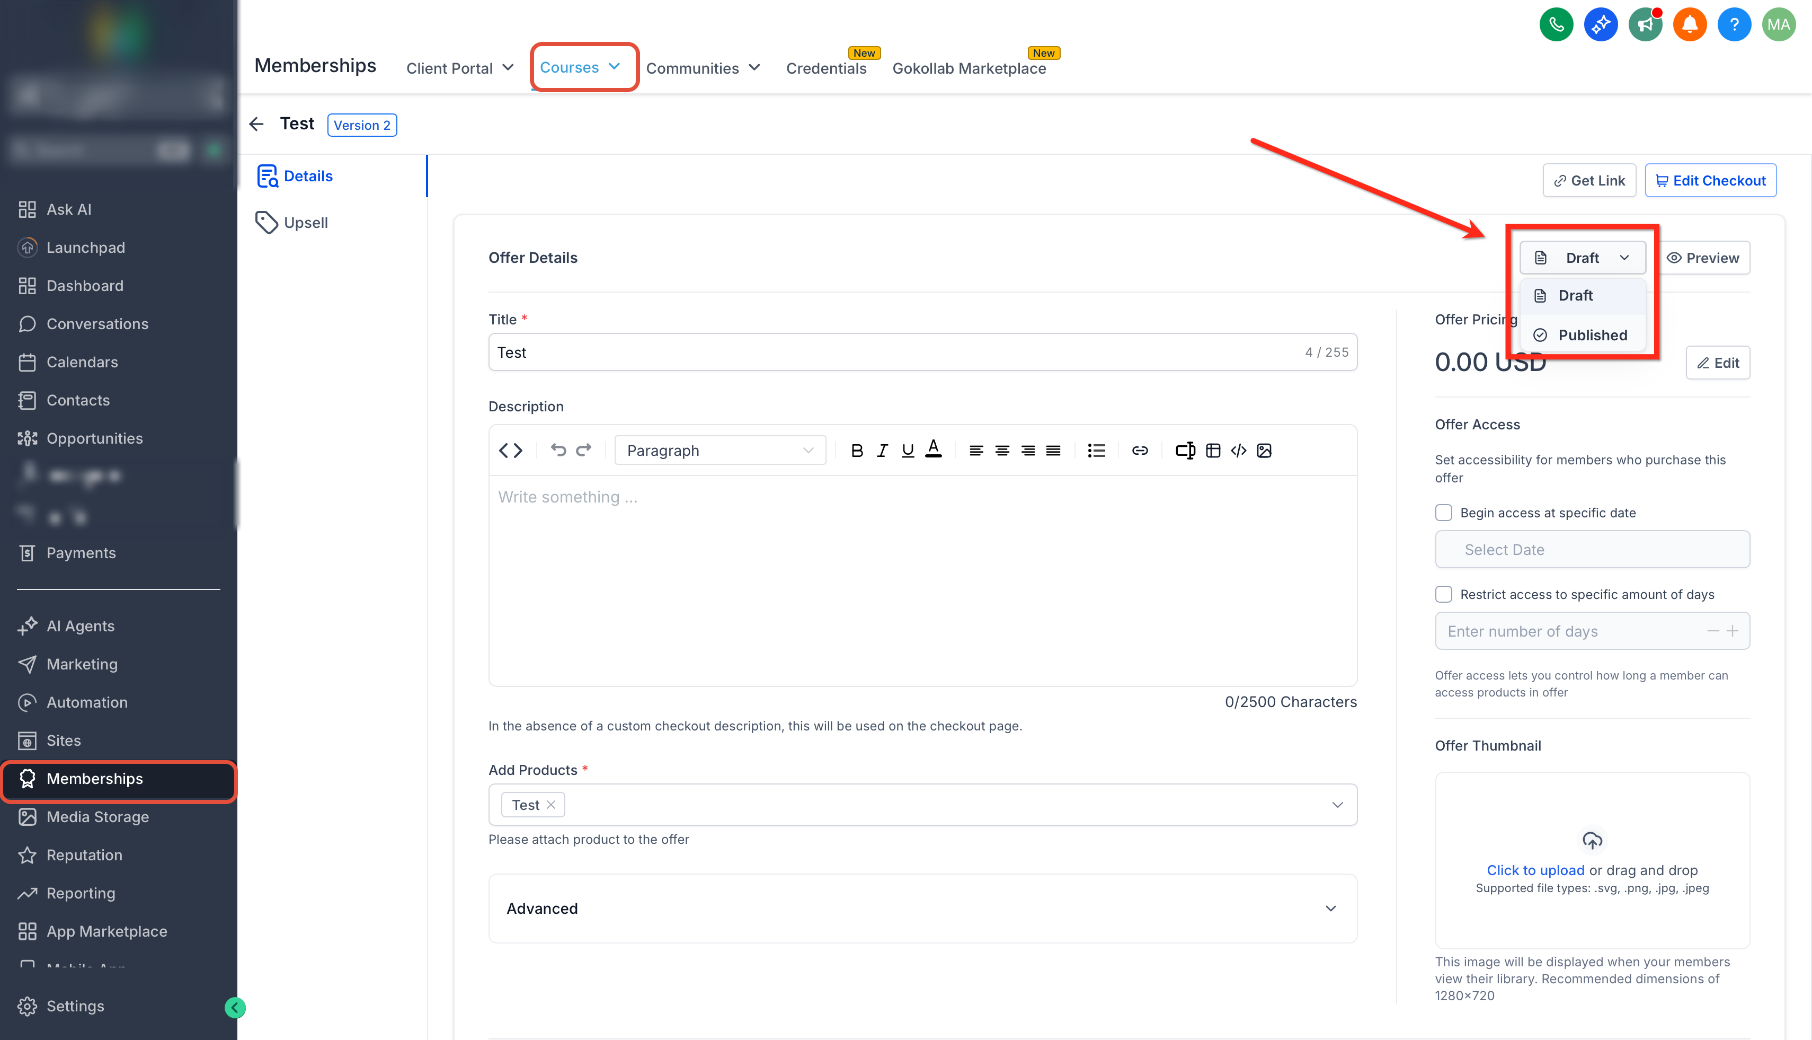
After publishing the offer, review and test the learner experience before distributing it. A separate Payments product can also be linked to a published Membership Offer when your sales flow requires it. Only published membership offers appear when selecting an offer for that configuration.
Course Access and the Client Portal
The Client Portal gives customers a centralized place to access supported resources associated with your business, including membership courses. Using the Client Portal can provide a consistent customer-facing location for course access alongside other supported client experiences.
Configure Client Portal Settings
Client Portal settings control supported customer-facing branding, domain, authentication, language, and portal behavior.
Go to: Sub-Account View → Memberships → Client Portal → Settings
From Client Portal settings, businesses can manage supported options such as branding, domain configuration, language settings, authentication options, and other portal settings.
Automate Course Access
Workflows can grant course access automatically when a contact meets the trigger and conditions you configure.
Use the Course Grant Offer workflow action to grant access to an existing course offer when the appropriate automation conditions are met.
Legacy Memberships: Businesses migrating from Legacy Memberships should review the applicable Client Portal migration guidance before changing their existing course-access experience.
Access Additional Course Training
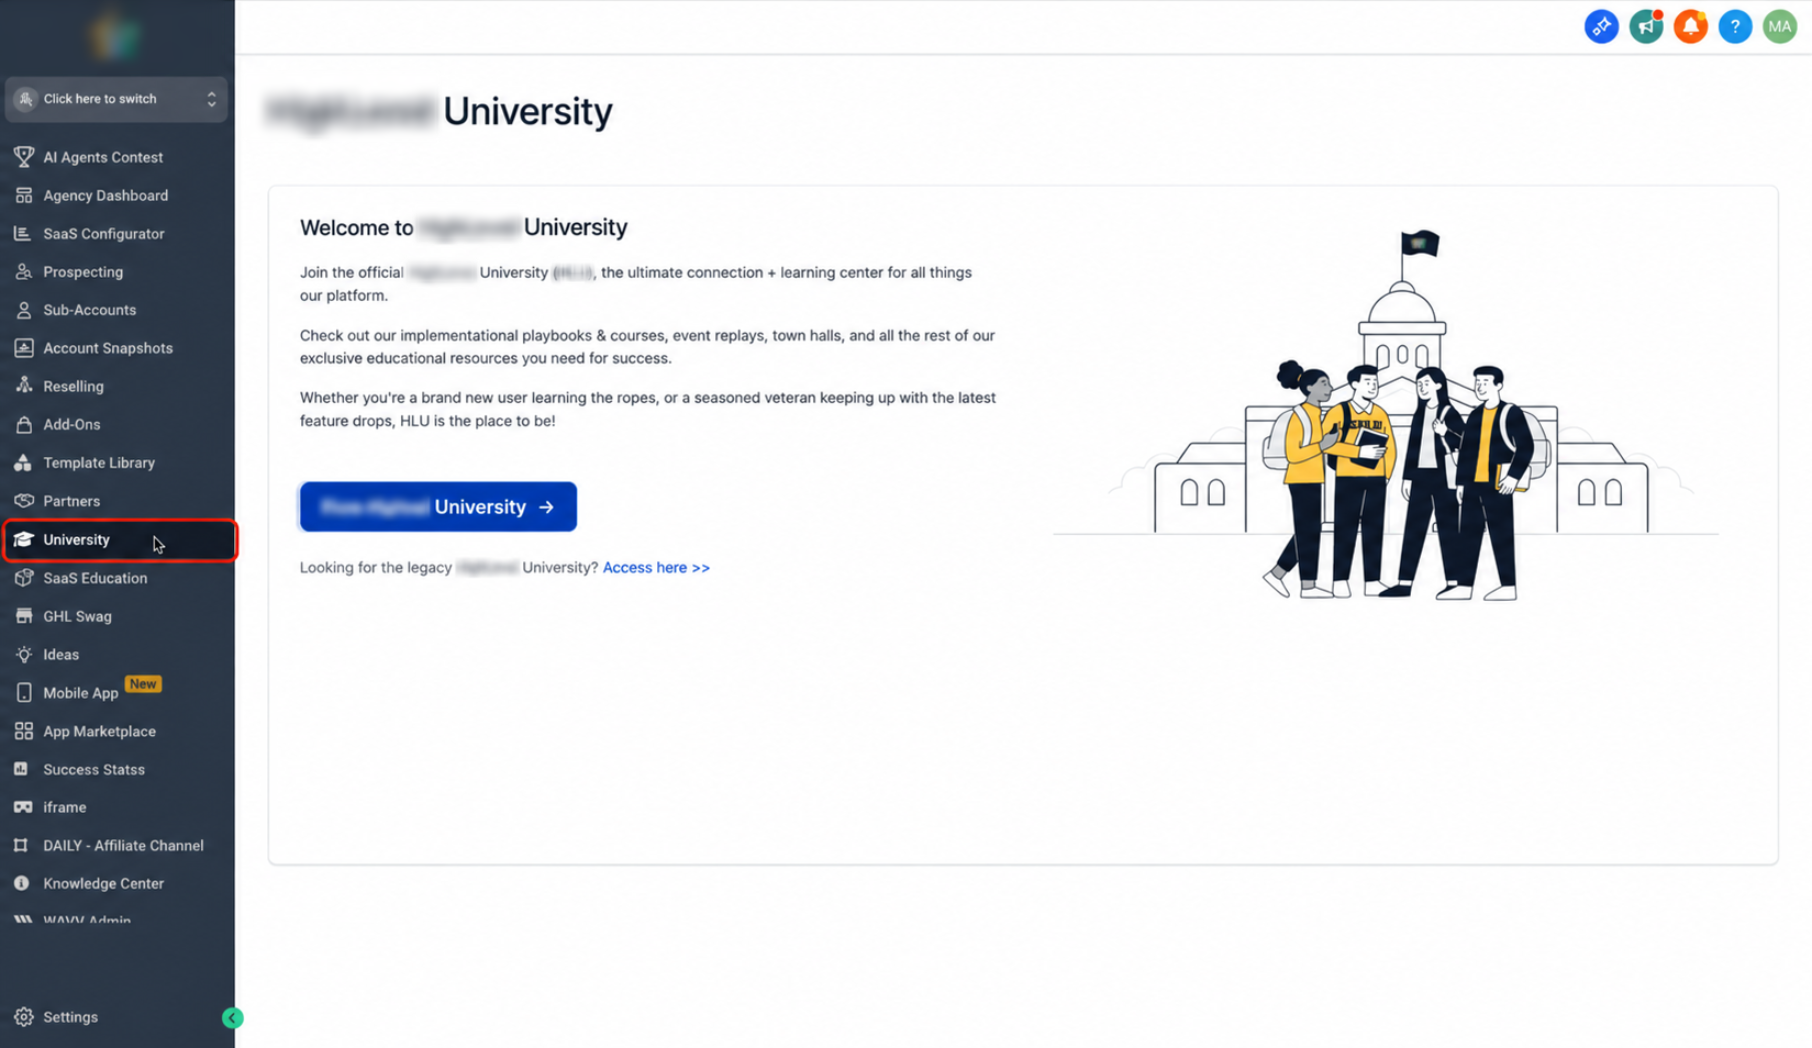
The University area provides additional guided training for users who want a video-based walkthrough of creating courses and building offers. The Course Creator's Playbook is available from the learning portal connected to an Agency account.
- From Agency View, click University.
- Use the available option to open the University training portal.
- The training portal opens in a new browser tab.
- In the top navigation menu, click Learning.
- Locate The Course Creator's Playbook.
- Click Open to begin the course.
Frequently Asked Questions
Need Help?
- Courses or Products are not visible: Confirm you are working in the correct sub-account and that your user has access to the Memberships and Courses areas.
- A course is created but learners cannot access it: Confirm the learner has access through the applicable published offer, purchase flow, or Course Grant Offer workflow action.
- An offer is missing from another configuration: Confirm the membership offer has been changed from Draft to Published and saved.
- A video will not upload: Confirm the file is a supported Course video format and does not exceed the current 5GB Course video limit.
- Other course files will not upload: Check the current upload limit for that specific file type because limits vary by media type.
- Client Portal access is not working as expected: Review the Client Portal settings and confirm the customer already has permission to the applicable course content.
- Workflow enrollment is not granting access: Review the workflow trigger, conditions, and Course Grant Offer action to confirm the intended published offer is selected.