
Learn the difference between Community group-access triggers and actions, create workflows that respond to access changes, automate granting or revoking access, distinguish group access from join requests and private channels, and test workflows before publishing them.
Group Access Granted and Group Access Revoked respond after a member's access changes. They are different from Requested to Join Group, which is designed for pending membership requests before access is approved. Private channel access also uses separate Community workflow triggers and actions.
2. Key Benefits of Community Group Access Automation
3. Prerequisites and Limitations
4. Community Group Access Triggers and Actions
5. How To Create a Group Access Trigger Workflow
6. How To Grant or Revoke Group Access with a Workflow
7. Best Practices for Group Access Workflows
8. Frequently Asked Questions
9. Need Help?
What Is Community Group Access Automation?
Community group access automation connects Communities with the Workflow Builder. A workflow can either respond when a member's group access changes or change the member's group access as part of a larger automated journey.
The key distinction is whether the access event should start the workflow or whether the workflow should perform the access change.
| Type | Name | What It Does |
|---|---|---|
| Trigger | Group Access Granted | Starts a workflow after a member is granted access to a Community group. |
| Trigger | Group Access Revoked | Starts a workflow after a member's access to a Community group is revoked. |
| Action | Grant Group Access | Grants a contact access to a specified Community group during workflow execution. |
| Action | Revoke Group Access | Removes a contact's access to a specified Community group during workflow execution. |
Quick rule: Use a trigger when the access change should start automation. Use an action when the workflow should make the access change.
Key Benefits of Community Group Access Automation
Automating Community access reduces repetitive administrative work and lets group membership become part of a larger customer journey managed through workflows.
- Automated Onboarding: Grant Community group access after another qualifying event in the customer journey.
- Automated Access Removal: Revoke group access when workflow conditions require it.
- Access-Based Follow-Up: Start communication or internal actions after group access is granted or removed.
- Consistent Access Management: Apply the same access logic across qualifying contacts.
- Connected Automation: Combine Community access with other supported workflow triggers, conditions, and actions.
Prerequisites and Limitations
Identifying whether your automation should respond to an access change or make the access change helps you select the correct Community workflow component before building the rest of the workflow.
Before you begin:
- Create or identify the Community group you want the workflow to monitor or manage.
- Decide whether the workflow should respond to an access change or perform the access change.
- Identify the event or condition that should cause the contact to enter the workflow.
- Use a representative test contact before publishing the workflow for broader use.
Keep these access types separate:
- Granted/Revoked Access: Group Access Granted and Group Access Revoked respond after an access change occurs.
- Access Actions: Grant Group Access and Revoke Group Access change the contact's group access during the workflow.
- Pending Join Requests: Use Requested to Join Group when automation should begin from a membership request before access is approved.
- Private Channels: Private channel access has its own separate grant/revoke triggers and actions.
Community Group Access Triggers and Actions
Each Community access trigger or action represents a different point in the member journey. Choosing the correct one determines whether the workflow listens for a group-access event or actively changes group access.
Group Access Granted
Group Access Granted is a Community workflow trigger. It starts the workflow after a member receives access to the selected group. Use it when receiving access should begin another process, such as a welcome message, internal notification, tagging sequence, or another supported workflow action.
Group Access Revoked
Group Access Revoked is a Community workflow trigger. It starts the workflow after a member's access to the selected group is removed. Use it when losing access should begin follow-up automation.
Grant Group Access
Grant Group Access is a Community workflow action. It grants the workflow contact access to a selected Community group. Use it when another qualifying workflow event should result in Community group access.
Revoke Group Access
Revoke Group Access is a Community workflow action. It removes the workflow contact's access to the selected Community group. Use it when another workflow event or condition should result in that access being removed.
How To Create a Group Access Trigger Workflow
A group-access trigger workflow responds after access has already been granted or revoked. Use this setup when an access change should automatically start follow-up communication, internal processing, or another workflow action.
Step 1: Create the Workflow
Start with a new workflow so the Community access event can serve as the enrollment trigger.
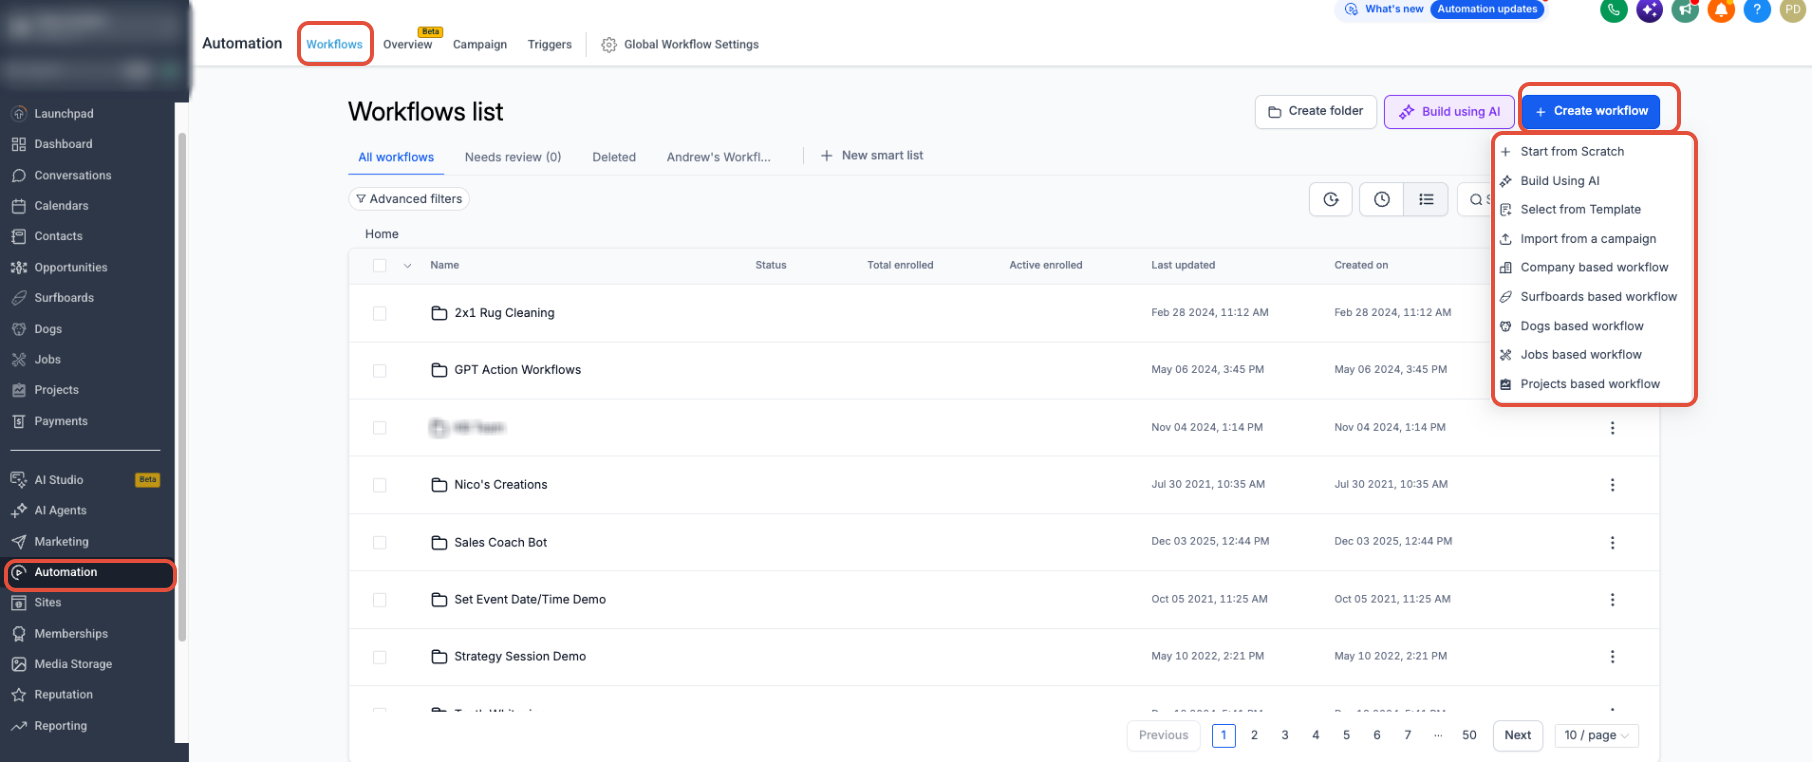
- From the Sub-Account View, click Automation.
- Select Workflows.
- Click + Create workflow.
- Select Start from Scratch.
Step 2: Add the Community Access Trigger
Choose the access event that should enroll the member into the workflow and select the Community group the automation should monitor.
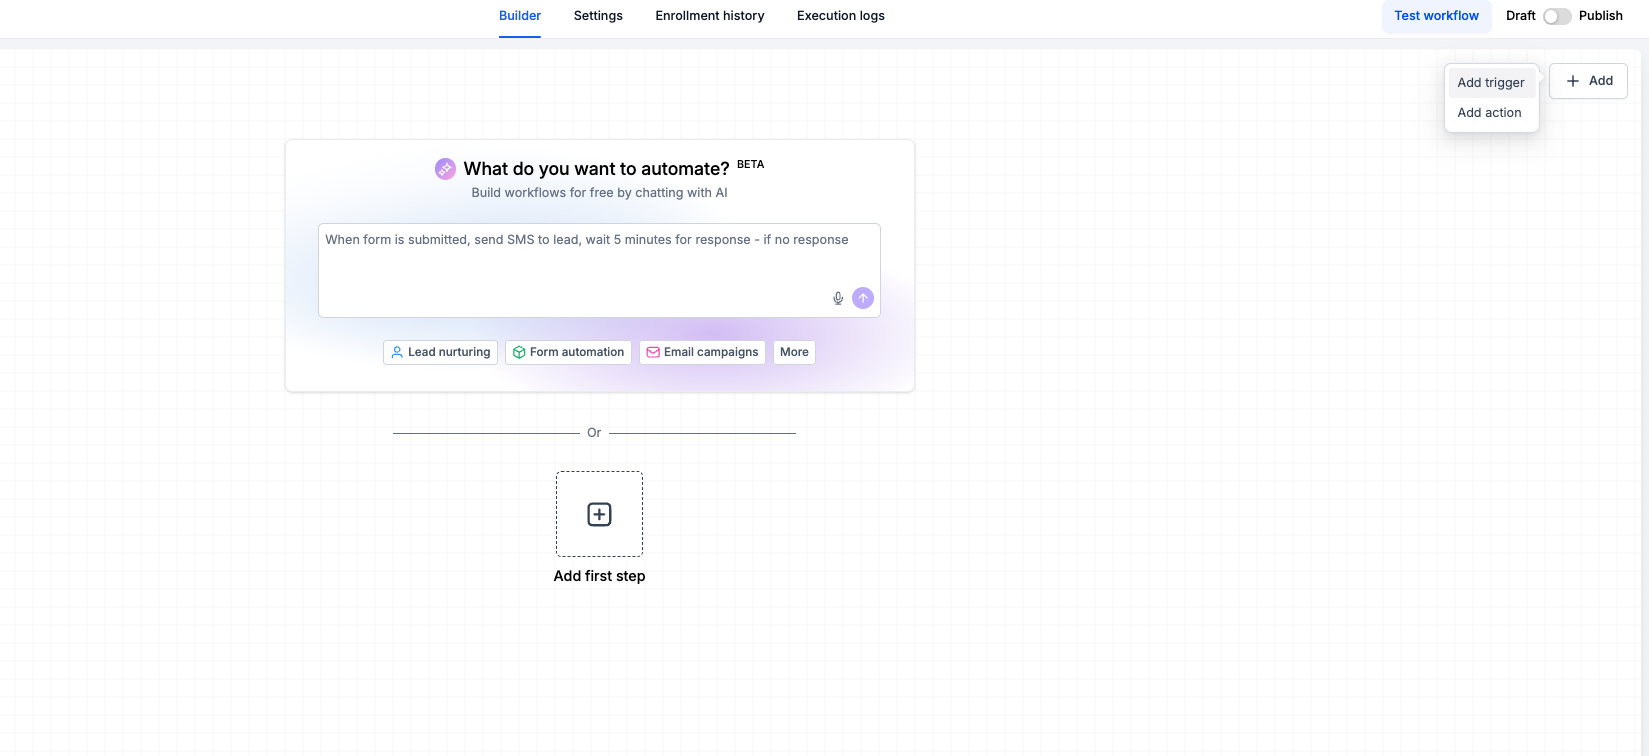
- Click + Add.
- Select Add trigger.
- Search for and select Group Access Granted or Group Access Revoked.
- Configure the trigger for the Community group you want to monitor.
- Save the trigger configuration.
Step 3: Add Follow-Up Actions
Follow-up actions determine what should happen after the system detects the group-access event.
- Click the + icon after the trigger.
- Select and configure the next workflow action.
- Add any additional conditions, communications, or actions required for the process.
Step 4: Test and Publish
Testing with a representative contact helps confirm that the workflow follows the expected path before it is made active for qualifying contacts.
- Review the trigger and all workflow actions.
- Click Test workflow.
- Select an appropriate test contact.
- Click Run test and confirm the expected workflow behavior.
- When the workflow is ready, switch it from Draft to Publish.
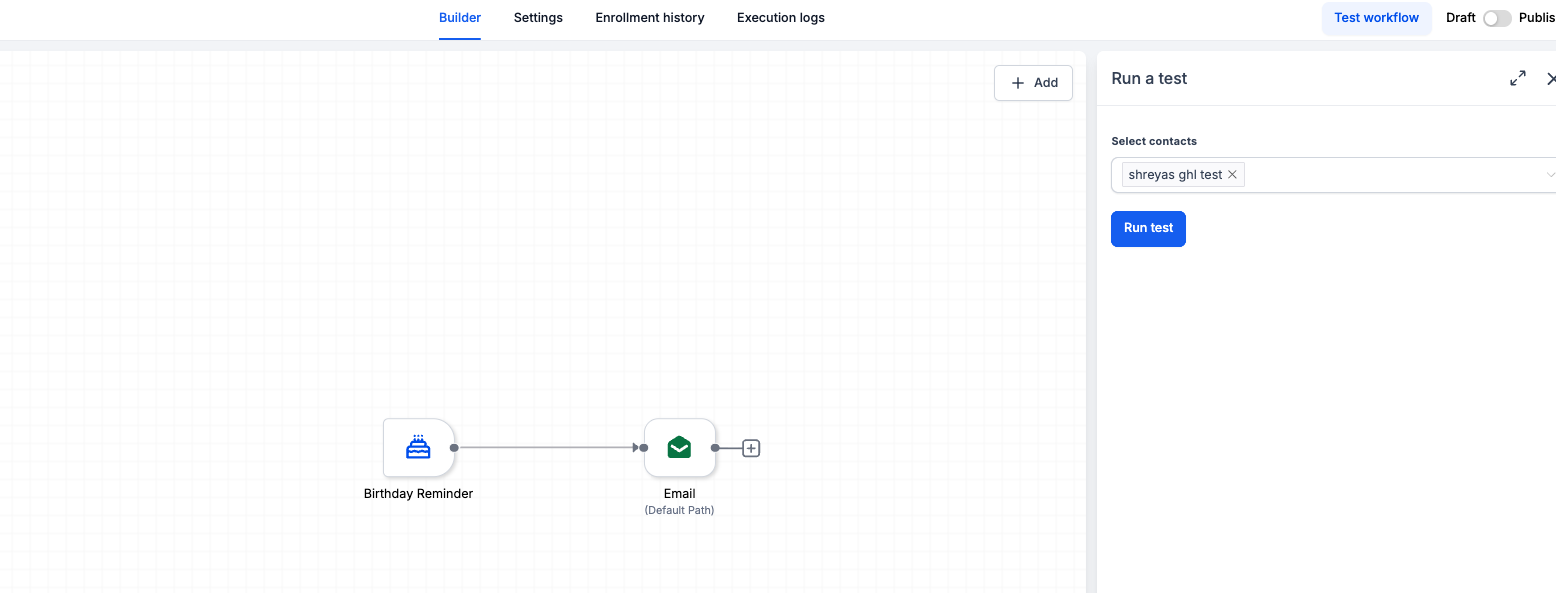
Draft vs. Publish: Saving workflow changes does not make the automation live. A workflow in Draft does not run for qualifying contacts until it is published.
How To Grant or Revoke Group Access with a Workflow
Grant and revoke actions let another qualifying event determine whether a contact receives or loses Community group access. The trigger starts the customer journey, and the Community action changes the access.
Step 1: Choose the Workflow Trigger
The workflow can begin from any supported trigger appropriate for your use case. Choose the event that should determine when the contact is evaluated for the group-access change.
- Go to Automation → Workflows.
- Create a new workflow or open an existing one.
- Add and configure the trigger that should enroll the contact.
- Save the trigger configuration.
Step 2: Add the Group Access Action
Add the Community action that matches the access change you want the workflow to perform.
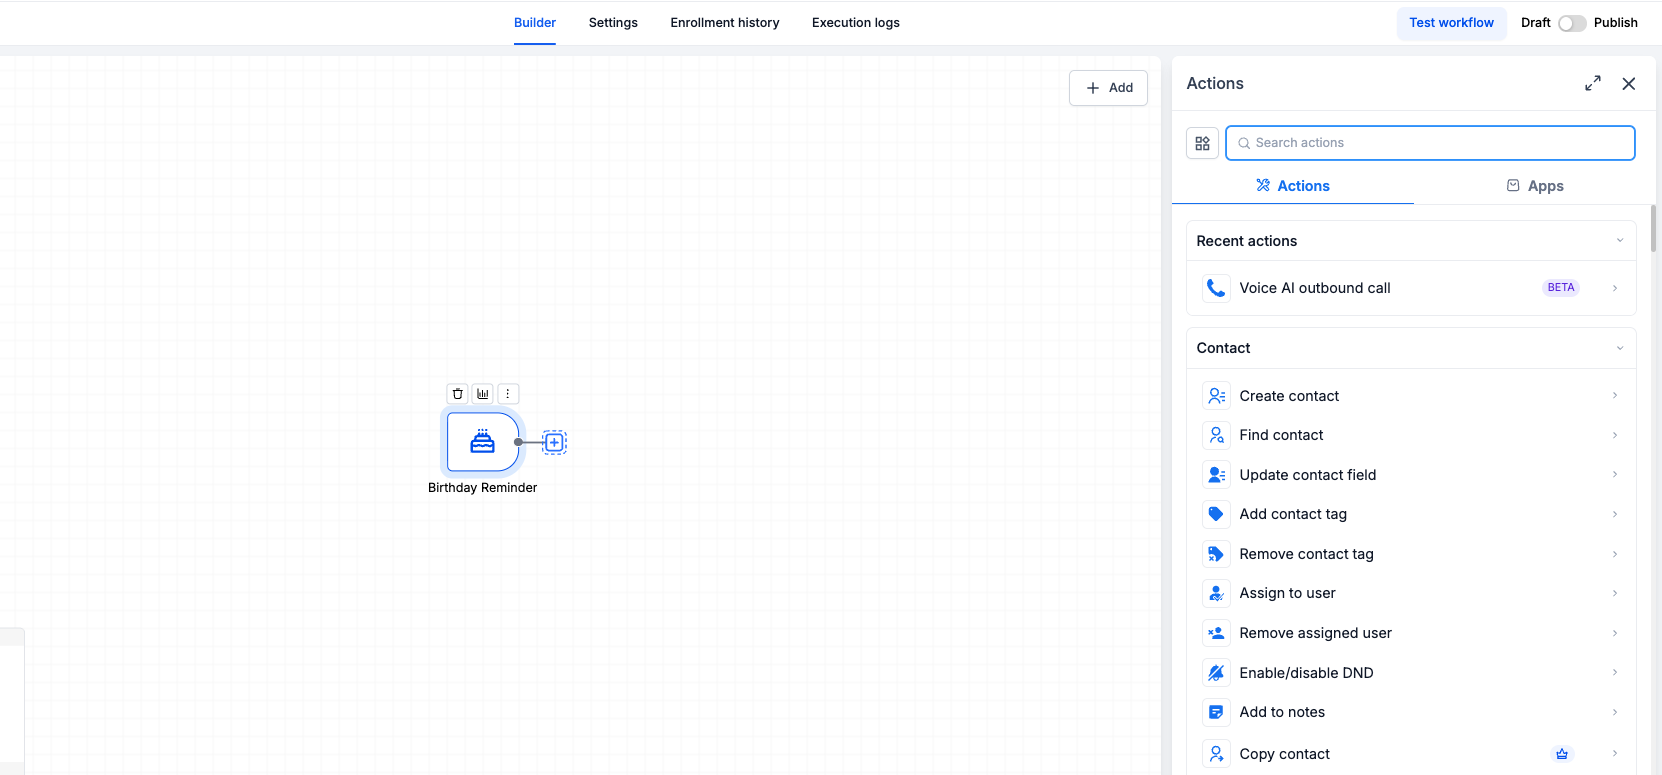
- Click + Add below the trigger or previous workflow step.
- Select Add action.
- Search for Grant Group Access or Revoke Group Access.
- Select the appropriate Community action.
- Select the Community group whose access should be granted or revoked.
- Save the action configuration.
Step 3: Complete, Test, and Publish the Workflow
Complete the rest of the customer journey, then verify the group-access result before publishing the workflow.
- Add any additional workflow steps required for the process.
- Review the selected Community group and access action.
- Use Test workflow with an appropriate contact where applicable.
- Confirm the expected group-access change occurs.
- Switch the workflow from Draft to Publish when it is ready to run.
Best Practices for Group Access Workflows
Clear trigger logic, descriptive naming, and controlled testing make Community access workflows easier to understand and reduce unintended membership changes.
- Separate Triggers from Actions: Use Group Access Granted or Revoked when an access event should start automation. Use Grant or Revoke Group Access when the workflow should make the change.
- Confirm the Correct Group: Review the selected Community group in every trigger and action before publishing.
- Use Descriptive Workflow Names: Include the access event and Community group in the workflow name so its purpose is easy to identify.
- Test with Representative Events: Test both the workflow enrollment and the resulting access state before broad rollout.
- Avoid Unintended Automation Loops: If one workflow changes group access and another workflow starts from that same access change, review the combined journey so contacts are not repeatedly routed through conflicting access actions.
- Use the Correct Join-Request Trigger: Use Requested to Join Group when the automation should begin before a pending member is approved.
- Keep Private Channel Logic Separate: Use the dedicated private-channel triggers and actions when the workflow manages access to a private channel rather than the entire group.
Frequently Asked Questions
Need Help?
- The workflow is not starting after access changes: Confirm you selected the correct Group Access Granted or Group Access Revoked trigger and the intended Community group.
- A contact is not receiving group access: Review the Grant Group Access action and confirm the correct Community group is selected.
- A contact still has group access: Confirm the workflow reached the Revoke Group Access action and review the workflow execution history for that contact.
- A pending join request is not starting the workflow: Use Requested to Join Group instead of Group Access Granted when the automation should begin before approval.
- Private channel access is not changing: Group-access actions manage the Community group, not private channels. Use the dedicated private-channel access triggers or actions instead.
- The workflow works in testing but not for live contacts: Confirm the workflow has been switched from Draft to Publish.
- Access keeps changing unexpectedly: Review other workflows that use the same Community group to make sure separate grant and revoke automations are not creating conflicting access changes.