
Learn the difference between Text and Email Snippets, how to create and organize reusable content in the current HiRise Snippets interface, how to use Snippets in Conversations, how reusable SMS content works in workflows, and how attachments behave in different messaging experiences.
The current HiRise Snippets experience is automatically enabled for locations and does not require a Labs or beta setting. The classic Snippets list layout has been retired. Users accessing Snippets through Conversations need Conversations → View & manage conversation permission.
What Are Snippets?
Snippets are reusable templates for text or email messages. Instead of repeatedly typing the same response, your team can save frequently used content once and insert it whenever the same or similar message is needed.
The platform supports separate Text Snippets and Email Snippets. Snippets can also use supported personalization tools such as Custom Values and Trigger Links so reusable messages can still include information specific to the contact or use case.
Common uses for Snippets include:
- Appointment reminders and follow-ups
- Answers to frequently asked questions
- Customer support responses
- Promotional messaging
- Business hours and contact information
- Standard instructions or next steps
- Frequently reused email content
Key Benefits of Snippets
Snippets make recurring communication faster while giving teams a centralized library of reusable messaging that can be reviewed, organized, and updated as business needs change.
- Save Time: Reuse frequently sent content instead of rewriting or repeatedly copying the same message.
- Improve Consistency: Give team members access to approved messaging for common situations.
- Personalize Messages: Use supported Custom Values to dynamically insert contact or account information.
- Stay Organized: Use folders, search, filters, and management controls to maintain larger Snippet libraries.
- Reduce Repetitive Work: Quickly insert prepared content into supported messaging experiences.
- Keep Content Current: Update reusable messaging from the Snippets workspace when business information or messaging changes.
Prerequisites and Limitations
Understanding where Snippets are stored, which permission controls access, and how different messaging channels treat reusable content helps prevent confusion when creating or sending Snippets.
Before you begin:
- Snippets are managed within the relevant Sub-Account.
- The current HiRise Snippets experience is automatically available; no Labs setting is required.
- Users accessing Snippets through Conversations need Conversations → View & manage conversation permission.
- Choose the appropriate Text Snippet or Email Snippet type based on the content you want to reuse.
Keep these distinctions in mind:
- Text vs. Email: Text Snippets and Email Snippets are separate reusable content types.
- Attachments: Attachment behavior differs between email templates, campaigns, and workflows.
- Workflows: Reusable content options depend on the workflow messaging action being configured.
- RCS Snippets: RCS uses separate formats and rich-message requirements.
- WhatsApp Templates: WhatsApp Templates are different from regular Snippets and have separate approval and usage requirements.
Give a User Access to Snippets
Snippets inside Conversations depend on the user's Conversations permission, so review their role when the Snippets tab or composer option is not available.
- From the Sub-Account View, click Settings.
- Select My Staff.
- Select the team member you want to update.
- Open Roles & Permissions.
- Locate Conversations.
- Enable View & manage conversation.
- Click Save.
How To Create a Snippet
Creating a Snippet gives your team reusable content that can be searched, organized, and inserted whenever the same type of communication is needed.
Step 1: Open the Snippets Dashboard
The current HiRise Snippets dashboard is located inside Conversations and provides access to your saved Snippets, folders, search, filters, and creation controls.
- From the Sub-Account View, click Conversations.
- Select Snippets at the top of the Conversations page.
Step 2: Choose the Snippet Type
Text and Email Snippets are created separately so reusable content can be structured for the communication channel where it will be used.
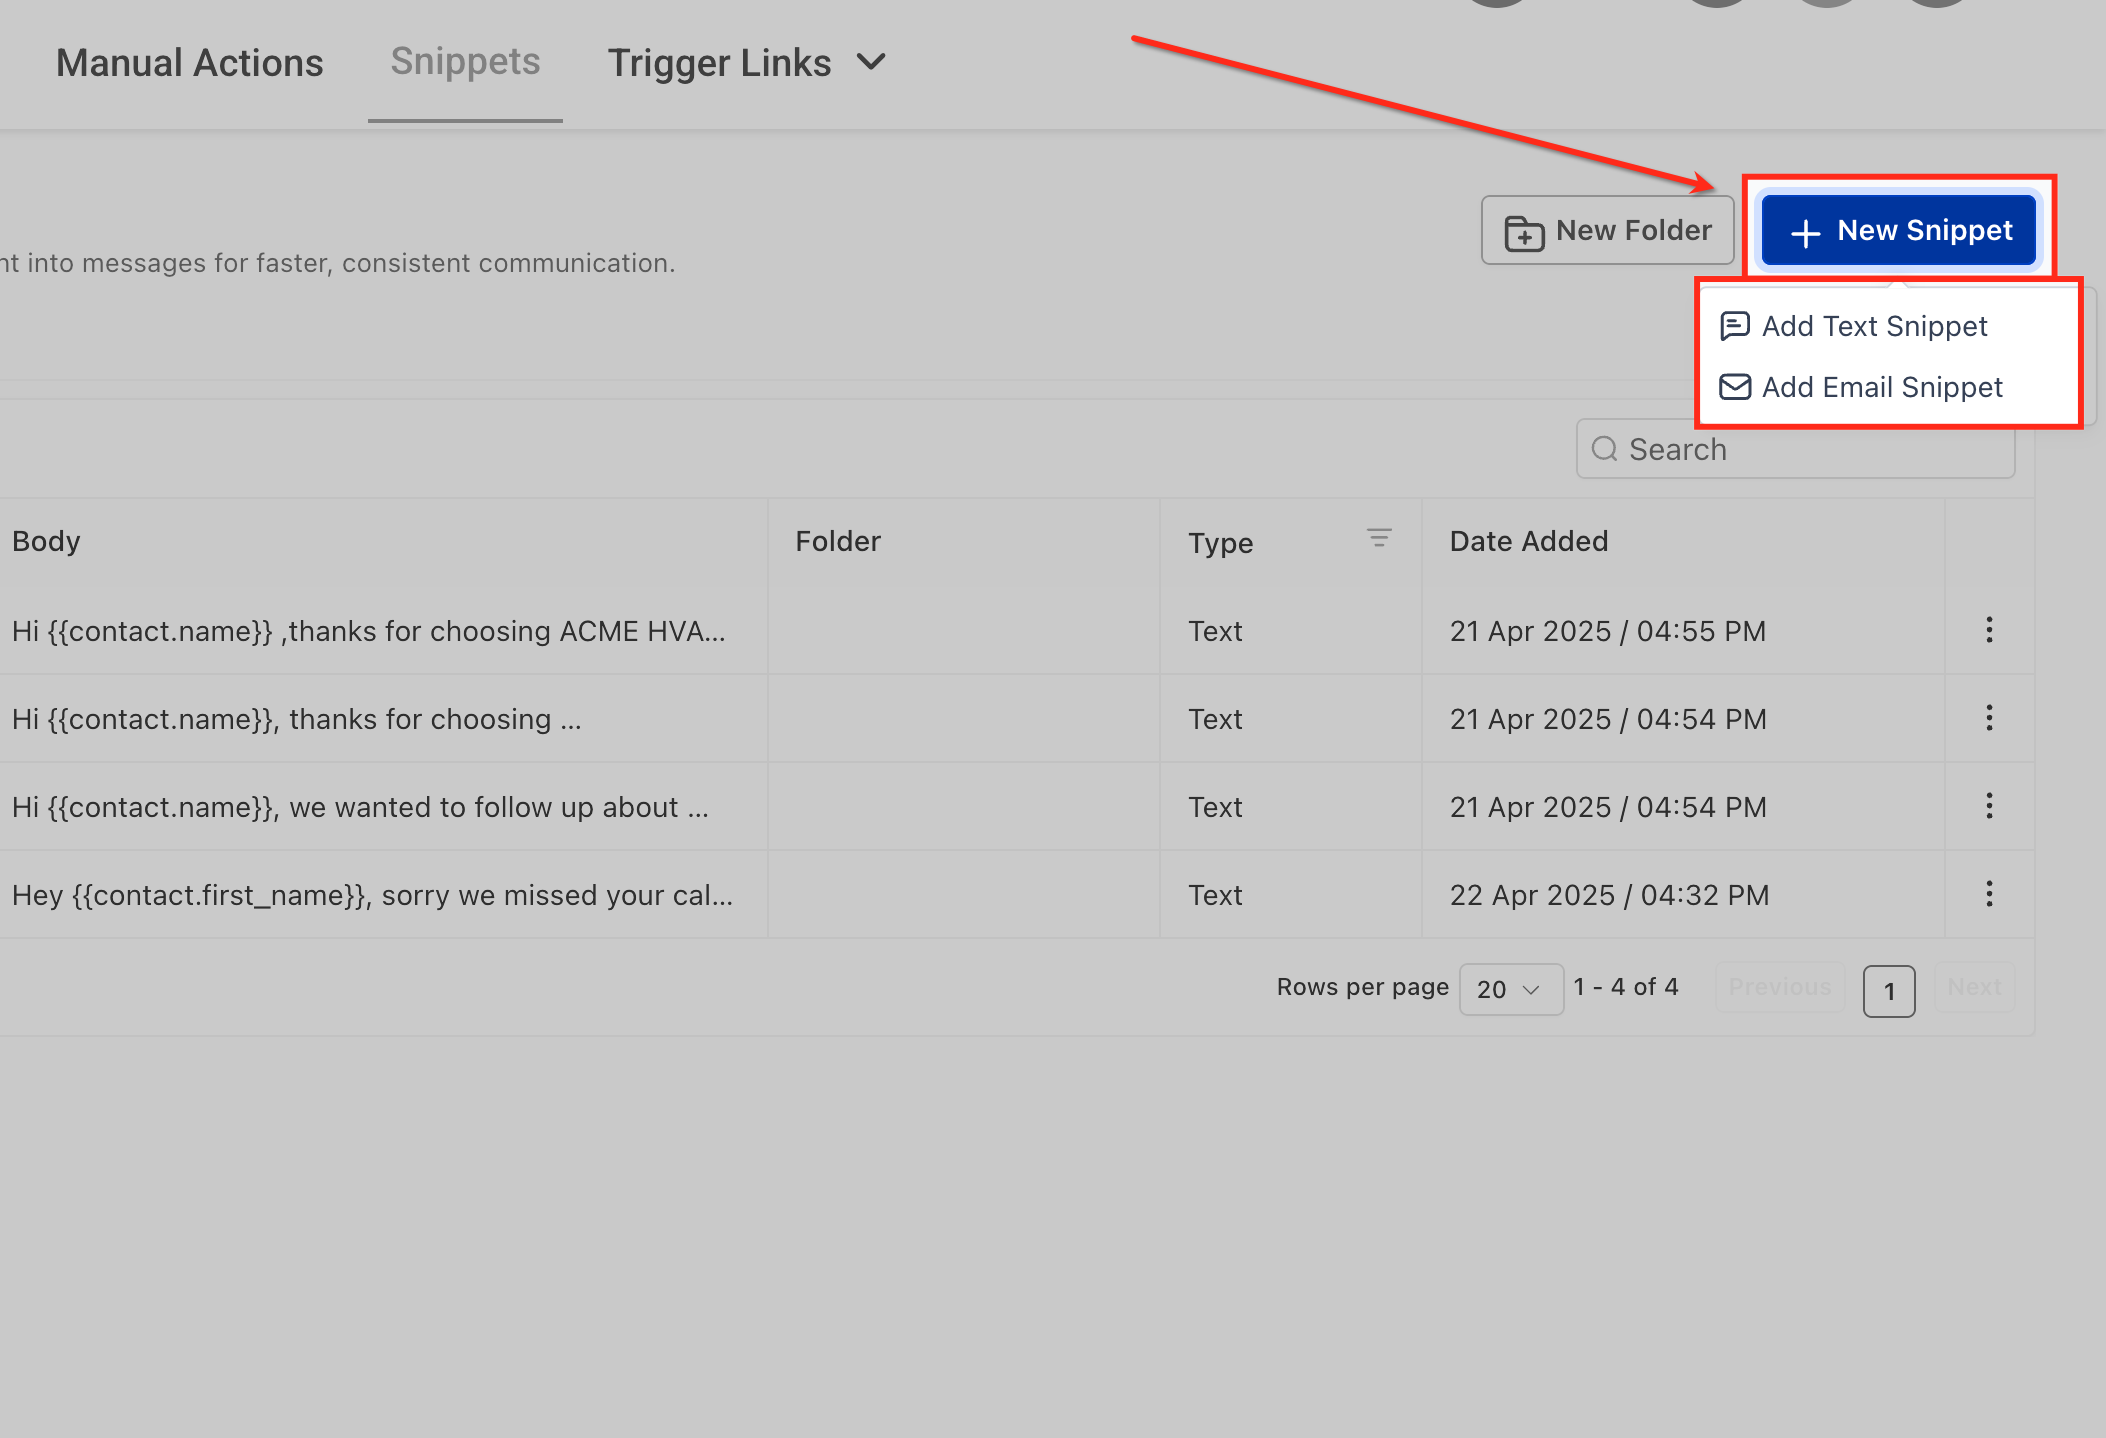
- Click + New Snippet.
- Select Add Text Snippet or Add Email Snippet.
Step 3: Build and Personalize the Snippet
A clear name, reusable message content, and supported dynamic values make the Snippet easier for other team members to understand and safely reuse.
- Enter a descriptive name for the Snippet.
- Add the message content.
- Add supported Custom Values when information should populate dynamically.
- Add a Trigger Link when the message requires a supported trackable link.
- Review the available preview.
- Use the available test option when appropriate.
- Click Save.
Naming Tip: Use names that explain the purpose of the Snippet, such as Appointment Reminder, FAQ - Business Hours, New Lead Introduction, or Support - Password Reset Instructions.
SMS Cost Awareness: For SMS-oriented content, review the displayed character count, segment count, and estimated cost information before sending.
Alternate Snippets Access
Snippets can also be accessed from Sub-Account View → Marketing → Snippets. The Conversations Snippets page uses the current HiRise layout and provides direct access to folders, search, filters, and management controls.
How To Organize and Manage Snippets
Keeping your Snippet library organized helps team members locate approved content quickly and reduces the chance that outdated or duplicate messaging is reused.
From Conversations → Snippets, you can:
- Use Search to locate Snippets by name or keyword.
- Filter Snippets by supported type.
- Click New Folder to create folders.
- Move Snippets into folders.
- Edit existing Snippets.
- Duplicate a Snippet to create a variation.
- Delete Snippets that are no longer needed.
- Use the current page URL to preserve supported search and pagination preferences when sharing the view with another user in the same sub-account.
Manage an Individual Snippet
The three-dot action menu gives you quick access to the most common Snippet management tasks without leaving the main Snippets list.
- Go to Conversations → Snippets.
- Locate the Snippet you want to manage.
- Click the three-dot menu (⋮).
- Select the appropriate option:
- Move to Folder
- Edit Snippet
- Duplicate Snippet
- Delete Snippet
Organization Tip: Folders are useful for grouping Snippets by purpose, such as Sales, Support, Appointments, Billing, or FAQs.
How To Use Snippets in Conversations
Using Snippets in Conversations lets team members quickly populate prepared messaging while still giving them an opportunity to review and edit the content before it is sent to the contact.
- From the Sub-Account View, click Conversations.
- Open the conversation with the contact you want to message.
- Select the appropriate messaging channel.
- Click the Snippets icon in the message composer.
- Browse the available folders or search for the Snippet you want.
- Select the Snippet.
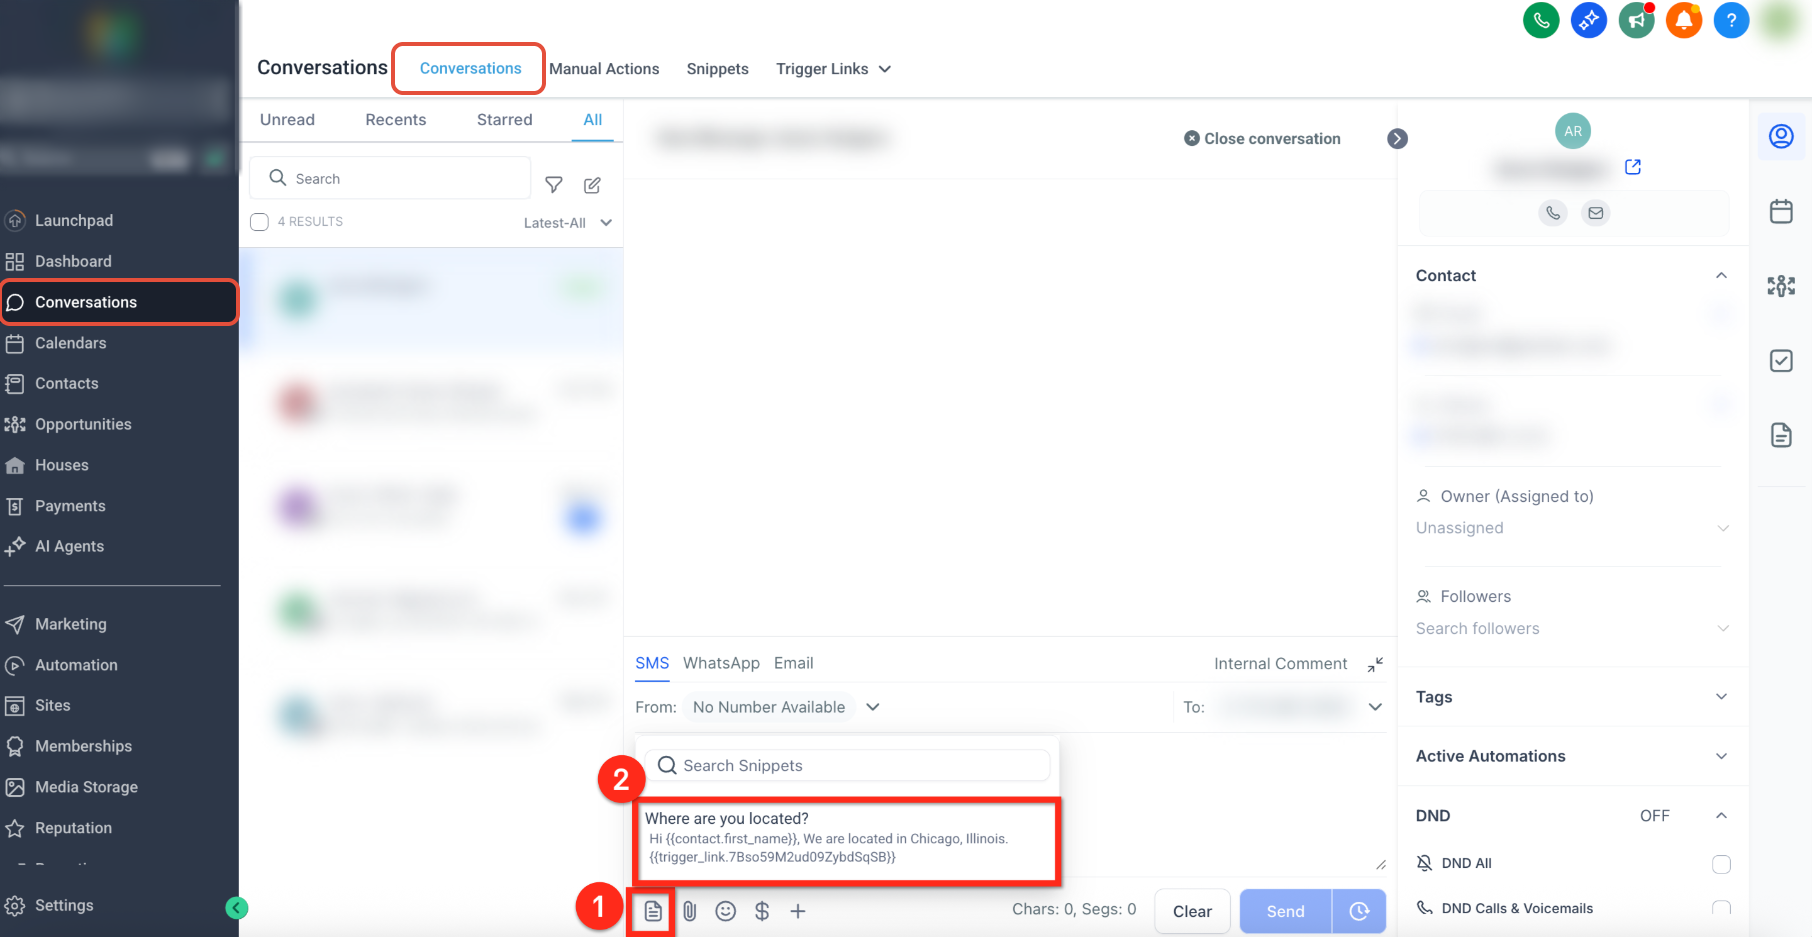
- Confirm that the Snippet content populates the message composer.
- Review the message and make any necessary changes.
- Confirm that supported dynamic values display as expected.
- Send the message.
Before Sending: Selecting a Snippet does not lock the populated message. You can review and edit the inserted content before sending it to the contact.
Using Snippets in Workflows
Reusable messaging can also help keep automated communication consistent. The available template controls depend on the workflow messaging action you are configuring.
Use Reusable Content in a Send SMS Action
The Send SMS workflow action includes a Templates selector that can populate the SMS message with saved reusable content, helping standardize automated messages without retyping the same copy.
- From the Sub-Account View, click Automation.
- Select Workflows.
- Open an existing workflow or create a new workflow.
- Add or open a Send SMS action.
- Locate Templates in the Send SMS configuration.
- Select the saved reusable message you want to use.
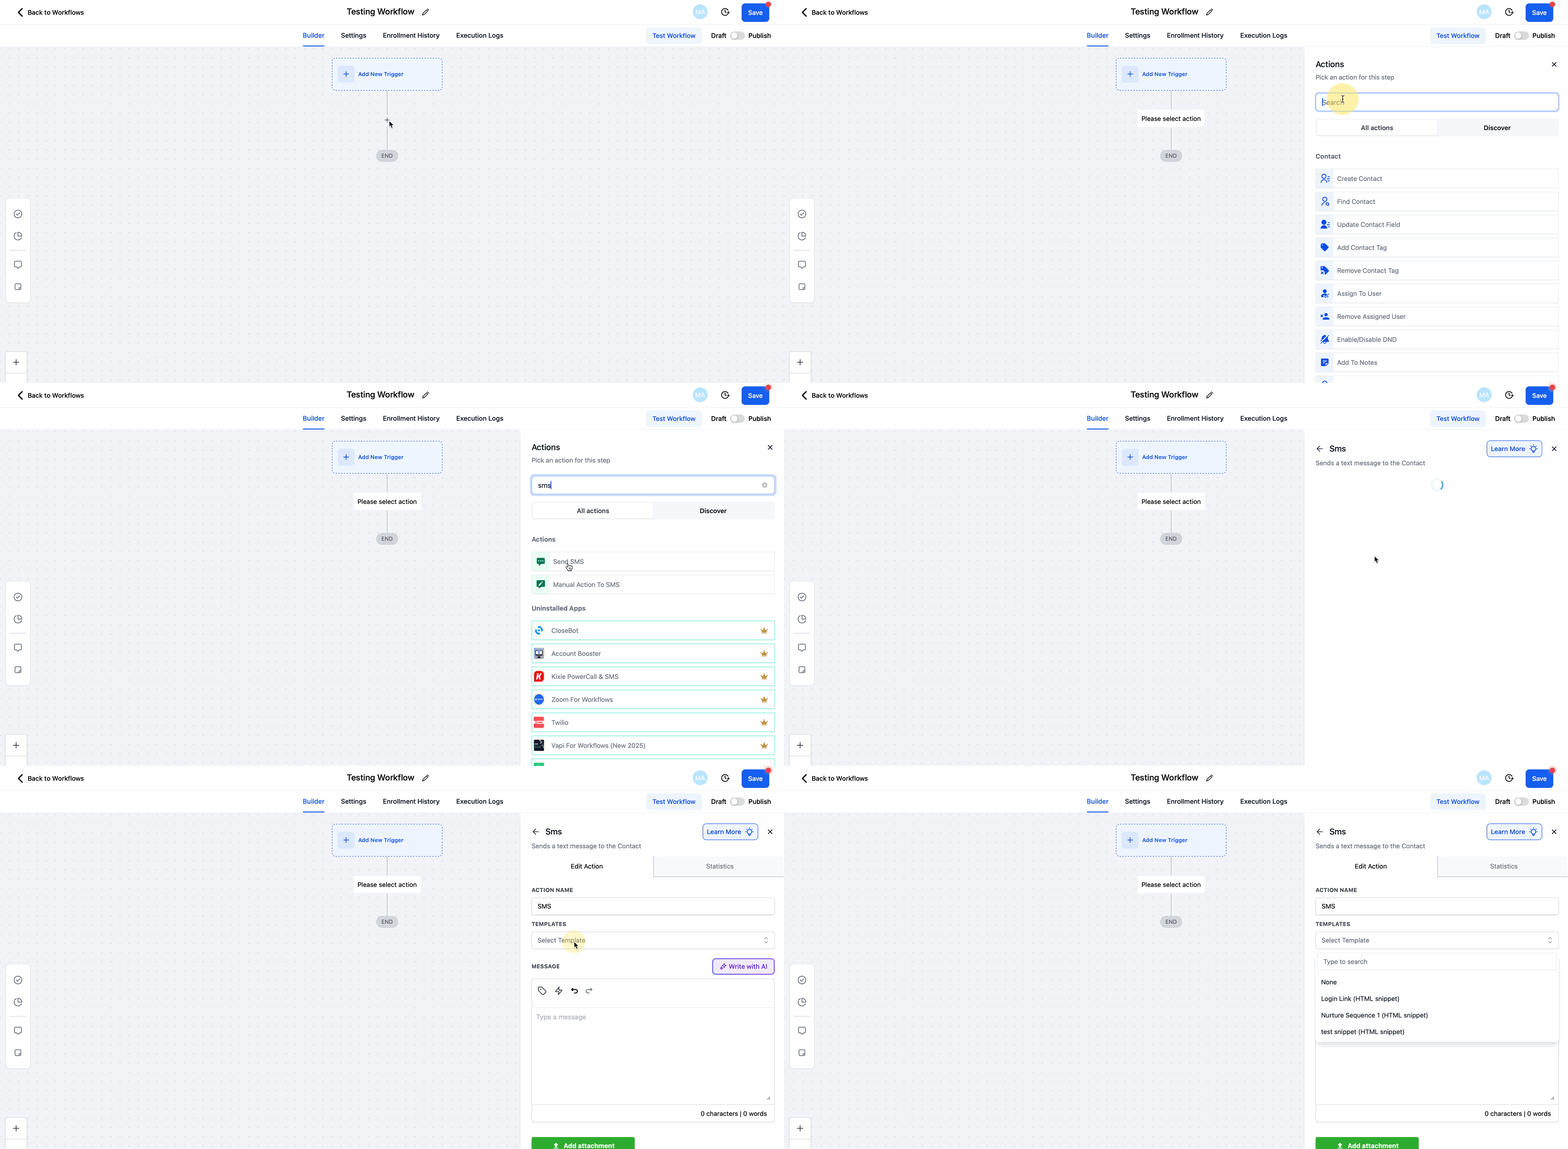
- Review the content that populates the message field.
- Add or update supported Custom Values when needed.
- Use the test SMS option to verify the message.
- Save the workflow action.
- Test the workflow before publishing it.
Send Email Workflows: The Send Email action also supports reusable email templates, but workflow email templates have separate editing, copy, and synchronization behavior. Use the dedicated workflow email template controls when configuring automated email content.
How Attachments Work with Snippets
Attachment behavior changes depending on where Snippet content is used. Reviewing these differences helps ensure recipients receive the intended files instead of only the reusable message content.
| Where the Snippet Is Used | Attachment Behavior |
|---|---|
| Email Templates | Attachments associated with the Snippet are not automatically included when the Snippet is inserted into an email template. The supported message content is inserted. |
| Campaign Emails | Attachments associated with the Snippet are included when the Snippet is inserted into a campaign email. |
| Workflows | Attachments associated with the Snippet are not automatically added to workflow emails or SMS messages. Add any required file using the supported controls in the workflow action. |
Before Sending: Always review the final message and its attachments before sending a campaign or publishing an automated workflow.
Frequently Asked Questions
Need Help?
- Snippets are missing from Conversations: Confirm the user has Conversations → View & manage conversation permission.
- A Snippet is difficult to find: Use Search, filters, or folders to narrow the available Snippets.
- Personalized values are not displaying as expected: Review the inserted Custom Values and confirm the contact or account has the information required to populate them.
- An attachment is missing: Check where the Snippet is being used. Attachments behave differently in email templates, campaigns, and workflow actions.
- Automated content does not look correct: Use the available test option and review the final workflow message before publishing the workflow.