
Learn how to prepare a Mailgun domain, connect it with a Private API key, activate Mailgun for Agency-level sending, understand sub-account provider priority, validate the connection, and troubleshoot common setup issues.
This integration uses your Mailgun Private API key. Treat the key as a secret and never expose it in screenshots, support tickets, documentation, or public messages.
2. Key Benefits of Connecting Mailgun
3. Prerequisites and Limitations
4. Mailgun Region and Domain Requirements
5. How To Connect Mailgun at the Agency Level
6. How Agency and Sub-Account Email Services Work Together
7. How To Validate Your Mailgun Connection
8. Troubleshooting
9. Frequently Asked Questions
10. Need Help?
What Is the Mailgun API Key Connection?
Connecting Mailgun lets the platform use your Mailgun account and verified sending domain for outbound email.
The Private API key authenticates the connection with Mailgun and makes eligible verified domains from the account available during setup. After saving the service, you must set it as Active before it becomes the Agency-level default.
Key Benefits of Connecting Mailgun
Connecting your own Mailgun account gives your agency more control over its email infrastructure while keeping provider management centralized.
- Use Your Own Infrastructure: Send through your existing Mailgun account and verified domain.
- Centralize Agency Setup: Use Mailgun as the default service for sub-accounts without their own provider.
- Switch Providers: Save multiple Agency-level Email Services and change which service is Active when needed.
- Support Sub-Account Overrides: Allow individual sub-accounts to use another provider when configured.
- Support Reply Routing: Proper Mailgun receiving and DNS configuration can route supported replies back into Conversations.
Prerequisites and Limitations
Preparing Mailgun before connecting it prevents the most common issues with missing domains, authentication failures, and unexpected provider behavior.
Before you begin:
- Have an active Mailgun account.
- Have at least one verified Mailgun sending domain or subdomain.
- Create the Mailgun domain in the US region.
- Complete the DNS records required for your Mailgun configuration.
- Have access to Agency View → Settings → Email Services.
- Have the appropriate Mailgun Private API key.
Keep these limitations in mind:
- Eligible verified Mailgun domains must be available from the US region.
- Saving a Mailgun service does not automatically make it Active.
- Only one Agency-level Email Service can be Active at a time.
- A sub-account-specific provider takes priority over the Agency-level provider.
- Inbound reply handling requires additional Mailgun receiving and DNS configuration.
- Mailgun billing, volume limits, and provider-level restrictions are managed through Mailgun.
Mailgun Region and Domain Requirements
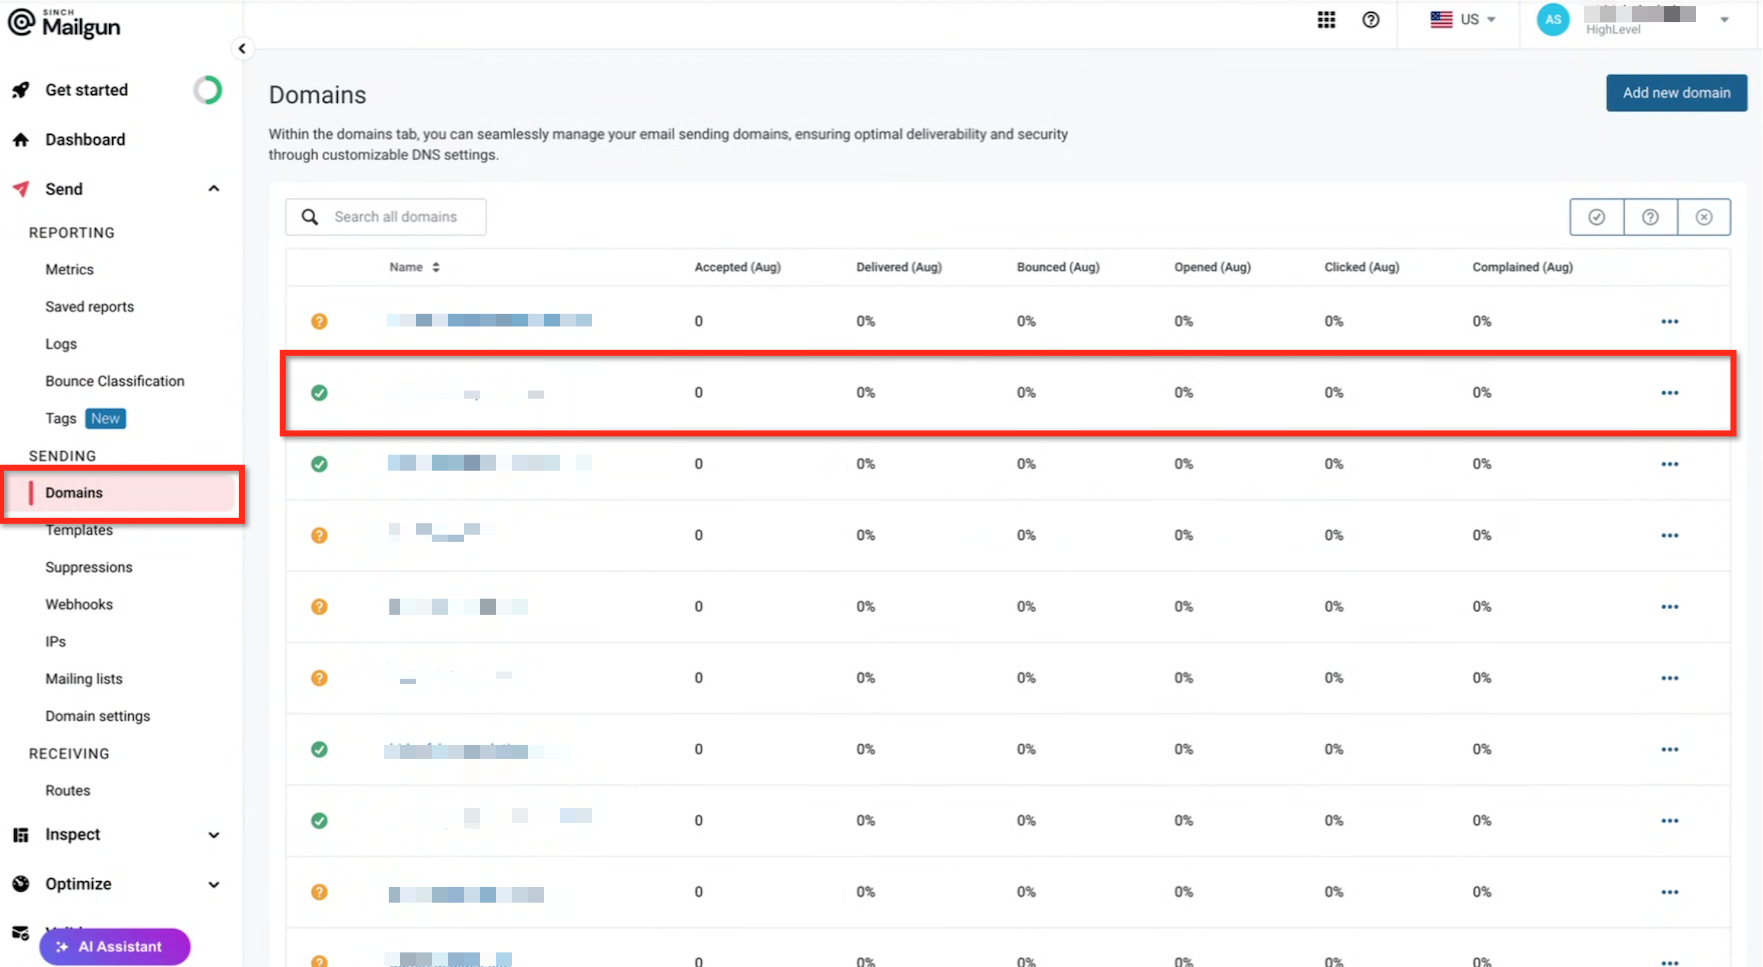
Eligible Mailgun domains appear during setup only when the domain is verified and configured in the supported Mailgun region.
- Create the Mailgun domain or subdomain in the US region, not the EU region.
- Confirm the domain shows as verified in Mailgun.
- Complete the DNS records required by your Mailgun configuration.
- Use a subdomain when you want Mailgun sending to remain separate from the primary domain's existing mailbox configuration.
Example: If your main domain is yourdomain.com, you can use a sending subdomain such as mg.yourdomain.com. This is especially useful when the root domain already receives mail through Google Workspace, Microsoft 365, or another mailbox provider.
How To Connect Mailgun at the Agency Level
Connecting Mailgun at the Agency level makes it available as the default sending service for eligible sub-accounts after the service is saved and activated.
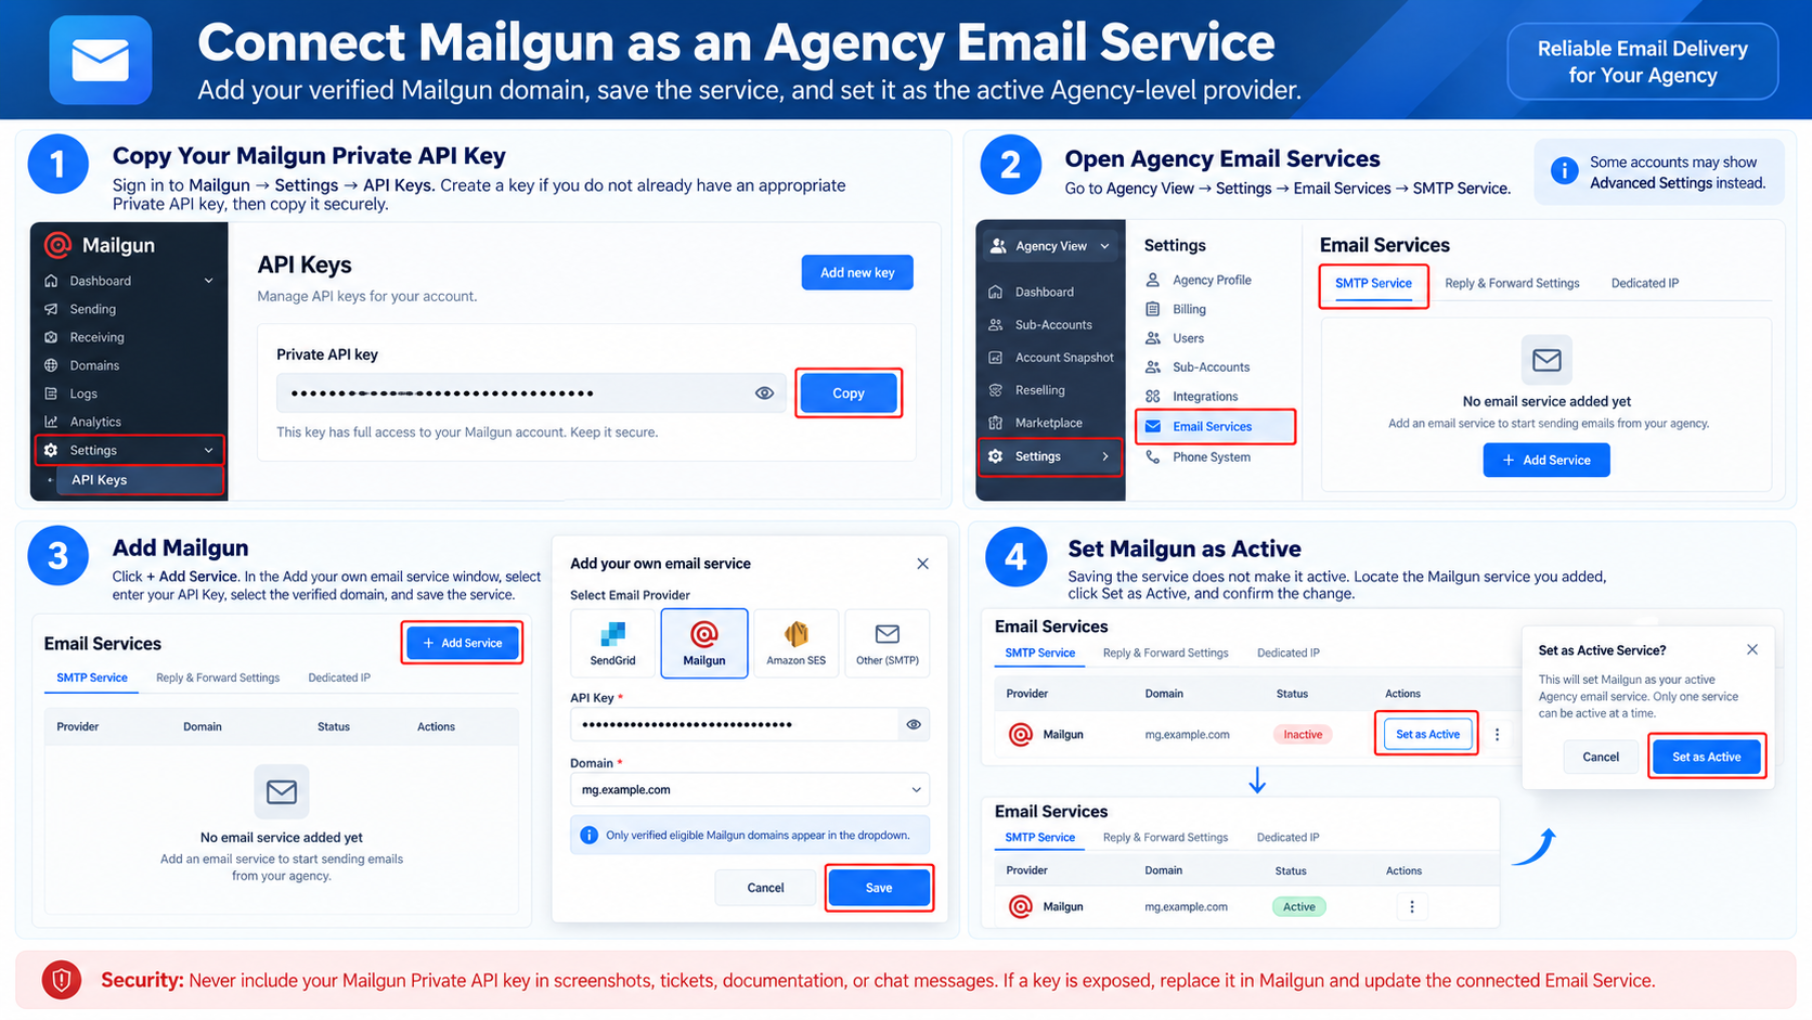
Step 1: Copy Your Mailgun Private API Key
The Private API key authenticates the connection between the platform and the Mailgun account containing your verified sending domain.
- Sign in to Mailgun.
- Go to Settings → API Keys.
- Create a key if you do not already have an appropriate Private API key.
- Copy the key securely.
Security: Never include your Mailgun Private API key in screenshots, tickets, documentation, or chat messages. If a key is exposed, replace it in Mailgun and update the connected Email Service.
Step 2: Open Agency Email Services
Agency Email Services control the default sending provider used when a sub-account does not have its own email provider configured.
- Open Agency View.
- Click Settings.
- Select Email Services.
- Open the SMTP Service tab.
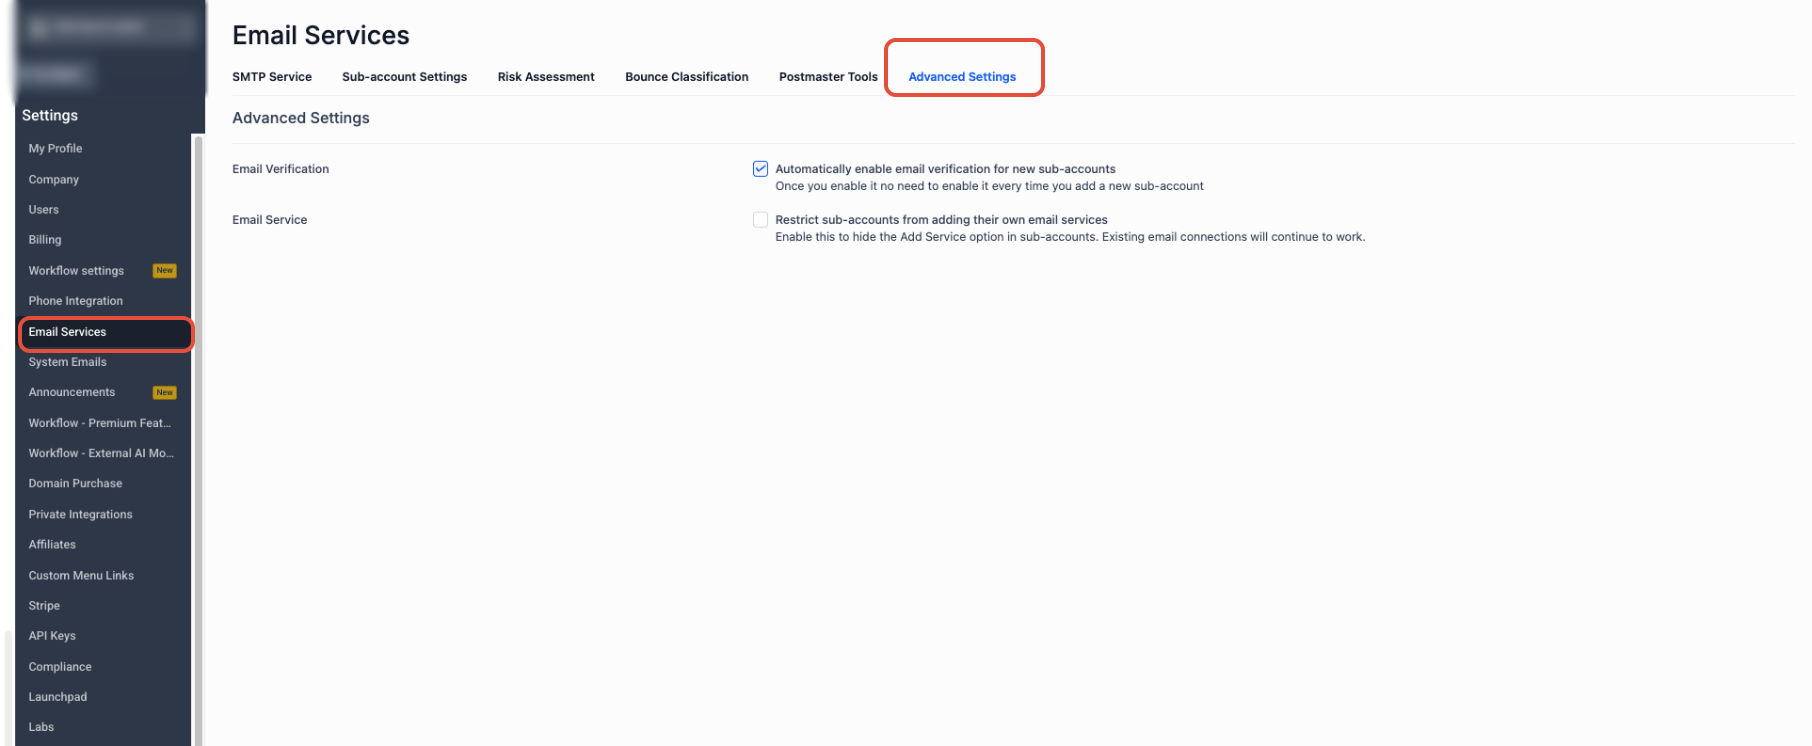
Interface Note: Depending on your current interface, this configuration area may also be labeled Advanced Settings.
Step 3: Add Mailgun
Add Mailgun as an Agency-level Email Service and select the verified sending domain associated with the Mailgun account.
- Click + Add Service.
- In the Add your own email service window, select Mailgun.
- Enter your Mailgun API Key.
- Select the verified Mailgun Domain.
- Save the Email Service.
If the domain is missing: Confirm it is fully verified in Mailgun, belongs to the account associated with the API key, and was created in the US region.
Step 4: Set Mailgun as Active
Saving the service adds Mailgun to your Agency account, but the Agency does not use it as the default provider until you activate it.
- Locate the Mailgun service you added.
- Click Set as Active.
- Confirm the change.
How Agency and Sub-Account Email Services Work Together
Provider priority determines which Email Service actually sends email when both Agency-level and sub-account-specific configurations exist.
1. Sub-account-specific default provider
2. Agency-level Active provider
If a sub-account has its own provider configured, that provider takes precedence. If it does not, the applicable Agency-level Active provider is used.
To review sub-account provider assignments, go to:
Agency View → Settings → Email Services → Location Settings
Agencies can also control whether sub-accounts are allowed to add their own Email Services from:
Agency View → Settings → Email Services → Advanced Settings
How To Validate Your Mailgun Connection
Testing Mailgun after activation confirms that the expected provider and sending domain work before you depend on the configuration for campaigns, workflows, or regular conversations.
- Confirm Mailgun shows as Active under Agency View → Settings → Email Services.
- Confirm the expected verified Mailgun domain is selected.
- Open a sub-account that should use the Agency-level provider.
- Create or open a test contact using an email address you can access.
- Send a test email from the contact conversation.
- Confirm the message is received.
- Reply to the email if you also want to test inbound reply handling.
- Confirm the reply appears in Conversations.
Outbound works but replies do not: Review the Mailgun receiving route, webhook, and inbound DNS configuration. A successful API connection alone does not configure inbound reply routing.
Troubleshooting
Most Mailgun connection issues come from domain verification, region selection, API authentication, provider priority, or inbound-routing configuration.
- Confirm the domain belongs to the Mailgun account associated with the API key.
- Confirm the domain is fully verified.
- Confirm the domain was created in Mailgun's US region.
- Confirm the required DNS configuration is complete.
- Confirm the intended Mailgun service is marked Active.
- Check whether the affected sub-account has its own default provider configured, which takes priority over the Agency-level provider.
- Confirm you are using the Mailgun Private API key.
- Confirm the key belongs to the expected Mailgun account.
- Confirm the key has not been deleted, replaced, or revoked.
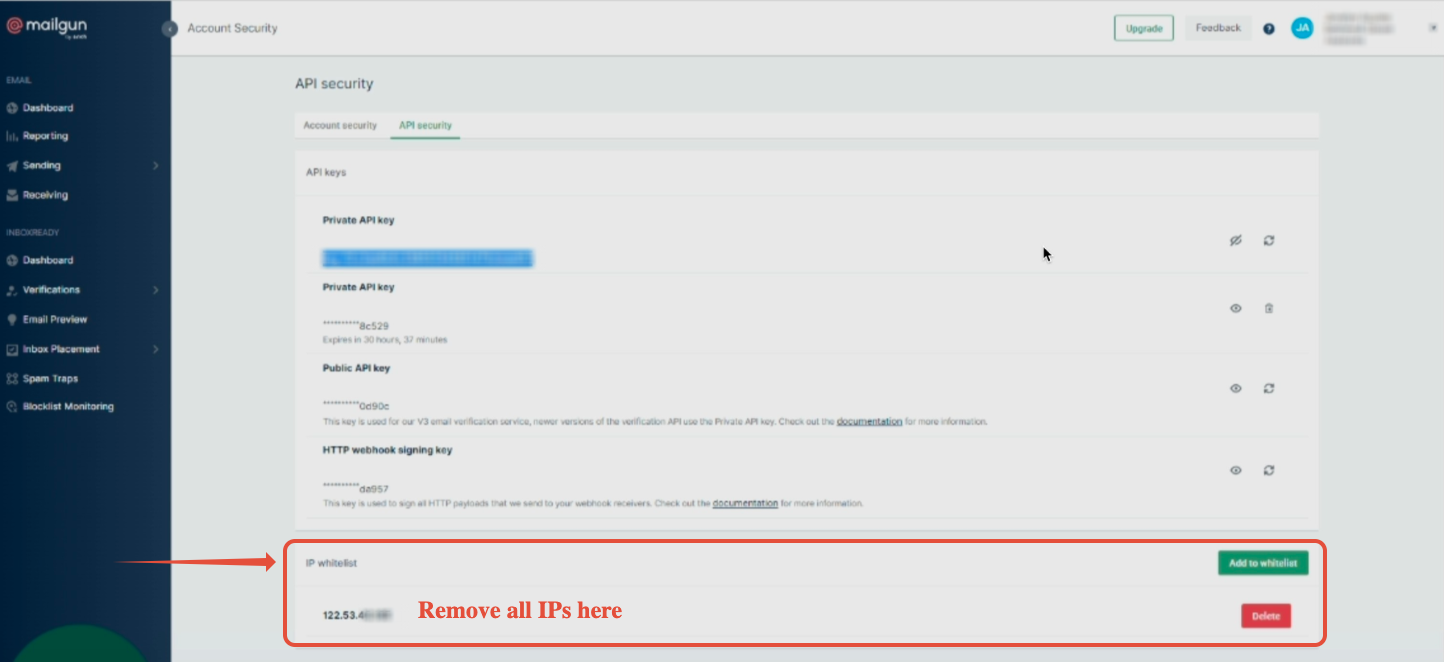
- If Mailgun IP restrictions prevent the platform from retrieving domain information, temporarily adjust the restriction, retry the connection, and restore the restriction after validation.
- Check the Mailgun receiving route and webhook.
- Confirm the Mailgun MX configuration is correct for the inbound setup.
- Confirm the expected domain is associated with the correct sub-account.
- For cold inbound email, use a unique dedicated domain or subdomain for the appropriate sub-account so inbound messages route to the intended destination.
Frequently Asked Questions
Need Help?
- Domain not listed: Confirm the Mailgun domain is verified, belongs to the correct account, and is configured in the US region.
- Mailgun is saved but not being used: Confirm the service is marked Active and check whether the sub-account has its own provider configured.
- Domains cannot be retrieved: Verify the Private API key and review Mailgun IP access restrictions.
- Email sends but replies are missing: Review Mailgun receiving routes, webhooks, MX records, and the domain assigned to the sub-account.
- API key was exposed: Replace the key in Mailgun immediately and update the connected Email Service with the new key.