
Ad Manager organizes LinkedIn advertising into a three-level hierarchy:
Campaign Group – The top-level container for related campaigns.
Campaign – Defines the audience, media type, language, location, and other campaign settings.
Ad – Defines the creative, including media, text, calls to action, and forms.
This guide explains how to create a Campaign Group, add campaigns, build ads, and review performance after publishing.
TABLE OF CONTENTS
- Use a Campaign Template
- Step 1: Create a Campaign Group
- Step 2: Create a Campaign Inside the Group
- Step 3: Create Ads Inside the Campaign
- Step 4: Review & Publish
- Step 5: View Campaign Group Performance
- Best Practices
Use a Campaign Template
LinkedIn campaigns can also be created from an Ad Manager template.
Select Ad Manager Templates, choose a LinkedIn template, review its details, and click Continue. Supported campaign configurations are pre-filled from the selected template.
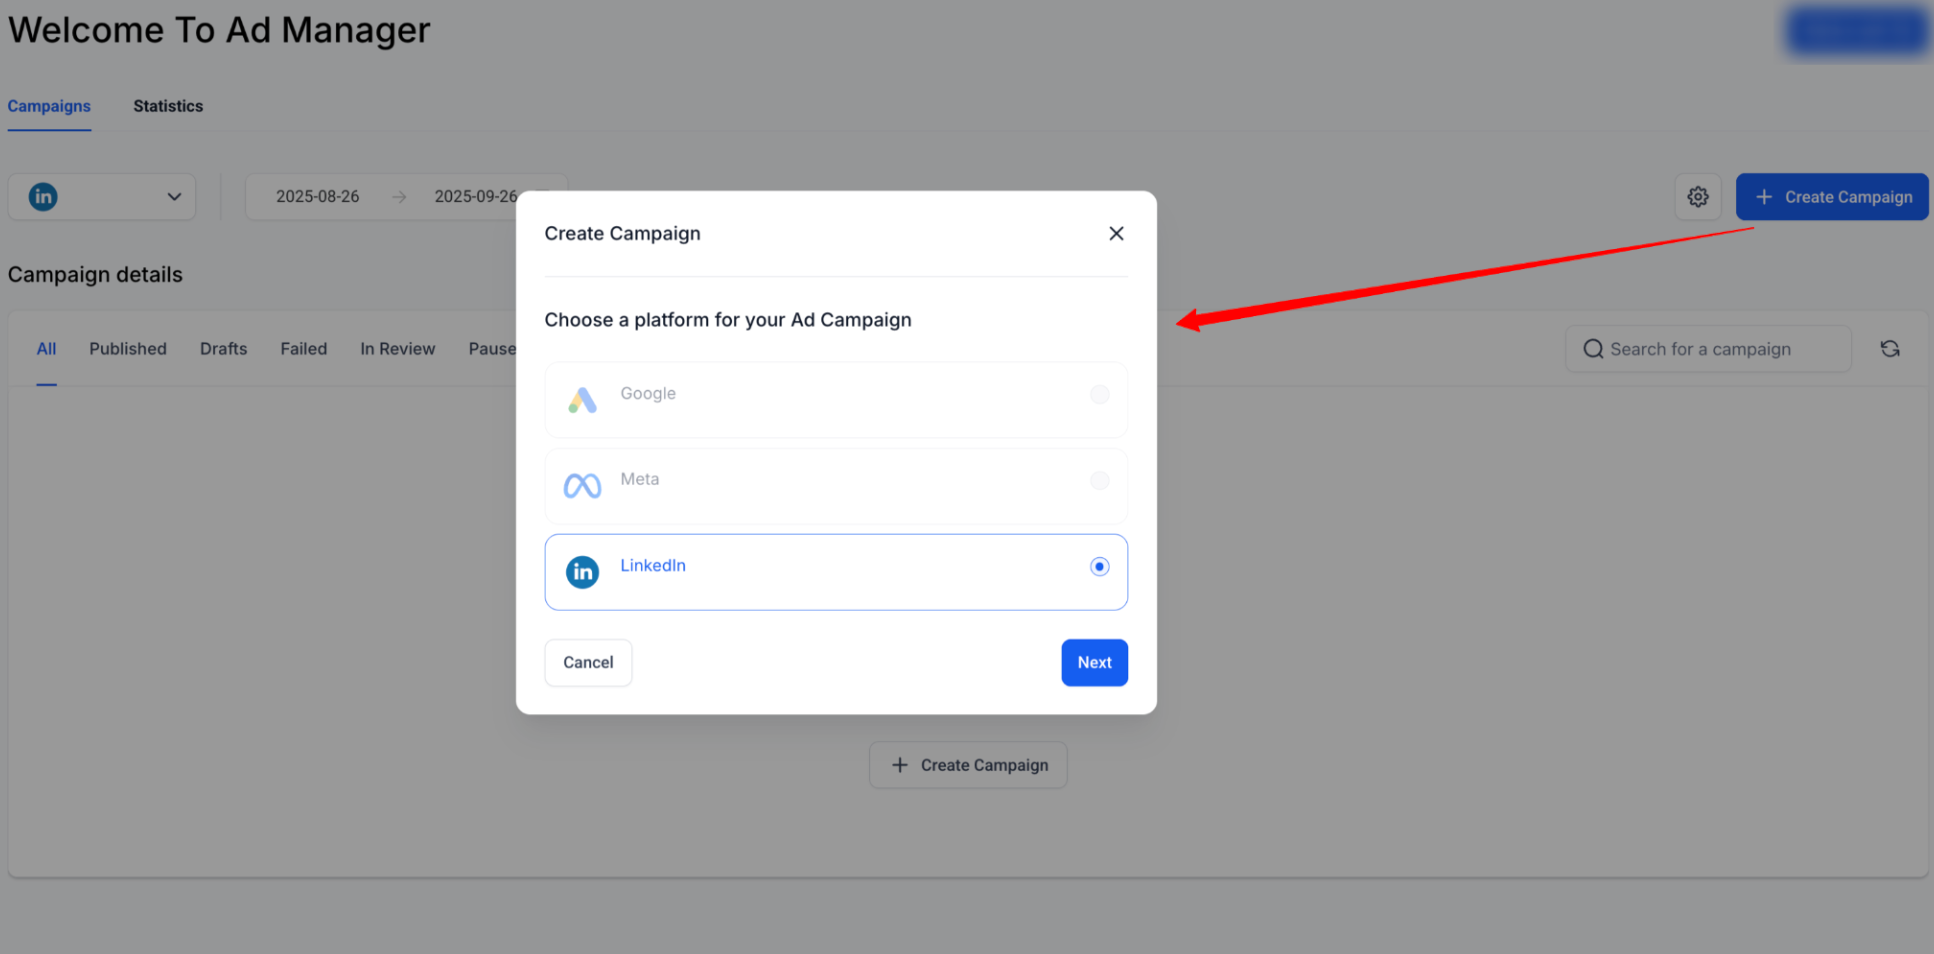
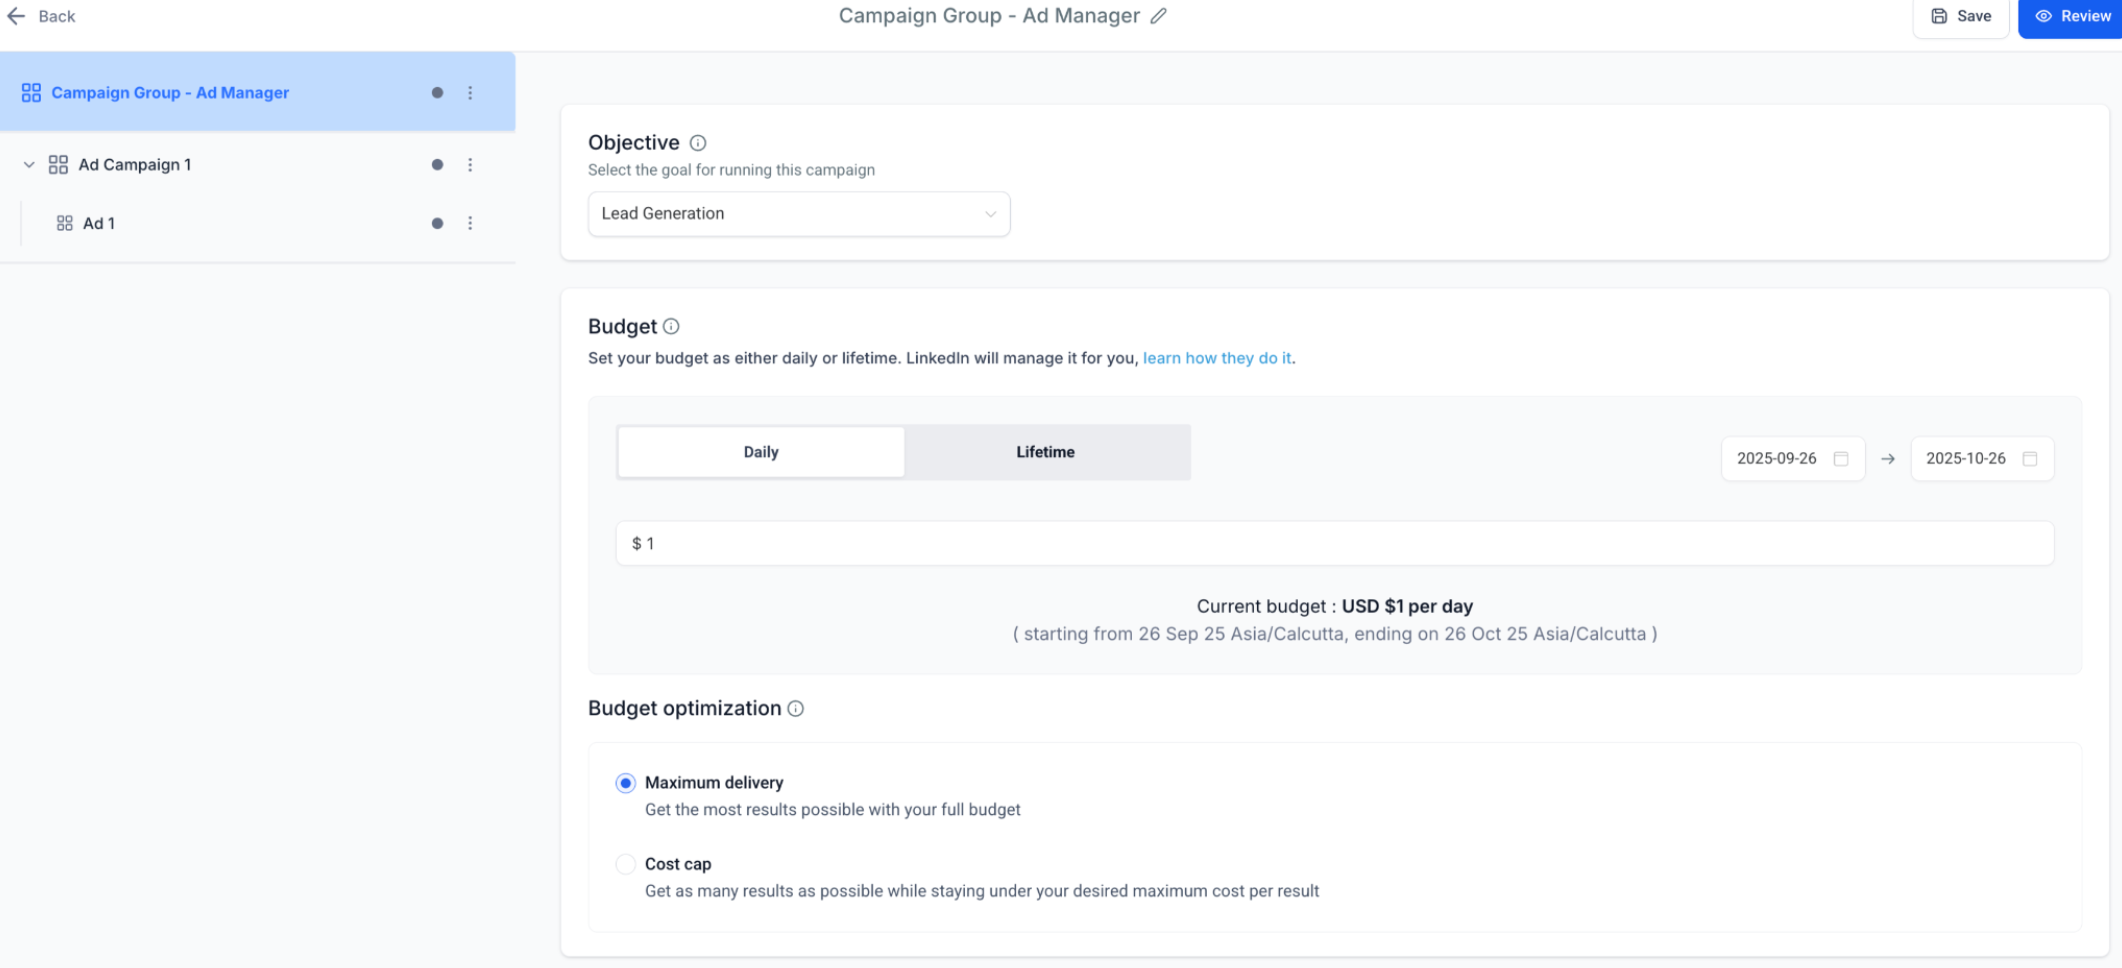
Step 1: Create a Campaign Group
A Campaign Group is the top-level container for your LinkedIn campaigns.
Configure the following:
Campaign Group Name – Enter a descriptive name, such as “Q4 SaaS Leads.”
Objective Selection – Choose one of the supported objectives:
Lead Generation – Capture leads with LinkedIn forms.
Website Traffic – Drive clicks to an external landing page.
Schedule – Set the start and end dates for the Campaign Group.
Tip: Use Campaign Groups to organize campaigns by business objective.
Step 2: Create a Campaign Inside the Group
After creating the Campaign Group, add one or more campaigns.
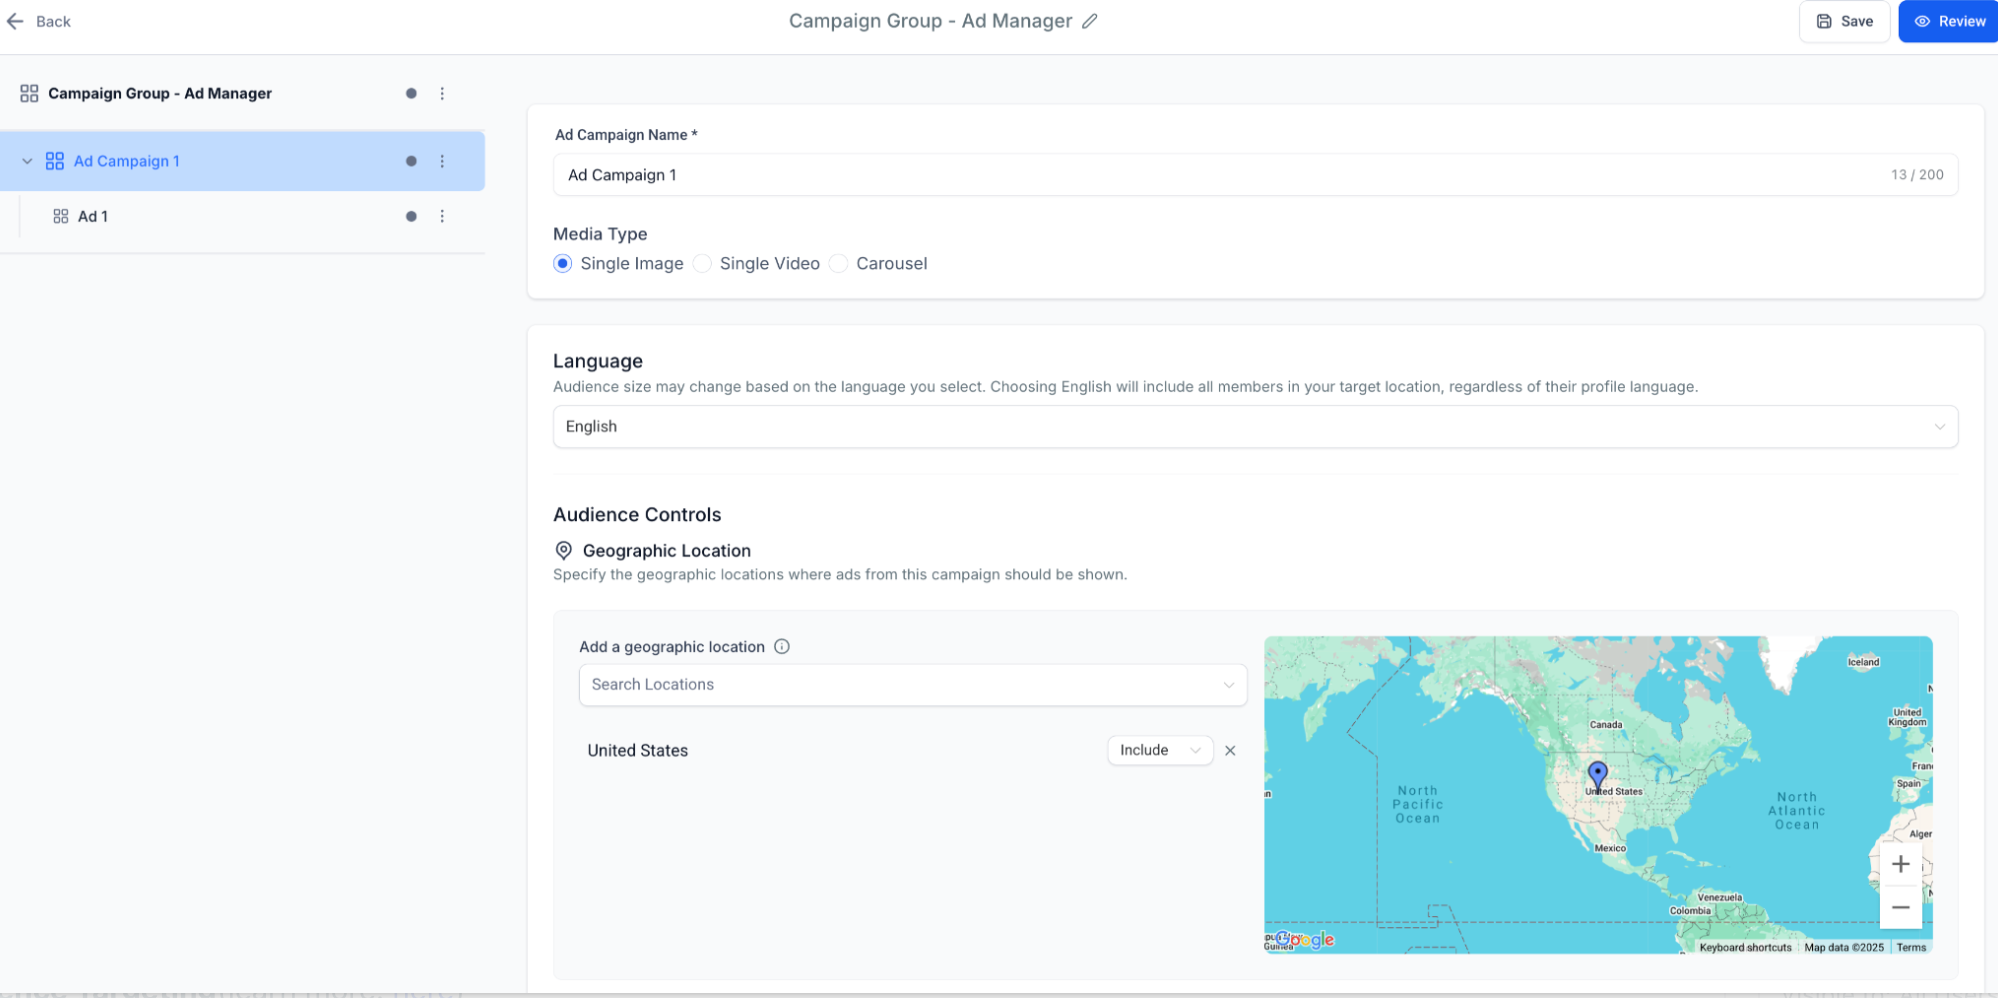
Fields Defined at Campaign Level
Configure the following campaign settings:
Campaign Name – The name used to identify the campaign.
Media Type – Select single image, video, or carousel.
Language
Geographic Location
Intended Audience – Optional.
Audience Targeting
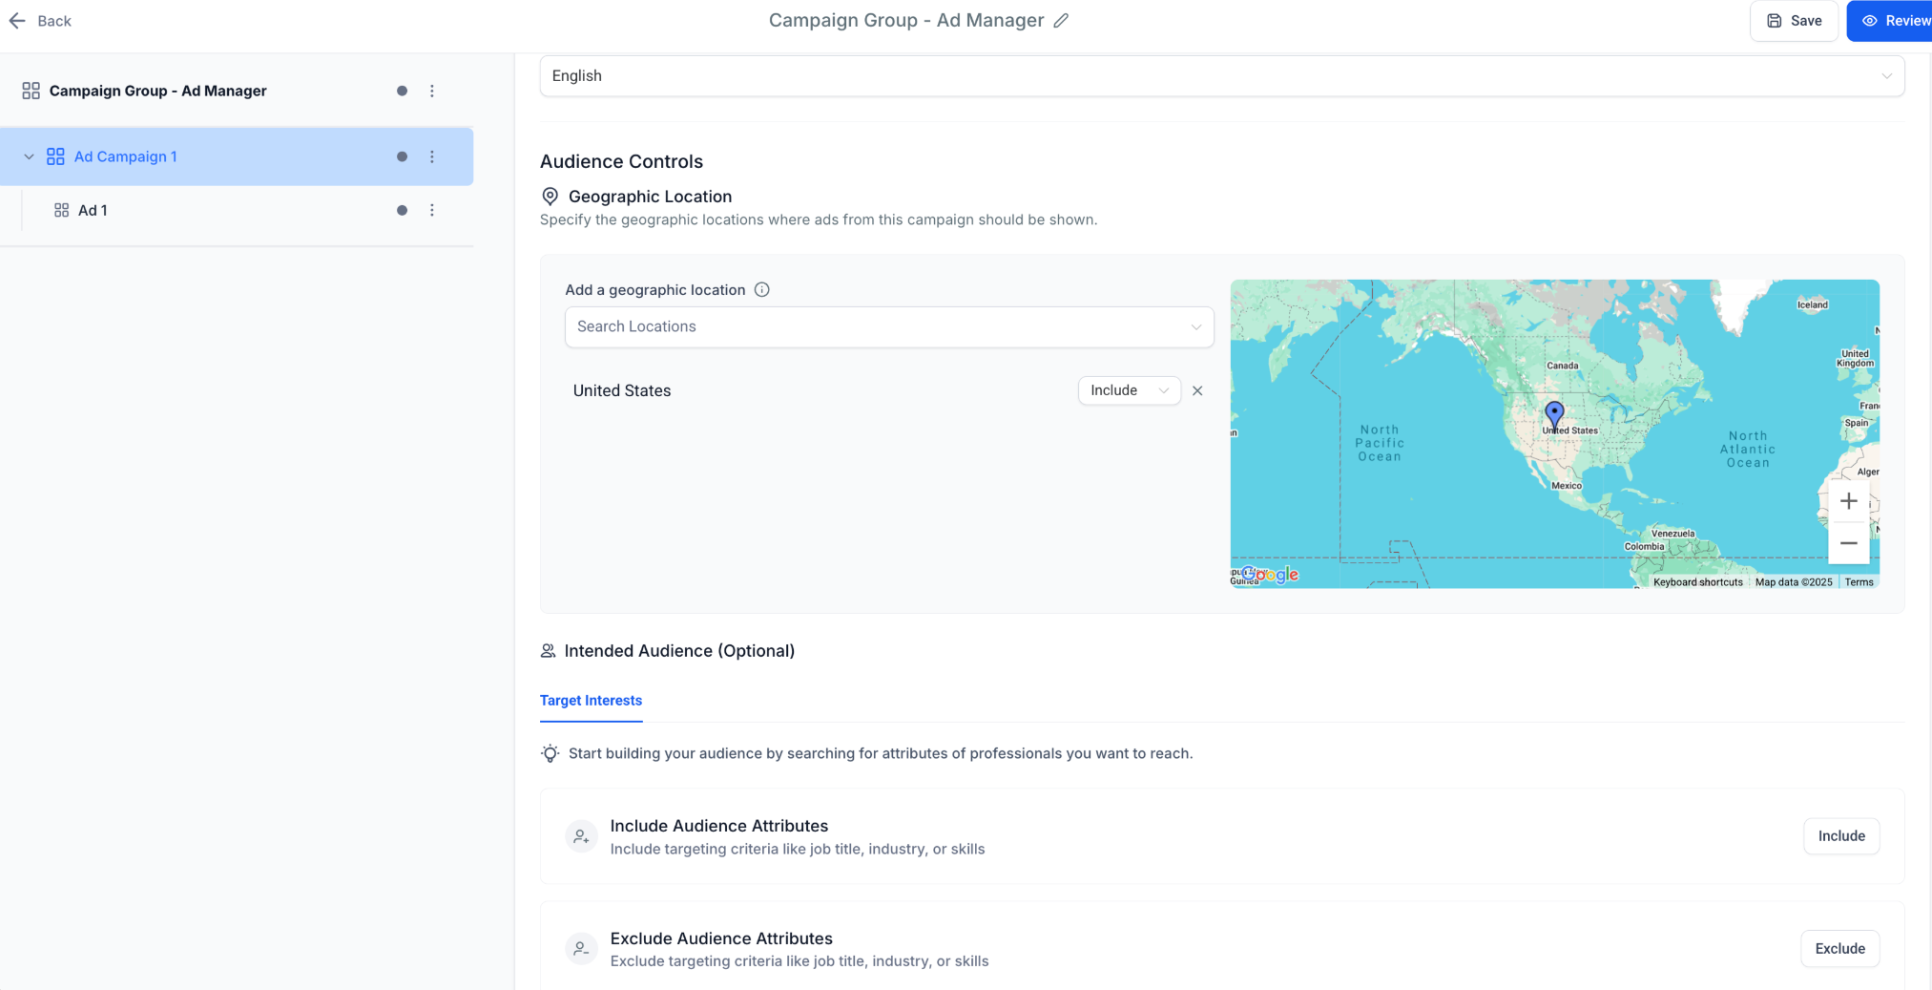
Audience targeting determines who can see your LinkedIn ads.
Required Targeting
Location – Include or exclude geographic locations.
Optional Filters
Available targeting attributes include:
Job Title
Industry
Company Size
Seniority
Skills
Education
Interests & Traits
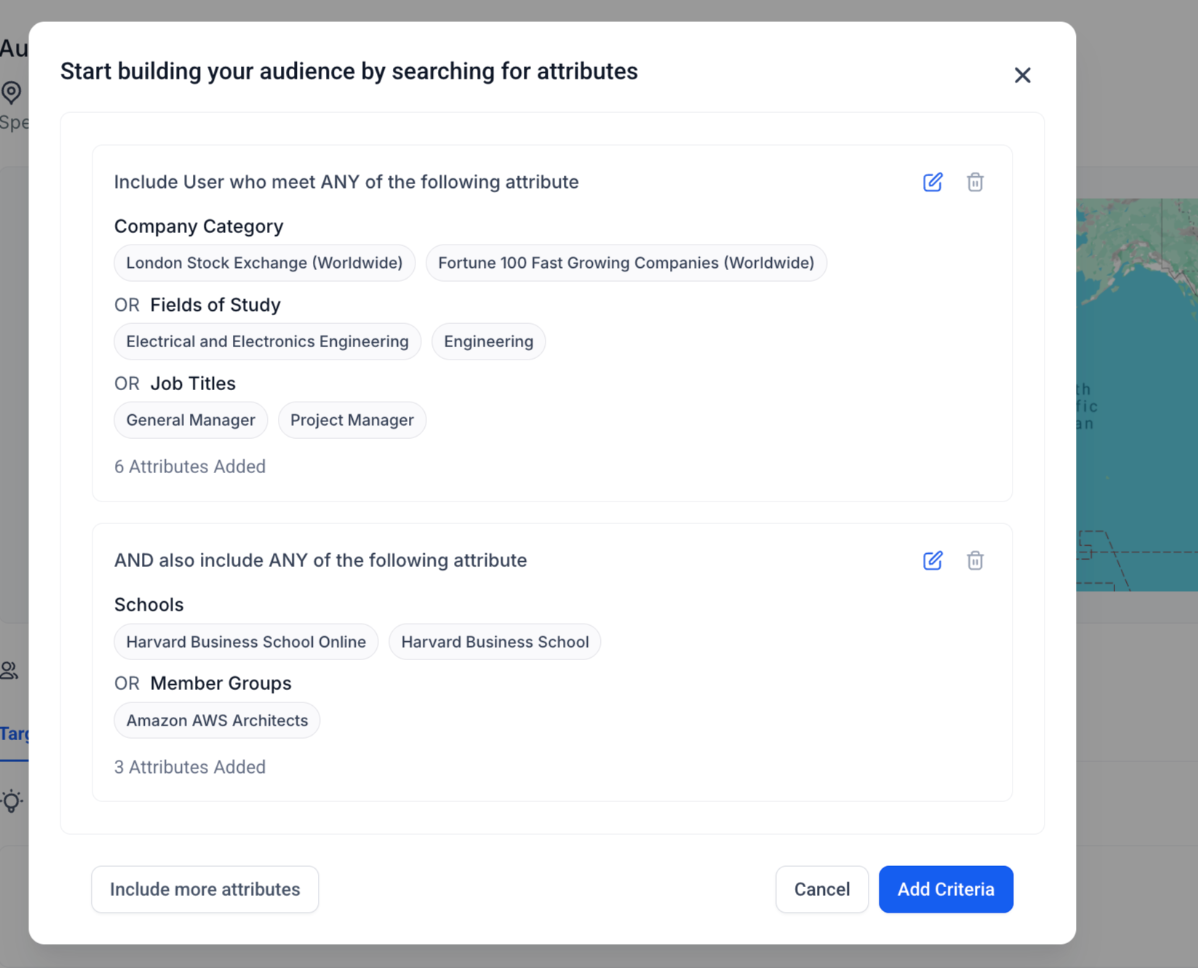
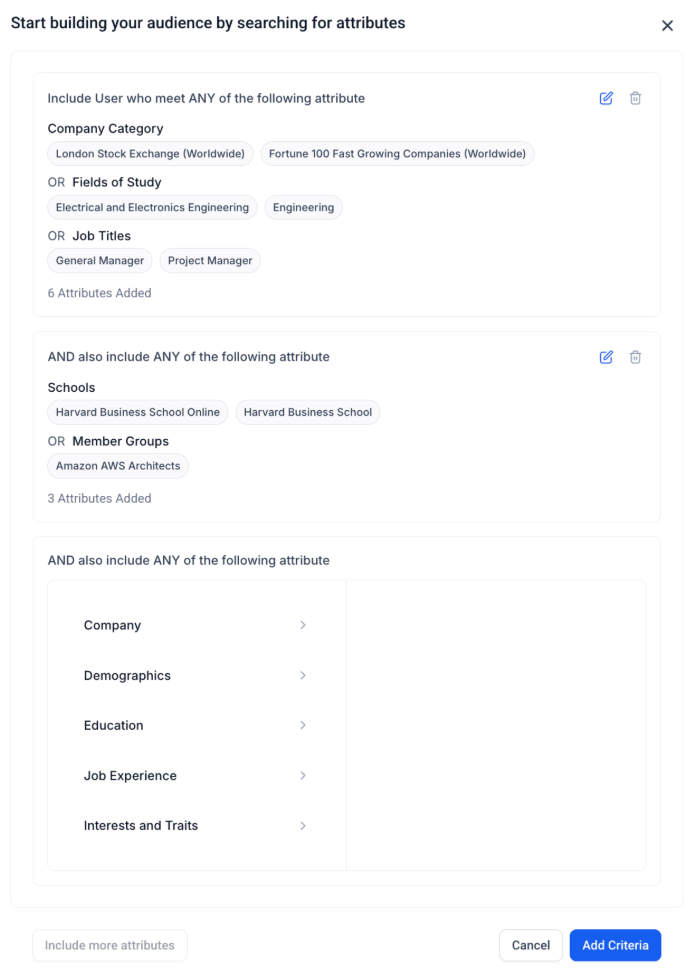
Logic Builder
You can further refine targeting by combining attribute groups:
Add up to 3 attribute groups.
Use OR logic within a group.
Use AND logic between groups.
Include and exclude targeting attributes.
For example:
Group 1: Job Title = Marketing Manager OR Director
Group 2: Industry = Healthcare
Exclude: Interns
Step 3: Create Ads Inside the Campaign
Each campaign can contain multiple ads.
Fields Defined at Ad Level
Configure the following:
Ad Name – An internal identifier for the ad.
Media Type – Uses the media type selected at the campaign level.
Supported media types include:
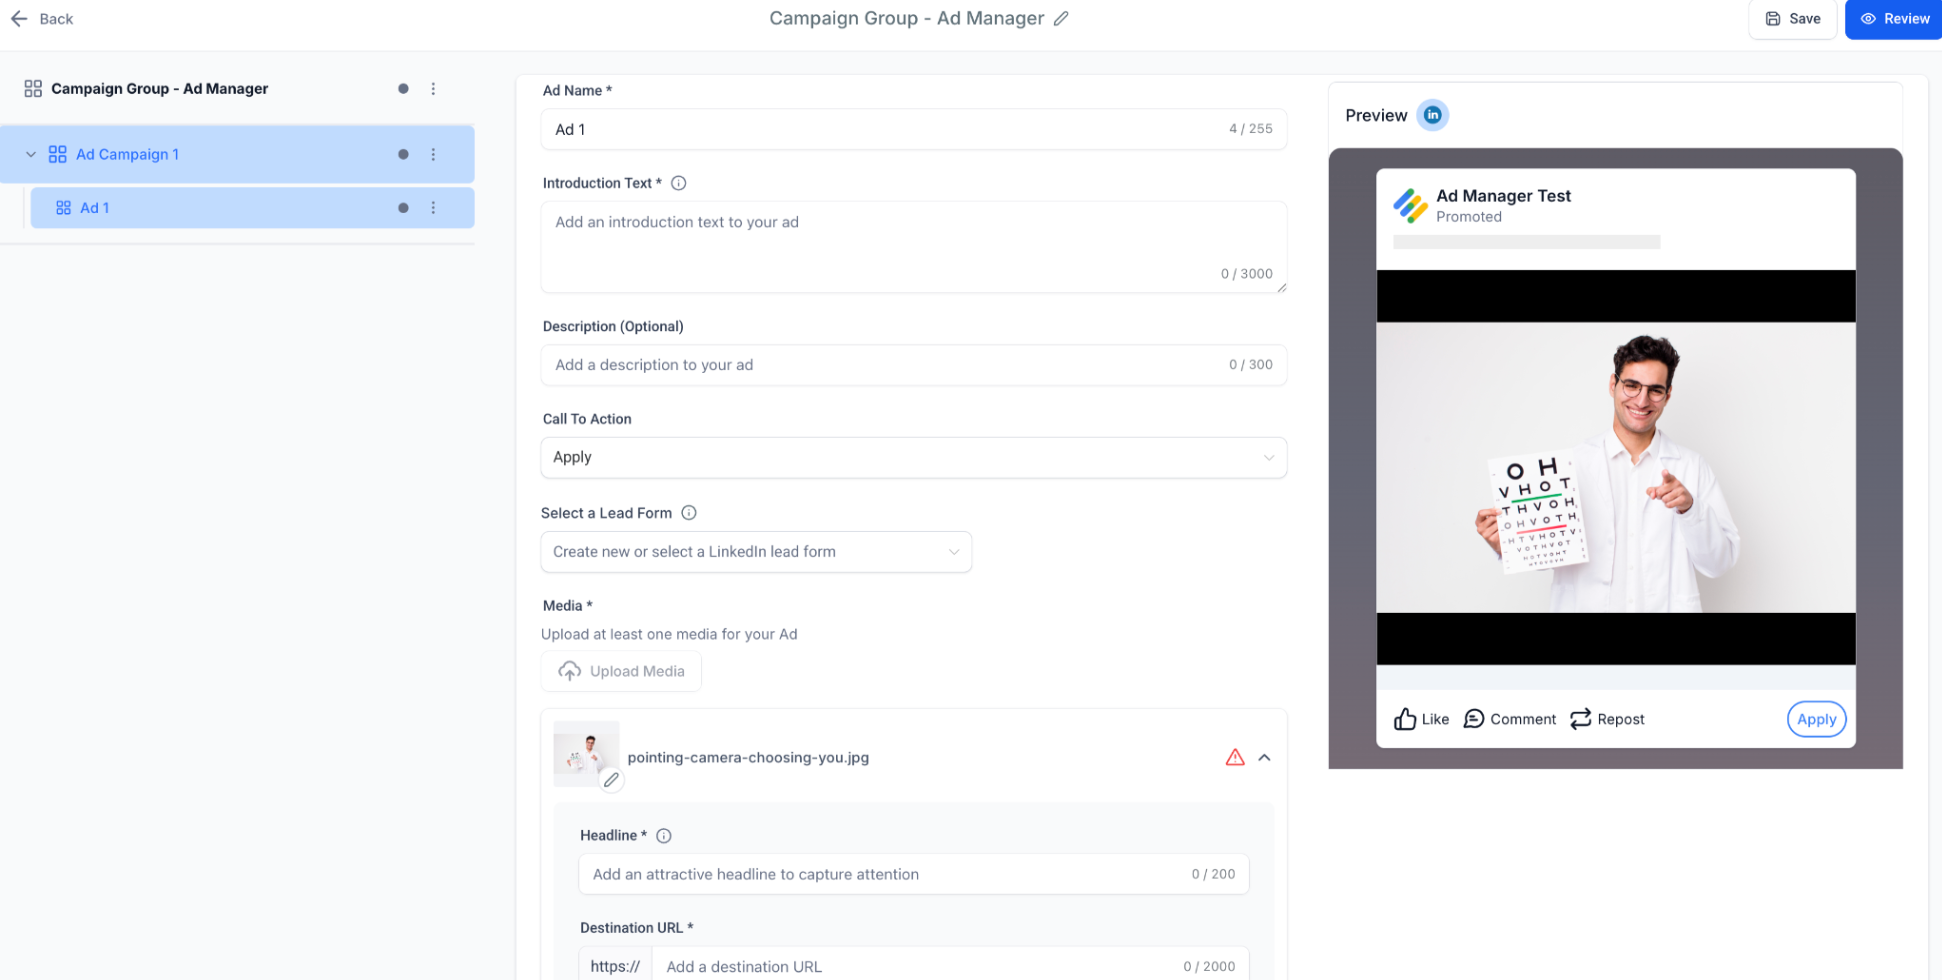
Single Image Ad: Upload one image for the ad.
Single Video Ad: Upload one video for the ad.
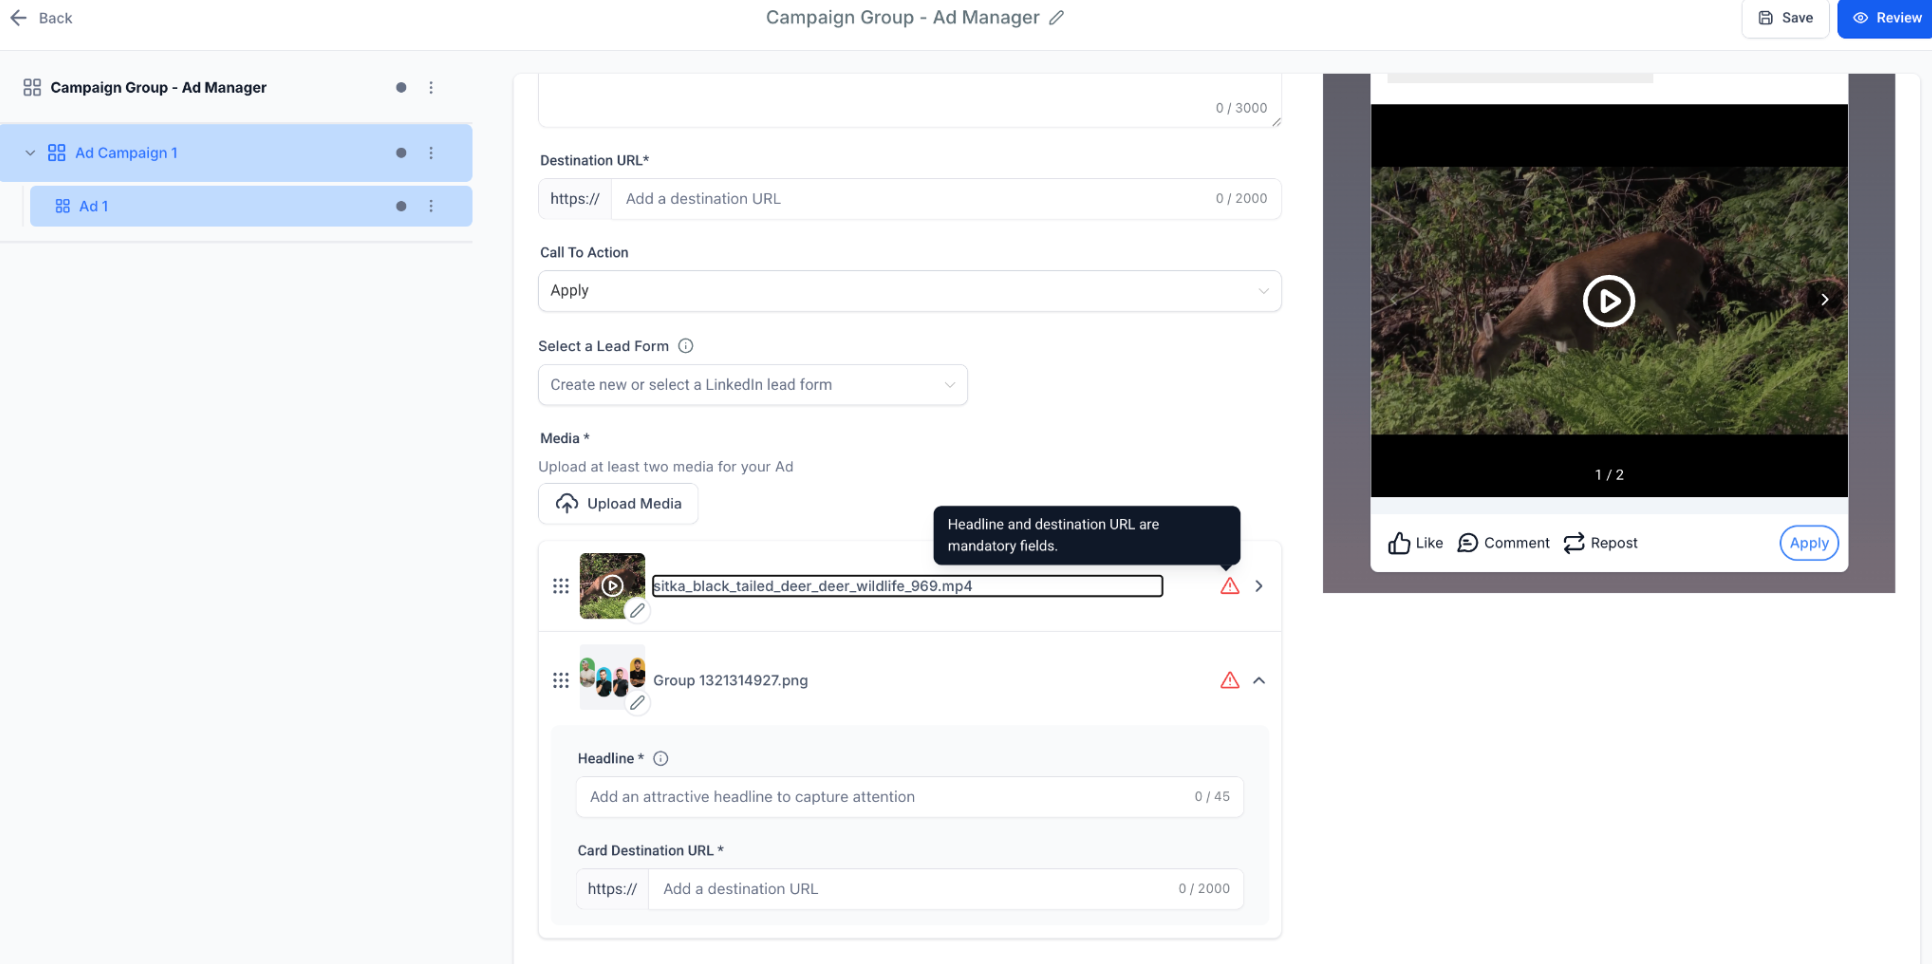
Carousel Ad: Create multiple cards. Each card can include:
Headline
Image or video
Destination URL
Creative Fields
Configure the content displayed in your ad:
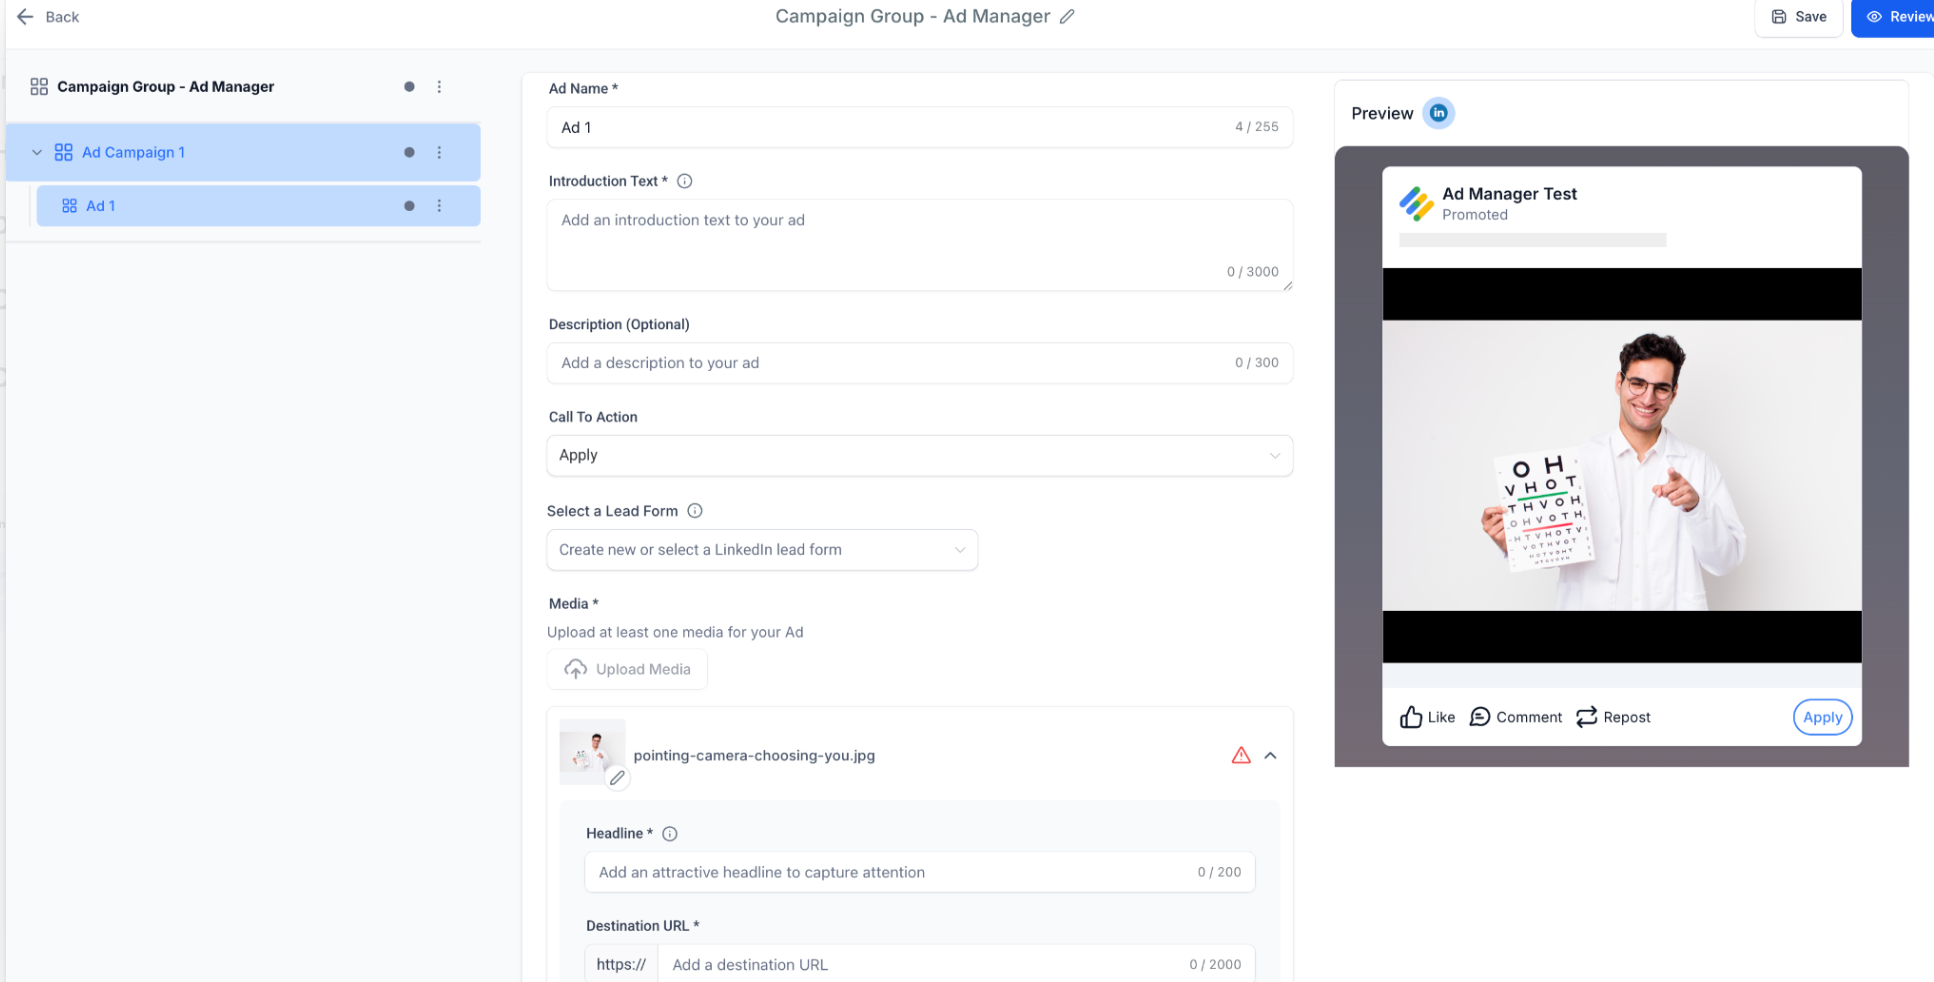
Introduction Text – Up to 3,000 characters.
Headline – Up to 70 characters. This field is required.
Description – Up to 300 characters. This field is optional.
Call-to-Action – Select an available LinkedIn CTA, such as Learn More, Download, or Apply.
Destination URL – Required for all ads. If the URL does not include a protocol,
https://is automatically added.
Lead Gen Forms
If you selected Lead Generation as the campaign objective, configure a LinkedIn Lead Gen Form.
Available fields include:
Form Name – Automatically generated and editable.
Headline & Description – Displayed prominently in the form.
Pre-filled Fields – Add up to 12 fields, such as Name, Email, and Job Title.
Custom Questions – Add up to 3 short-answer or multiple-choice questions.
Hidden Fields – Add up to 20 hidden fields, such as UTM tags or campaign IDs.
Privacy Section – Add the required privacy URL and optional disclosure text.
Consent Checkboxes – Add up to 5 consent checkboxes.
Confirmation Page – Configure a thank-you message and an optional CTA, such as Visit Website, Download, or Call.
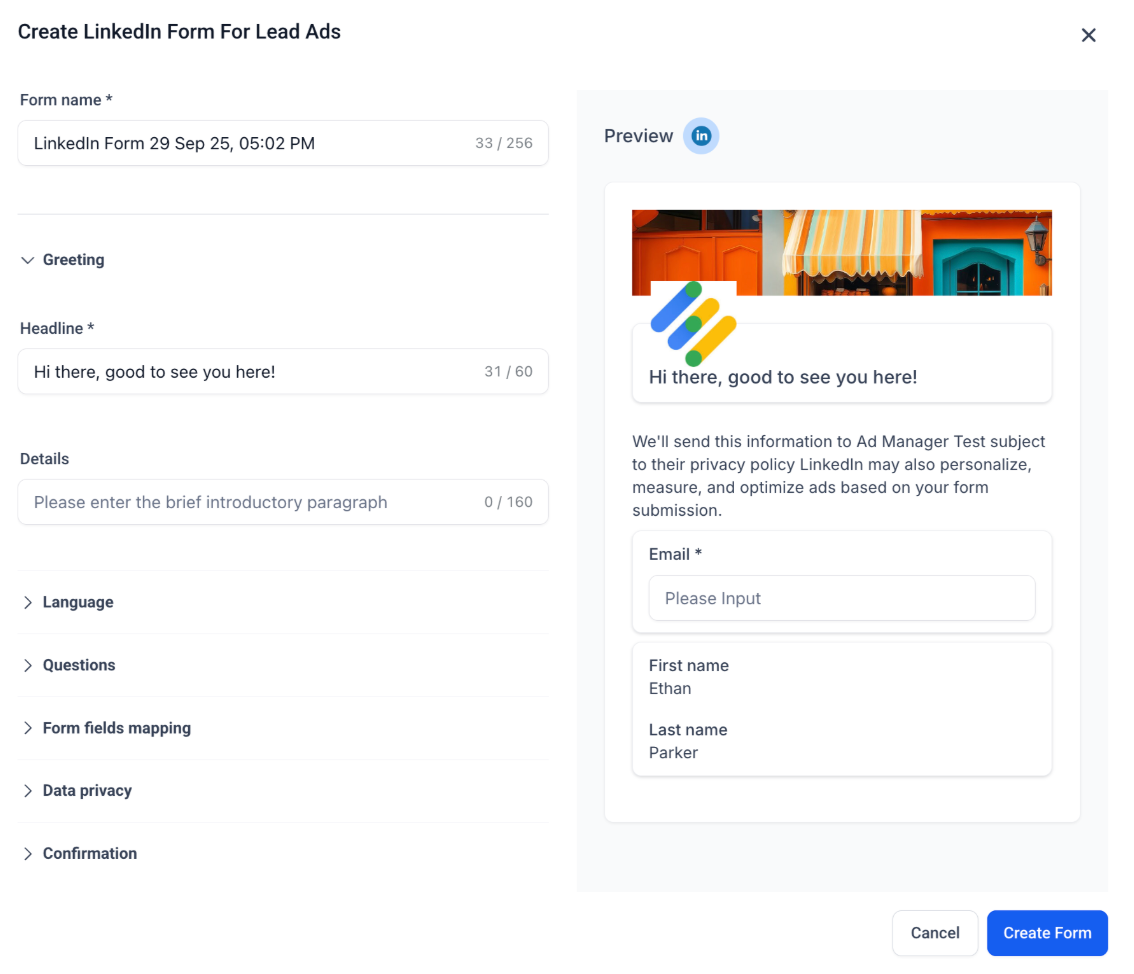
For detailed instructions, see How to create a LinkedIn lead form in Ad Manager.
Step 4: Review & Publish
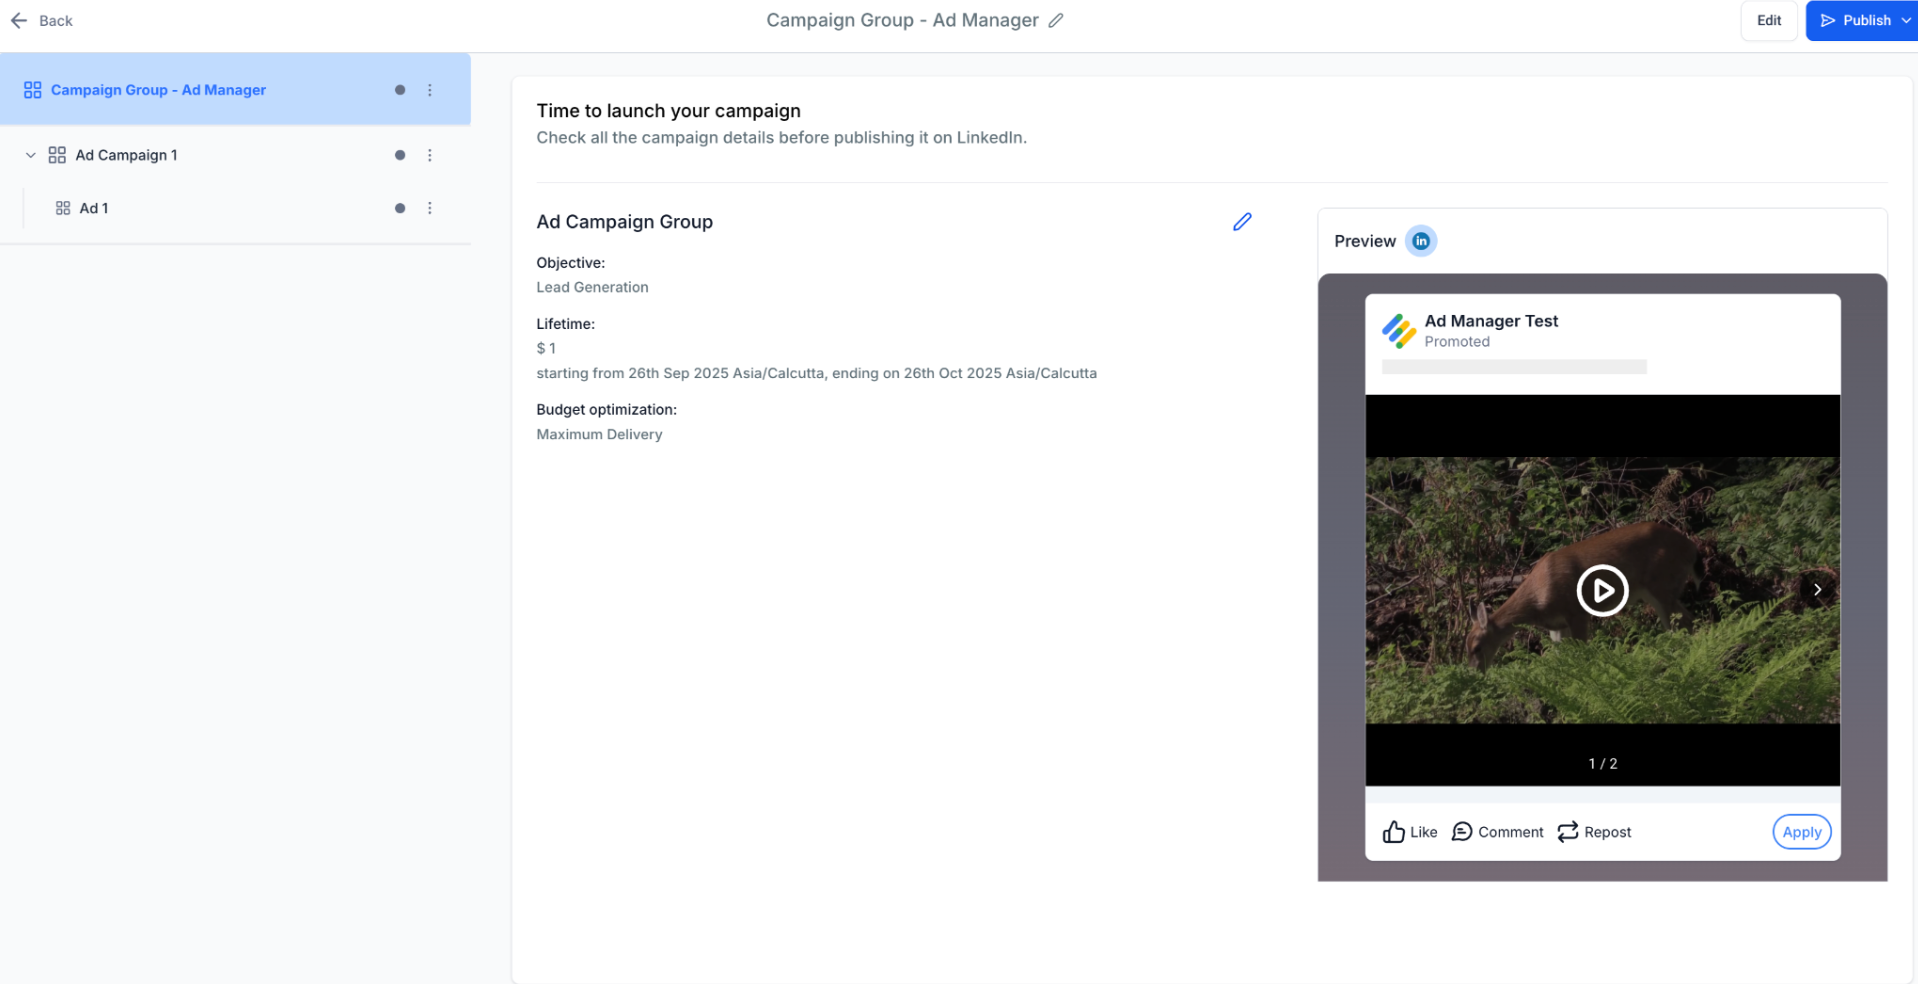
Before publishing the campaign, review its configuration on the Review & Publish screen.
Review:
Campaign objective
Schedule
Optimization mode
Full creative preview for desktop and mobile
Ad Manager also validates the campaign before publishing. Validation checks include:
Required fields are completed.
Destination URLs are valid.
Resolve any validation issues before publishing the campaign.
Step 5: View Campaign Group Performance
After publishing, navigate to Statistics > LinkedIn to review campaign performance.
You can analyze results at different levels:
Campaign Group Level – Review metrics such as impressions, clicks, and CTR.
Campaign Level – Review conversions and audience effectiveness.
Ad Level – Review creative performance using metrics such as CTR and conversions.
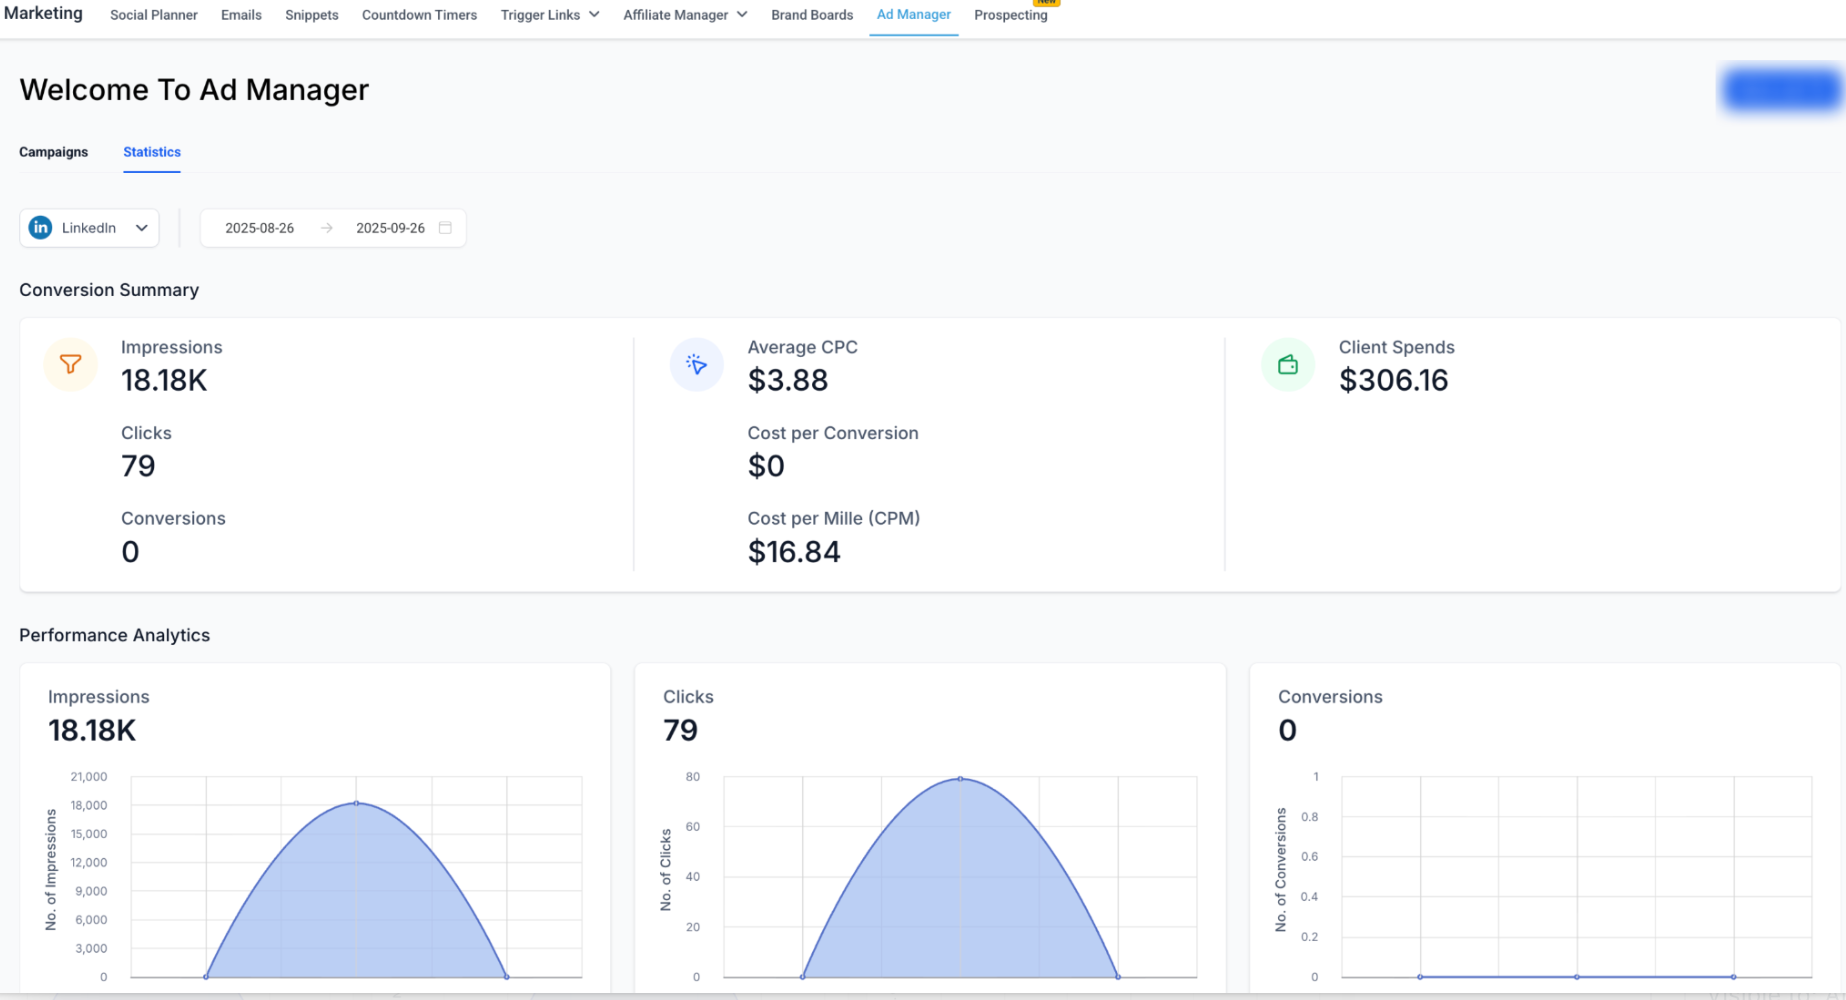
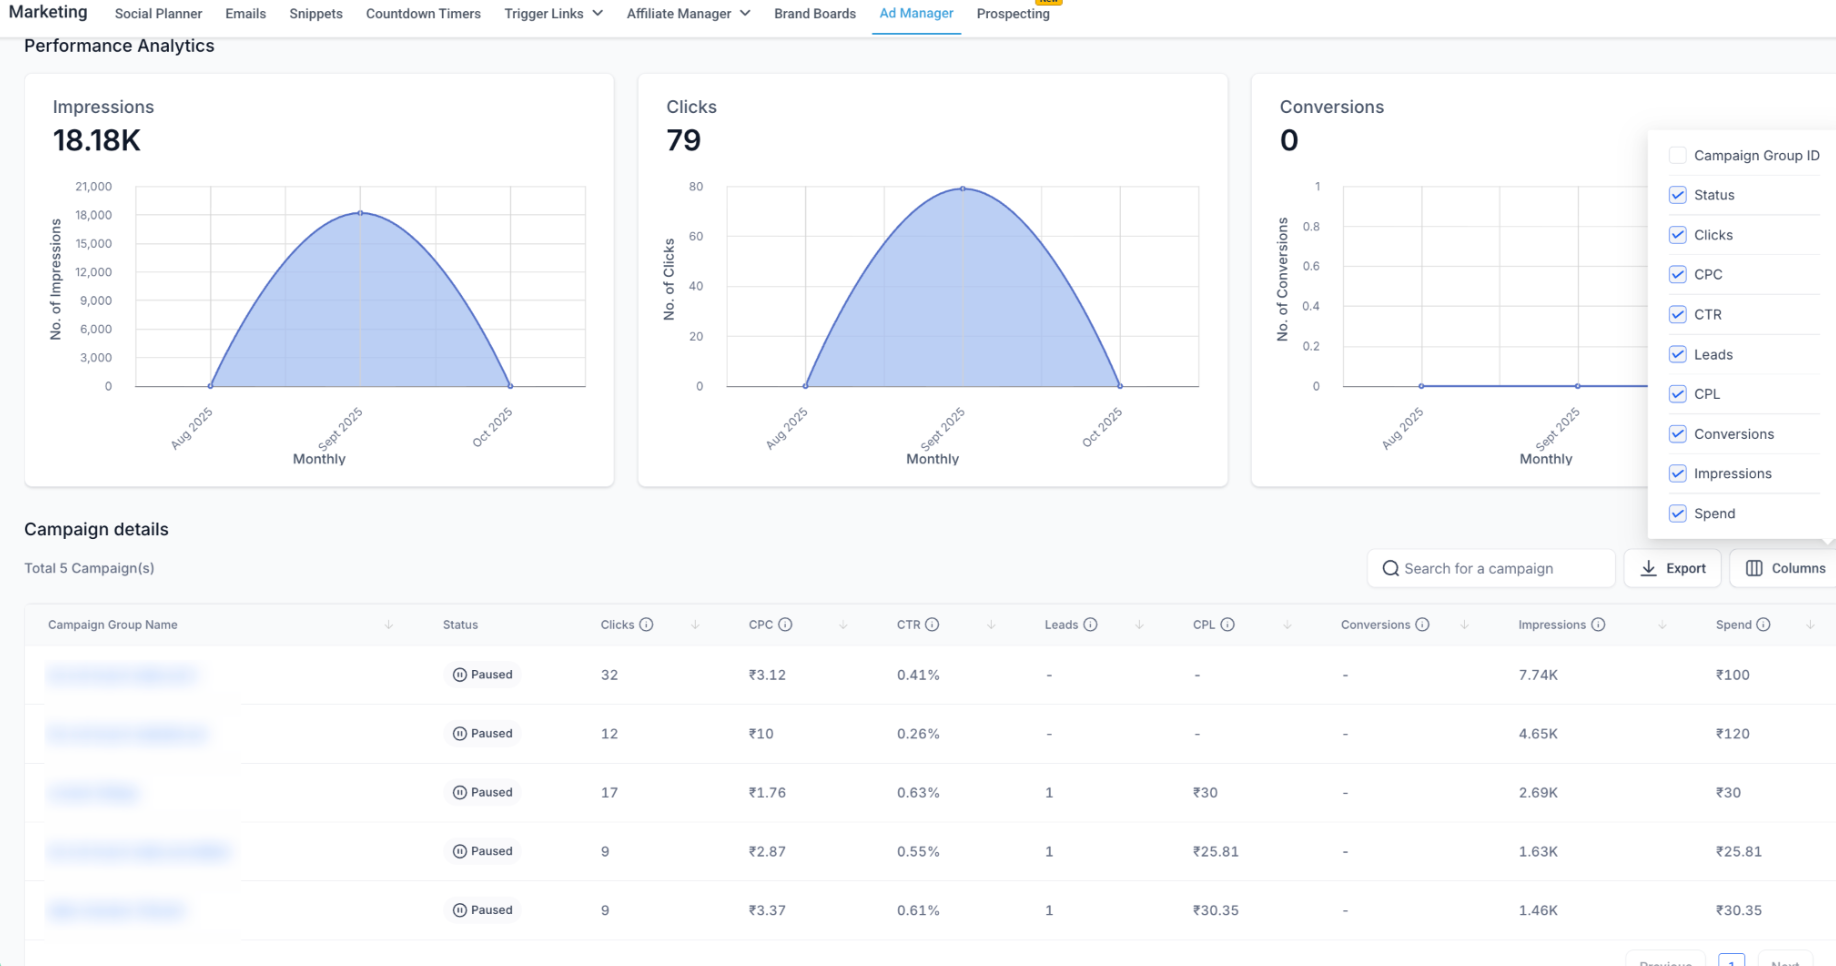
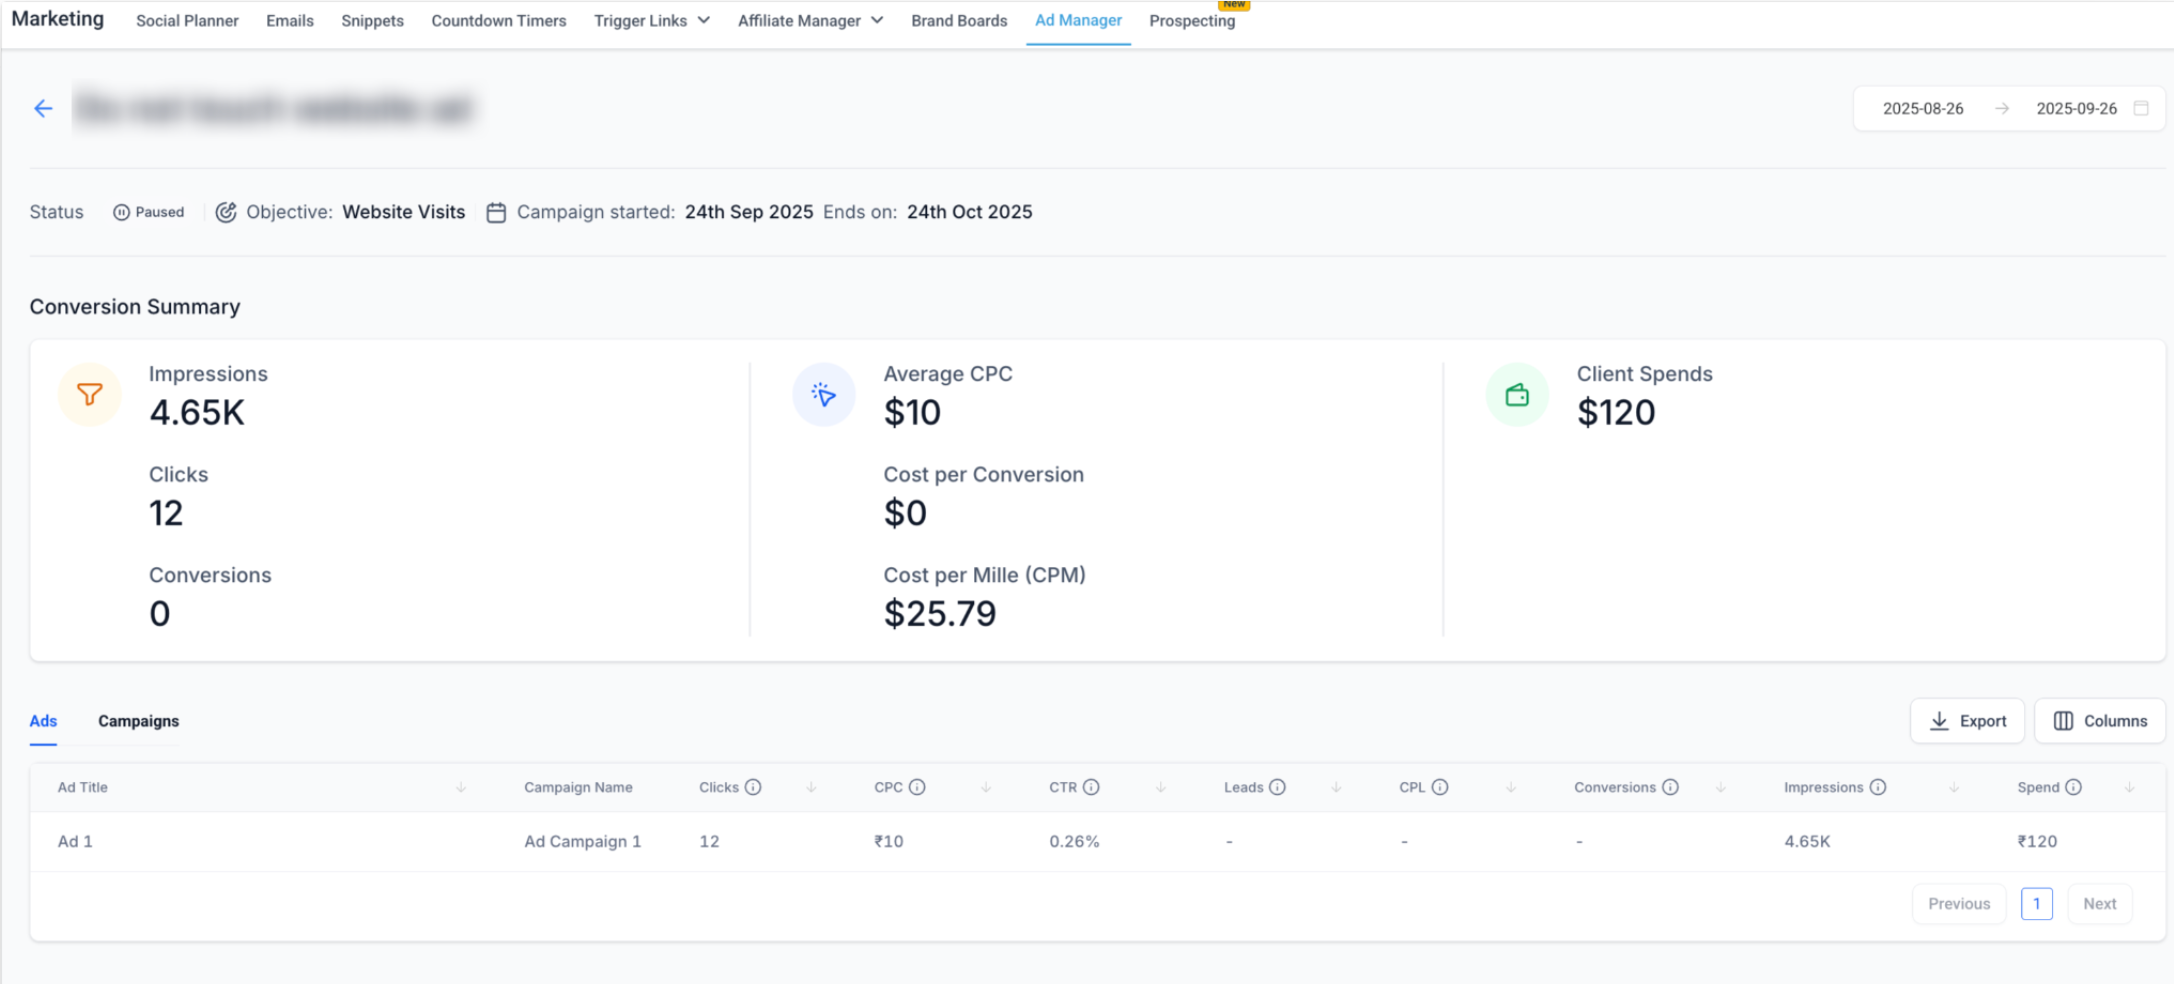
For more information about available metrics, see Understanding LinkedIn statistics in Ad Manager.
Best Practices
Organize by business objective – Group related campaigns based on their intended goal.
Keep campaigns focused – Use one audience definition for each campaign.
Use multiple ads – Run multiple ads within a campaign to compare creative performance.
Start broad and refine – Begin with broader audience targeting, then refine it with relevant filters.
Keep Lead Gen Forms concise – Shorter forms can reduce the amount of information users must provide.
Use UTM tagging for Website Traffic campaigns – Add UTM parameters to support external analytics and attribution.