
Connect Jotform with workflows to automate processes when form submissions or signed documents arrive. Jotform activity can start workflows, while the Create Submission action can write workflow data into a Jotform form. This guide explains how to connect Jotform, configure its triggers and action, map supported fields, and understand current limitations.
Learn how to connect Jotform to a sub-account, configure New Submission and New Signed Document triggers, create Jotform submissions from workflows, test trigger metadata, map supported fields, and avoid unsupported-field issues.
What Is the Jotform Integration in Workflows?
The Jotform integration connects Jotform with workflows so activity can move between the two platforms without manually exporting or copying submission data.
Jotform activity can start a workflow when a new form response is submitted or when a document containing an e-signature field is completed and signed.
Workflows can also use Create Submission to write supported workflow values into a selected Jotform form.
Key Benefits of the Jotform Integration
The Jotform workflow integration helps automate follow-up and data movement while keeping the surrounding CRM automation inside the platform.
- Respond to New Submissions Automatically: Start a workflow when a new Jotform response is submitted.
- Automate Signed-Document Follow-Up: Start workflow processes after a Jotform document containing an e-signature is completed and signed.
- Create Jotform Submissions From Workflows: Write workflow data into a selected form with the Create Submission action.
- Reduce Manual Data Entry: Map workflow values instead of copying information between platforms.
- Support Internal or Offline Records: Create Jotform submissions for information collected through another process.
- Use Submission Data Later in the Workflow: Test Jotform triggers to retrieve metadata that can be referenced by downstream workflow steps.
Prerequisites and Limitations
Understanding the connection method, trigger timing, testing requirements, and supported field types helps prevent unexpected workflow behavior before you publish an automation.
- A Jotform account must be connected to the applicable sub-account before its triggers or actions can run.
- Jotform connects through the integration flow using a Jotform API key.
- New Submission is webhook-based and starts when Jotform sends a new submission event.
- New Signed Document uses polling. The platform checks Jotform approximately every five minutes, so a short delay is expected.
- Run Test Trigger during trigger setup so metadata can be retrieved for use in later workflow steps.
- Create Submission supports 15 standard Jotform input types.
- Unsupported fields do not appear in the Create Submission mapping list.
- Unsupported fields are saved empty, including unsupported fields marked required in Jotform.
- A blank unsupported required field does not cause the workflow to raise an error; Jotform can still create and mark the submission active.
- Create Submission does not create or attach payment, amount, product, signature, or booked appointment information.
- Appointment fields do not reserve an appointment slot.
- Assign Form and Assign Prefilled Form are not included in this release.
How To Set Up Jotform in Workflows
Connect the correct Jotform account before configuring a trigger or action so Workflow Builder can load the forms and fields available to that connection.
Connect Jotform From Workflow Builder
Connecting from Workflow Builder is the most direct option when you are already creating the automation and need to configure a Jotform step.
- From the Sub-Account view, go to Automation → Workflows.
- Create a new workflow or open an existing workflow.
- For a trigger, click Add New Trigger.
- For an action, click the + button at the point where the action should run.
- Search for Jotform.
- Select the Jotform trigger or action you want to configure.
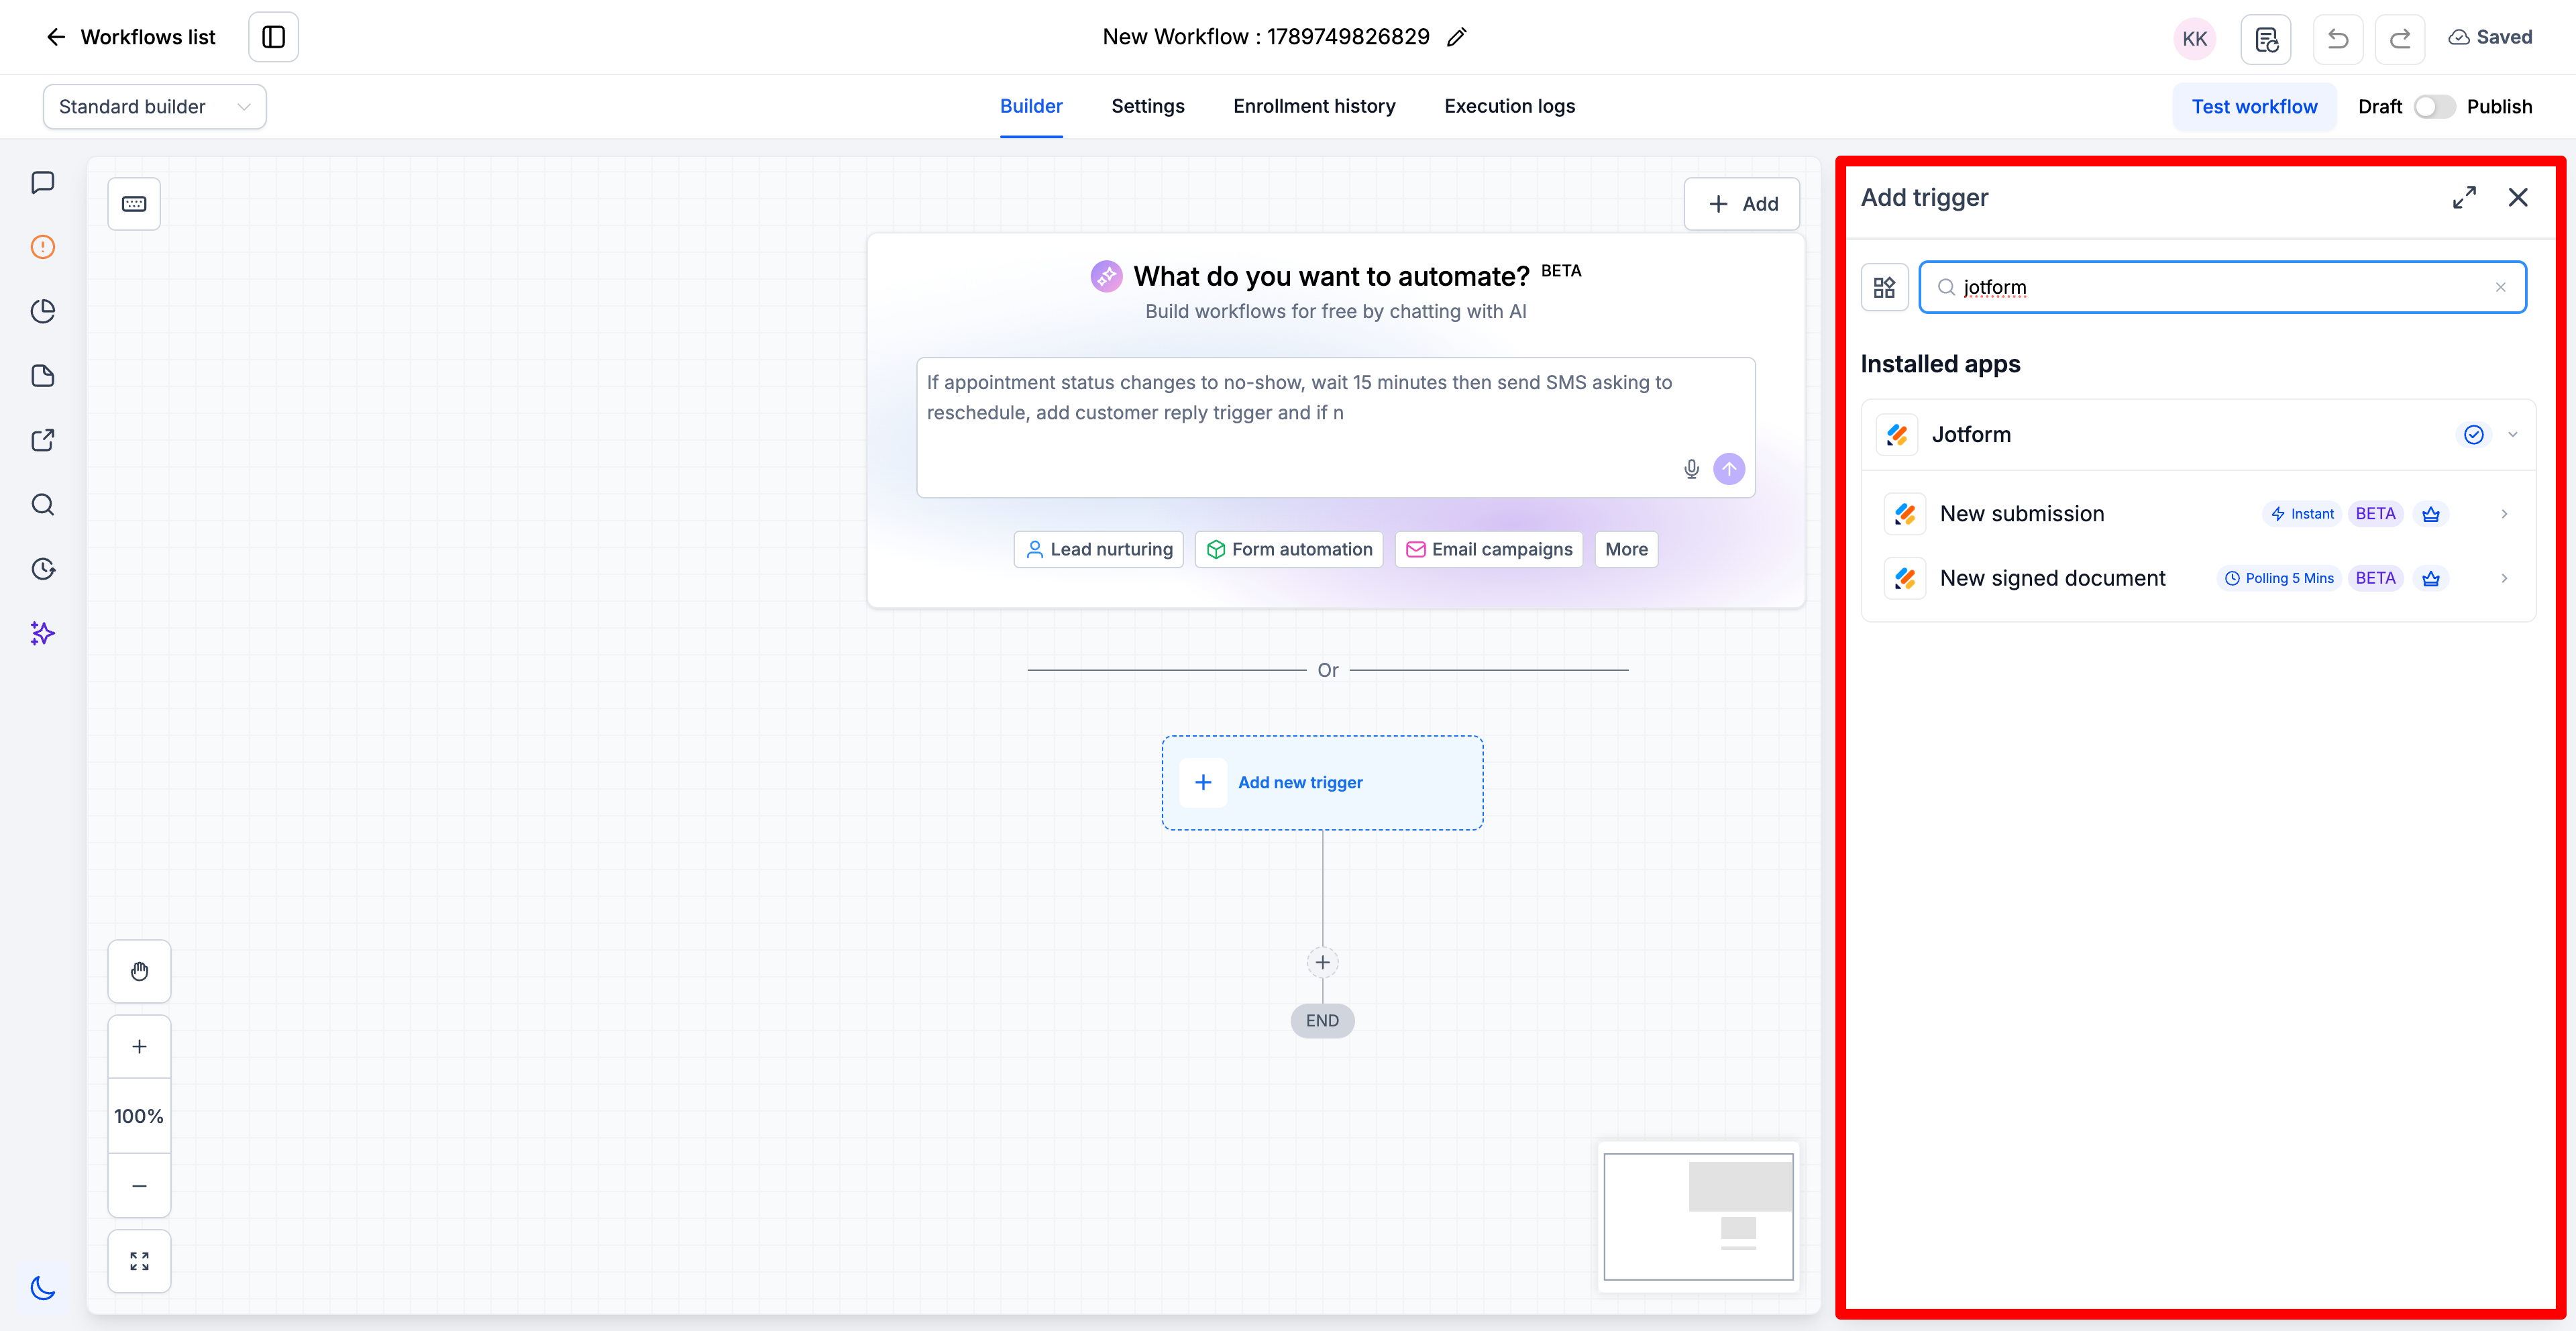
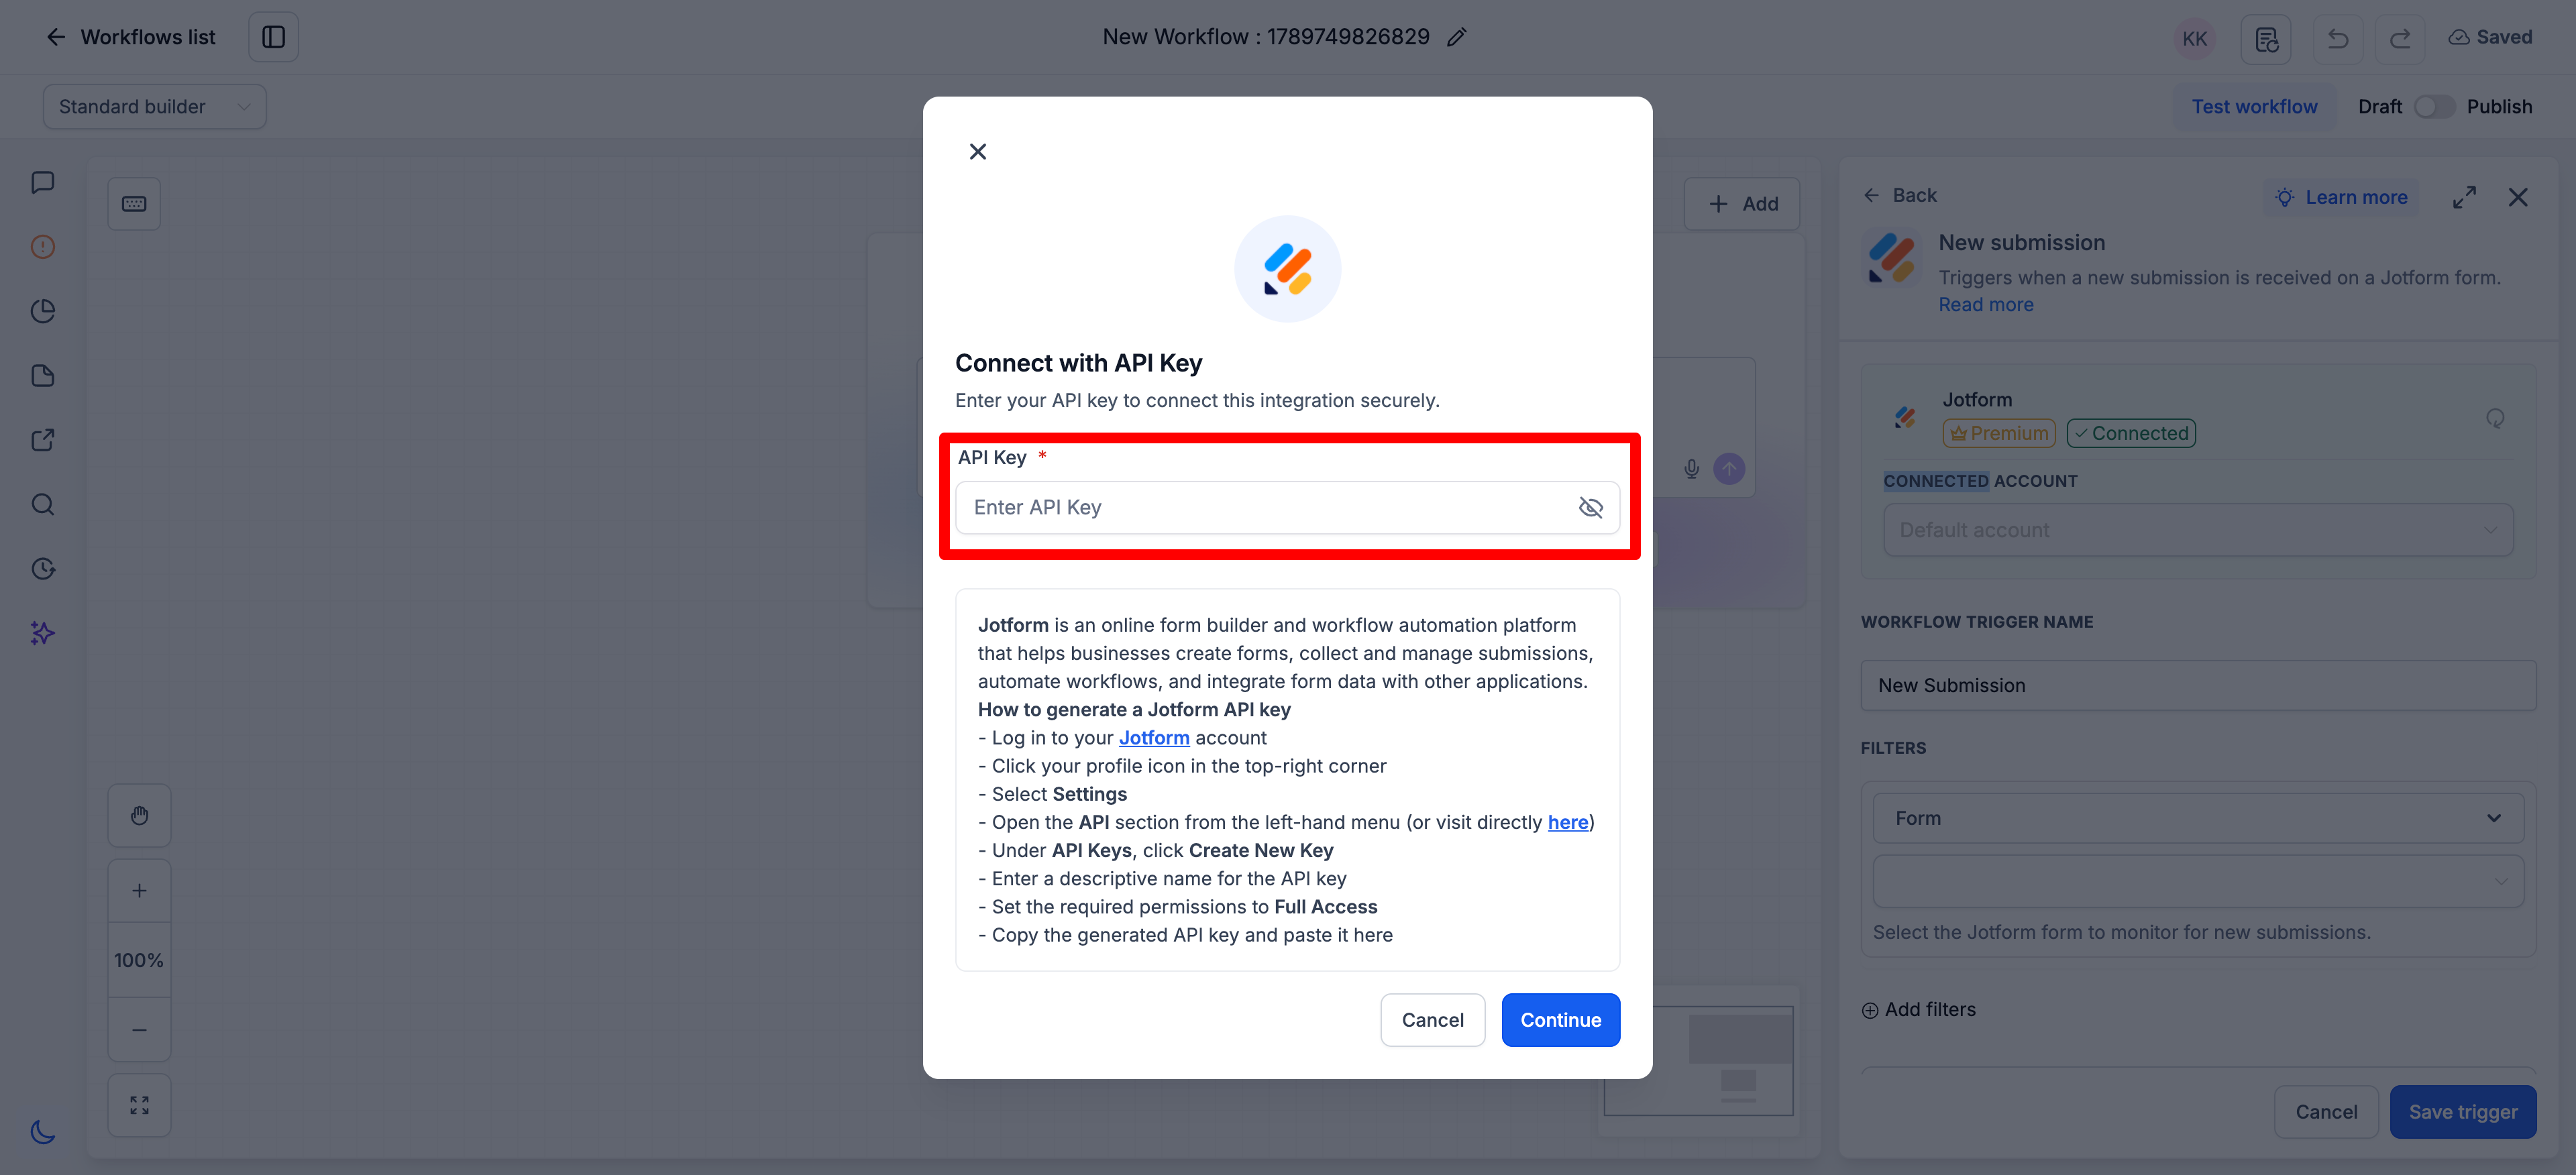
- If Jotform is not already connected, click Connect your account.
- Follow the connection instructions and provide the required Jotform API key.
- Complete the connection.
- Return to the workflow step and configure the required fields.
Connect Jotform From Settings
Connecting through Integrations is useful when you want the Jotform account ready before you begin building the workflow.
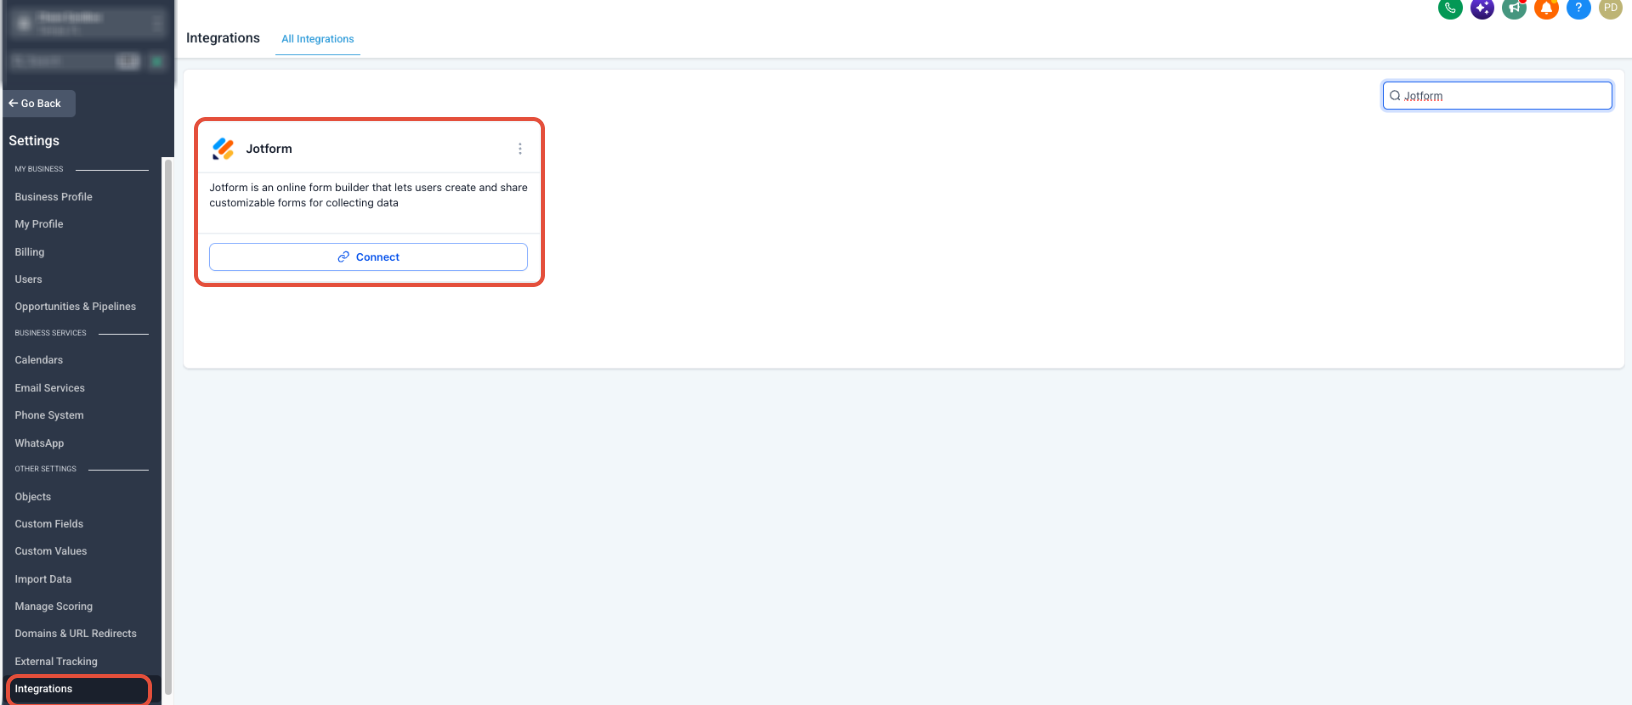
- From the Sub-Account view, open Settings.
- Select Integrations.
- Locate Jotform.
- Start the connection process.
- Provide the required Jotform API key and complete the connection.
- Return to Automation → Workflows and add the required Jotform trigger or action.
Jotform Triggers
Jotform triggers allow activity in Jotform to start a workflow. The two available triggers use different delivery methods, so their expected timing is different.
New Submission
New Submission uses a webhook so Jotform can notify the platform when a new response is submitted to the selected form.
- Go to Automation → Workflows and create or open a workflow.
- Click Add New Trigger.
- Search for Jotform and select New Submission.
- Connect the Jotform account if required.
- Give the trigger a name and complete the required configuration.
- Select the applicable Jotform form.
- Click Test Trigger and review the test data returned from Jotform.
- Click Save trigger.
- Add the downstream workflow actions and publish the workflow when it is ready.
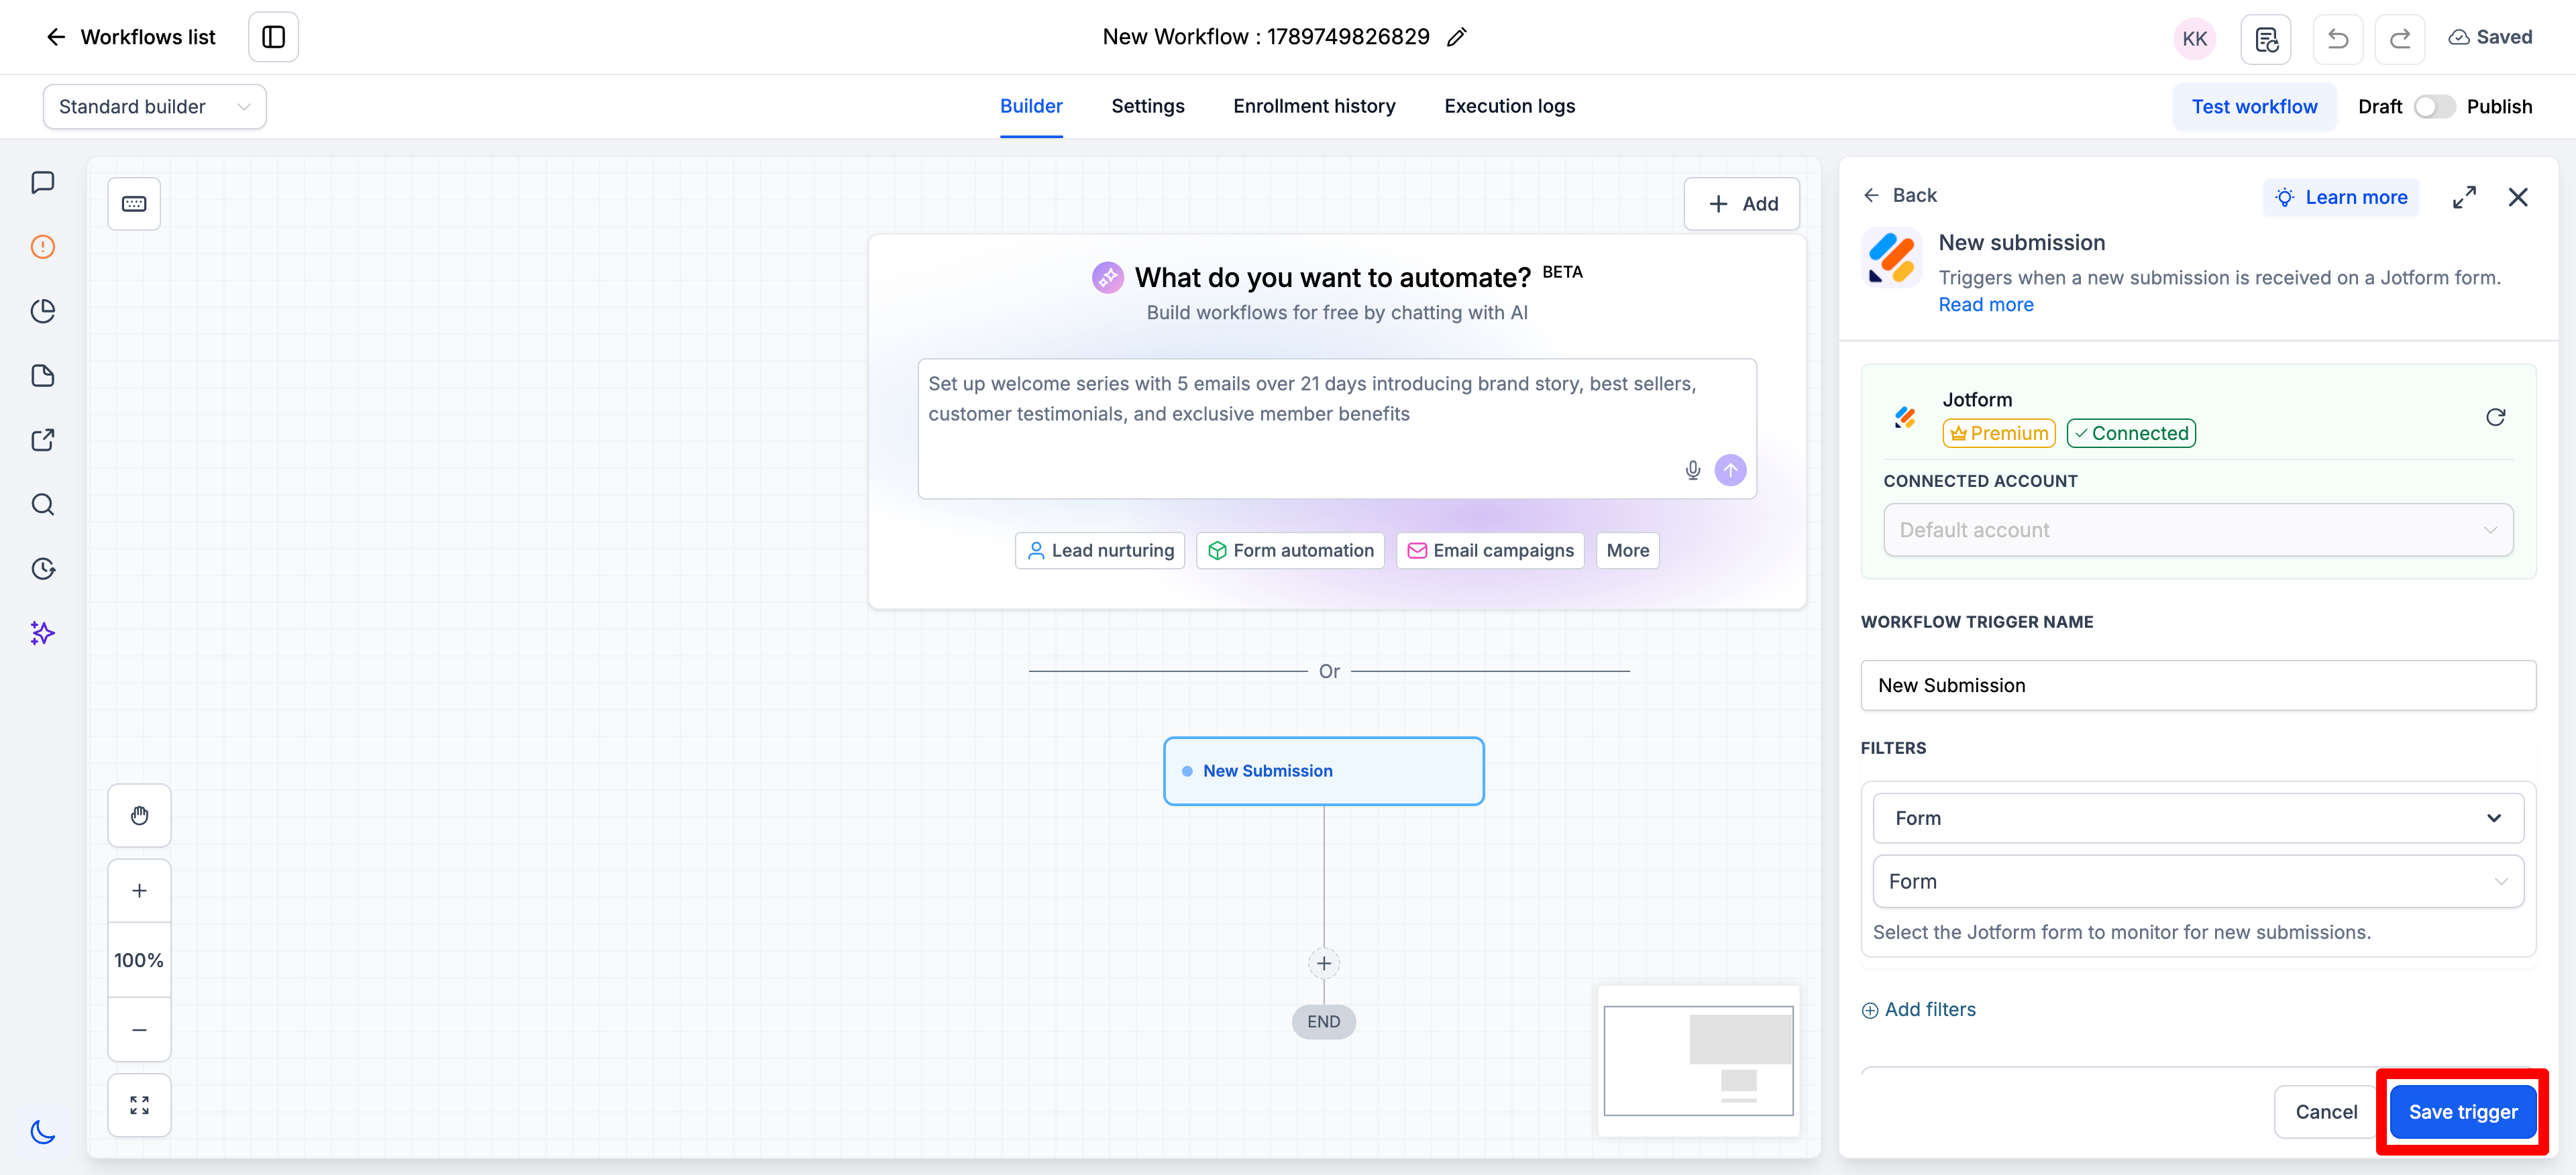
Why testing matters: Test Trigger retrieves Jotform metadata so supported submission values can become available for use in later workflow steps.
New Signed Document
New Signed Document starts a workflow after a Jotform document containing an e-signature field is completed and signed. This trigger uses polling rather than the webhook delivery used by New Submission.
- Go to Automation → Workflows and create or open a workflow.
- Click Add New Trigger.
- Search for Jotform and select New Signed Document.
- Connect the Jotform account if required.
- Give the trigger a name and complete its required configuration.
- Select the applicable Jotform form or document context presented by the trigger.
- Click Test Trigger to retrieve available metadata.
- Click Save trigger.
- Add the workflow actions and publish the workflow when it is ready.
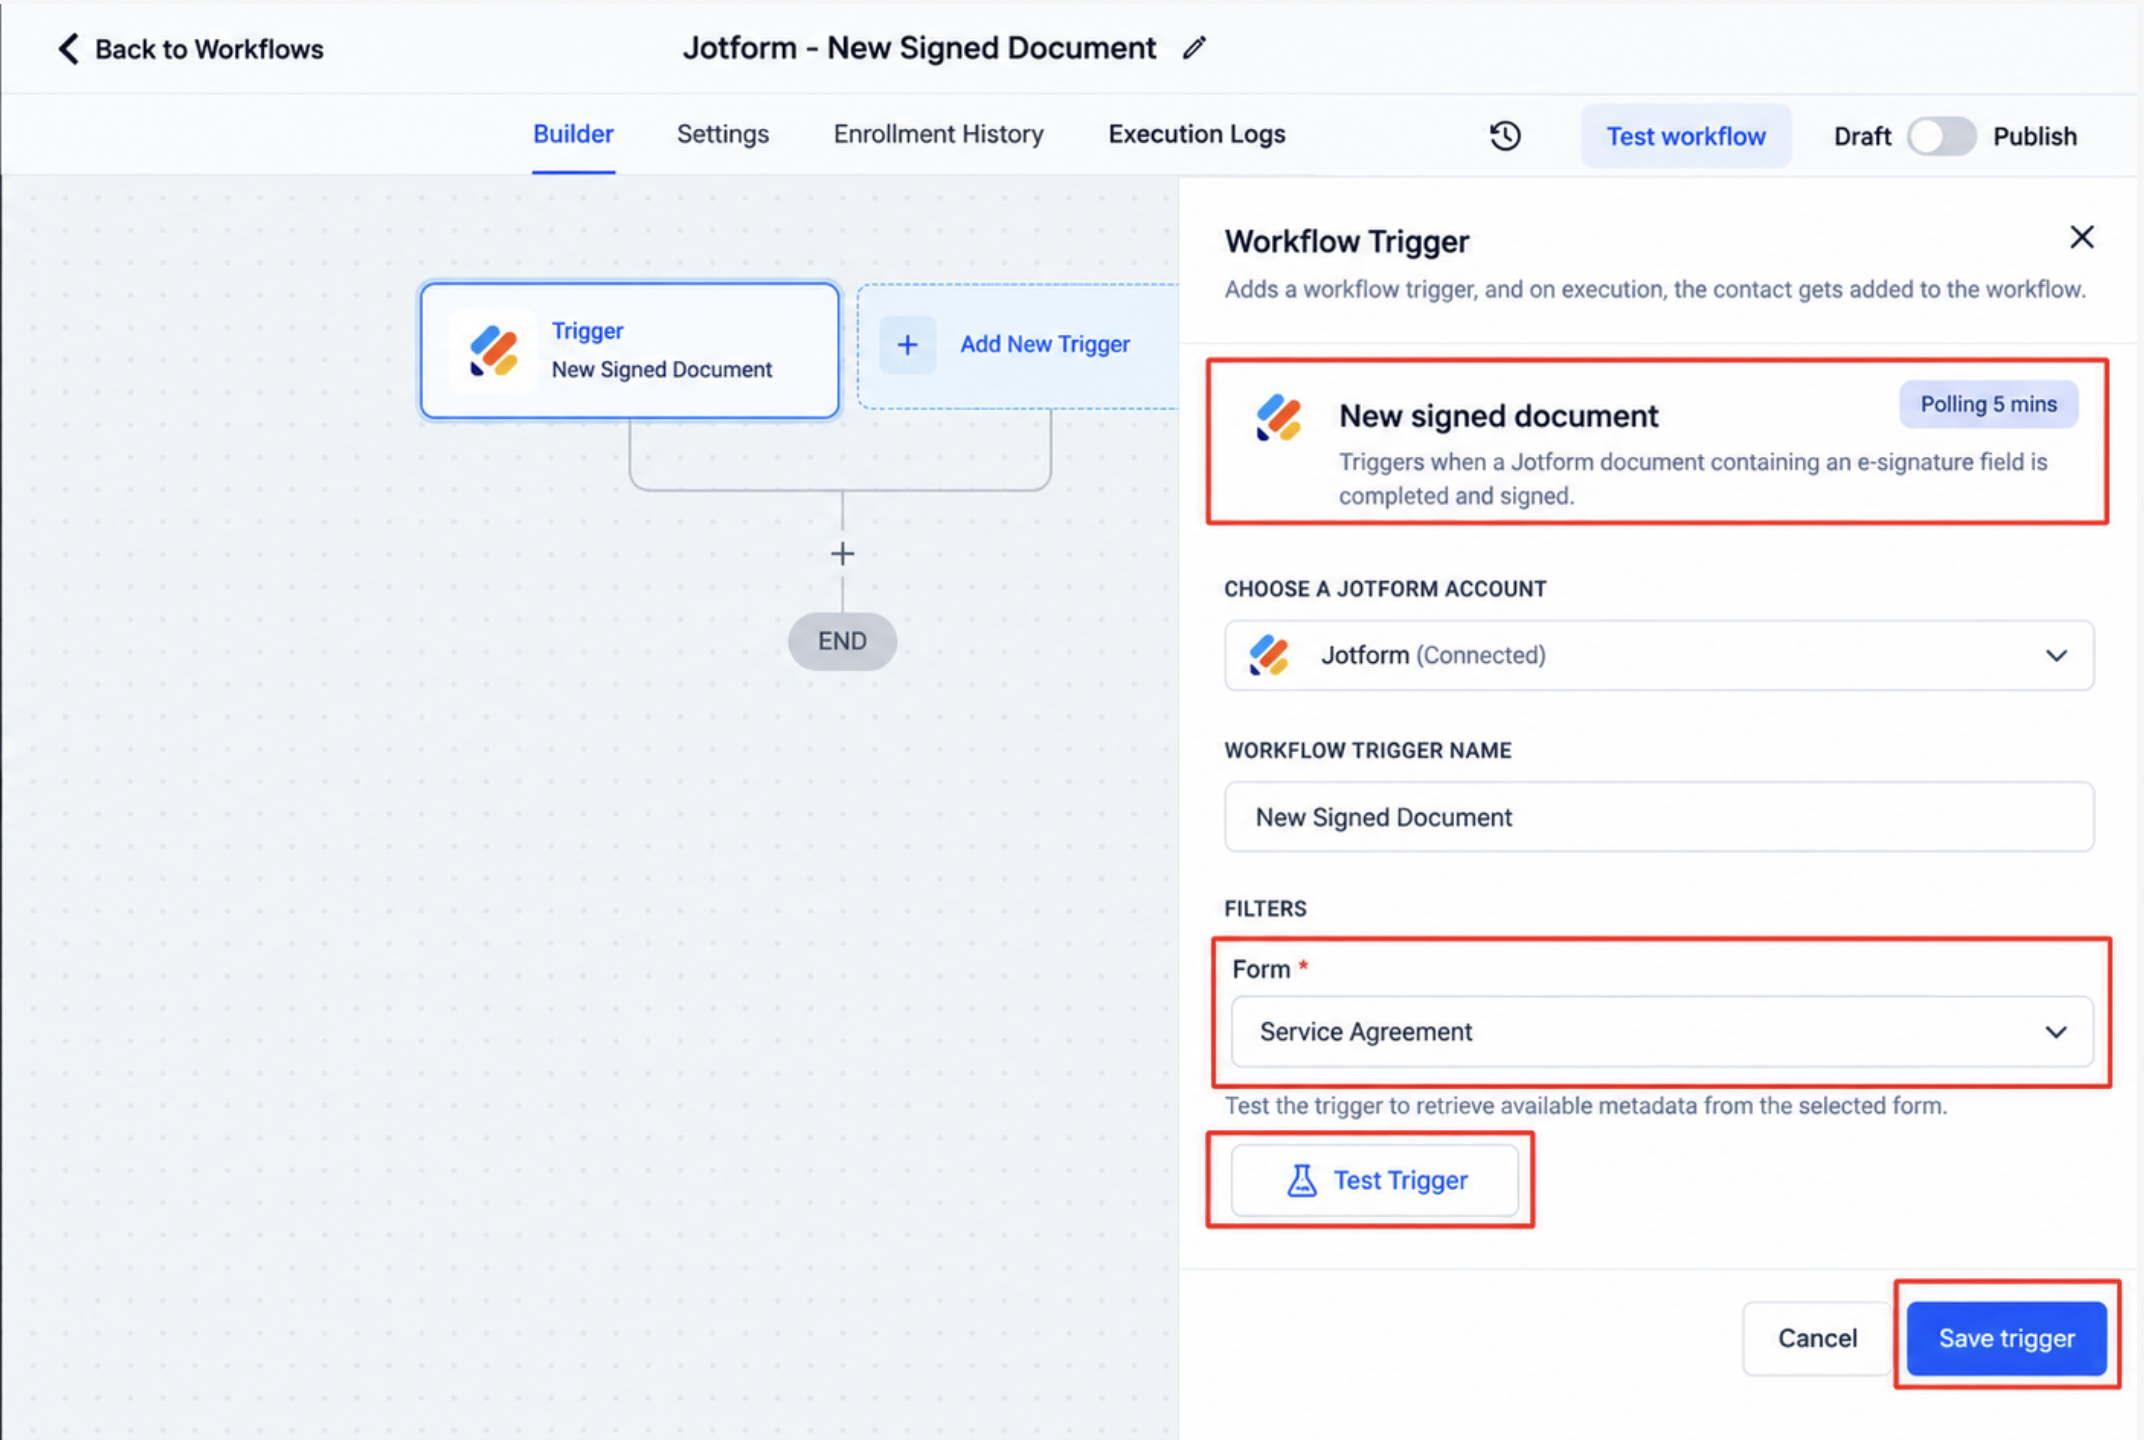
Timing: The platform checks Jotform approximately every five minutes for newly signed documents, so a short delay between signing and workflow enrollment is expected.
Create Submission Action
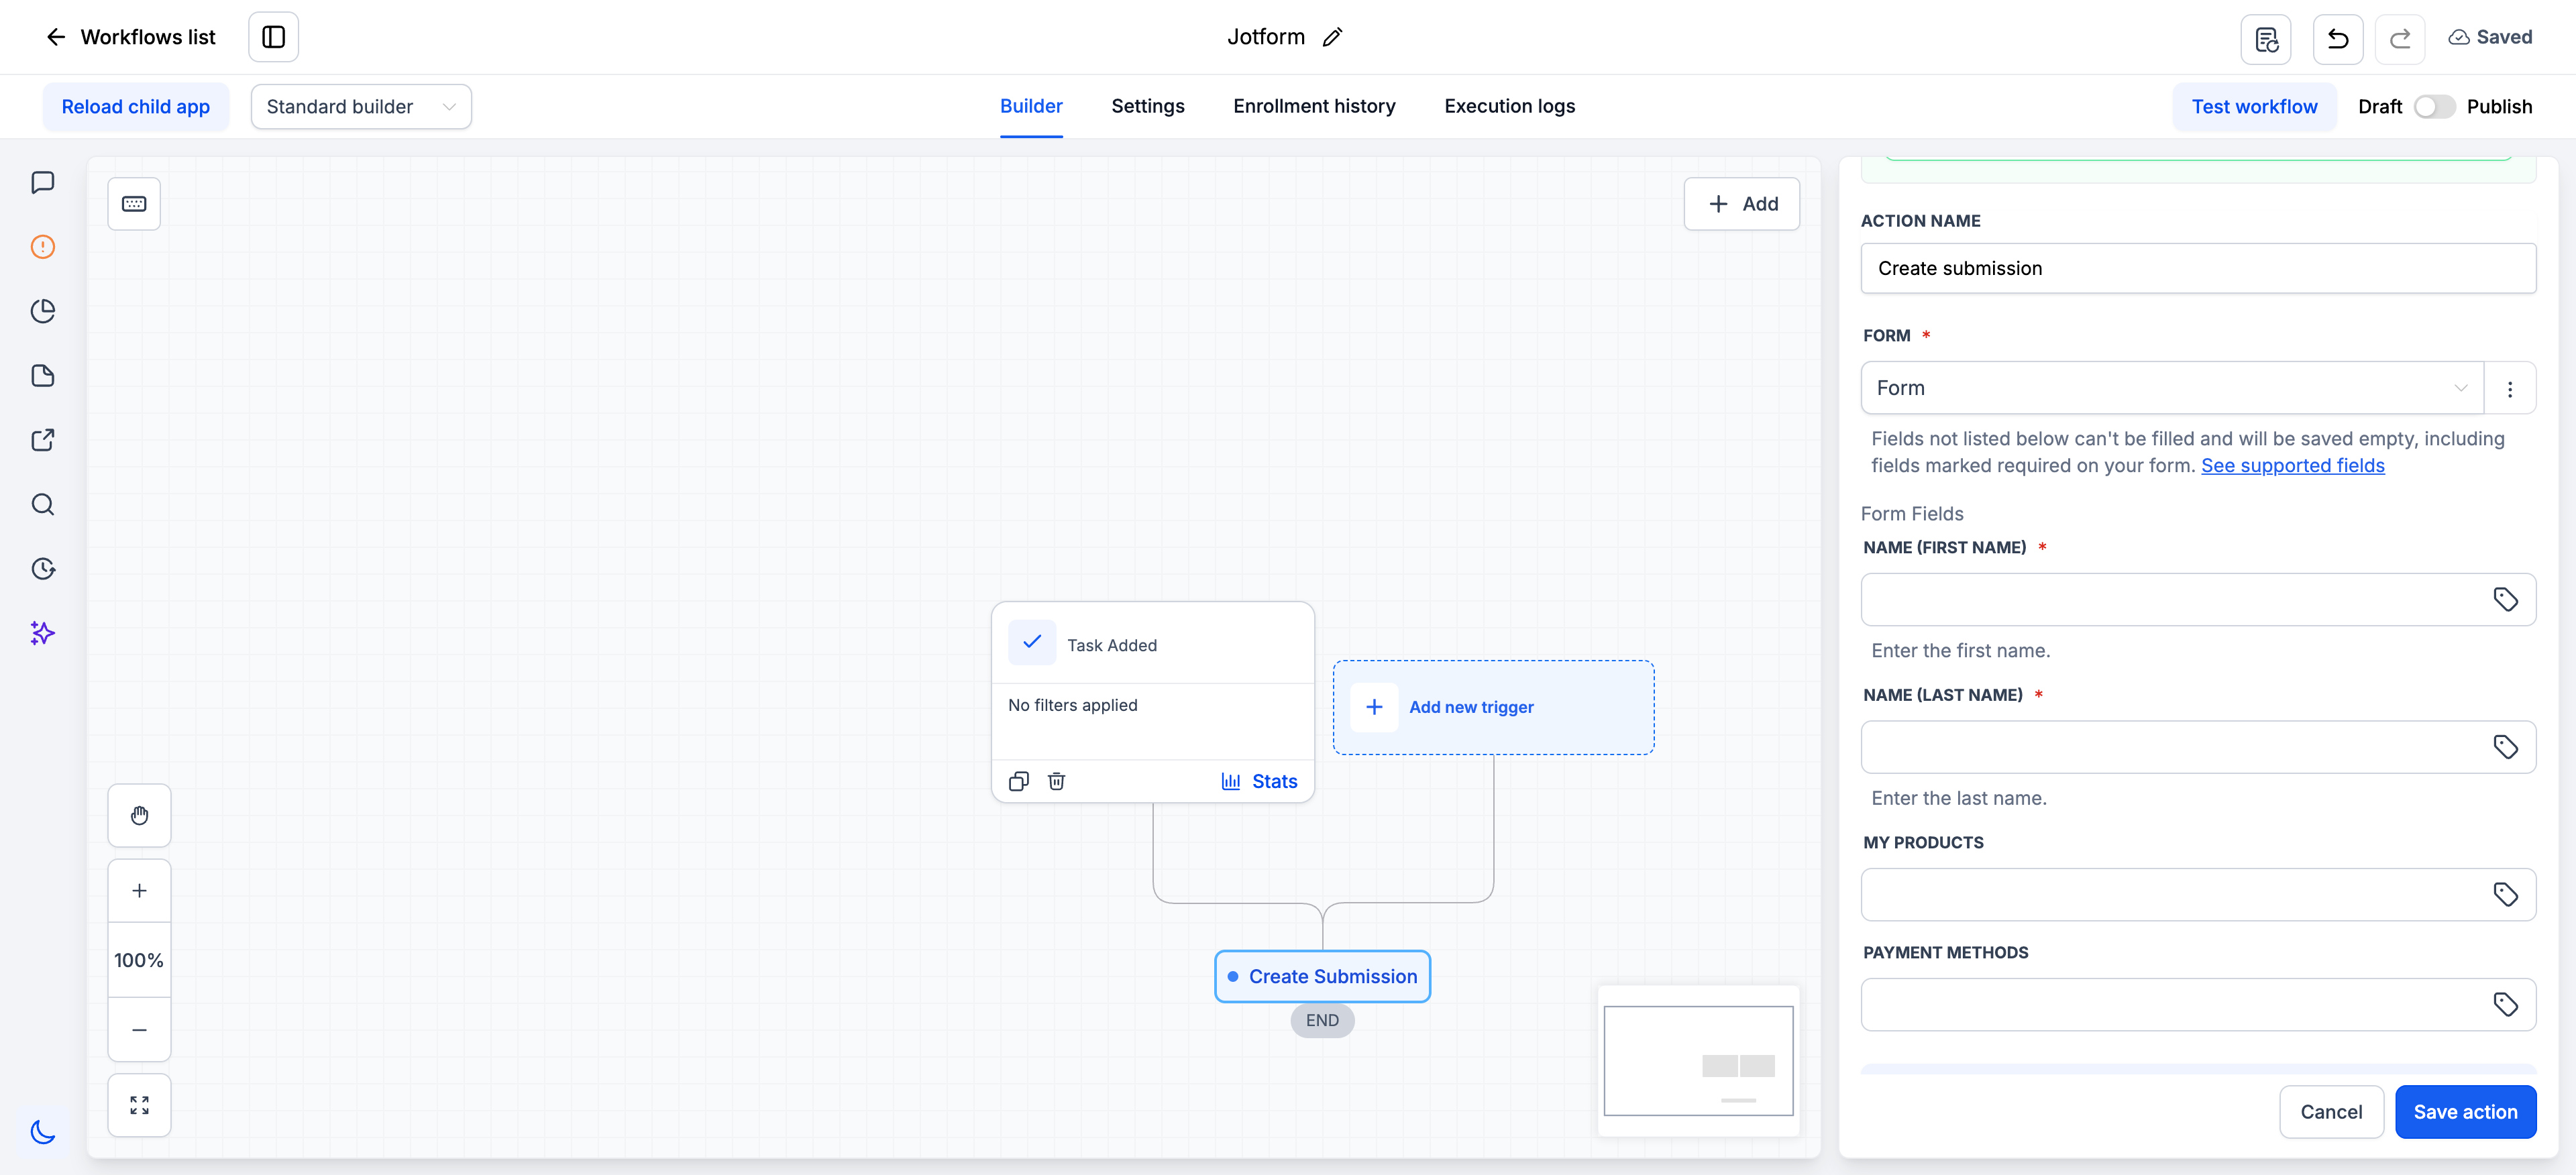
Create Submission lets a workflow write a new submission directly into a selected Jotform form. This is useful when information begins in the CRM but should also be recorded in Jotform.
- Go to Automation → Workflows and create or open the workflow.
- Add or configure the trigger that should start the workflow.
- Click the + button where the Jotform action should run.
- Search for Jotform.
- Select Create Submission.
- Connect the Jotform account if it is not already connected.
- Select the Jotform form that should receive the submission.
- Allow the platform to load the supported fields from the selected form.
- Map each available field using static text or an applicable workflow custom value.
- Use YYYY-MM-DD for Date Picker values.
- Use HH:MM for Time values.
- Review the mappings and save the action.
- Publish the workflow when the complete automation is ready.
Supported Fields in Create Submission
Create Submission only displays Jotform field types that the platform can populate. Reviewing field support before choosing a form helps prevent unexpected blank values in the resulting submission.
| Supported Field | Mapping Behavior |
|---|---|
| Full Name | Maps first and last name separately |
| Supported | |
| Address | Maps address line, city, state, postal code, and country separately |
| Phone | Supported |
| Short Text | Supported |
| Long Text | Supported |
| Number | Supported |
| Dropdown | Supported |
| Single Choice | Supported |
| Multiple Choice | Supported |
| Yes / No | Appears as a dropdown in the action |
| Star Rating | Appears as a dropdown in the action |
| Scale Rating | Appears as a dropdown in the action |
| Date Picker | Use YYYY-MM-DD |
| Time | Use HH:MM |
Supported fields can be populated with static text or applicable workflow custom values.
Unsupported Fields
Unsupported field types do not appear in the Create Submission mapping list. If the selected form contains one of these fields, Create Submission leaves that field empty.
- File Upload
- Signature
- Appointment
- Payment
- Product List
- Input Table
- Fill in the Blanks
- Spinner
- Emoji Slider
- Image Choice
- Captcha
- Widgets, including Terms and Conditions, Checklist, Configurable List, Multi Text List, Dynamic Text Box, and Calculation
If an unsupported field is marked required in Jotform, the submission can still be created and marked active with that field blank. The workflow does not raise an error because the unsupported required field was left empty.
Important: Create Submission does not process a payment, attach a payment amount or product, generate a signature, or reserve an appointment slot. If you use Create Submission with a form that normally collects payment, do not treat the resulting submission as proof of payment unless payment was confirmed separately.
Frequently Asked Questions
Need Help?
- Jotform will not connect: Confirm the correct Jotform API key is being used and reconnect the account from the workflow or Integrations settings.
- A form or field is missing: Confirm the correct Jotform account and form are selected. Unsupported field types do not appear in Create Submission mapping.
- Submission data is unavailable later in the workflow: Run Test Trigger and review the metadata returned before saving the trigger.
- A signed document has not started the workflow yet: New Signed Document uses polling, so allow approximately five minutes for the next check.
- Create Submission contains blank fields: Review whether the fields are supported and confirm Date Picker and Time values use the required formats.
- Payment, signature, or appointment data is missing: These field types are not created by Create Submission and must be handled separately.