
A custom 404 error page gives visitors a branded destination when they open a URL that does not exist on your site. Instead of leaving visitors at a generic error experience, you can use a Funnel or Website page to help them continue navigating your content. The platform can also identify eligible connected domains that are missing a default page or default 404/error page. This guide explains how to create, assign, test, and manage a custom 404 page for your domain.
What Is a Customizable 404 Error Page?
A customizable 404 error page is a page you select to handle unavailable or invalid URLs for a connected domain.
You create the page using the platform's Funnel or Website builder, then assign it as the domain's Default 404/Error Page. Visitors who reach an unavailable URL can then see your custom experience instead of the standard error page.
A useful 404 page can include your branding, navigation, contact information, or links that help visitors return to active content.
Key Benefits of a Custom 404 Error Page
A custom 404 page gives visitors a useful next step when the URL they requested is unavailable, helping preserve a consistent site experience.
- Consistent Branding: Use your own page design instead of relying on a generic error experience.
- Better Visitor Recovery: Provide links or navigation that help visitors continue to active areas of your site.
- Flexible Page Design: Build the error page with the same Funnel or Website page-building tools used for other site content.
- Domain-Level Control: Select which eligible page should serve as the default 404/error experience for the connected domain.
- Configuration Visibility: Eligible connected domains can display Action Required when default-page configuration is incomplete.
Prerequisites and Limitations
Confirming the domain connection and preparing the page in advance helps ensure the correct content is available when you configure the 404 experience.
Before you begin:
- The domain or subdomain must already be connected to the applicable Sites experience.
- You need access to the sub-account where the domain is managed.
- Create a Funnel or Website page that you want visitors to see when they reach an unavailable URL.
- Complete and publish the page before testing the live 404 experience.
Current limitations and behaviors:
- The default 404/error page is configured for the applicable domain connection.
- The Action Required reminder applies to eligible connected products when the required default-page configuration is incomplete.
- The reminder appears in the sub-account where the domain was originally connected.
- The page options available for assignment depend on the pages eligible for the selected domain connection.
When Does a Custom 404 Page Help?
Understanding why visitors reach unavailable URLs helps you decide whether they need a helpful error experience or should instead be redirected to a known replacement page.
- Broken or outdated links: A visitor follows a link to a page that no longer exists.
- Deleted pages: Content was removed, but visitors still have the previous URL.
- Mistyped URLs: A visitor manually enters an incorrect page path.
- Changed page paths: A visitor opens an old path that is no longer available.
404 page or 301 redirect? Use a custom 404 page when there is no specific replacement for the requested URL. If an old URL has permanently moved to a known new destination, configure a 301 redirect instead.
How To Set Up a Custom 404 Error Page
Setting up a custom 404 experience requires a published Funnel or Website page and a domain configuration that points invalid URLs to that page.
Step 1: Create the 404 Page
Create the page visitors should see when they reach an unavailable URL, then add clear navigation or other useful ways to return to active content.
Option A: Create a Website Page
- From the Sub-Account view, go to Sites → Websites.
- Open the Website you want to use.
- Click Add New Page.
- Enter a page name, such as 404 Error Page, and configure the page path.
- Click Create New Page.
- Select Create From Blank, or use another available starting point when appropriate.
- Build the page using the Website Builder.
- Add branding, navigation, contact information, or links that help visitors recover.
- Save your changes and publish the page when it is ready to go live.
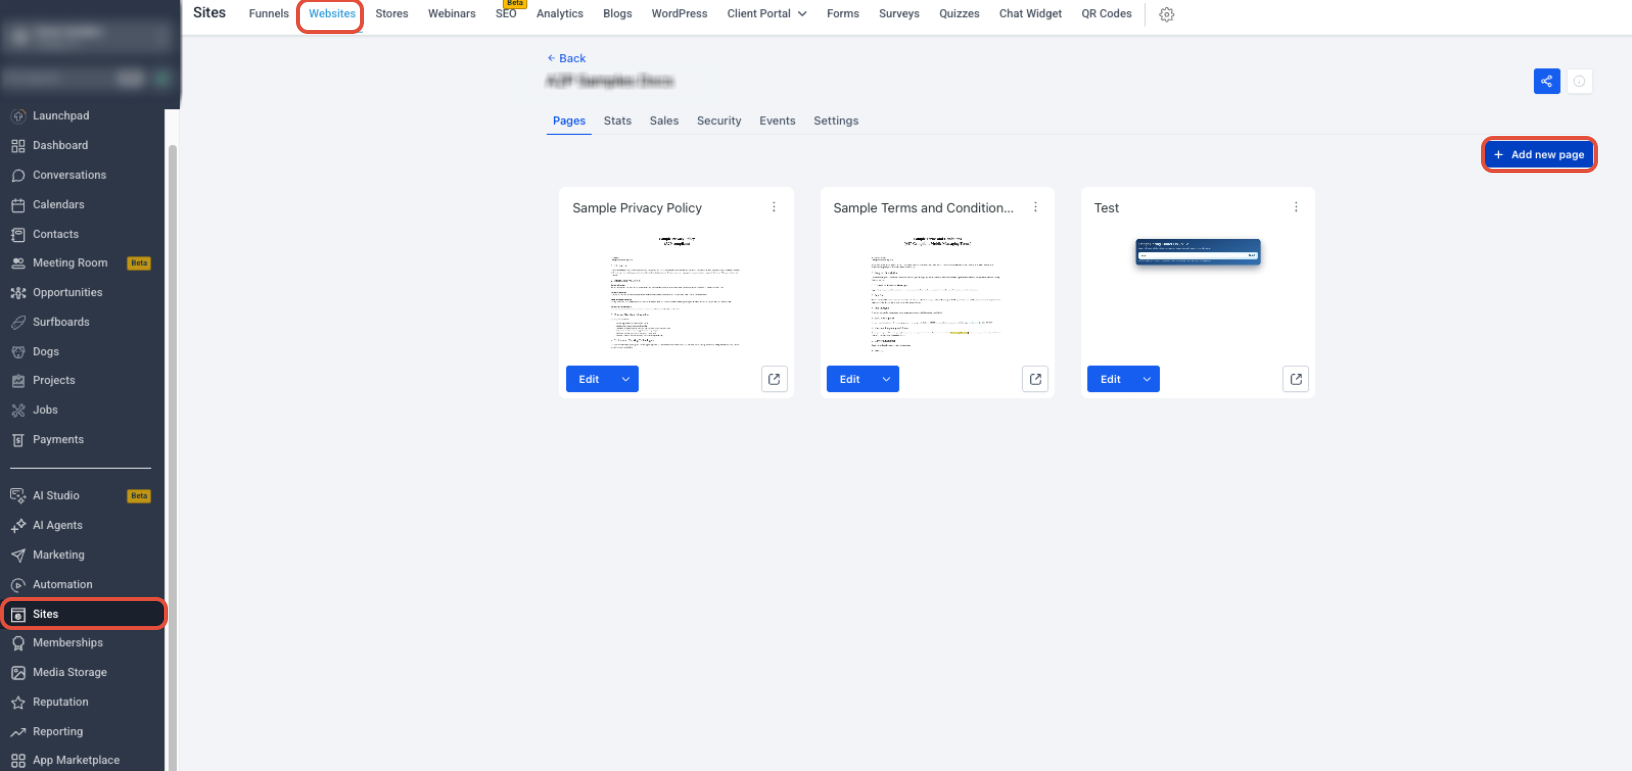
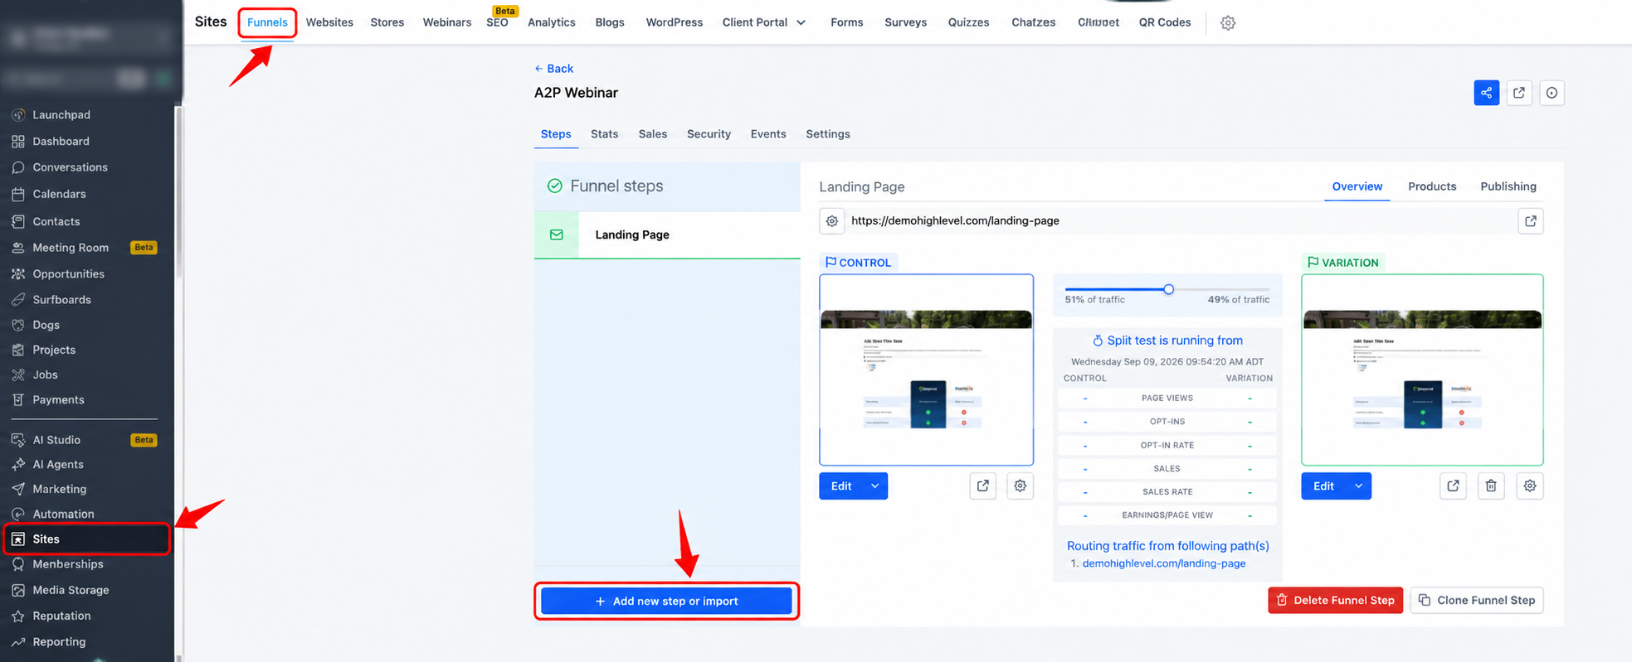
Option B: Create a Funnel Step
- From the Sub-Account view, go to Sites → Funnels.
- Open the Funnel you want to use.
- Click Add New Step.
- Enter a name, such as 404 Error Page.
- Enter the page path.
- Click Create Funnel Step.
- Open the new step and click Edit.
- Build the page visitors should see when they reach an unavailable URL.
- Save and publish the completed page.
Step 2: Assign the Default 404/Error Page to the Domain
Assigning the page at the domain level tells the platform which page should handle unavailable URLs for that specific connection.
- From the Sub-Account view, click Settings.
- Select Domains & URL Redirects.
- Locate the applicable connected domain and click Manage.
- On the Connected Products screen, locate the applicable domain connection.
- Open the three-dot menu for the connection.
- Select Edit.
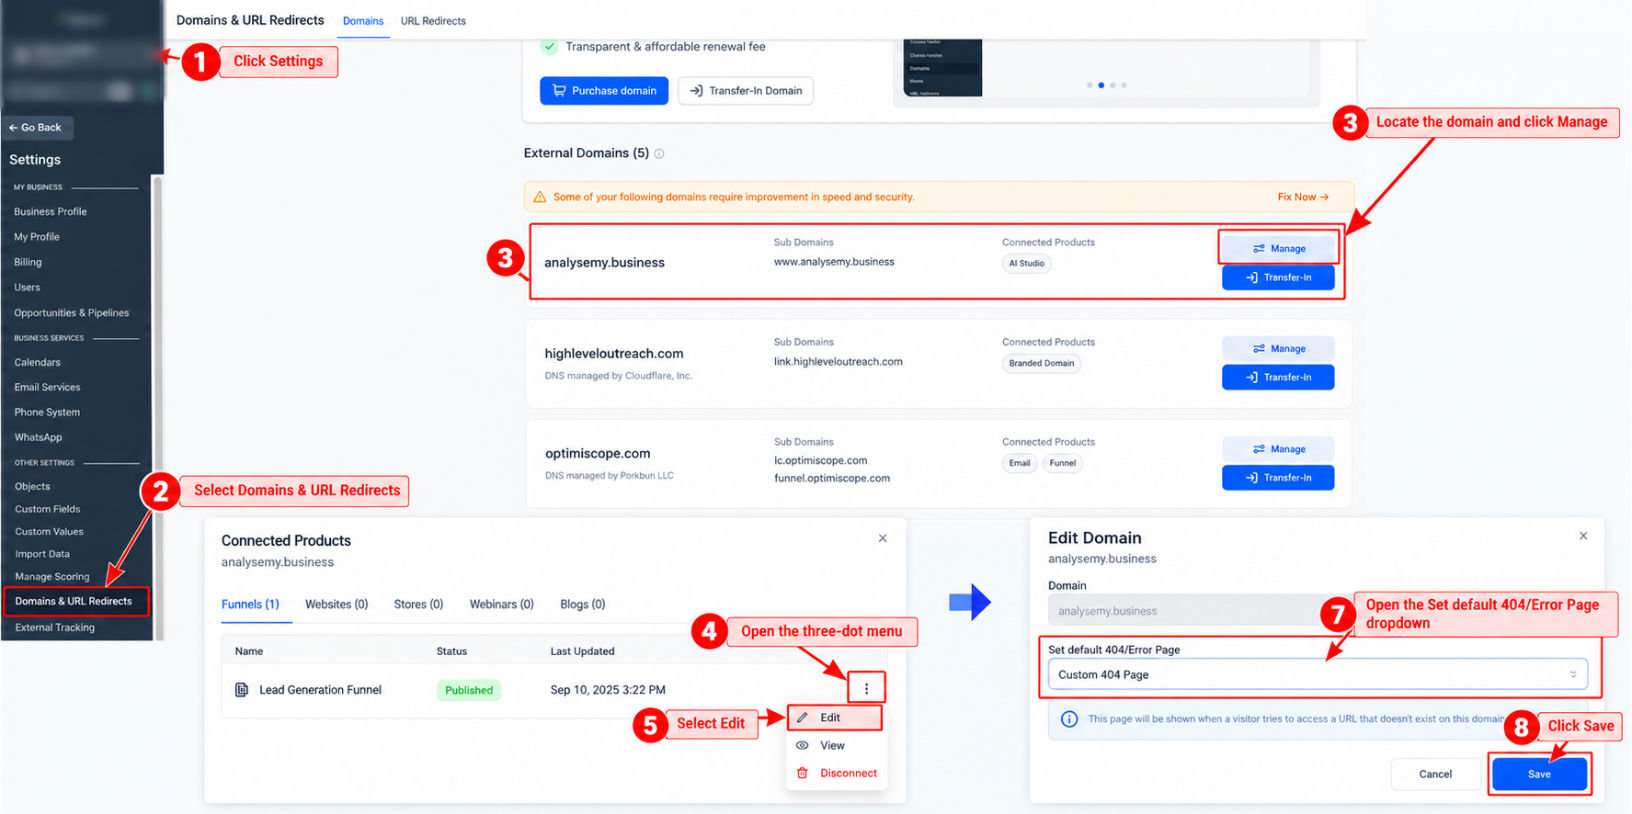
- Open the Set default 404/Error Page dropdown.
- Select the page you created for the 404 experience.
- Click Save.
Step 3: Test the Custom 404 Page
Testing an invalid path confirms that the domain sends visitors to the intended custom error experience before you rely on it for live traffic.
- Open the connected domain in a browser.
- Add a page path that does not exist on the site.
- Load the URL.
- Confirm that the custom 404/error page appears.
- Test any navigation, buttons, or links included on the custom page.
If the expected page does not appear: Return to Settings → Domains & URL Redirects → Manage → three-dot menu → Edit and confirm that the intended page is selected under Set default 404/Error Page.
Understand the Action Required Domain Nudge
The Action Required reminder makes incomplete default-page configuration easier to identify from the domain's Connected Products screen.
For eligible domains connected to a Funnel, Website, Store, Webinar, or Blog, the reminder can appear when the Default Page or Default 404/Error Page still needs to be configured.
- Go to Settings → Domains & URL Redirects.
- Click Manage for the applicable domain.
- Review the Connected Products screen.
- If Action Required appears, click it.
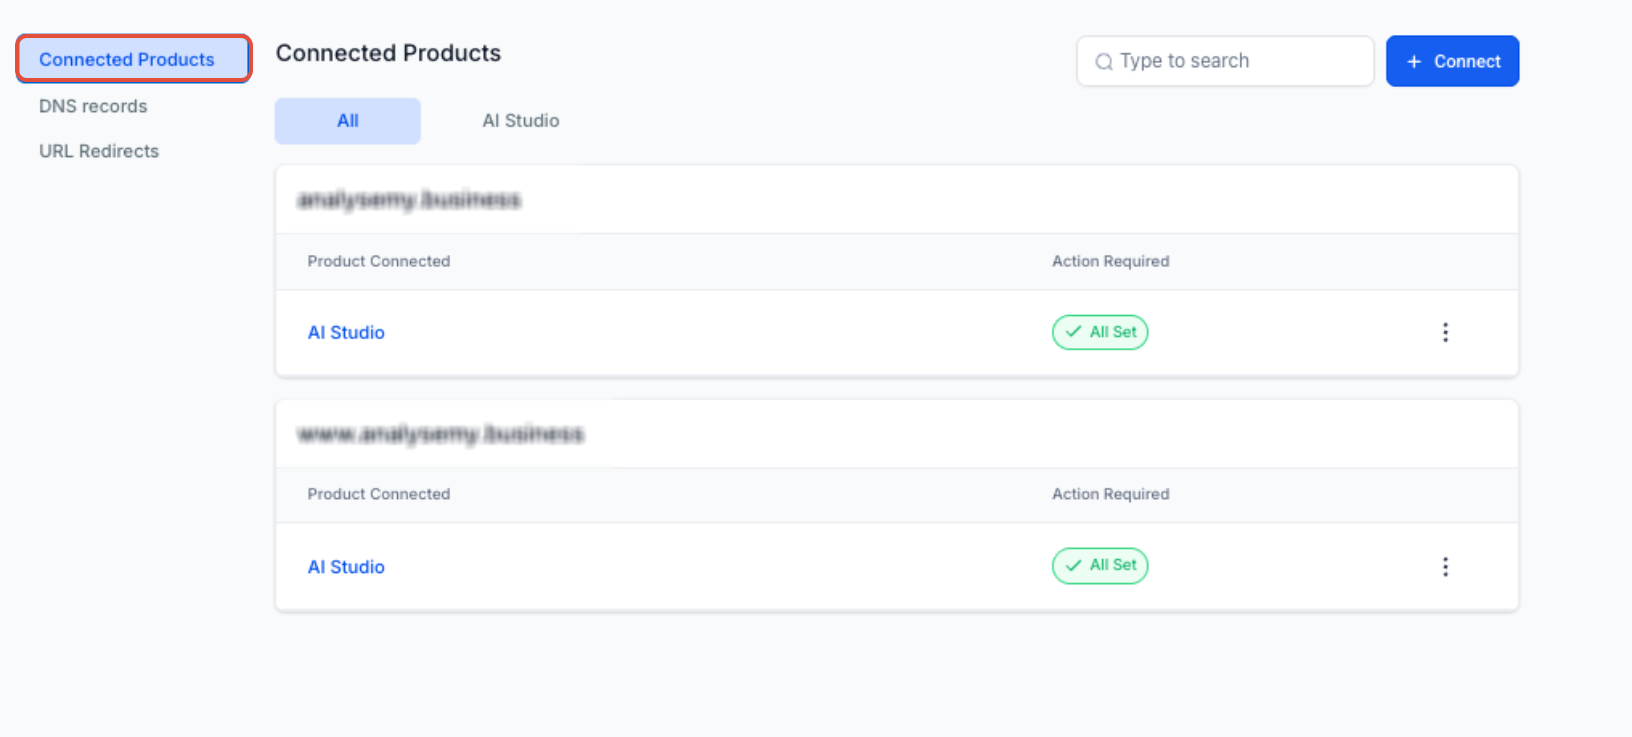
The Action Required modal includes:
- Default Page
- Default 404/Error Page
Use the available dropdowns to select eligible pages for the domain.
Note: The Action Required reminder is visible in the sub-account where the domain was originally connected. You can continue using the three-dot Edit flow to manage the default and 404/error page settings manually.
Frequently Asked Questions
Need Help?
- The custom 404 page does not appear: Confirm that the intended page is published and selected under Set default 404/Error Page for the correct domain connection.
- The page is not available for selection: Confirm that the page is eligible for the selected domain connection and that you are working in the correct sub-account.
- Action Required still appears: Review the domain's Default Page and Default 404/Error Page settings in the sub-account where the domain was originally connected.
- An old URL has a known replacement: Use a 301 redirect when visitors should always be sent from the old URL to a specific new destination.