
You can move an eligible domain to another Cloudflare account using the domain transfer workflow. This process transfers domain management between Cloudflare accounts without changing registrars. No EPP or authorization code is required. This guide explains how to prepare the destination account, initiate the move, accept the transfer, and verify its completion.
TABLE OF CONTENTS
- What Is a Cloudflare Account Transfer?
- Key Benefits
- Prerequisites and Limitations
- How To Transfer a Domain to Another Cloudflare Account
- After the Transfer Completes
- Troubleshoot a Cloudflare Account Transfer
- Frequently Asked Questions
What Is a Cloudflare Account Transfer?
A Cloudflare account transfer moves the management of an eligible domain from one Cloudflare account to another. The domain remains registered with Cloudflare, so the process does not require changing registrars or obtaining an EPP authorization code.
The destination Cloudflare account must be prepared before the transfer begins. Once the request is initiated, the receiving account must accept the move before the transfer can finish.
Key Benefits
Moving a domain directly between Cloudflare accounts simplifies the ownership transition while keeping domain registration with the same registrar.
- No registrar change: The domain remains registered with Cloudflare throughout the account move.
- No authorization code: An EPP or authorization code is not required for this type of transfer.
- Direct account management: The destination Cloudflare account takes over domain management after the move completes.
- DNS preparation: You can configure and verify the required DNS records in the destination account before completing the transfer.
- Transfer visibility: Cloudflare displays the pending move and the domain status during the transfer process.
Prerequisites and Limitations
Before starting a Cloudflare account transfer, verify that the domain is eligible and the destination account is ready. Completing these checks helps prevent transfer failures and DNS configuration issues.
- The domain must be eligible for the Cloudflare account transfer workflow.
- You must have access to the destination Cloudflare account.
- The domain must already be added to the destination Cloudflare account.
- The required DNS records must be configured in the destination account.
- DNSSEC must be disabled.
- Proxying must be turned off for all DNS records in the destination account.
- The domain must not be restricted by an applicable 60-day transfer lock.
- The domain must not have another pending Cloudflare account move.
Important: Cloudflare does not automatically copy DNS records during the account move. The DNS records configured in the destination account are used after the transfer completes.
How To Transfer a Domain to Another Cloudflare Account
The transfer process requires preparing the destination Cloudflare account, initiating the domain move, and accepting the request in Cloudflare. Follow these steps in order to ensure the receiving account is ready before the transfer begins.
Step 1: Prepare the Destination Cloudflare Account
Adding the domain and preparing its DNS configuration allows the destination account to manage the domain after the transfer finishes.
- Sign in to the destination Cloudflare account.
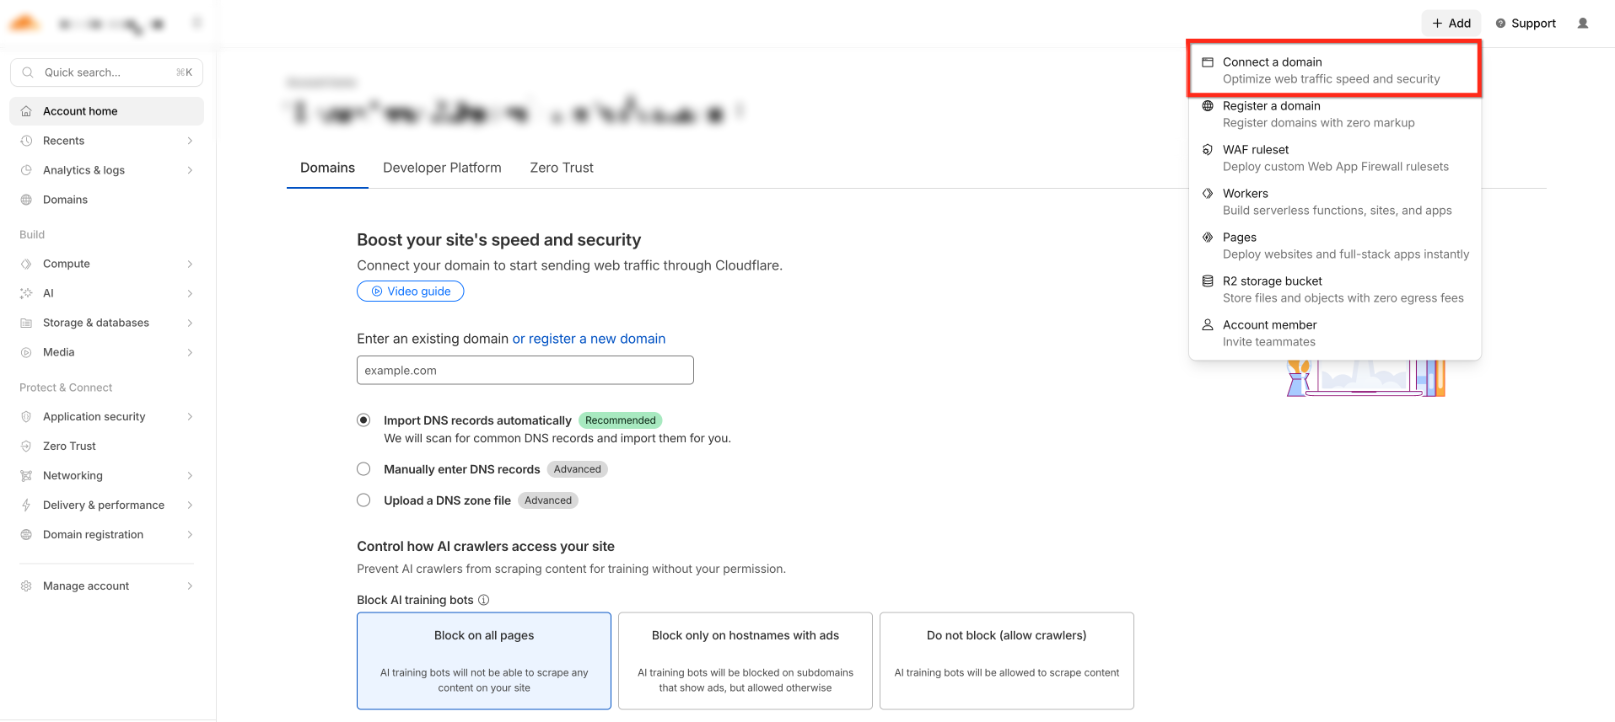
- Click + Add, then select Connect a domain.
- Enter the domain name and continue through the domain connection process.
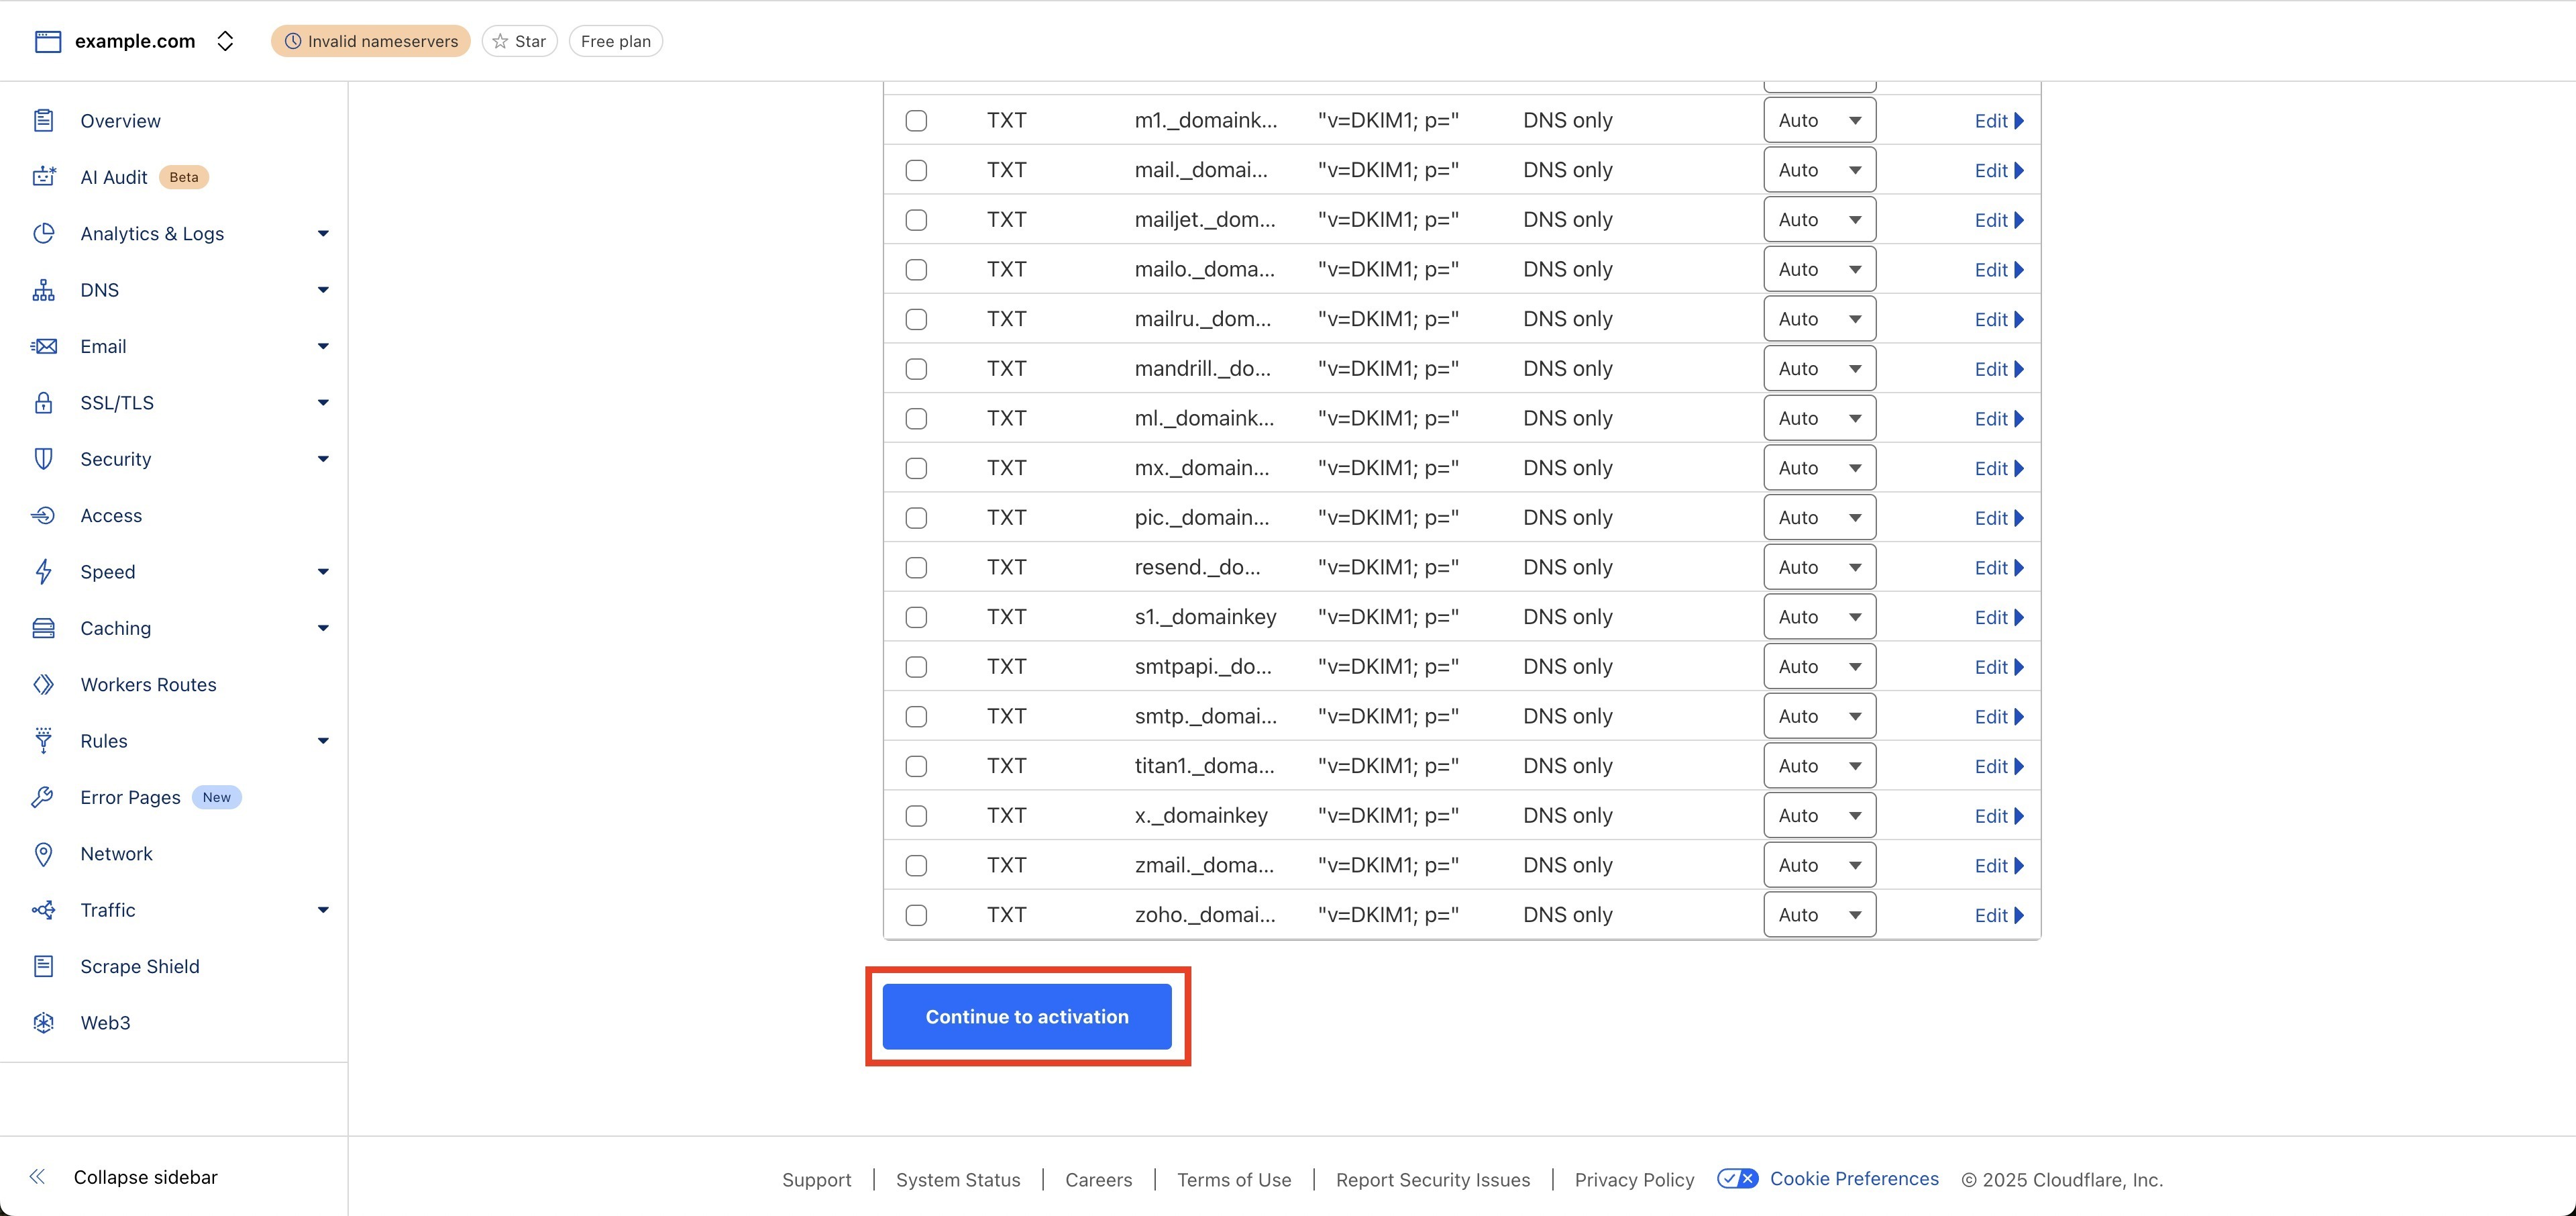
- Review the DNS records detected for the domain.
- Confirm that all required DNS records are present and correctly configured.
- Turn proxying off for all DNS records.
- Confirm that DNSSEC is disabled.
- Click Continue to Activation when the DNS configuration is ready.
Important: Do not change the domain's nameservers during destination-account preparation unless the transfer workflow specifically requires it. Confirm that the DNS records match the existing configuration before proceeding.
Step 2: Open the Domain Transfer Settings
Use the domain management settings to access the transfer controls for the eligible domain.
- Go to Settings.
- Select Domains & URL Redirects.
- Locate the domain and click Manage.
- Open Advanced Settings, then select Configuration.
- Click Transfer to Another Registrar.
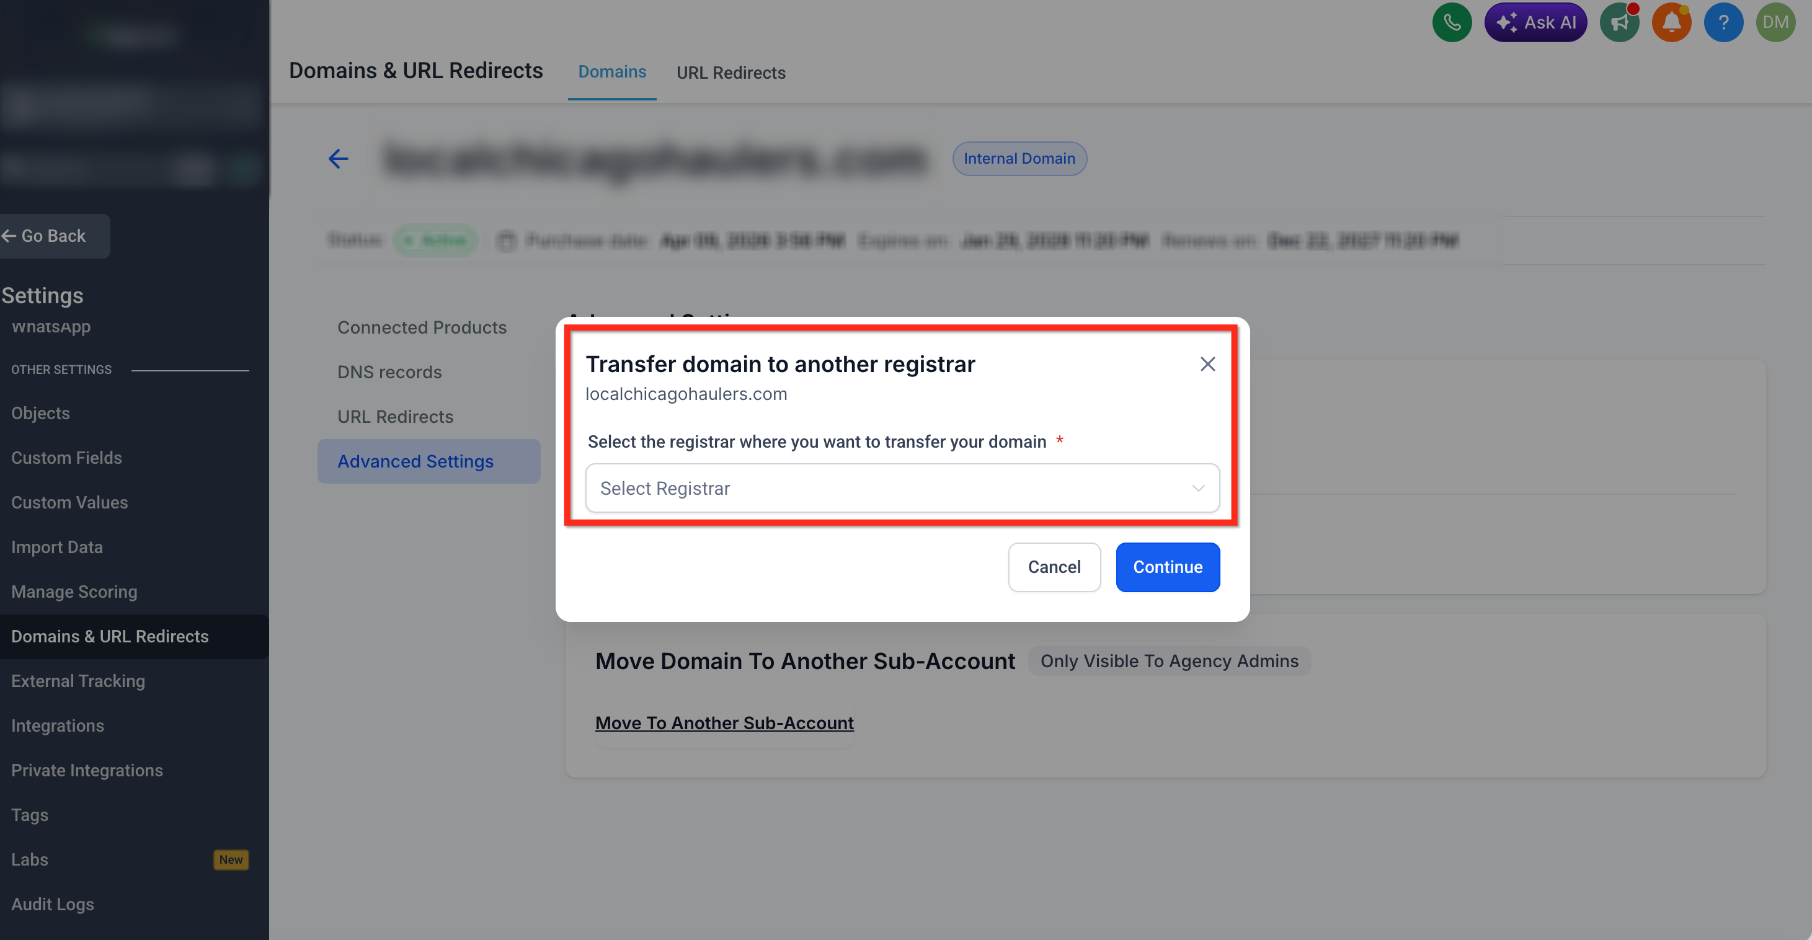
Note: Although the option is labeled Transfer to Another Registrar, selecting the Cloudflare account-move option does not change registrars. The domain remains registered with Cloudflare.
Step 3: Review Transfer Eligibility
The eligibility check helps determine whether the domain can be transferred immediately or must wait until an applicable restriction expires.
- Review the eligibility information displayed in the transfer window.
- If the domain is restricted by the 60-day transfer lock, review the displayed eligibility date.
- If the domain is eligible, continue to the available transfer options.
Step 4: Choose the Cloudflare Account Transfer
Selecting the Cloudflare account-move option keeps the domain registered with Cloudflare while allowing it to be managed from another Cloudflare account.
- Choose the option to transfer the domain to another Cloudflare account.
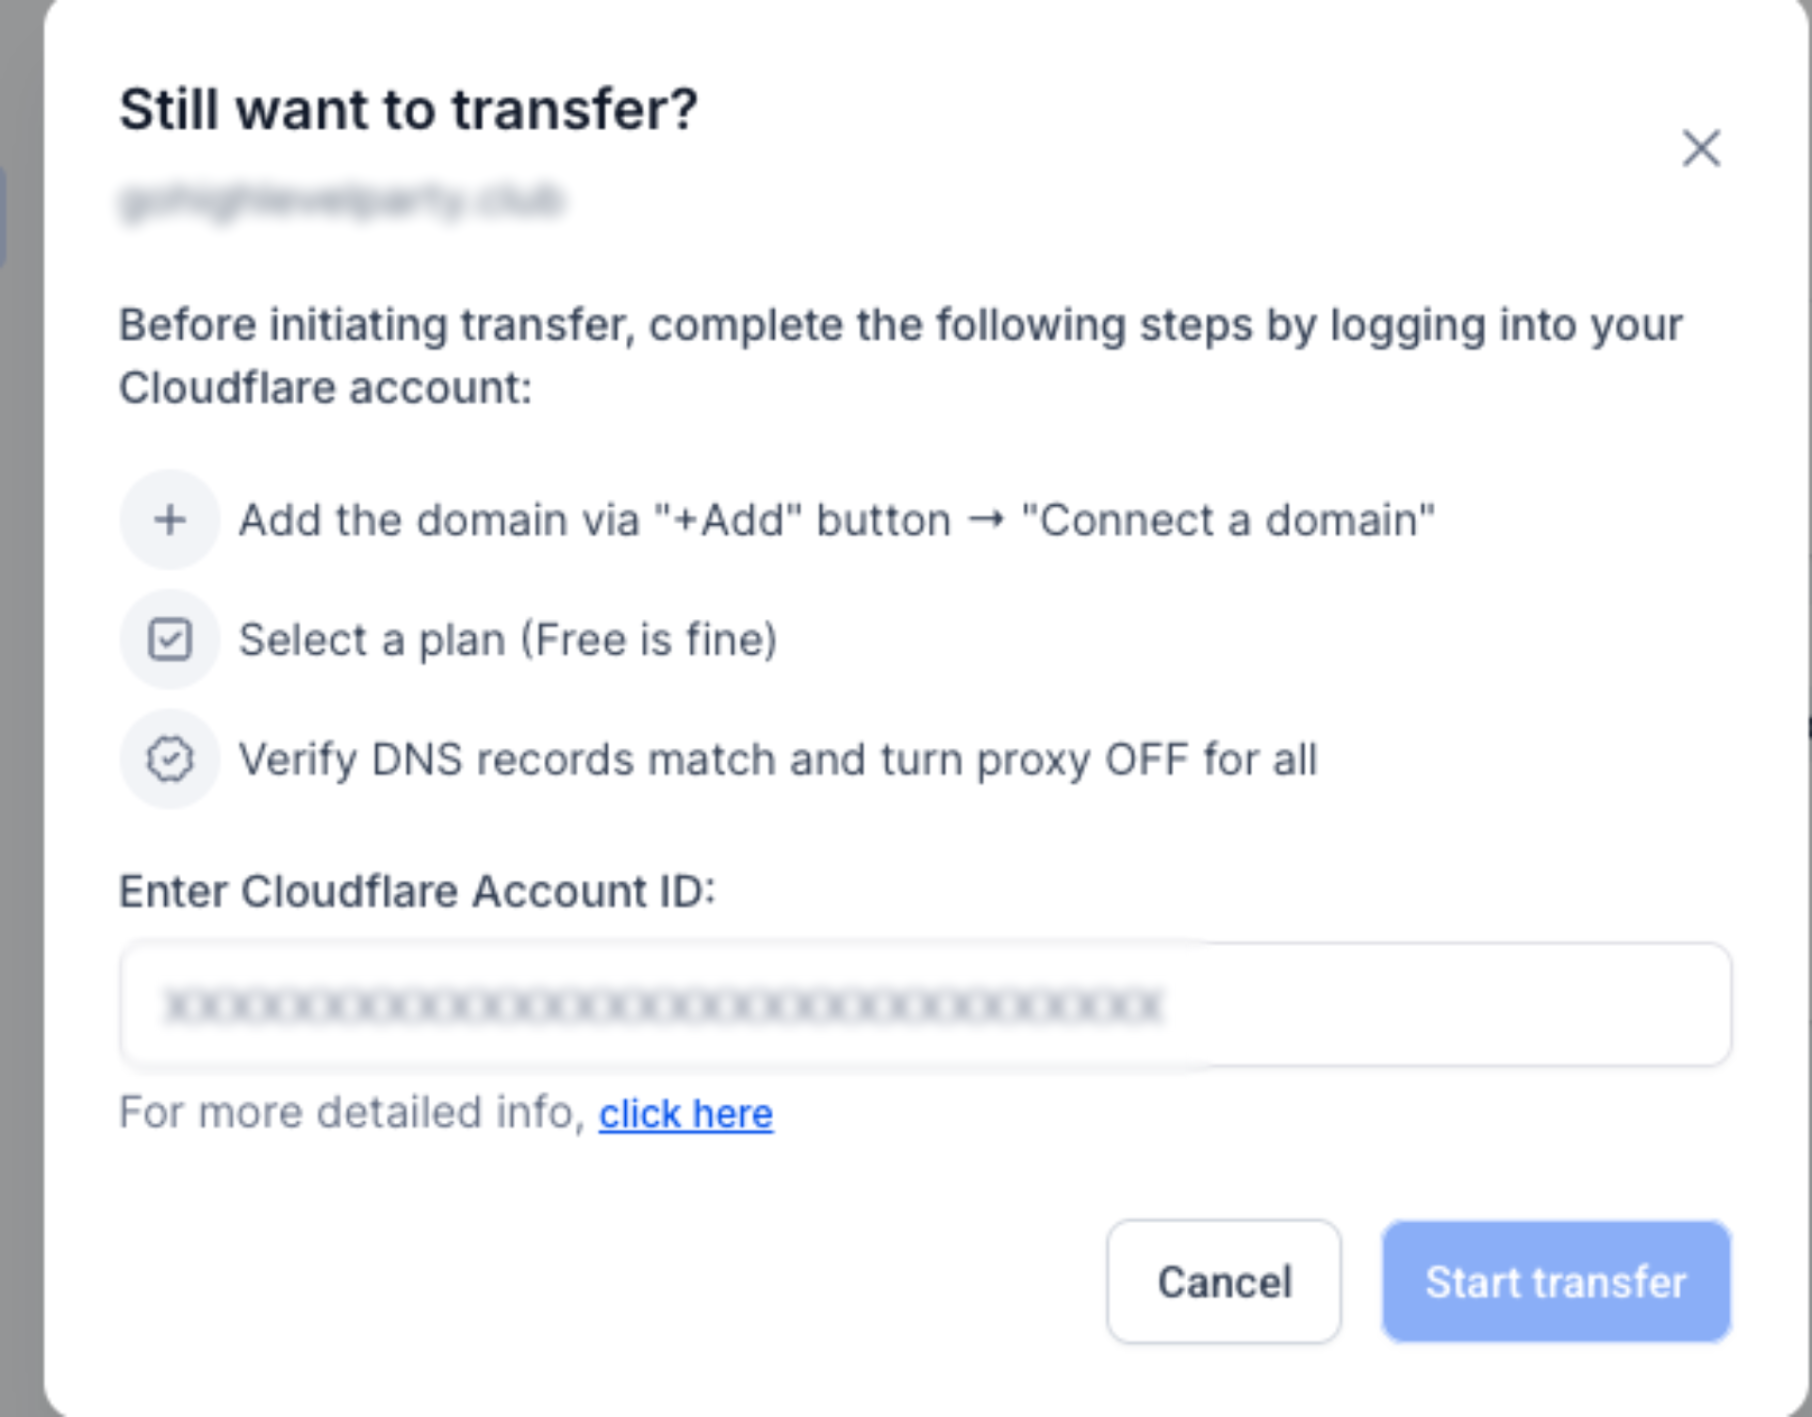
- Review the destination-account requirements displayed in the transfer window.
- Confirm that the destination account has been prepared.
Step 5: Enter the Destination Cloudflare Account ID
The destination Cloudflare Account ID identifies the account that will receive the domain. Entering the correct ID helps ensure the request is directed to the intended account.
- Obtain the Cloudflare Account ID from the destination Cloudflare account.
- Return to the domain transfer window.
- Enter the destination Cloudflare Account ID.
- Review the information, then click Start transfer.
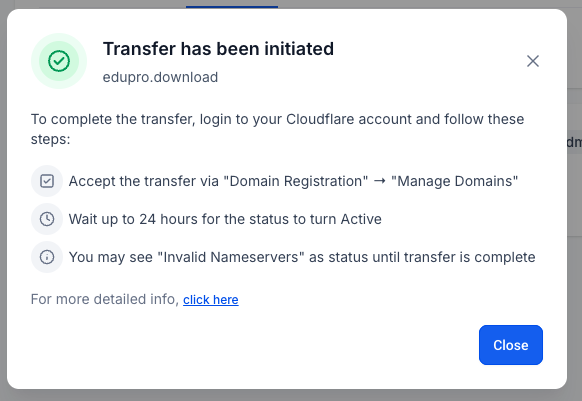
Step 6: Confirm the Transfer Was Initiated
After the request is submitted, verify that the transfer has been initiated before moving to the destination account for approval.
- Wait for the transfer request to be submitted.
- Confirm that the message Transfer has been initiated appears.
- Sign in to the destination Cloudflare account to complete the approval process.
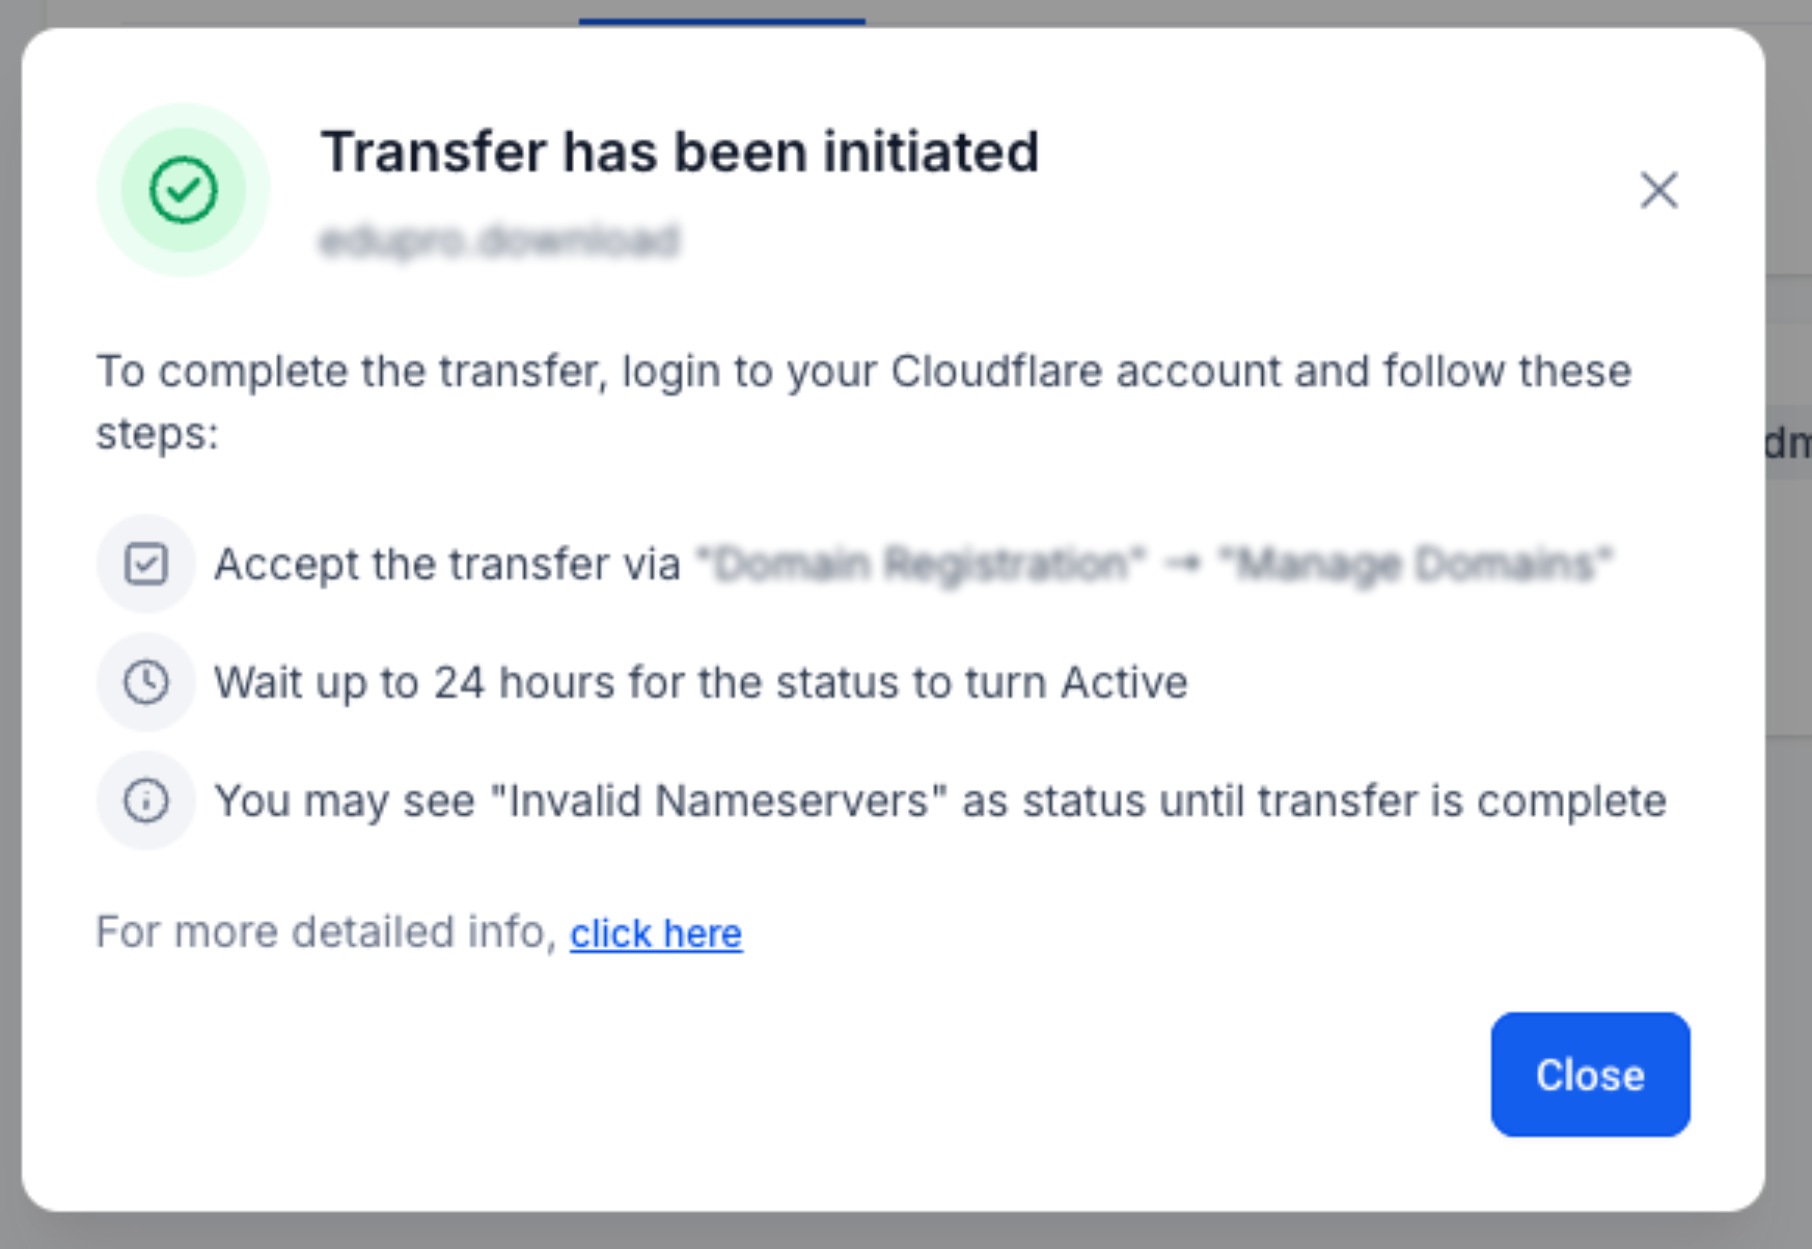
Important: Initiating the transfer does not complete the account move. The transfer must be accepted in the destination Cloudflare account.
Step 7: Accept the Transfer in Cloudflare
The receiving Cloudflare account must approve the pending domain move. This approval allows Cloudflare to finish transferring management of the domain.
- Sign in to the destination Cloudflare account.
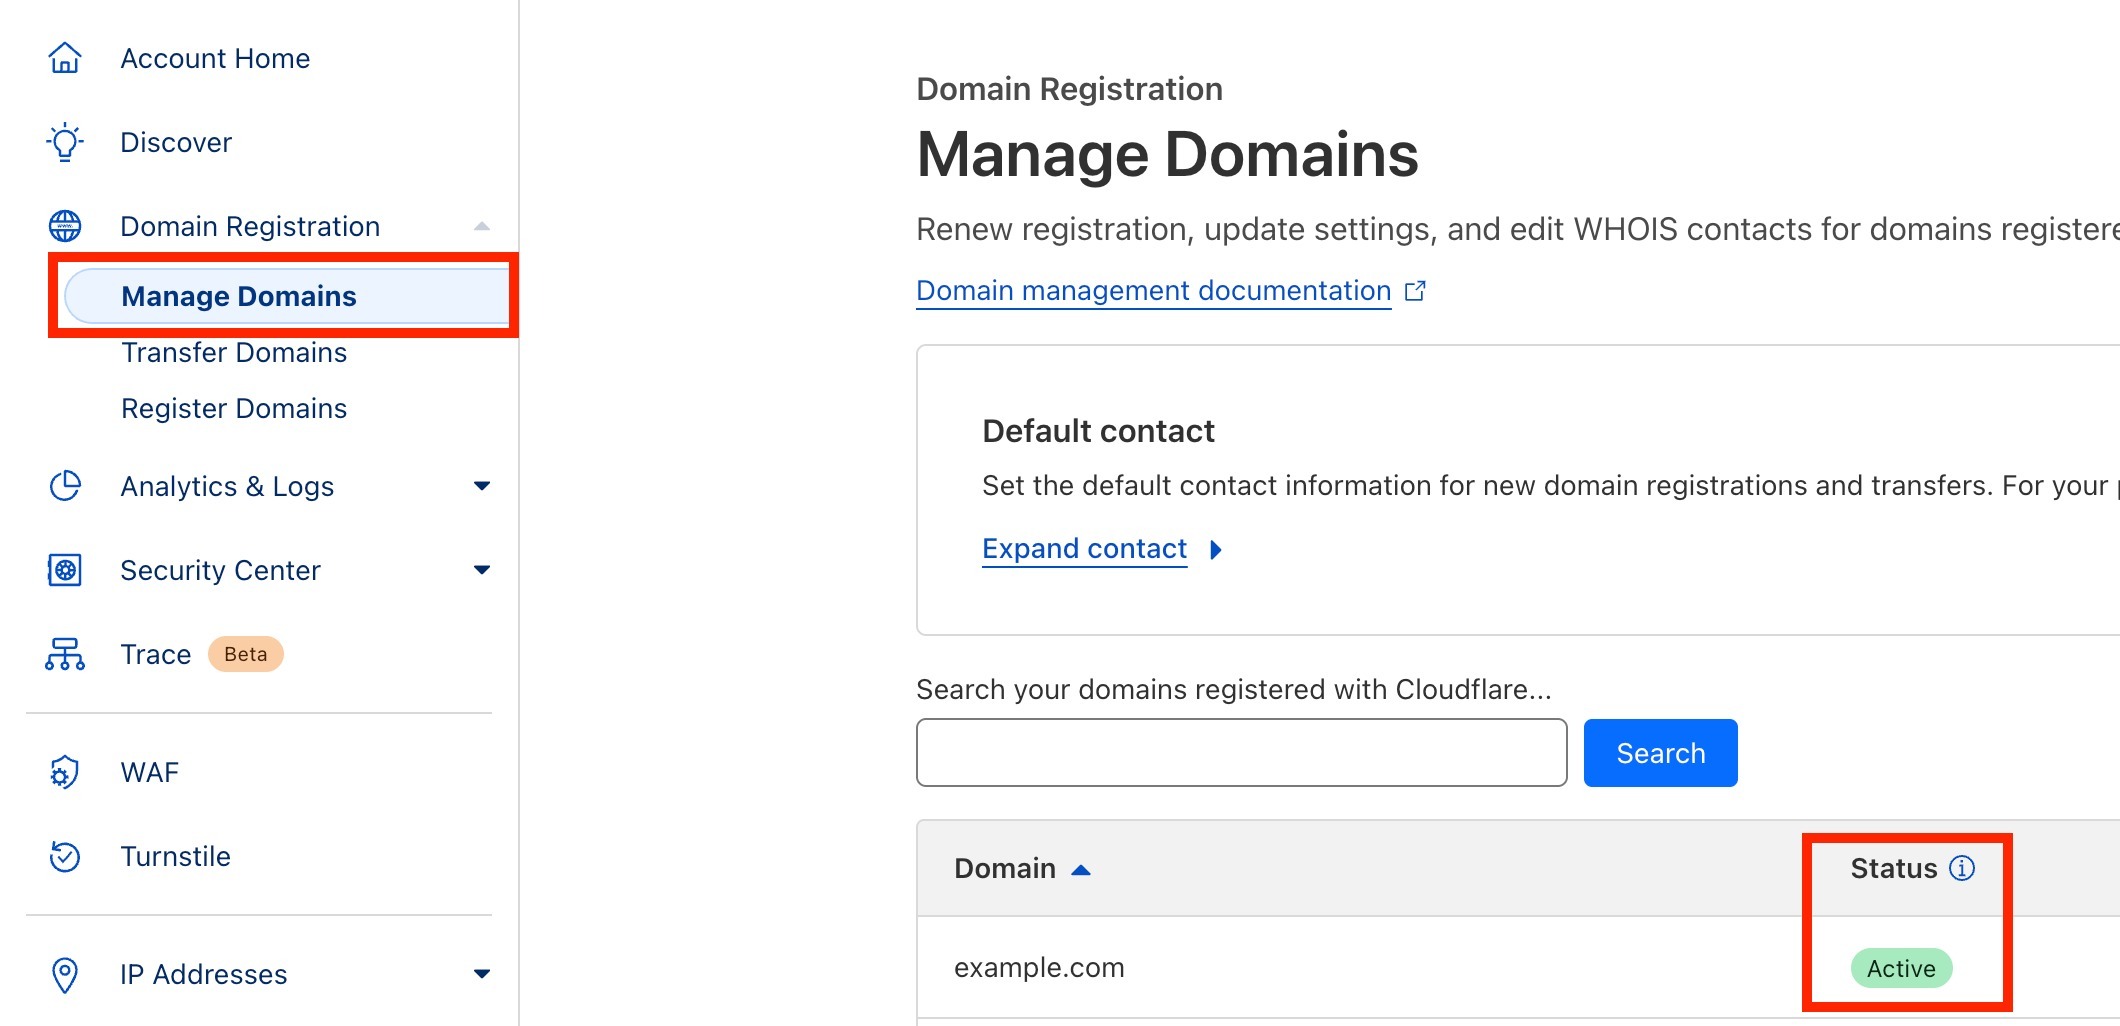
- In the navigation menu, select Domain Registration.
- Click Manage Domains.
- Locate the domain associated with the pending move.
- Open its management options or select View actions for the pending account move.
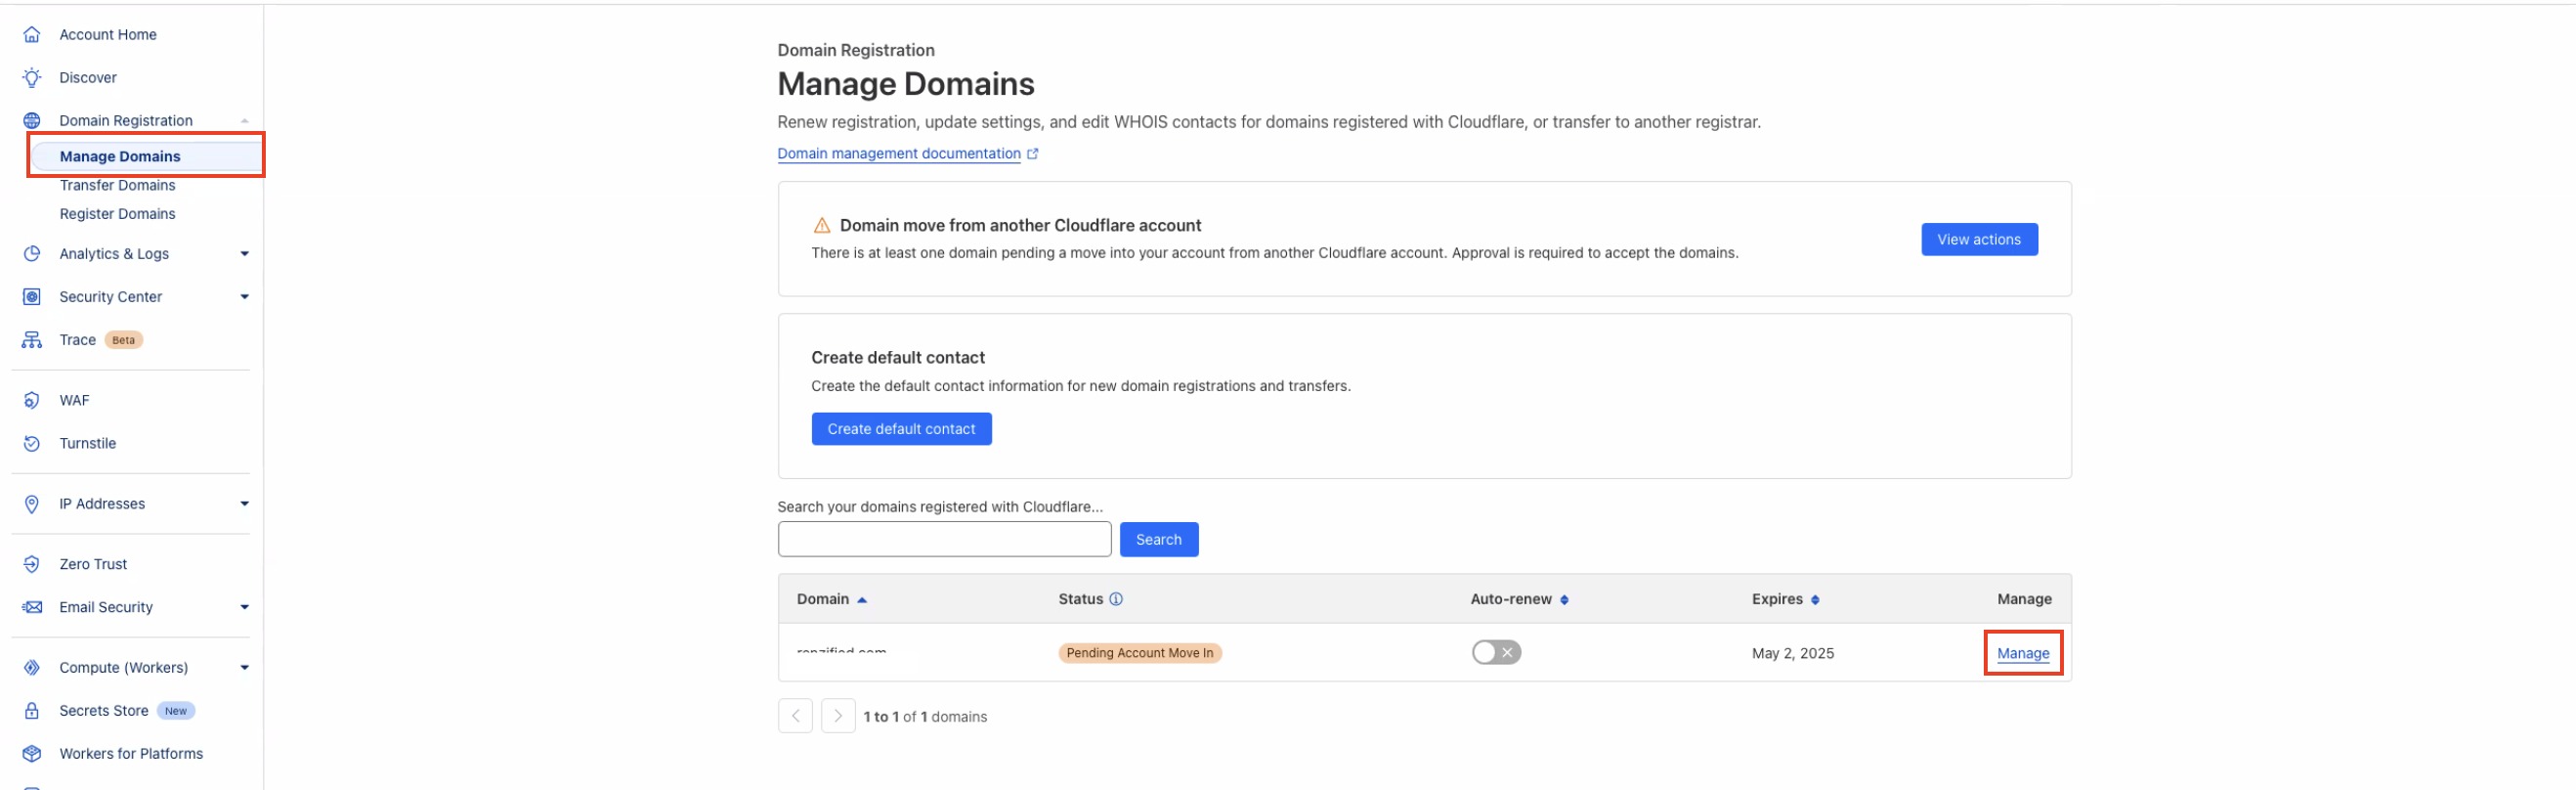
- Locate the pending domain move in the Action Center.
- Click Accept to approve the transfer.
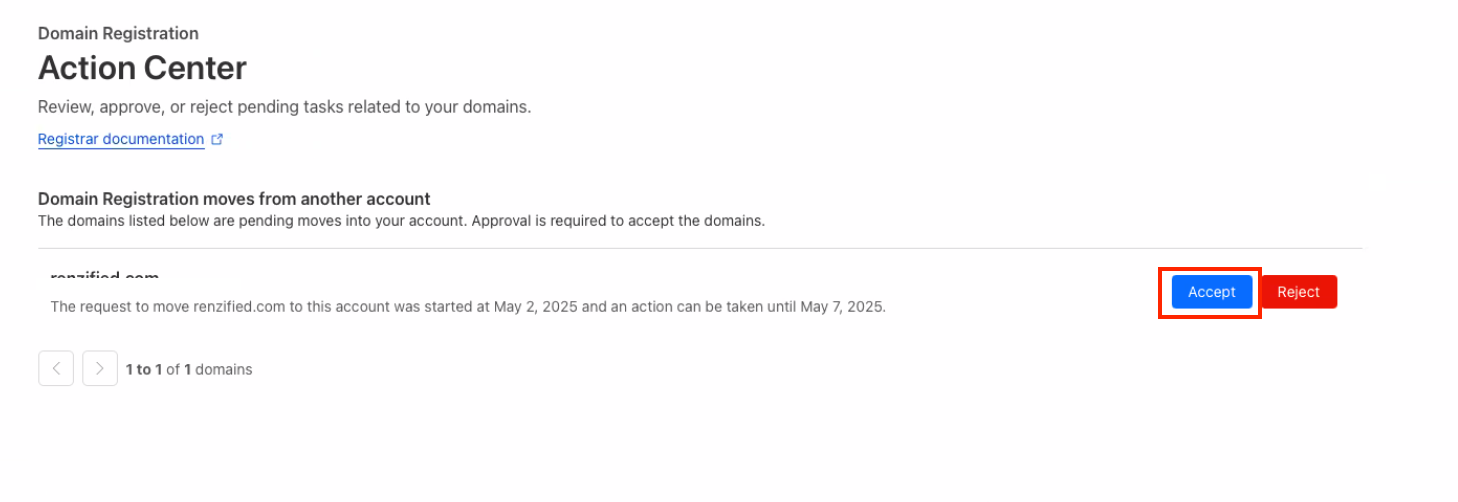
- Allow up to 24 hours for the account move to complete.
- Return to Domain Registration → Manage Domains.
- Confirm that the domain status changes to Active.
After the Transfer Completes
Once Cloudflare completes the account move, verify that the domain is active and that its DNS configuration is working correctly. These checks help confirm that the receiving account is ready to manage the domain.
- The transfer-out request is marked complete.
- The destination Cloudflare account manages the domain registration.
- Future domain renewals and billing are managed through the destination Cloudflare account.
- The DNS records configured in the destination Cloudflare account are used after the move.
To verify the completed transfer:
- Sign in to the destination Cloudflare account.
- Go to Domain Registration → Manage Domains.
- Locate the transferred domain.
- Confirm the status is Active.
- Verify that the expected DNS records are configured and serving correctly.
Troubleshoot a Cloudflare Account Transfer
If a domain transfer cannot be initiated or does not appear complete, review the transfer eligibility, destination account information, and DNS configuration. The following checks address common issues during a Cloudflare account move.
Transfer Already in Progress
Only one pending Cloudflare account move is allowed per domain.
If the transfer workflow displays Transfer already in progress, another request cannot be submitted until the existing move is accepted in Cloudflare or expires.
Review the pending transfer in the destination Cloudflare account before attempting another request.
Invalid Cloudflare Account ID
If the destination Account ID is invalid, verify that the identifier was copied from the correct Cloudflare account.
- Sign in to the intended destination Cloudflare account.
- Locate and copy the correct Account ID.
- Return to the domain transfer workflow.
- Correct the Account ID and retry the transfer.
Domain Not Added to the Destination Account
The domain must be added to the destination Cloudflare account before the move can begin.
- Sign in to the destination Cloudflare account.
- Click + Add → Connect a domain.
- Add the domain and complete the required connection steps.
- Review and configure the required DNS records.
- Confirm that proxying is disabled for all DNS records.
- Retry the domain transfer.
Domain Restricted by a Transfer Lock
An eligible domain may still be restricted by the applicable 60-day transfer lock.
If the transfer window displays an eligibility date, wait until the restriction expires before attempting the move again.
Invalid Nameservers
After accepting the account move, Cloudflare may temporarily display Invalid Nameservers while processing the transfer.
This status can appear during the account move and may resolve automatically within 24 hours.
Allow the transfer to finish, then check the domain again under Domain Registration → Manage Domains.
Once the transfer completes, the domain should display Active.
If the status does not resolve after the expected processing period, verify the nameservers and DNS configuration in the destination Cloudflare account.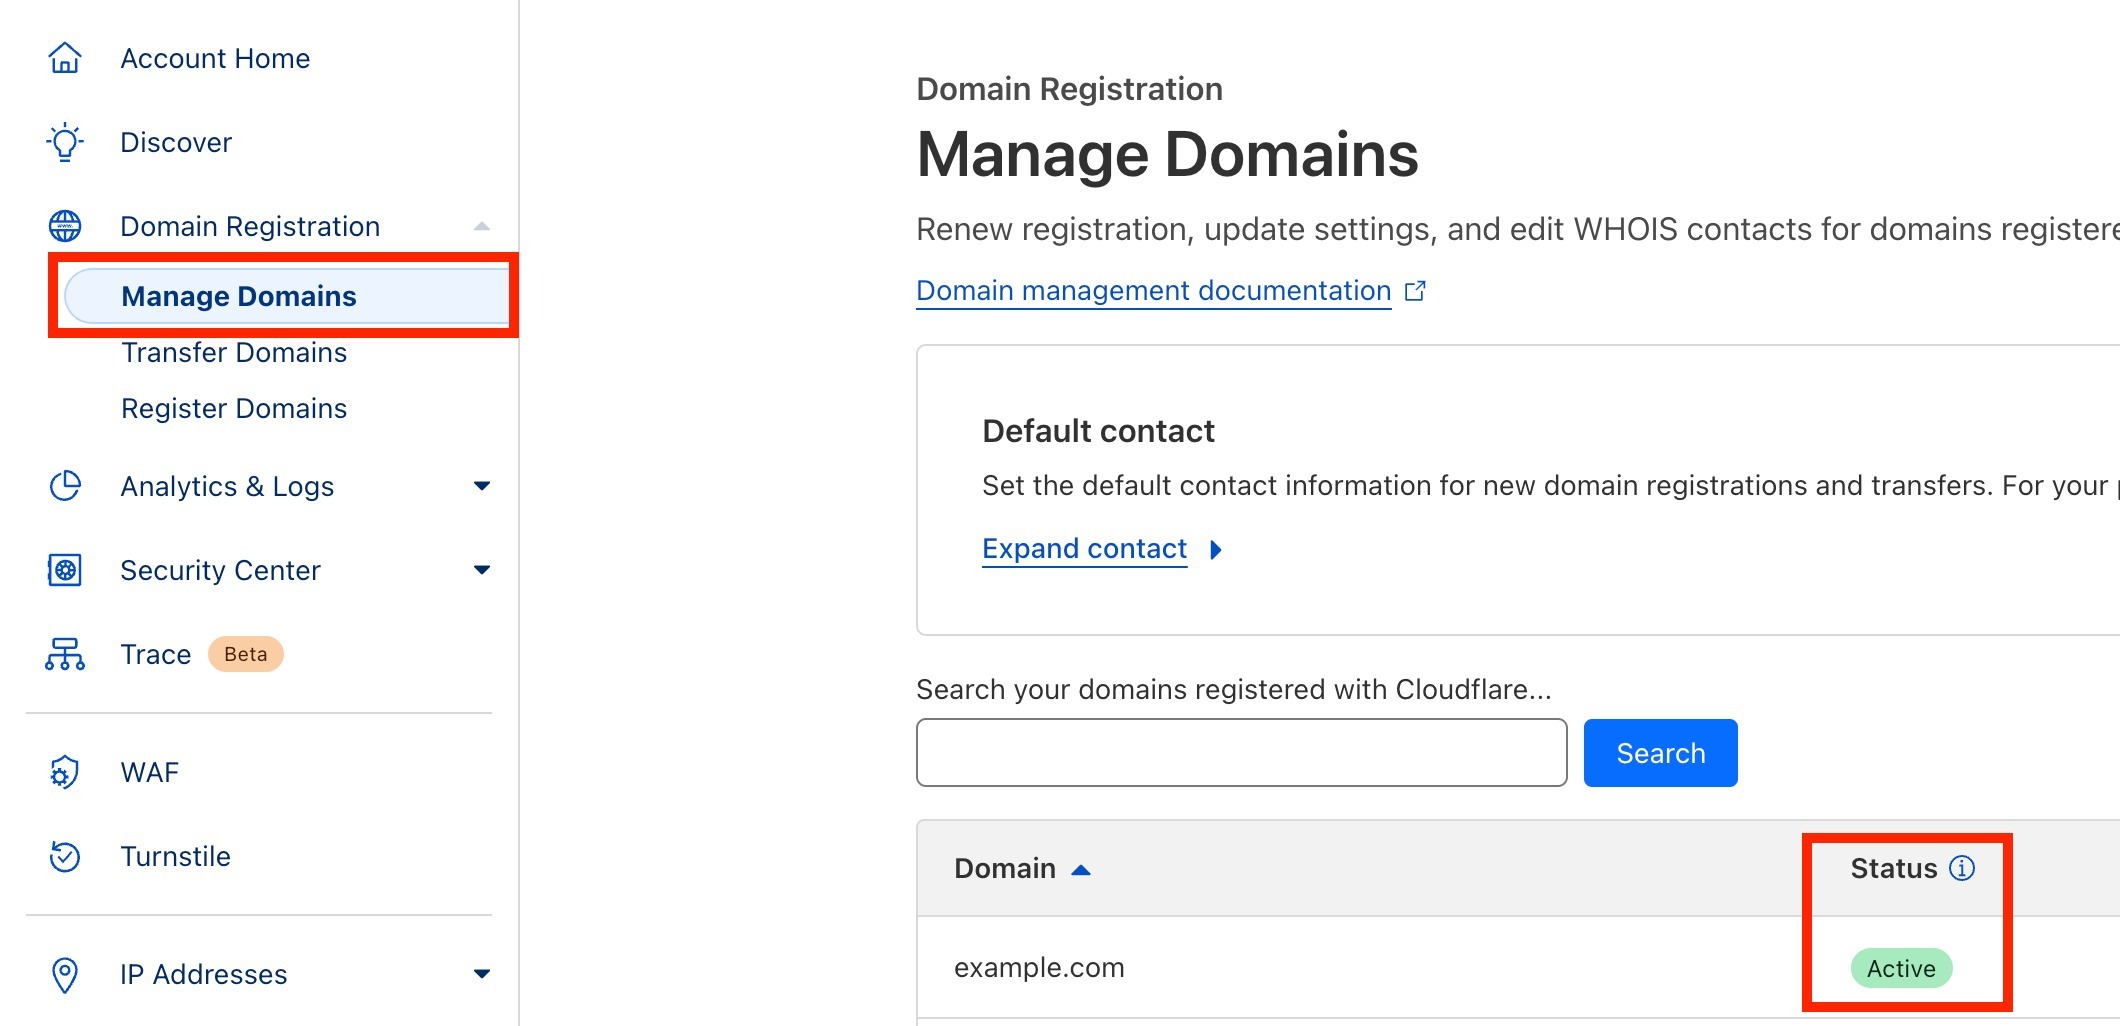
Frequently Asked Questions
Q: Do I need an EPP or authorization code?
No. A Cloudflare-to-Cloudflare account move does not change registrars, so an EPP or authorization code is not required.
Q: Can I transfer any domain using this workflow?
No. This process applies only to domains eligible for the Cloudflare account-move workflow. Other domains may require a different transfer process.
Q: Why is my domain not eligible for transfer yet?
The domain may be subject to a 60-day transfer restriction. When this applies, the transfer window displays the date when the domain becomes eligible.
Q: Do my DNS records automatically move to the destination Cloudflare account?
No. Cloudflare does not copy DNS records during the account move. Configure the required records in the destination account before initiating the transfer.
Q: Does this process change my domain registrar?
No. The domain remains registered with Cloudflare. Only the account responsible for managing the domain changes.
Q: How long does the transfer take?
Allow up to 24 hours after accepting the move for the transfer to complete. The domain should display Active in the destination Cloudflare account when the process finishes.
Q: What happens to domain renewal after the transfer?
Future renewals and billing are managed through the destination Cloudflare account after the account move completes.
Q: Why does Cloudflare show Invalid Nameservers after I accept the move?
This status may appear temporarily while Cloudflare processes the transfer. Allow up to 24 hours for the domain to become active. If the issue continues, verify the nameserver and DNS configuration.
Need Help?
If you experience issues or need additional assistance, contact support for help. Include a description of the issue, any error messages, and the steps you've already taken to help troubleshoot the problem.