
RSS email campaigns help you automatically deliver newly published blog posts, news, and other feed updates to your subscribers. You design an email with RSS content blocks and choose a recurring delivery schedule. The campaign uses your RSS feed to populate each scheduled email, so you do not need to build a separate newsletter for every new post. This guide explains how to prepare your feed, create and test the email, schedule delivery, and manage future sends.
TABLE OF CONTENTS
- What Are RSS Email Campaigns?
- Key Benefits of RSS Email Campaigns
- Before You Begin
- RSS Header and RSS Items in Email Builder
- How RSS Scheduling Works
- How to Set Up an RSS Email Campaign
- How to Preview and Test an RSS Email
- How to Manage Scheduled RSS Campaigns
- Frequently Asked Questions
- Need Help?
What Are RSS Email Campaigns?
RSS (Really Simple Syndication) is a format that allows websites to publish a feed of their latest content. An RSS email campaign uses that feed to automatically place new posts into an email. For example, you can send a weekly roundup of recent blog articles instead of creating each newsletter manually.
Unlike a one-time email broadcast, an RSS campaign uses RSS Schedule to check for new feed content on a recurring schedule. You control the email design, recipients, sending frequency, and the maximum number of feed items included.
Key Benefits of RSS Email Campaigns
RSS campaigns are useful when you publish content regularly and want to keep subscribers informed without rebuilding your email every time new content goes live.
- Automatic Content Updates: Populate email content from new items in your RSS feed.
- Recurring Newsletters: Schedule daily, weekly, or monthly sends instead of preparing each update manually.
- Consistent Design: Reuse the same email layout while RSS Header and RSS Items pull in current feed content.
- Controlled Content Volume: Set a maximum number of feed items to include in each email.
- Flexible Campaign Management: Edit future content, reschedule delivery, or pause a scheduled campaign when needed.
Before You Begin
A working RSS feed, a prepared audience, and a configured email-sending setup are required before you schedule recurring content. Checking these items first helps prevent blank feed sections or delivery issues.
- RSS Feed URL: Obtain a publicly accessible RSS or XML feed URL from the website whose posts you want to share. To create one from a blog in the platform, go to Sites → Blogs → Settings → RSS.
- Published Content: Confirm the feed contains published items and the details you want to display, such as titles, descriptions, and links.
- Verified Sending Domain: Make sure your sending domain is configured and verified before scheduling the email.
- Recipients: Prepare the contacts, Smart List, or other available audience selection you want to receive the campaign.
Tip: A feed generated from the built-in Blogs area includes published posts, not drafts. Check the feed URL directly if expected articles are missing.
RSS Header and RSS Items in Email Builder
The Email Builder uses two RSS blocks to insert feed content dynamically. Understanding which block controls feed-level information and which controls individual posts helps ensure the newsletter renders correctly.
| Block | Purpose | Example RSS Values |
|---|---|---|
| RSS Header | Displays feed-level information, such as the publication name or description. | {{rss_feed.title}}, {{rss_feed.description}} |
| RSS Items | Repeats content for individual feed entries, such as post titles, summaries, and links. | {{rss_item.title}}, {{rss_item.content}}, {{rss_item.url}} |
Use RSS Items to display the articles themselves. Add RSS Header when you also want feed-level information such as the feed title or description.
Where the editor provides Basic and Custom RSS editing options, Basic uses a preset layout while Custom allows supported RSS values and formatting to be edited.
Important: If you edit an RSS Items block in Custom mode, keep the repeating-item opening and closing tags intact so each feed entry can render correctly.
How RSS Scheduling Works
An RSS campaign checks for new feed content on its configured schedule. This lets you control when subscribers receive a digest instead of sending an email every time a single article is published.
- Frequency: Choose an available recurring option, such as daily, weekly, or monthly.
- Sending Days and Time: Set the days and time applicable to your selected frequency. Review the displayed next execution time and configured time zone.
- Maximum Items: Limit how many recent eligible feed entries appear in one email.
- No New Posts: If no new RSS items are available for a scheduled cycle, the email is not sent for that cycle.
Important: Choose RSS Schedule for emails that contain RSS variables. Using regular Send Now, standard Schedule, or Batch Schedule with an RSS-based template can result in empty RSS values.
How to Set Up an RSS Email Campaign
Build the email with RSS blocks first, then connect the feed in the campaign's RSS Schedule settings. The RSS blocks control what appears in the email, while RSS Schedule supplies the feed content and recurring delivery timing.
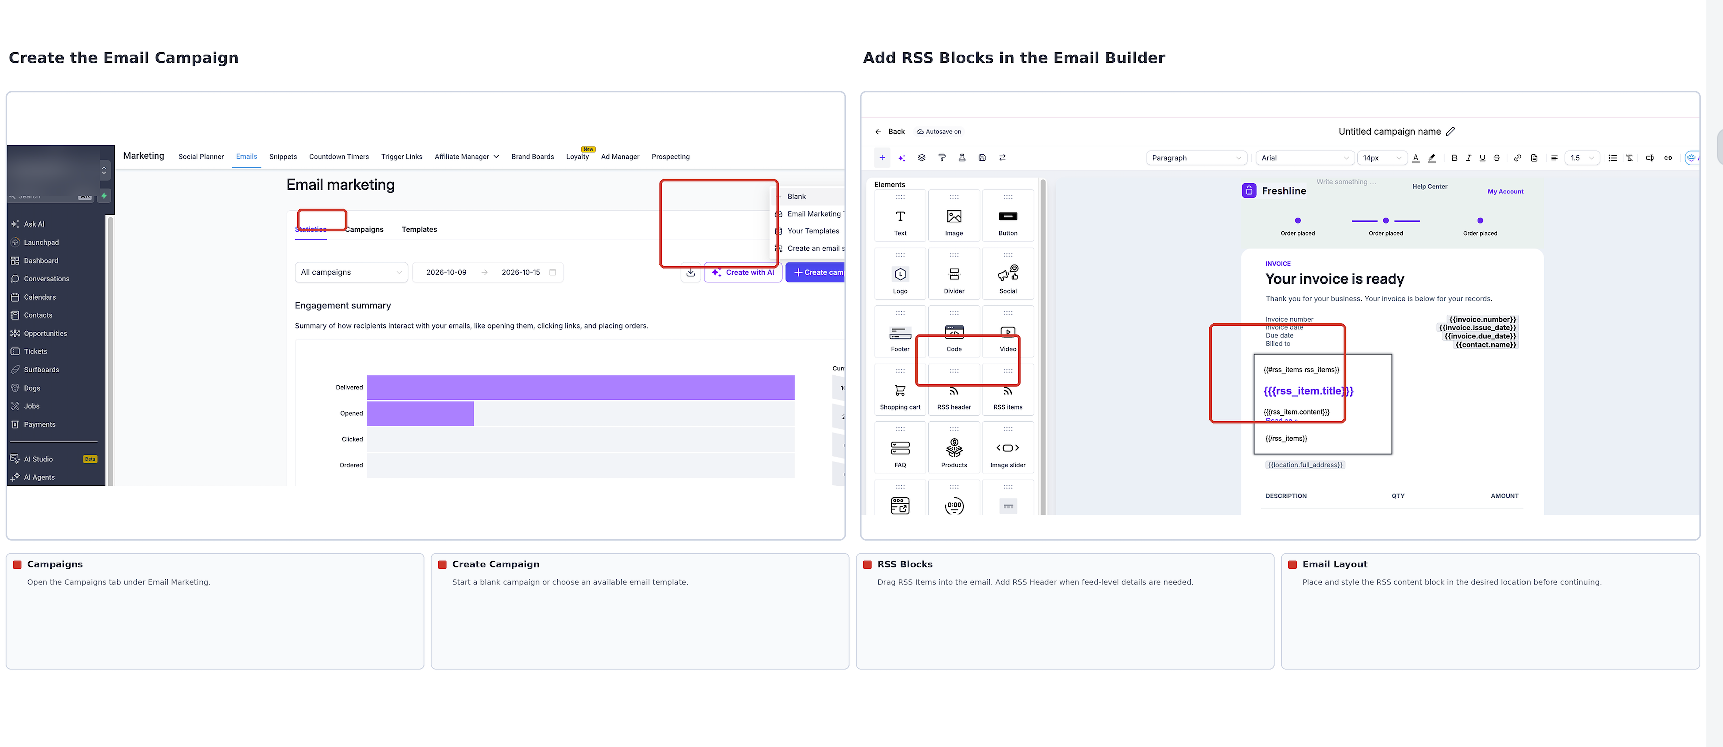
- Go to Marketing → Emails → Campaigns → Email Campaigns.
- Create a New Campaign and choose an existing email template or begin with a new design.
- Open the Email Builder. In the elements panel, add the RSS Items block to the email layout. Optionally, add RSS Header for feed-level information such as the title or description.
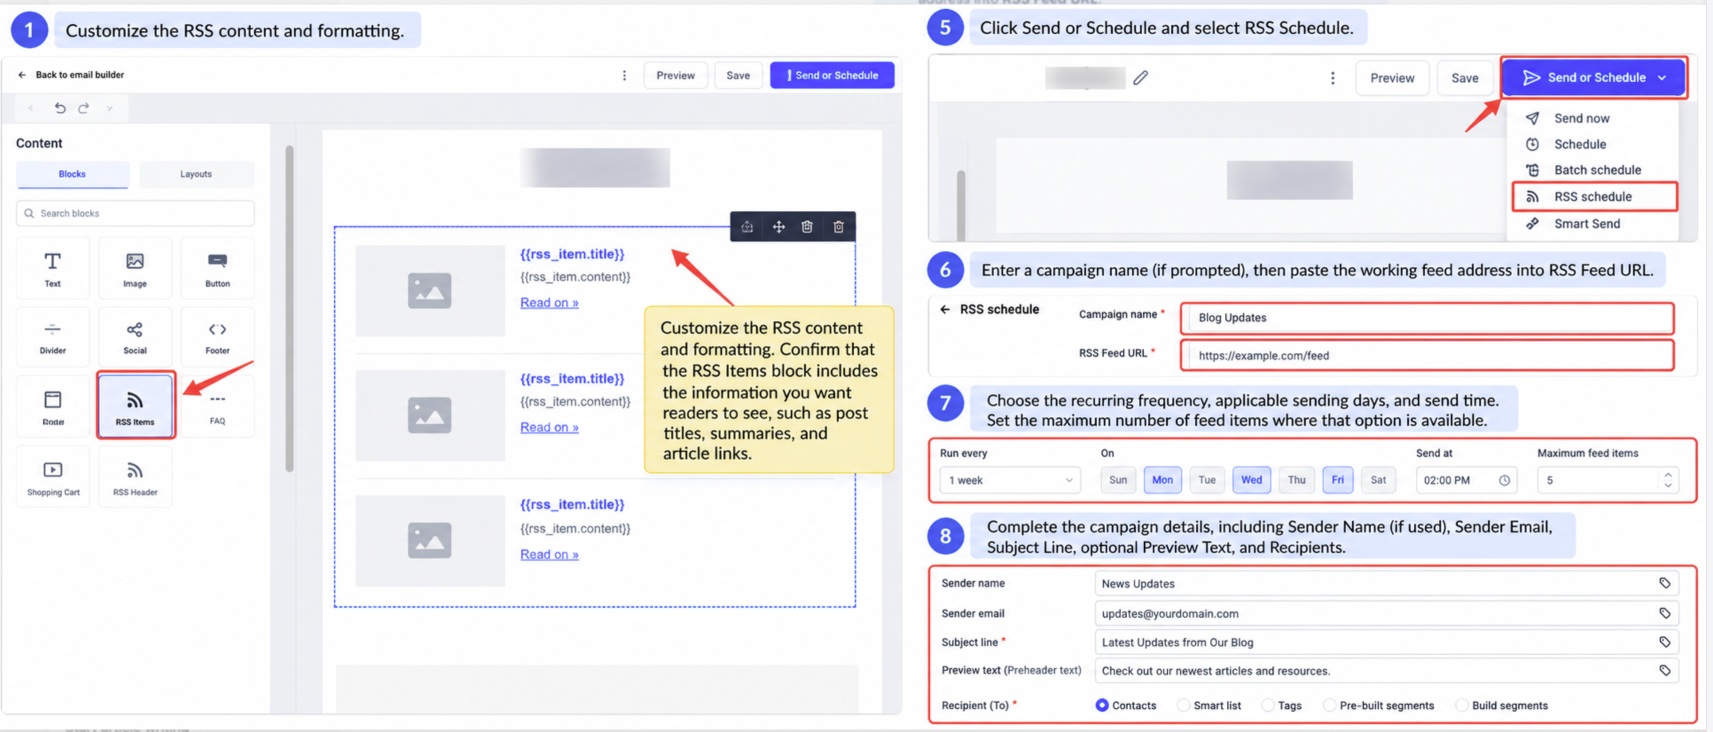
- Customize the RSS content and formatting. Confirm that the RSS Items block includes the information you want readers to see, such as post titles, summaries, and article links.
- Click Send or Schedule and select RSS Schedule.
- Enter a campaign name if prompted, then paste the working feed address into RSS Feed URL.
- Choose the recurring frequency, applicable sending days, and send time. Set the maximum number of feed items where that option is available.
- Complete the campaign details, including Sender Name if used, Sender Email, Subject Line, optional Preview Text, and Recipients.
- Review the RSS Feed URL, selected audience, next execution date and time, and displayed time zone.
- Click Schedule to confirm the recurring RSS campaign.
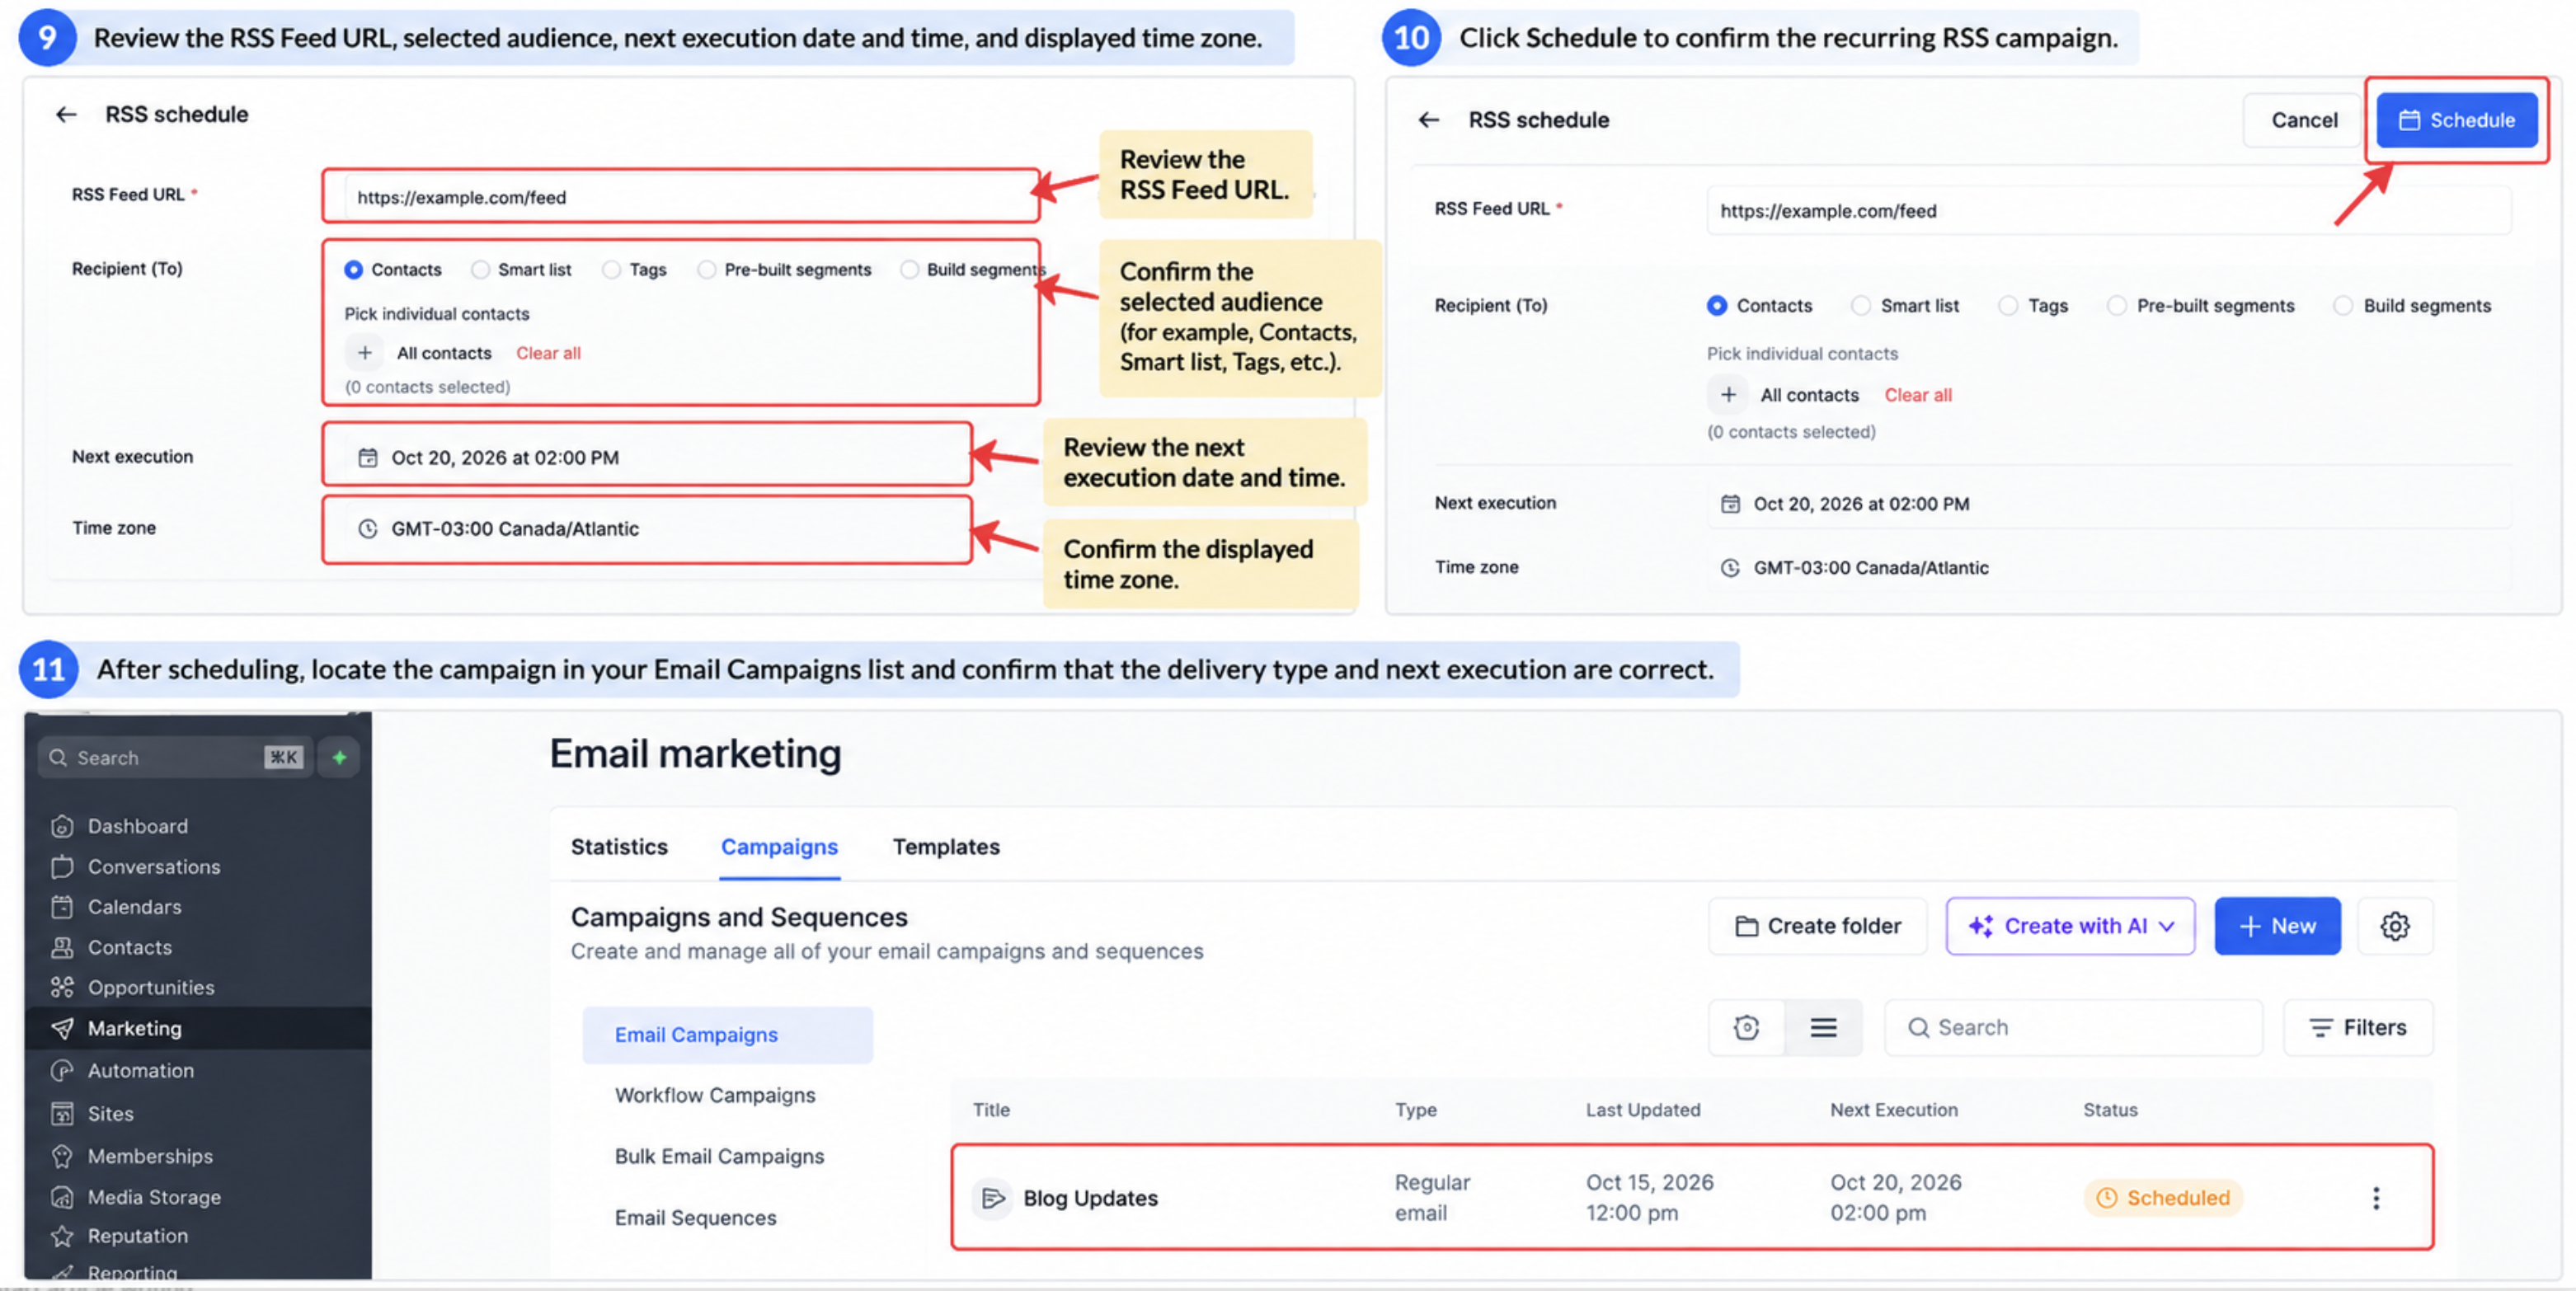
After scheduling, locate the campaign in your Email Campaigns list and confirm that the delivery type and next execution are correct.
How to Preview and Test an RSS Email
RSS variables are populated from an external feed, so a normal editor preview may not show exactly what subscribers will receive. Sending a test email helps confirm that the feed content, links, sender information, and layout appear as intended.
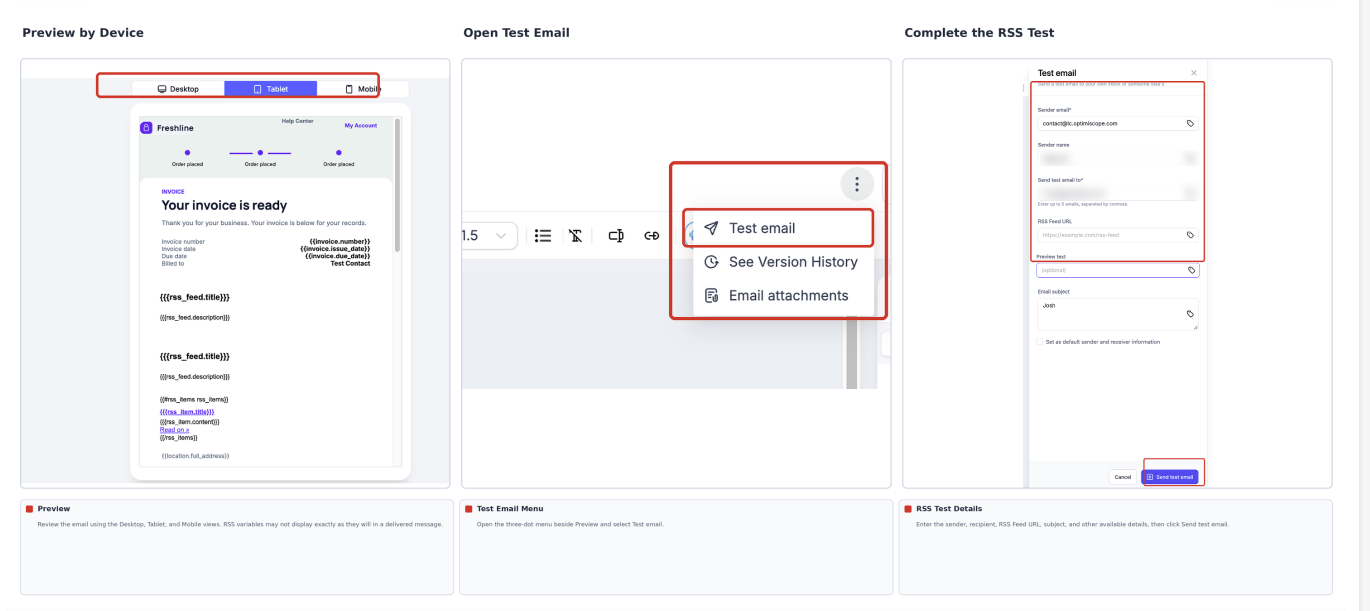
- In the Email Builder, click Preview and review the available desktop, tablet, and mobile views.
- Open the three-dot menu beside Preview and select Test Email.
- Complete the available sender, recipient, subject, and preview fields. For an RSS-based email, enter your feed in the RSS Feed URL field when preparing the test.
- Click Send Test Email.
- Open the received message and confirm that titles, descriptions, links, and any images are populated correctly.
- Correct any issues in the builder and send another test before scheduling the campaign.
Note: If the RSS Feed URL is missing from an RSS test, RSS variables can appear blank. Test emails also do not activate unsubscribe links; review those settings separately before a live send.
How to Manage Scheduled RSS Campaigns
RSS campaigns can continue sending on a recurring schedule, so you may need to revise content or delivery settings after the initial setup. Use the campaign's available actions under Marketing → Emails → Campaigns → Email Campaigns to manage upcoming executions.
- Update Email Content: Open the scheduled or ongoing campaign's action menu, select Update Email Content, make your changes, and click Save. Make changes well before the next send because processing or caching may prevent last-minute updates from appearing.
- Reschedule: For an eligible scheduled campaign, select Reschedule, update the settings, click Save, and then click Schedule. Complete the change at least 60 minutes before execution.
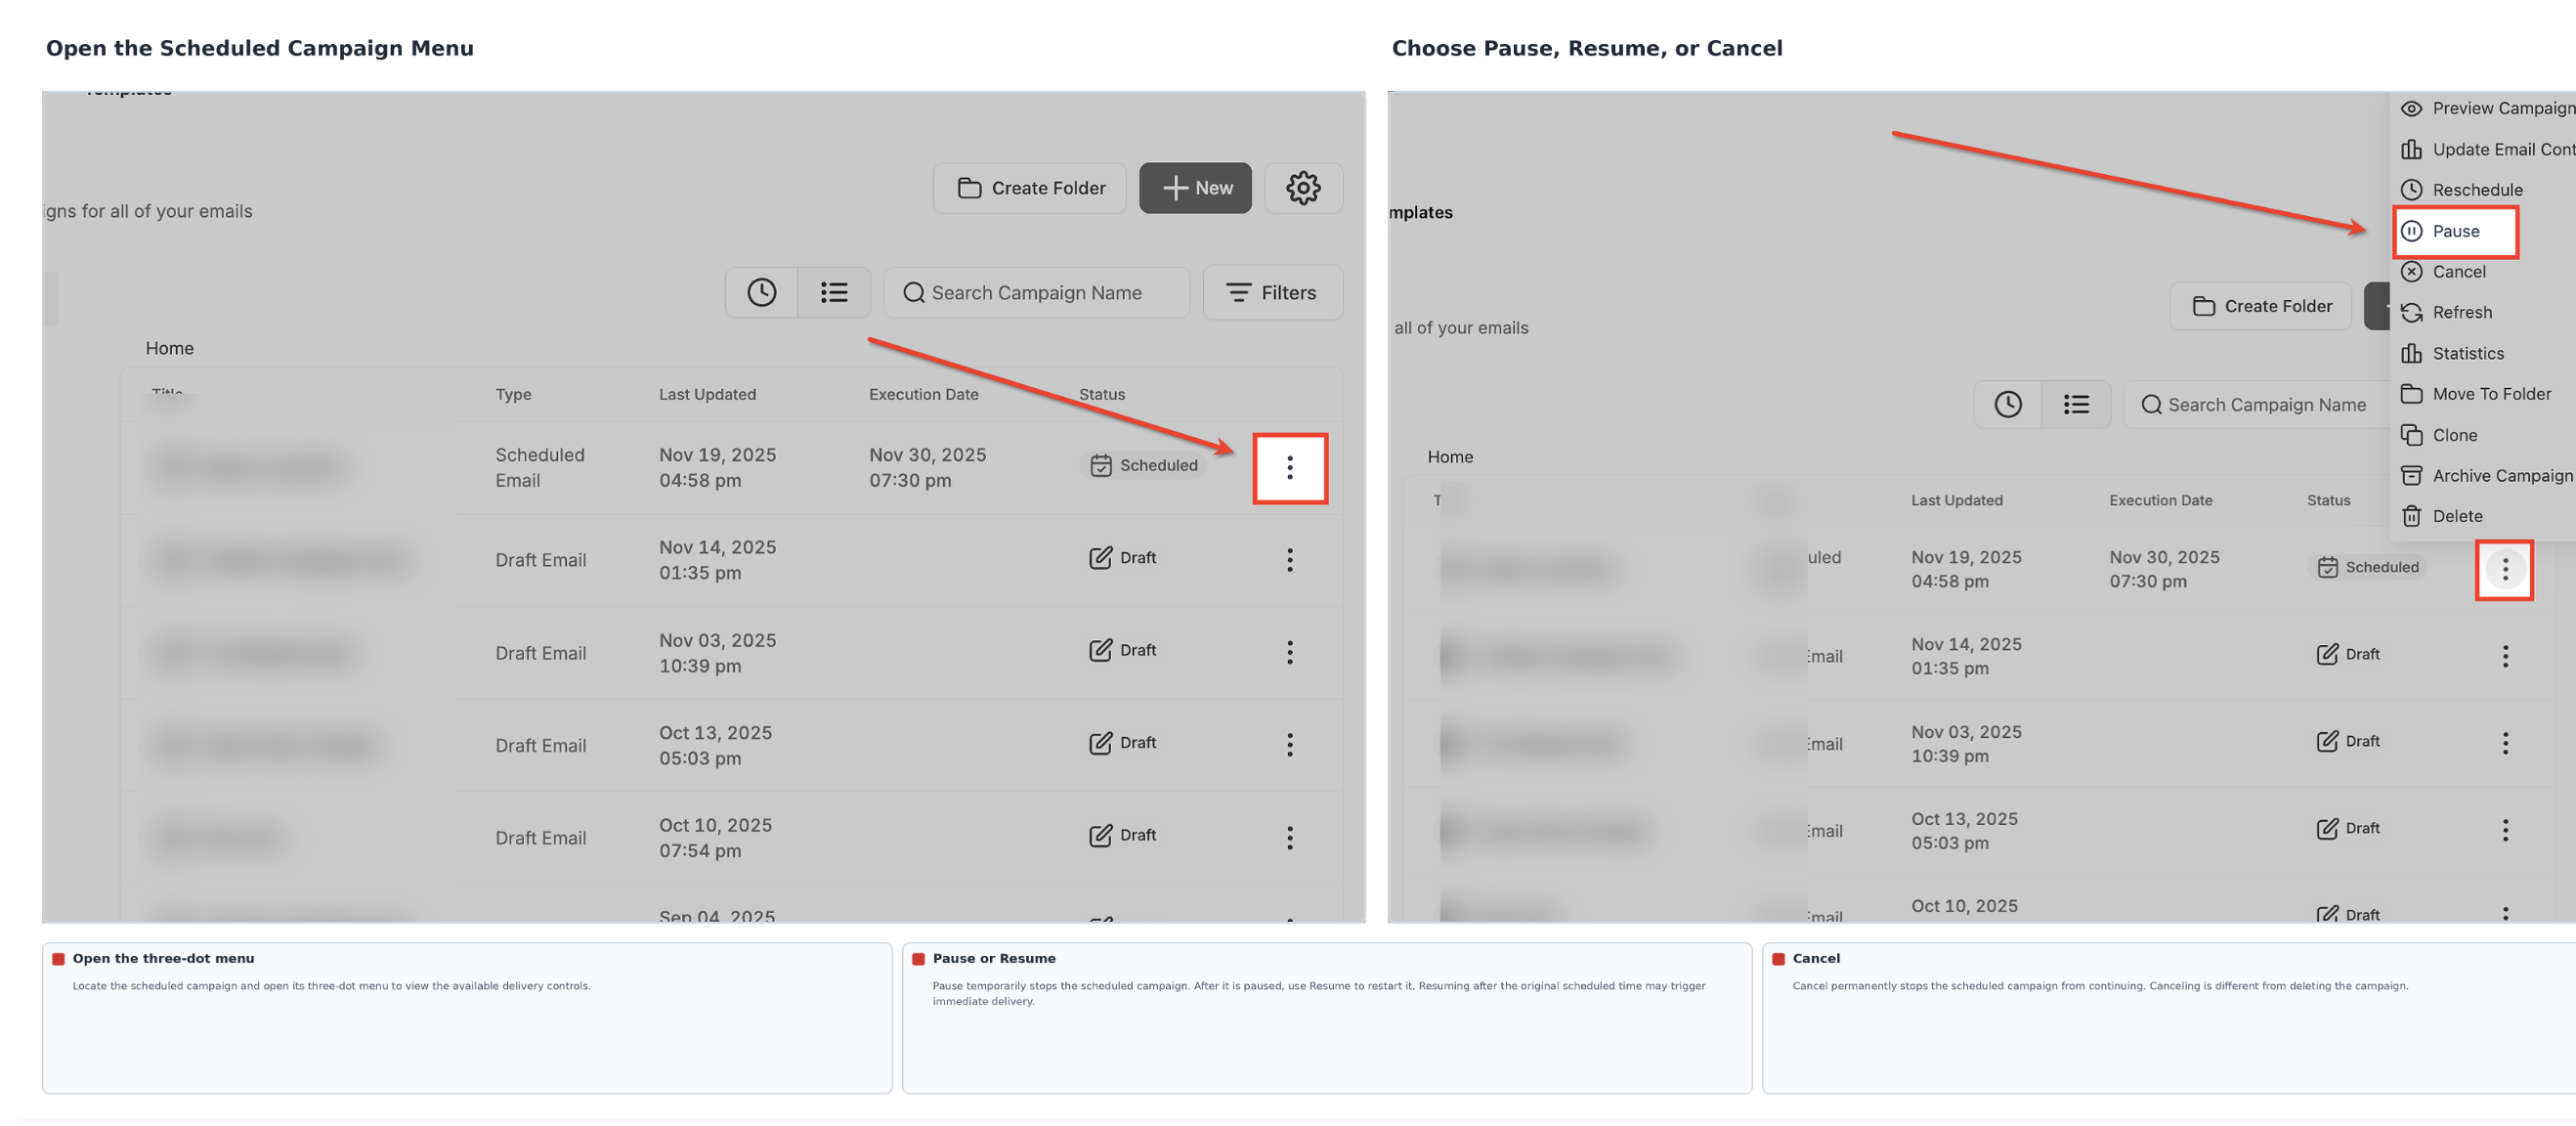
- Pause or Resume: Use Pause to temporarily stop scheduled delivery and Resume to restart it. Resuming after the original scheduled time can trigger immediate delivery.
- Cancel: Use Cancel to permanently stop the scheduled campaign from continuing. Canceling is different from deleting the campaign.
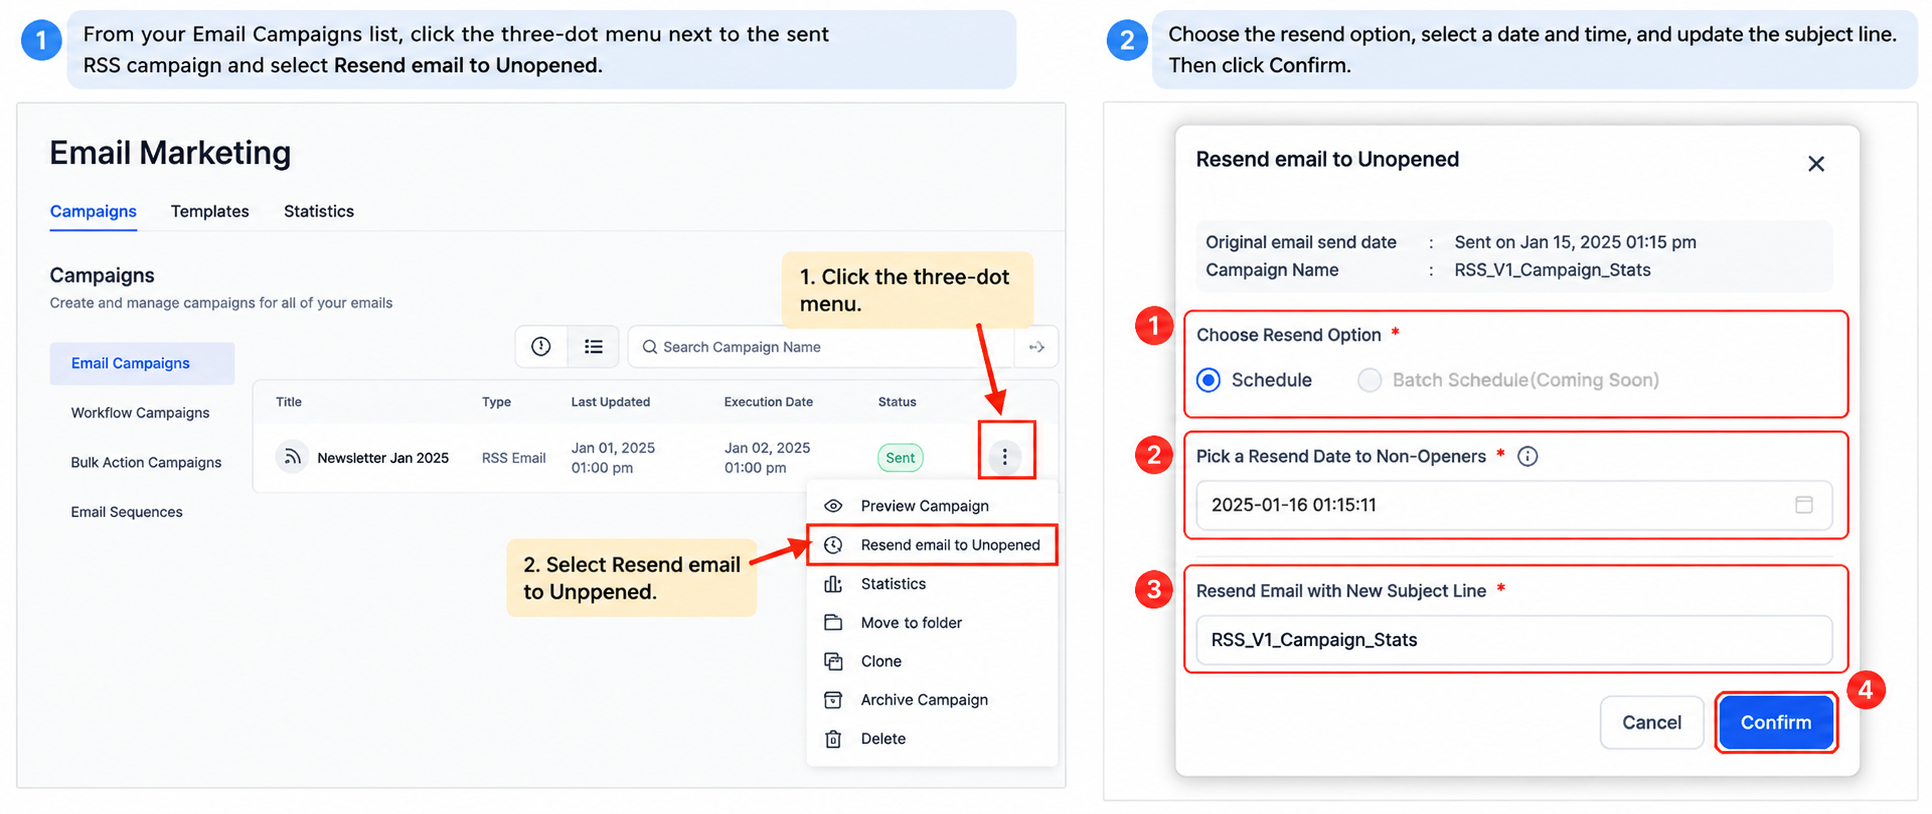
- Resend to Unopened: For an already-sent RSS campaign, Resend to Unopened can schedule a follow-up to contacts who did not open the original message.
Important: Clicking Save alone does not complete a reschedule. You must also click Schedule to apply the revised schedule.
Frequently Asked Questions
Q: Can I use an RSS feed from an external website?
Yes. Use a valid, accessible RSS feed URL that provides the content fields needed for your email. Check the feed and send a test before scheduling.
Q: Why didn't my RSS campaign send at its scheduled time?
If no new posts were available for that cycle, the scheduled send is skipped. Check the feed for recently published items and review the campaign's audit information before treating it as a delivery failure.
Q: Why are RSS placeholders blank in my test email?
The test may be missing the RSS Feed URL, or the feed may not contain the fields referenced by the template. Provide the feed URL in the RSS test settings and verify the available feed values.
Q: Why weren't older blog posts included in the RSS email?
RSS campaigns select new content based on the scheduling period and the configured maximum item count. For the first scheduled send, posts published after scheduling are included. Check publication dates, feed availability, and the maximum-items setting.
Q: Why is my RSS email showing HTML tags instead of formatted text?
The RSS source may provide HTML-formatted content that is being escaped. If the feed is trusted, you can use {{{rss_item.content}}} in a Custom RSS Items block to render that content.
Q: Why do I see multiple entries for the same RSS campaign?
Recurring RSS sends can appear as separate campaign executions, with reporting information for each send. Review the execution date and campaign type when checking results.
Need Help?
If your RSS email is not displaying or sending as expected, review the feed, campaign settings, and test results before making changes.
- Missing RSS Content: Confirm that the RSS Feed URL is accessible and contains published items. Check that the RSS Items block references fields available in the feed.
- Blank Test Email Values: Enter the correct RSS Feed URL when configuring the test. Send another test email to verify that the content populates.
- Campaign Did Not Send: Check whether new feed items were available for the scheduled cycle. Review the next execution time and campaign audit information.
- Incorrect Sending Time: Review the campaign's recurring frequency, selected days, execution date, and displayed time zone.
- Unable to Reschedule: Confirm that the campaign is eligible for rescheduling and that the change is completed at least 60 minutes before execution. Click both Save and Schedule.
- Need to Stop Future Sends: Use Pause for a temporary stop or Cancel to permanently stop the scheduled campaign.
If the issue continues, contact support for assistance. Include the affected campaign, RSS Feed URL, scheduled execution details, and any relevant error messages.