
RSS blocks pull blog posts and other feed updates into emails built with the Email Builder. Use RSS Header for feed information and RSS Items for individual posts. You can choose a ready-made layout or customize supported RSS variables. This guide covers setup, testing, and the sending option needed to populate RSS content.
TABLE OF CONTENTS
- What Are RSS Blocks in the Email Builder?
- Key Benefits of RSS Blocks
- Prerequisites and Limitations
- RSS Header Block and Feed Variables
- RSS Items Block and Display Options
- Custom RSS Layouts and HTML Content
- How to Set Up RSS Blocks in the Email Builder
- How to Test and Send Emails with RSS Blocks
- Troubleshooting RSS Blocks
- Frequently Asked Questions
- Need Help?
What Are RSS Blocks in the Email Builder?
RSS (Really Simple Syndication) is a format websites use to share updates. The Email Builder provides two email blocks that insert RSS feed data into a campaign:
- RSS Header: Displays feed-level information, such as its title and description.
- RSS Items: Displays individual posts, including titles, excerpts, links, and other available fields.
You can use either block or both. The blocks supply content; an RSS Schedule determines when the campaign sends. Adding a block does not immediately send an email when a post is published.
Key Benefits of RSS Blocks
RSS blocks let you reuse one email layout for regularly published content instead of rebuilding every newsletter.
- Dynamic Content: Insert feed updates into scheduled emails.
- Flexible Layouts: Choose headlines, excerpts, images, full content, or a custom layout.
- Consistent Design: Format feed content within your email template.
- Less Manual Editing: Reuse the design for recurring post digests.
Prerequisites and Limitations
Before configuring RSS blocks, prepare a valid RSS feed and review how the Email Builder populates dynamic content. Understanding these requirements helps you avoid missing feed information when testing or scheduling emails.
- RSS Feed URL: Use a valid, accessible RSS feed containing the information you want to display.
- Design Editor: Open an email template in the Design Editor to configure RSS Header and RSS Items blocks.
- Available Feed Fields: RSS variables populate only when the source feed provides the corresponding information.
- RSS Schedule: Use RSS Schedule when sending live emails that contain RSS variables.
- Testing: Enter the RSS Feed URL when sending a test email to verify that the variables populate correctly.
Important: Sending an RSS-based template through standard email delivery options can result in empty RSS variables. Use RSS Schedule for live RSS campaigns.
RSS Header Block and Feed Variables
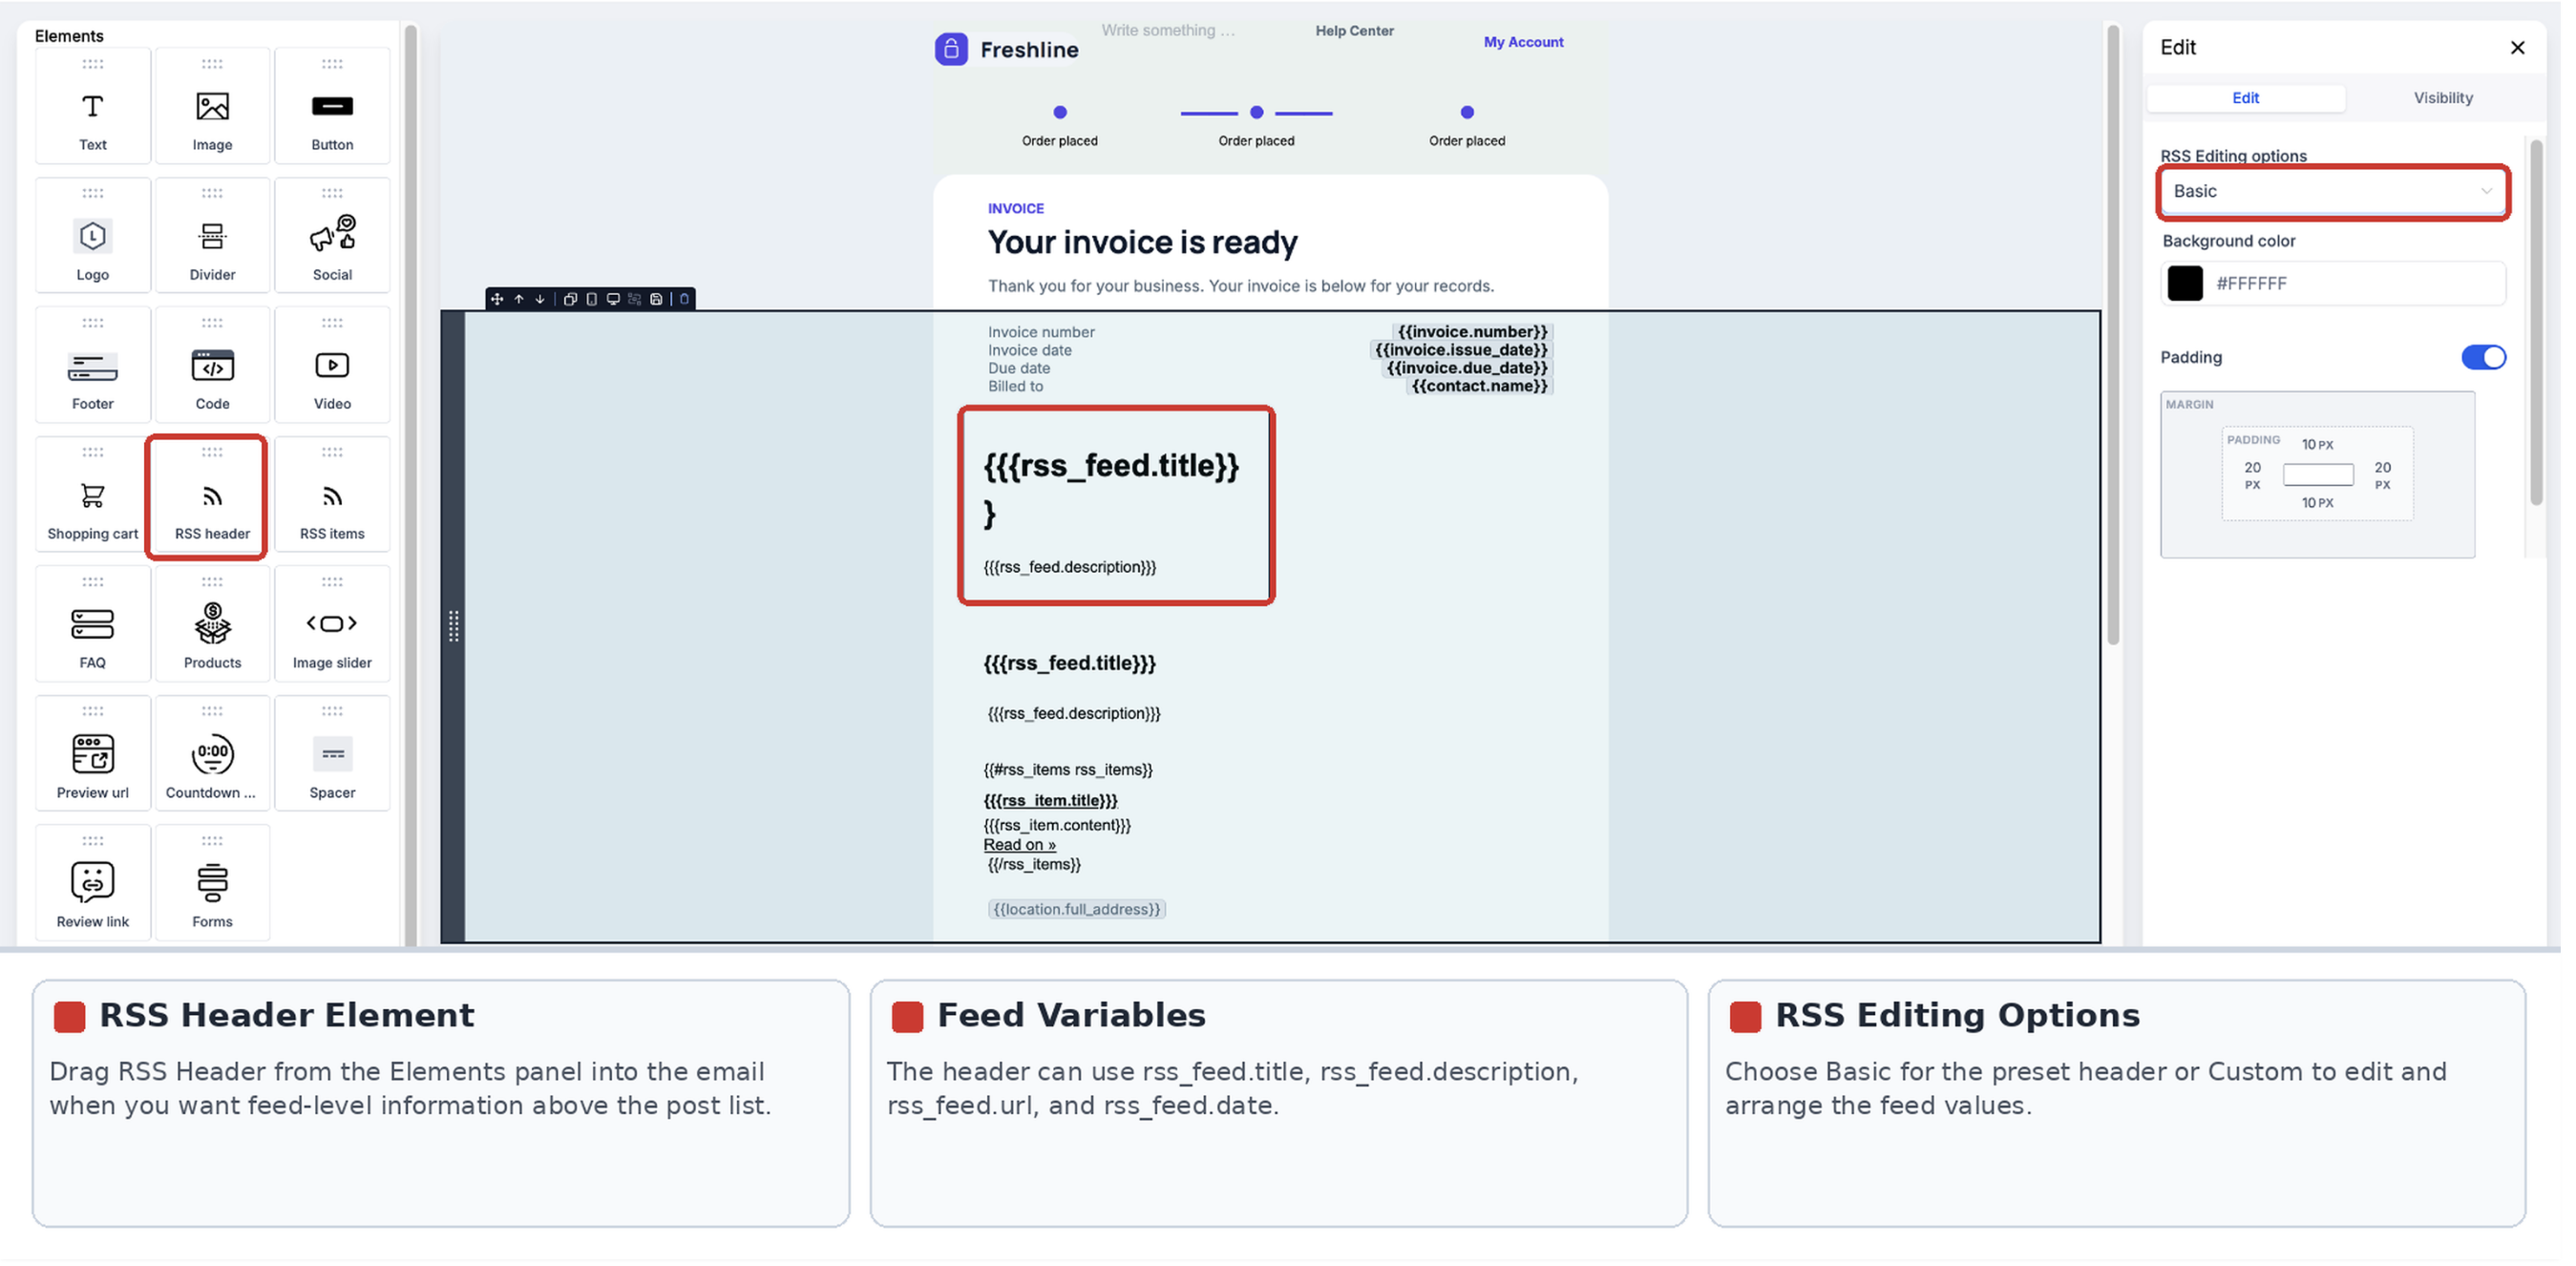
The RSS Header displays information about the feed itself. Use it when your email needs a source name or description above the list of posts.
| Feed Information | RSS Variable |
|---|---|
| Feed title | {{rss_feed.title}} |
| Feed description | {{rss_feed.description}} |
| Feed link | {{rss_feed.url}} |
| Last build date | {{rss_feed.date}} |
Under RSS Editing Options, choose Basic for the preset header or Custom to edit its content and arrange these values.
The documented RSS Header variables can also be used in the subject line of an RSS campaign.
RSS Items Block and Display Options
The RSS Items block repeats information for the posts selected from your feed. Choose the display option that matches how much content recipients should see.
- Excerpts: Short previews of each post.
- Excerpts with Image: Previews with images when compatible image data is available.
- Title: Post titles in a compact list.
- Full Content: The full post content provided by the feed.
- Custom: Your own arrangement of supported post fields.
Custom layouts can use these documented values:
| Post Information | RSS Variable |
|---|---|
| Title | {{rss_item.title}} |
| Summary/description | {{rss_item.content}} |
| Full content | {{rss_item.content_full}} |
| Post link | {{rss_item.url}} |
| Publication date | {{rss_item.date}} |
| Author | {{rss_item.author}} |
| Image URL | {{rss_item.imageUrl}} |
Values appear only when the source feed provides the corresponding information.
{{rss_item.imageUrl}} returns an image URL, not a rendered image. For an image-based preset, choose Excerpts with Image. The rss_img helper is also supported for images in custom RSS content.
Custom RSS Layouts and HTML Content
Use Custom when you need to control which feed fields appear and their order. Repeating post content is enclosed by the RSS Items opening and closing tags:
{{#rss_items rss_items}}
<a href="{{rss_item.url}}">{{rss_item.title}}</a>
<p>{{rss_item.content}}</p>
{{/rss_items}}
This is an example of a custom RSS Items layout. If the editor already inserts the loop tags, keep them in place rather than adding another pair.
RSS text may appear with literal HTML tags, such as <p>. Triple braces, such as {{{rss_item.content}}}, can render unescaped HTML in a Custom RSS Items block.
Important: Use unescaped HTML only with a feed you trust, and test the result. Triple braces do not fix an invalid or missing RSS Feed URL.
How to Set Up RSS Blocks in the Email Builder
Start with an accessible RSS Feed URL. Configure the two blocks in the Design Editor so feed details and individual posts appear in the order you want.
- Go to Marketing → Emails → Templates and open a template or create one in the Design Editor.
- Open Add Elements (+) and drag RSS Header into the design if you want to display feed-level information.
- Select the Header block and choose Basic or Custom under RSS Editing Options.
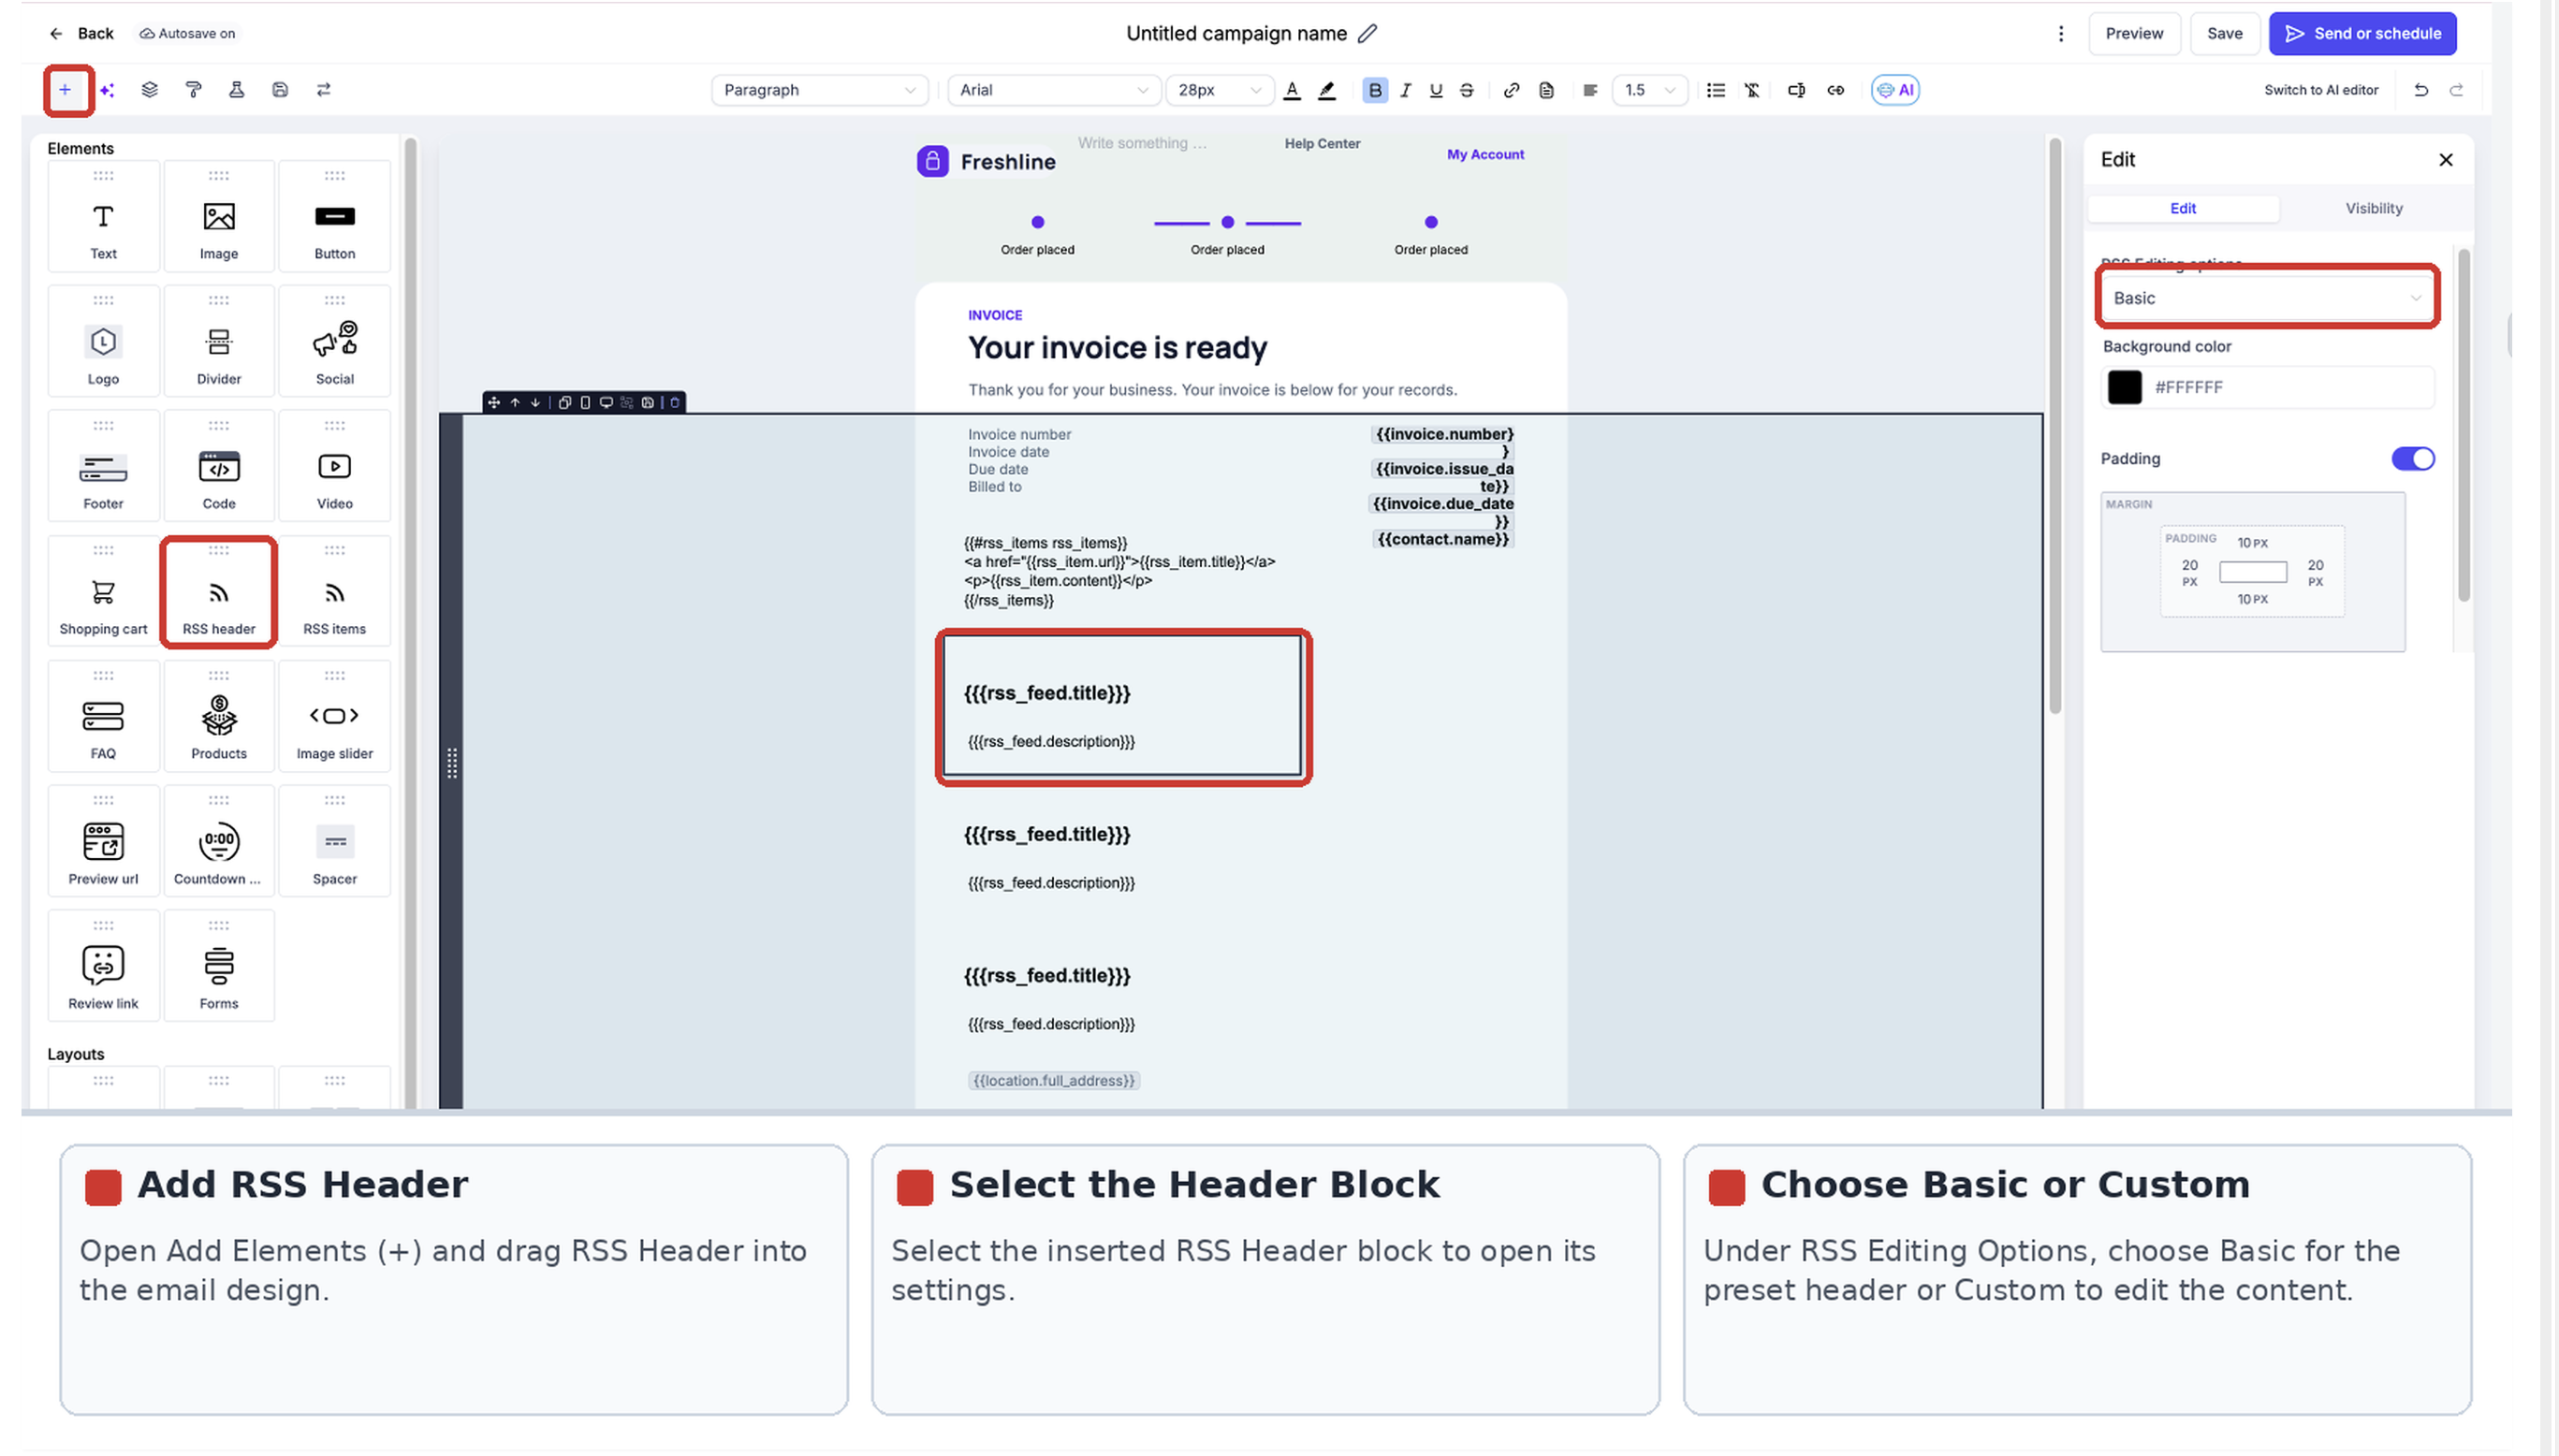
RSS Header editing options and the header preview.
- From Add Elements (+), drag RSS Items below the header, or use it alone if you only want posts.
- Select RSS Items and choose a display option such as Excerpts, Title, or Custom.
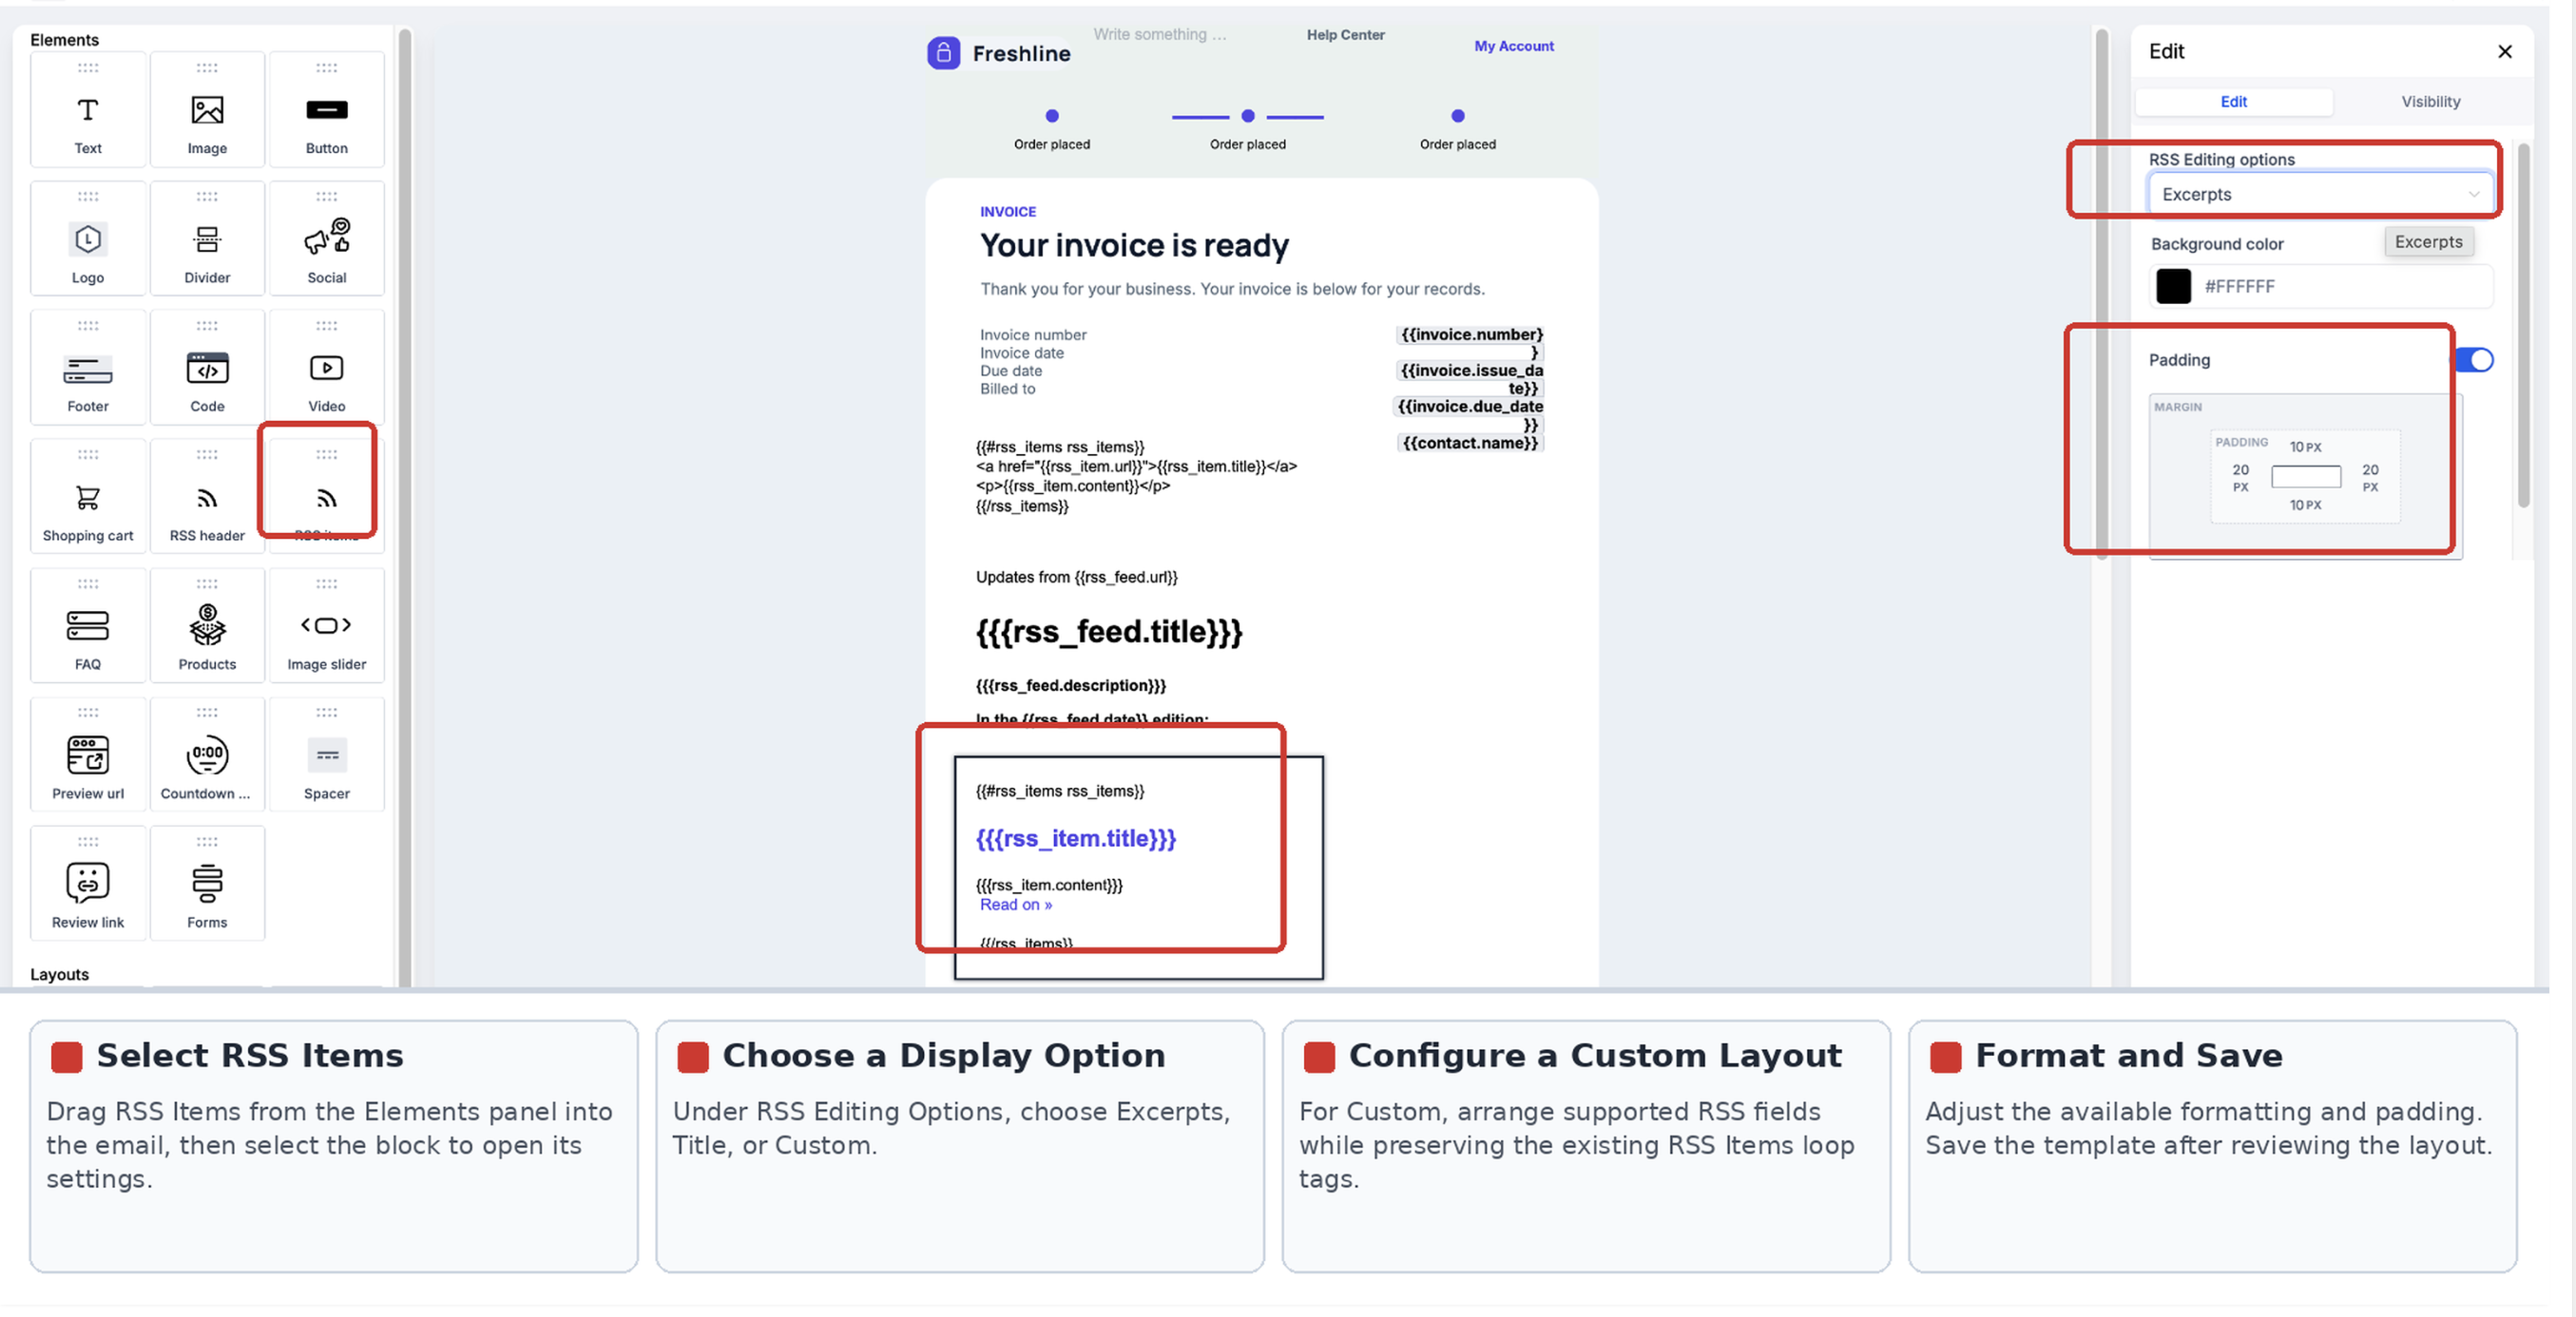
RSS Items display selection and excerpt-style preview.
- For a Custom layout, arrange supported RSS fields and preserve the existing RSS Items loop tags.
- Adjust the available formatting and padding, then save the template.
How to Test and Send Emails with RSS Blocks
Preview checks the design; a test email confirms that the RSS variables resolve to real feed content. Use RSS Schedule when sending a live RSS campaign.
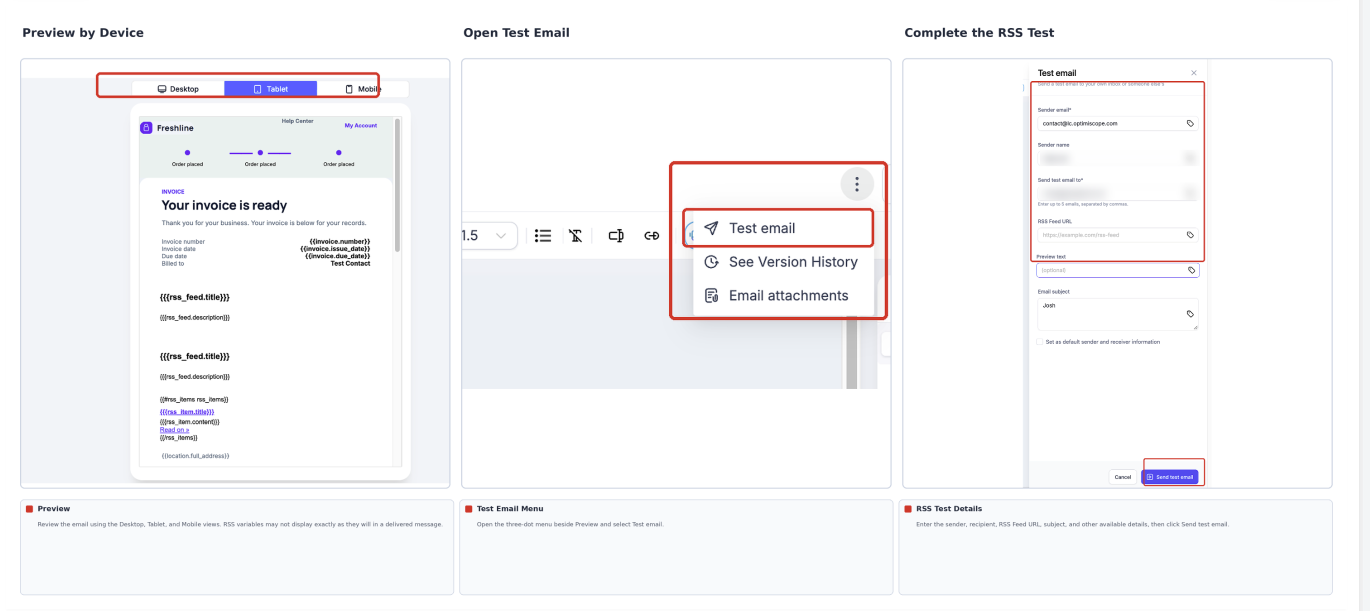
- In the editor, select Preview to review desktop, tablet, and mobile layouts.
- Open the three-dot menu beside Preview and select Test Email.
- Enter the required email details and paste a valid URL into the test email's RSS Feed URL field.
- Send the test. Check post titles, dates, images, links, and formatting in your inbox.
- To send to recipients, create an email campaign using the RSS-enabled design, then go to Send or Schedule → RSS Schedule.
- Enter the RSS Feed URL, select the available frequency, send time, and maximum number of items, and review recipients before scheduling.
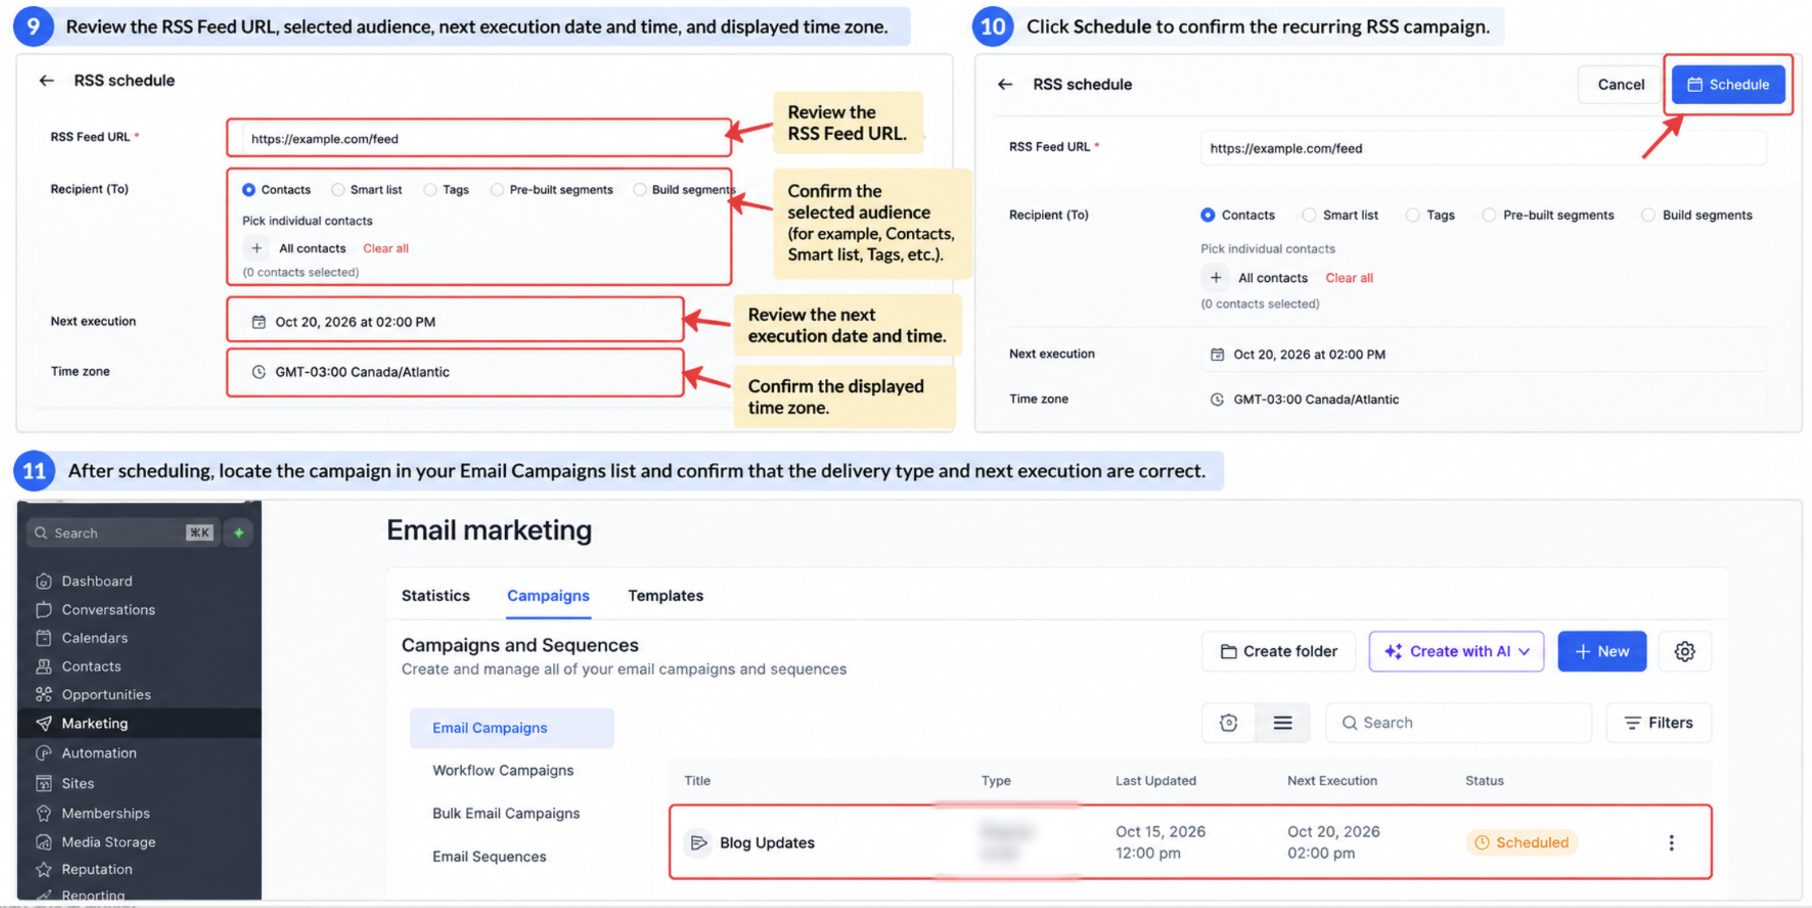
Important: Without a feed URL in an RSS test, RSS variables may be blank. For live RSS emails, use RSS Schedule rather than Send Now, ordinary Schedule, or Batch Schedule; standard delivery methods do not populate RSS variables as documented.
Troubleshooting RSS Blocks
When RSS content looks wrong, check whether the issue comes from the feed, the selected block layout, or the sending method.
- Blank RSS Fields: Confirm the feed URL is present in the test email or live RSS Schedule.
- Missing Post Images: Check the feed's image data and the chosen RSS Items layout.
- HTML Tags Appear as Text: Review the feed format before using triple braces to render trusted HTML content.
- No Email Sent for a Cycle: An RSS send may be skipped when no new feed items are available. Check the campaign audit log.
Frequently Asked Questions
Q: Do I have to add both RSS Header and RSS Items?
No. RSS Header is optional. Use RSS Items alone if you only need to display individual posts.
Q: Can I use an RSS feed from an external website?
Yes. Use a valid, accessible RSS feed URL and confirm that it contains the post details you want to display.
Q: What happens if an RSS post has no author or date?
The corresponding value may not populate if that field is absent from the source feed. Check the feed and send a test email.
Q: How does the maximum item setting affect the email?
The RSS campaign includes the most recent available posts up to the maximum item count set when scheduling.
Q: Can I edit the email content after scheduling an RSS campaign?
Yes. Open the scheduled campaign's Actions → Update Email Content option, edit the content, and save. Changes made close to the next send may not take effect in time.
Need Help?
If RSS blocks are not displaying the expected content, review the source feed, RSS variables, and sending settings before making changes.
- Missing RSS Content: Confirm the RSS Feed URL is accessible and contains the required information.
- Blank Test Email Values: Enter the correct RSS Feed URL when configuring the test email.
- Missing Images: Check the feed's image data and whether the selected RSS Items layout supports image display.
- HTML Formatting Issues: Review the RSS content format and the Custom RSS Items settings. Use unescaped HTML only with a trusted feed.
- Campaign Not Sending: Confirm that the campaign uses RSS Schedule and check whether new feed items were available for the scheduled cycle.
- Incorrect Feed Variables: Verify that the source feed contains the fields referenced by the selected RSS variables.
If the issue continues, contact support for assistance. Include the RSS Feed URL, affected email template or campaign, and any relevant error messages or screenshots.