
Style your event pages with a live CSS editor, click-to-select elements, quick style presets, and instant previews without manually inspecting the page's HTML.
Customize your event pages using the Custom CSS Editor with live element selection and instant previews. Adjust colors, typography, spacing, and other design elements to match your brand.
This guide explains how to apply custom CSS, use quick style presets, and preview your changes across public event pages.
TABLE OF CONTENTS
- What is the Custom CSS Editor?
- Key Features
- How to Use the Custom CSS Editor
- Quick Style Presets
- Public Page Coverage
- Important Considerations
- Copying and Duplicating Events with Custom CSS
- Frequently Asked Questions
What is the Custom CSS Editor?
The Custom CSS Editor allows you to customize the appearance of your public event pages directly within the Events management area.
With live element selection, you can identify CSS selectors, insert starter code, and preview styling changes without manually inspecting the page's HTML.
Custom CSS applies across the supported public pages of the selected event, helping you maintain a consistent design throughout the attendee experience.
Key Features
The Custom CSS Editor makes it easier to personalize event pages and maintain consistent branding across the attendee experience.
Live CSS Editor — Add custom CSS that applies across all supported public pages of an event, with instant previews of your changes.
Click-to-Select Elements — Click any element in the page preview to identify its CSS selector. Copy the selector or insert a starter CSS rule with one click.
Quick Style Presets — Generate starter CSS for commonly customized properties, including borders, backgrounds, text color, button color, border radius, spacing, shadows, and typography.
Complete Public Page Coverage — Apply custom CSS to all supported public event page types, including Details, Schedule, Checkout, Payment, Confirmation, Leave Checkout, and Online Event pages.
Copy and Duplicate Support — Retain custom CSS when duplicating an event or copying design settings from another event by selecting the Custom CSS option.
How to Use the Custom CSS Editor
The Custom CSS Editor lets you select page elements, apply custom styles, and preview changes before saving them.
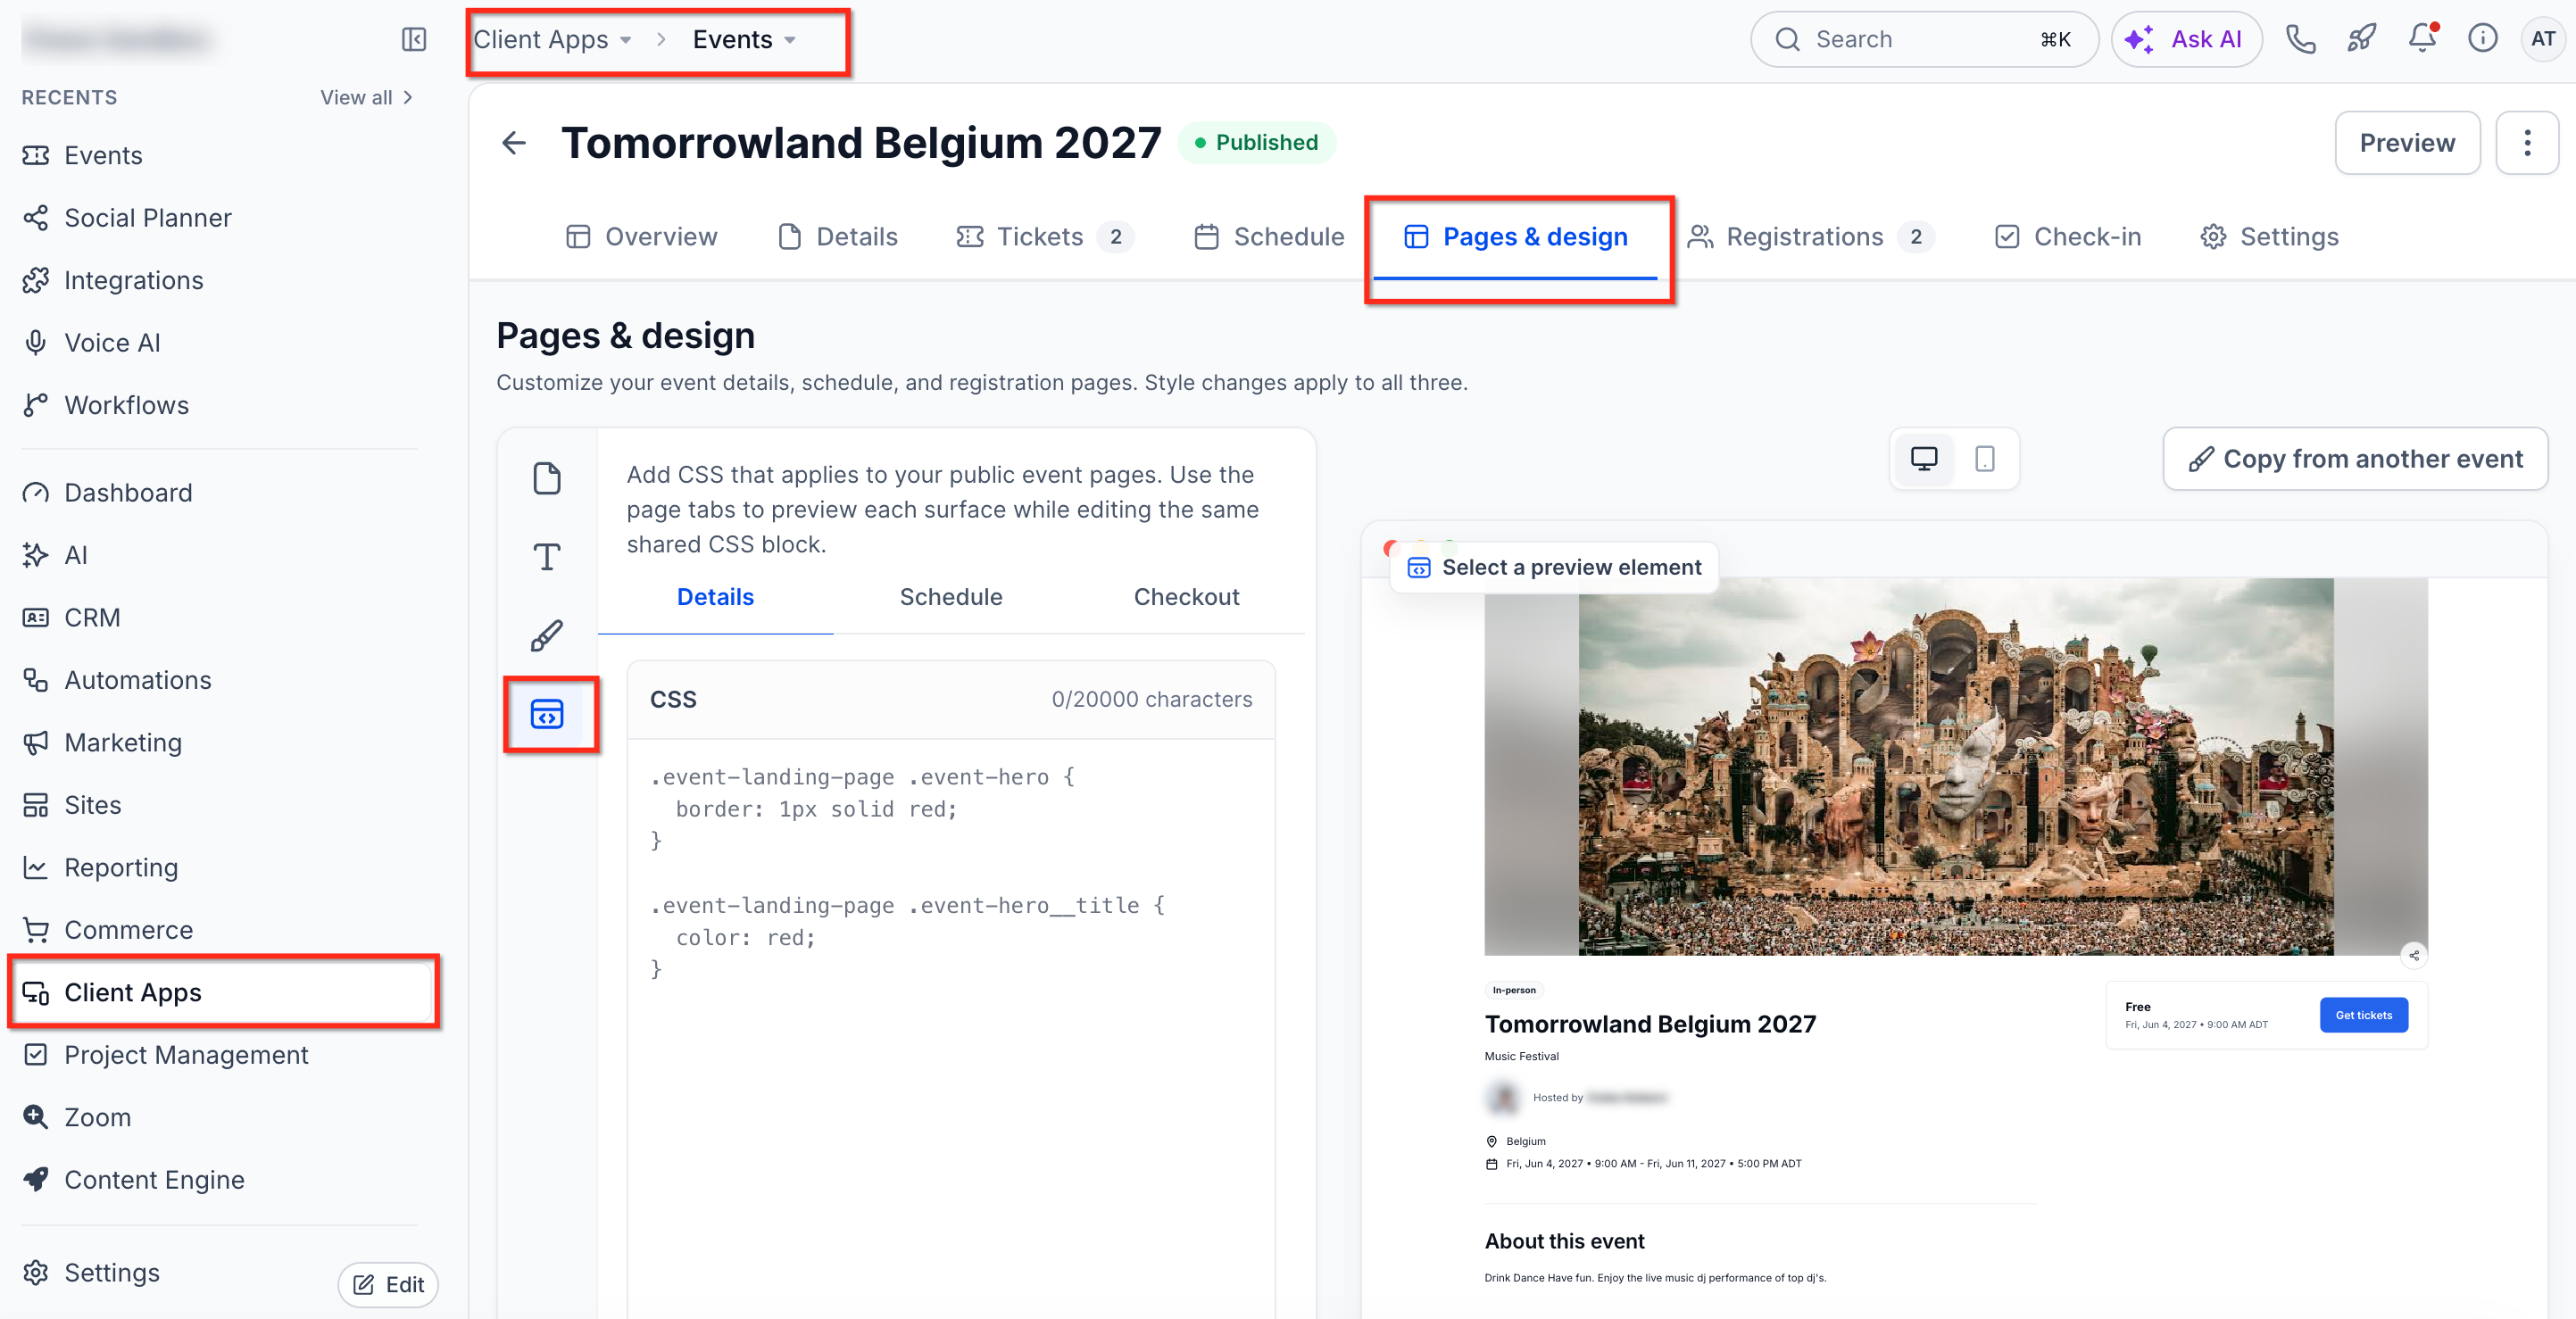
Step 1: Open the Custom CSS Editor
Navigate to Client Apps → Events and open the event you want to customize.
Select Pages & Design.
Click the Custom CSS icon in the left toolbar.
Step 2: Select an Element
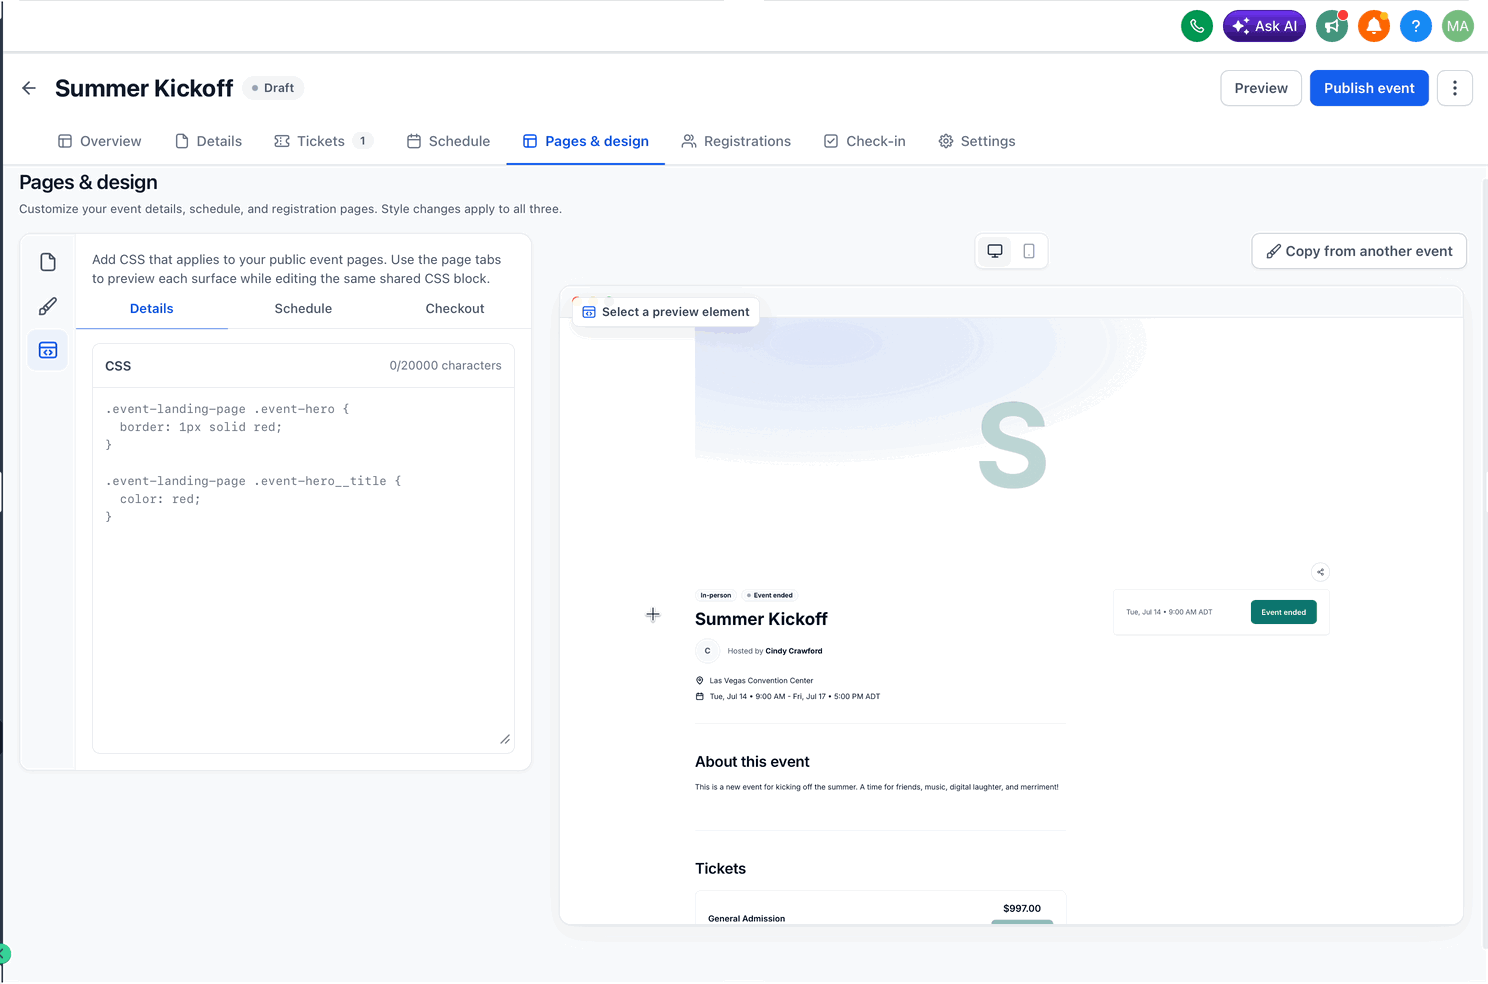
Click any element in the page preview to identify its CSS selector.
The selector appears in a popup with options to copy it or insert a starter CSS rule into the editor.
Step 3: Write or Insert CSS
Add your custom CSS rules in the editor.
You can write CSS manually or use the quick style presets (see the next section) to generate starter code for common styling properties.
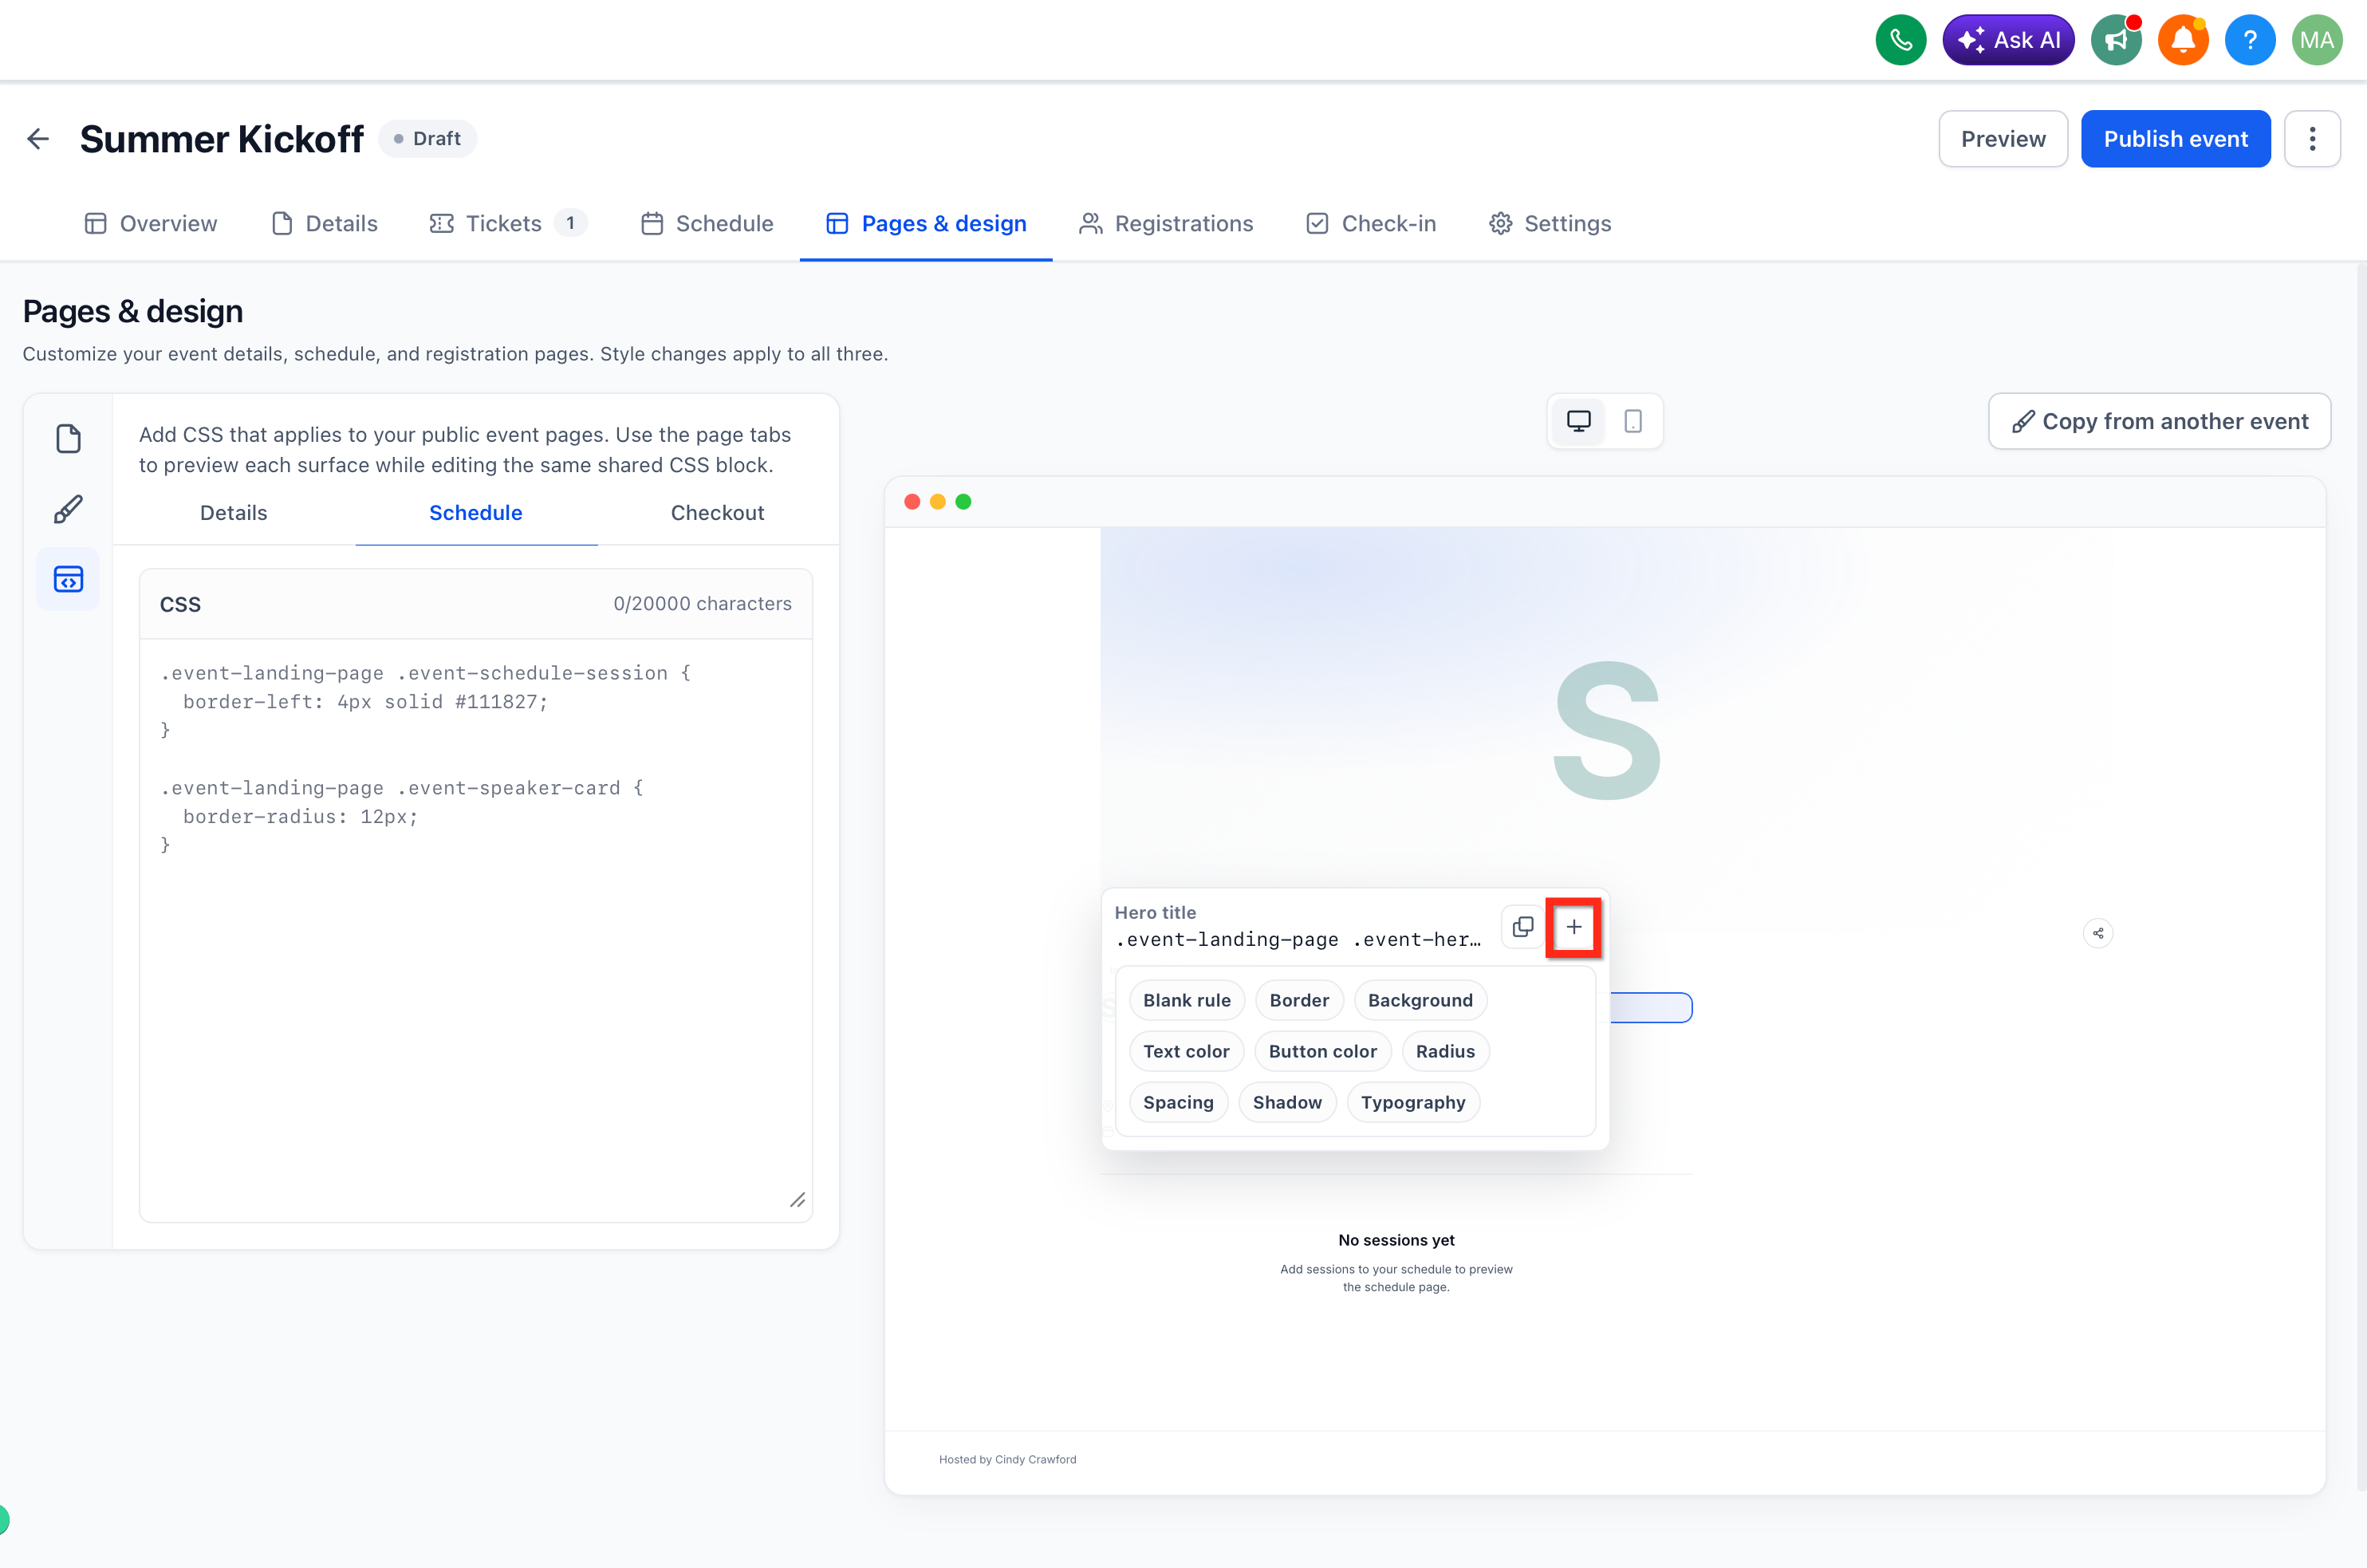
Changes appear instantly in the preview pane.
Step 4: Preview and Save
Review your changes in real time using the preview pane.
Once satisfied, save your custom CSS. The styles apply to all supported public pages of the selected event.
Tip: Use the click-to-select feature to quickly identify complex nested elements without manually inspecting the page's HTML.
Quick Style Presets
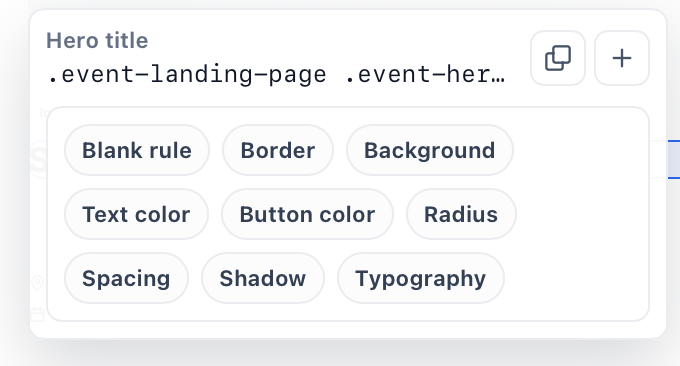
Quick style presets allow you to generate starter CSS code for commonly customized properties without writing CSS from scratch.
After selecting an element, choose a preset to insert preconfigured CSS rules into the editor.
The following presets are available:
1. Border: Inserts CSS rules to customize the border width, style, and color of the selected element.
2. Background: Generates CSS to change the background color or image of the selected element.
3. Text Color: Inserts a CSS rule to modify the text color of the selected element.
4. Button Color: Generates CSS to change the background and text colors of buttons.
5. Border Radius: Inserts CSS to adjust the corner rounding of the selected element.
6. Spacing: Generates CSS rules to modify the padding and margin of the selected element.
7. Shadow: Inserts a CSS rule to add or modify box-shadow effects on the selected element.
8. Typography: Generates CSS to change the font family, size, weight, and line height of the selected text element.
Pro Tip: After inserting a preset, customize the generated CSS values to match your brand guidelines. The starter code provides a foundation you can refine.
Public Page Coverage
Custom CSS applies across all supported public-facing pages of the selected event. This helps maintain consistent branding and styling throughout the event attendee experience.
The following event page types support custom CSS:
- Details — The event details page where participants view event information.
- Schedule — The page displaying the event schedule and session times.
- Checkout — The page where participants complete event registration or ticket checkout.
- Payment — The page where participants complete event payments.
- Confirmation — The confirmation page displayed after successful registration or checkout.
- Leave Checkout — The page shown when a participant exits the checkout flow.
- Online Event — The page participants access for virtual or online events.
Important Considerations
Understanding how custom CSS is applied helps prevent unintended styling changes and makes it easier to reuse event designs.
Event-Specific Styling: Custom CSS applies only to the selected event's supported public pages.
Responsive Design: CSS affects desktop and mobile layouts. Use media queries when device-specific adjustments are needed.
CSS Conflicts: If a style does not apply, check selector specificity before adding overrides.
Event Duplication: When duplicating an event or using Copy from another event, select Custom CSS among the available design options to retain its styling.
Removing Styles: Delete the custom CSS rules and save to restore the affected elements to their default appearance.
Copying and Duplicating Events with Custom CSS
You can reuse custom CSS when duplicating an event or copying design settings from another event.
Select the Custom CSS option during the copy process to preserve the original styling without manually re-entering the code.
Option 1: Duplicate an Event
When duplicating an event, you can copy its custom CSS to the new event.
Navigate to Events.
Find the event you want to duplicate.
Open the three-dot menu and select Duplicate.
Review the duplication options.
Under the available design options, select Custom CSS.
Preview the duplicated event and complete the duplication process.
The new event retains the selected custom CSS settings.
Option 2: Copy Settings from Another Event
You can copy custom CSS from an existing event without duplicating the entire event.
Open the destination event.
Navigate to Pages & Design.
Select Copy from another event.
Choose the source event.
Under the design options, select Custom CSS.
Review the preview and click Apply.
The custom CSS from the source event is copied to the destination event.
Tip: After duplicating an event or copying its settings, you can modify the custom CSS in the destination event without affecting the original event's styles.
Frequently Asked Questions
Q: Does custom CSS apply to all events?
No. Custom CSS is event-specific. Each event has its own custom CSS settings. To apply the same CSS to multiple events, use the duplication or copy settings features.
Q: Can I preview my changes before saving?
Yes. The Custom CSS Editor includes a live preview pane that updates instantly as you write CSS. This lets you see the effects of your changes before saving them.
Q: Do I need to know CSS to use this feature?
Basic CSS knowledge is helpful but not required.
Quick style presets generate starter CSS for you. You can also click elements to identify selectors and use presets to customize common properties without writing CSS from scratch.
Q: What happens if my custom CSS conflicts with the default styles?
Your custom CSS is applied after the default styles. In most cases, your custom rules override the defaults.
If a style does not apply as expected, use more specific CSS selectors or add !important declarations when necessary to increase rule priority.
Q: Can I remove or reset custom CSS after applying it?
Yes. Delete the CSS code in the editor and save your changes to remove the custom styles.
The affected event page elements revert to their default appearance.
Q: Do quick style presets work for all elements?
Quick style presets generate CSS based on the selected element.
Some presets, such as Typography, work best with text elements. Others, such as Border or Background, work with most container elements.
You can edit the generated CSS to suit your specific needs.
Q: Will custom CSS affect event pages on mobile devices?
Yes. Custom CSS applies to all screen sizes.
To create mobile-specific styles, use CSS media queries, such as @media (max-width: 768px), to target smaller screens.
Yes. You can retain custom CSS using the copy settings feature.
Alternatively, copy the CSS code from one event's Custom CSS Editor and paste it into another event's Custom CSS Editor.