
The Router action in Workflows sends a contact through every branch whose conditions match. Unlike If/Else, which follows only the first matching path, Router can process multiple matching paths in a single workflow. Branches run sequentially from left to right, and you can change their order. This article explains how to configure Router branches, manage their execution order, test the results, and publish your workflow.
TABLE OF CONTENTS
- What Is the Router Action?
- Key Benefits of the Router Action
- Action Name
- Action Description
- Action Details
- How to Configure the Router Action
- Router Behavior and Logic
- Testing the Router
- Use Case: Route a Lead to Multiple Service Teams
- Frequently Asked Questions
- Need Help?
What Is the Router Action?
The Router action sends a contact down every branch whose conditions match. The branches run one after another, from left to right. Use it when one contact can qualify for more than one path, such as a form lead who selects several services at once.
Router belongs to the same family of conditional workflow actions as If/Else. The difference is how many branches run.
If/Else sends the contact into the first branch that matches and ignores the remaining branches, even when the contact matches them too.
Router checks every branch and runs each one that matches.
Key Benefits of the Router Action
The Router action handles several matching conditions within one workflow. This makes complex follow-up processes easier to manage without creating separate workflows for every combination of conditions.
- Every Match Runs: A contact who matches three branches goes into all three, not only the first one.
- Predictable Order: Branches run from left to right. You can drag them into the order you need.
- Three Branch Types: Use Custom rules, Always run, or Fallback to control when each branch executes.
- Familiar Conditions: Build branch rules using fields, operators, conditions, and rule groups.
- Fewer Duplicate Workflows: One Router can replace additional branches or separate workflows previously used to handle second or third matches.
- Clear Test Results: Test output helps you identify which branch conditions passed and why.
Action Name
The action name identifies the Router on the workflow canvas and helps users recognize the step when editing or reviewing a workflow.
Router
Action Description
The action description summarizes what happens when Router evaluates a contact against its configured branches.
Send the contact down every branch whose conditions match. Branches run one after another, from left to right.
Action Details
The Router action includes settings for naming the action, managing branches, choosing branch types, and defining conditions. Review the fields below before building your routing logic.
| Field | Description | Mandatory |
|---|---|---|
| Action Name | The name shown on the workflow canvas. Defaults to "Router". | Yes |
| Branches | The list of branches in this Router, displayed in execution order. Use Add branch to create a branch, the drag handle to change its order, and the delete icon to remove it. | Yes |
| Branch Name | The name of the branch, such as "Branch 1". The name appears on the canvas above the branch. | Yes |
| Branch Type | Custom rules: Runs only when its conditions match. Always run: Runs for every contact without conditions. Fallback: Runs only when no other path matches. | Yes |
| Only continue if | Shown for Custom rules. Select a field, an operator, and a comparison value. Use Add condition or Add rule group to define additional conditions. | Yes, for Custom rules |
How to Configure the Router Action
Configure Router in the workflow builder to process contacts through all matching branches. The following procedure starts with adding Router, then explains how to configure branches, arrange their order, and add actions beneath them.
Step 1: Add the Router Action
Open a workflow and insert the Router action where you want the contact's conditions to be evaluated.
- Go to Automation > Workflows.
- Open an existing workflow or create a new one.
- In the workflow builder, click the + icon where you want to add Router.
- In the Actions panel, search for Router.
- Select Router.
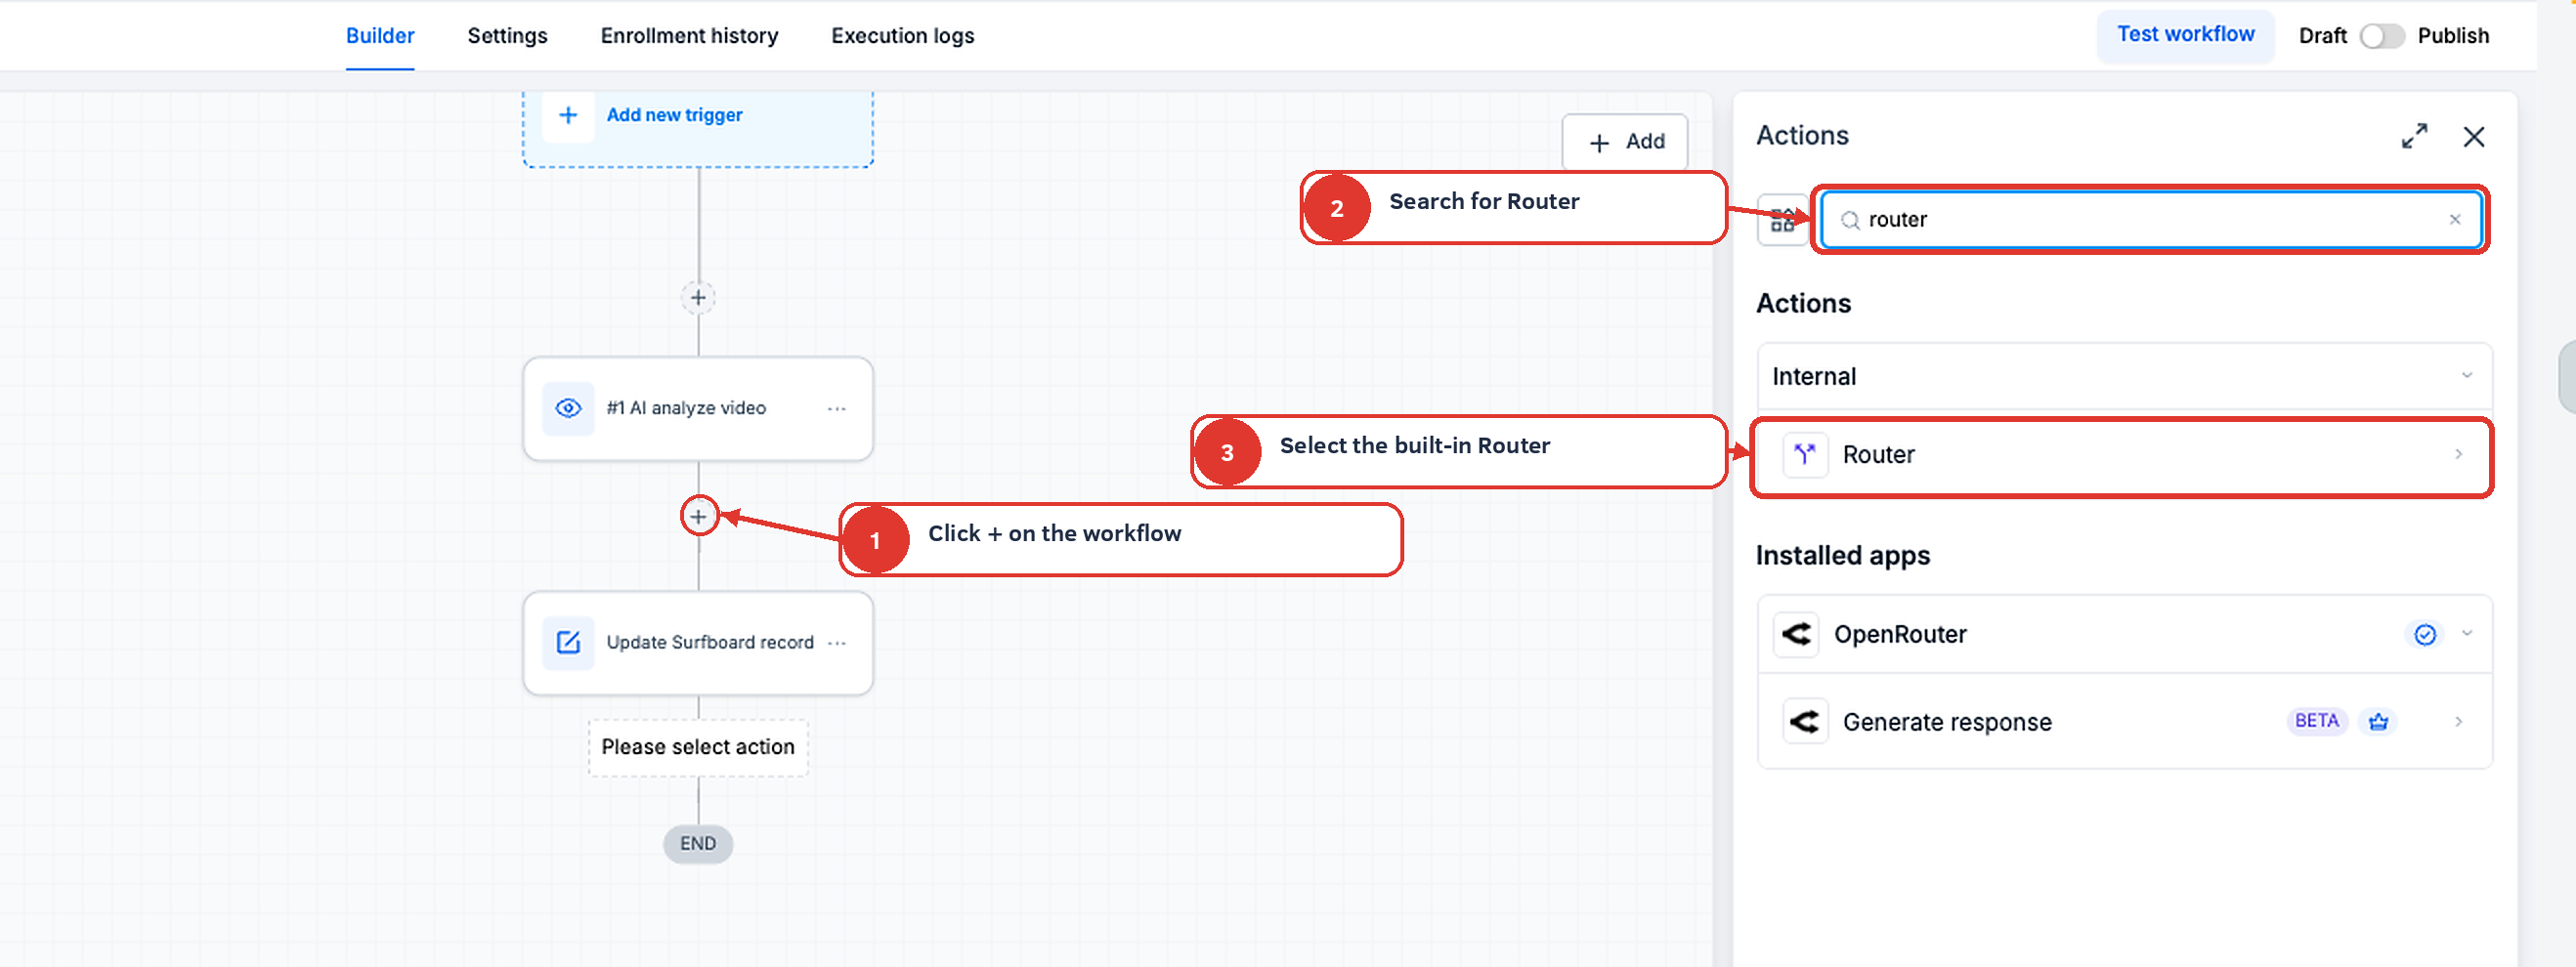
The Router action appears on the workflow canvas with its branches below it.
Step 2: Open a Branch
Use the Branches list to review and edit the paths available within the Router action.
- Open the Router panel.
- Find the Branches list.
- Click a branch to open its settings.
- Enter a Branch Name.
- Click Back to branches to return to the branch list.
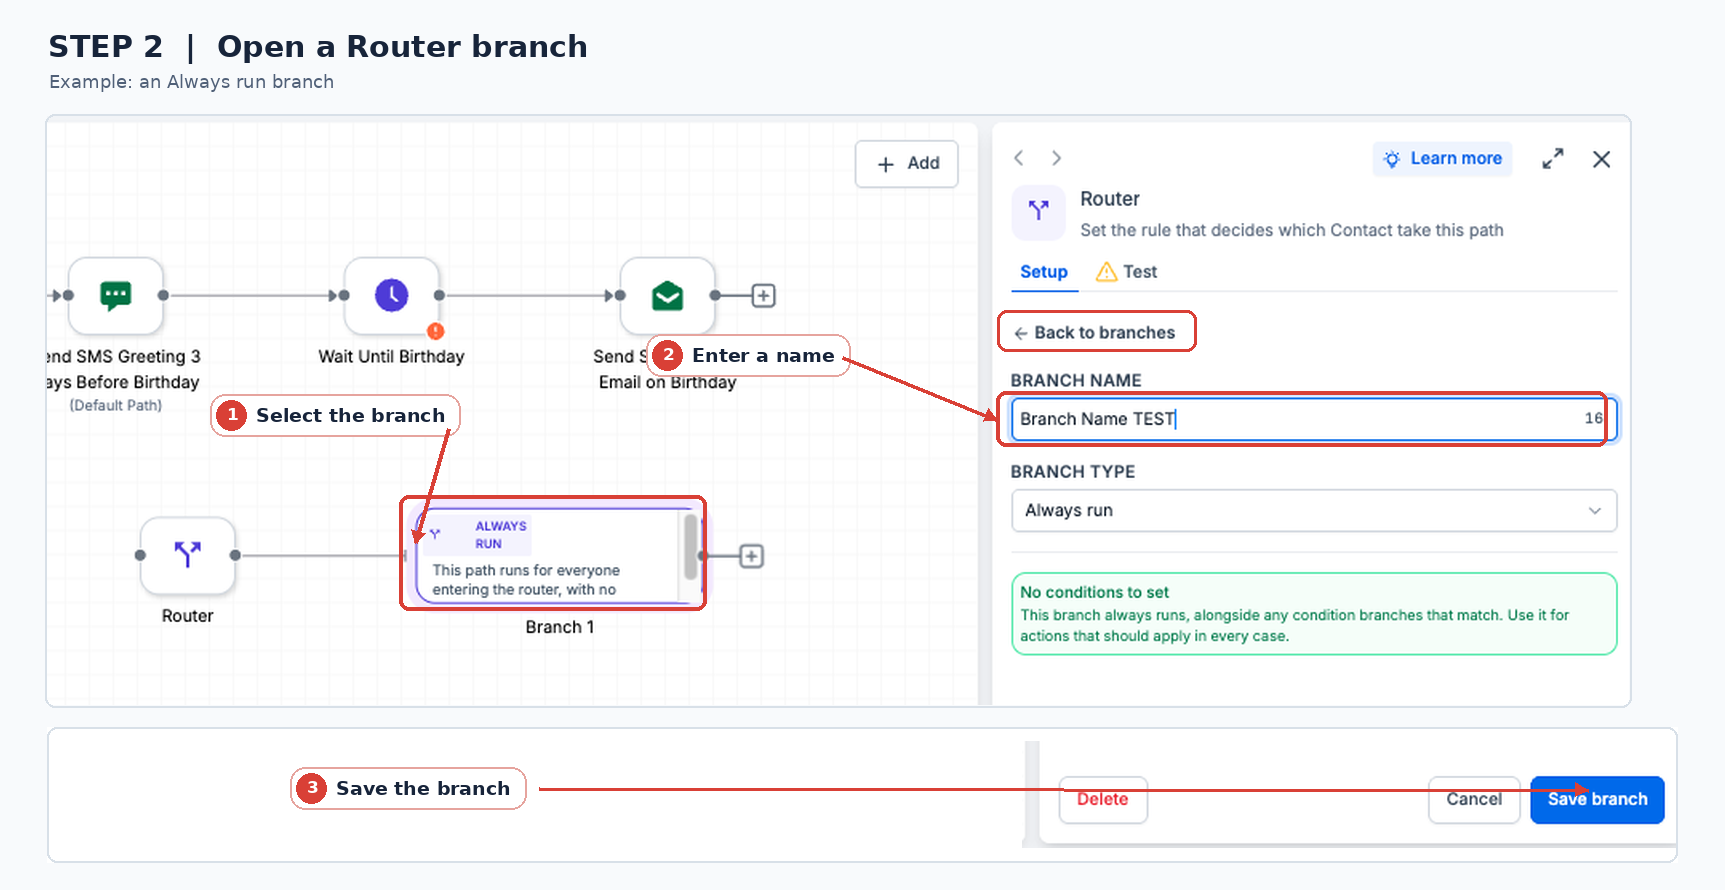
Step 3: Choose the Branch Type
Each branch has a type that determines when it runs. Choose the appropriate type for the behavior you want.
- Open the Branch Type dropdown.
- Select one of the available types.
- Custom rules: The branch runs only when its configured conditions match.
- Always run: The branch runs for every contact, without conditions.
- Fallback: The branch runs only when no other path matches.
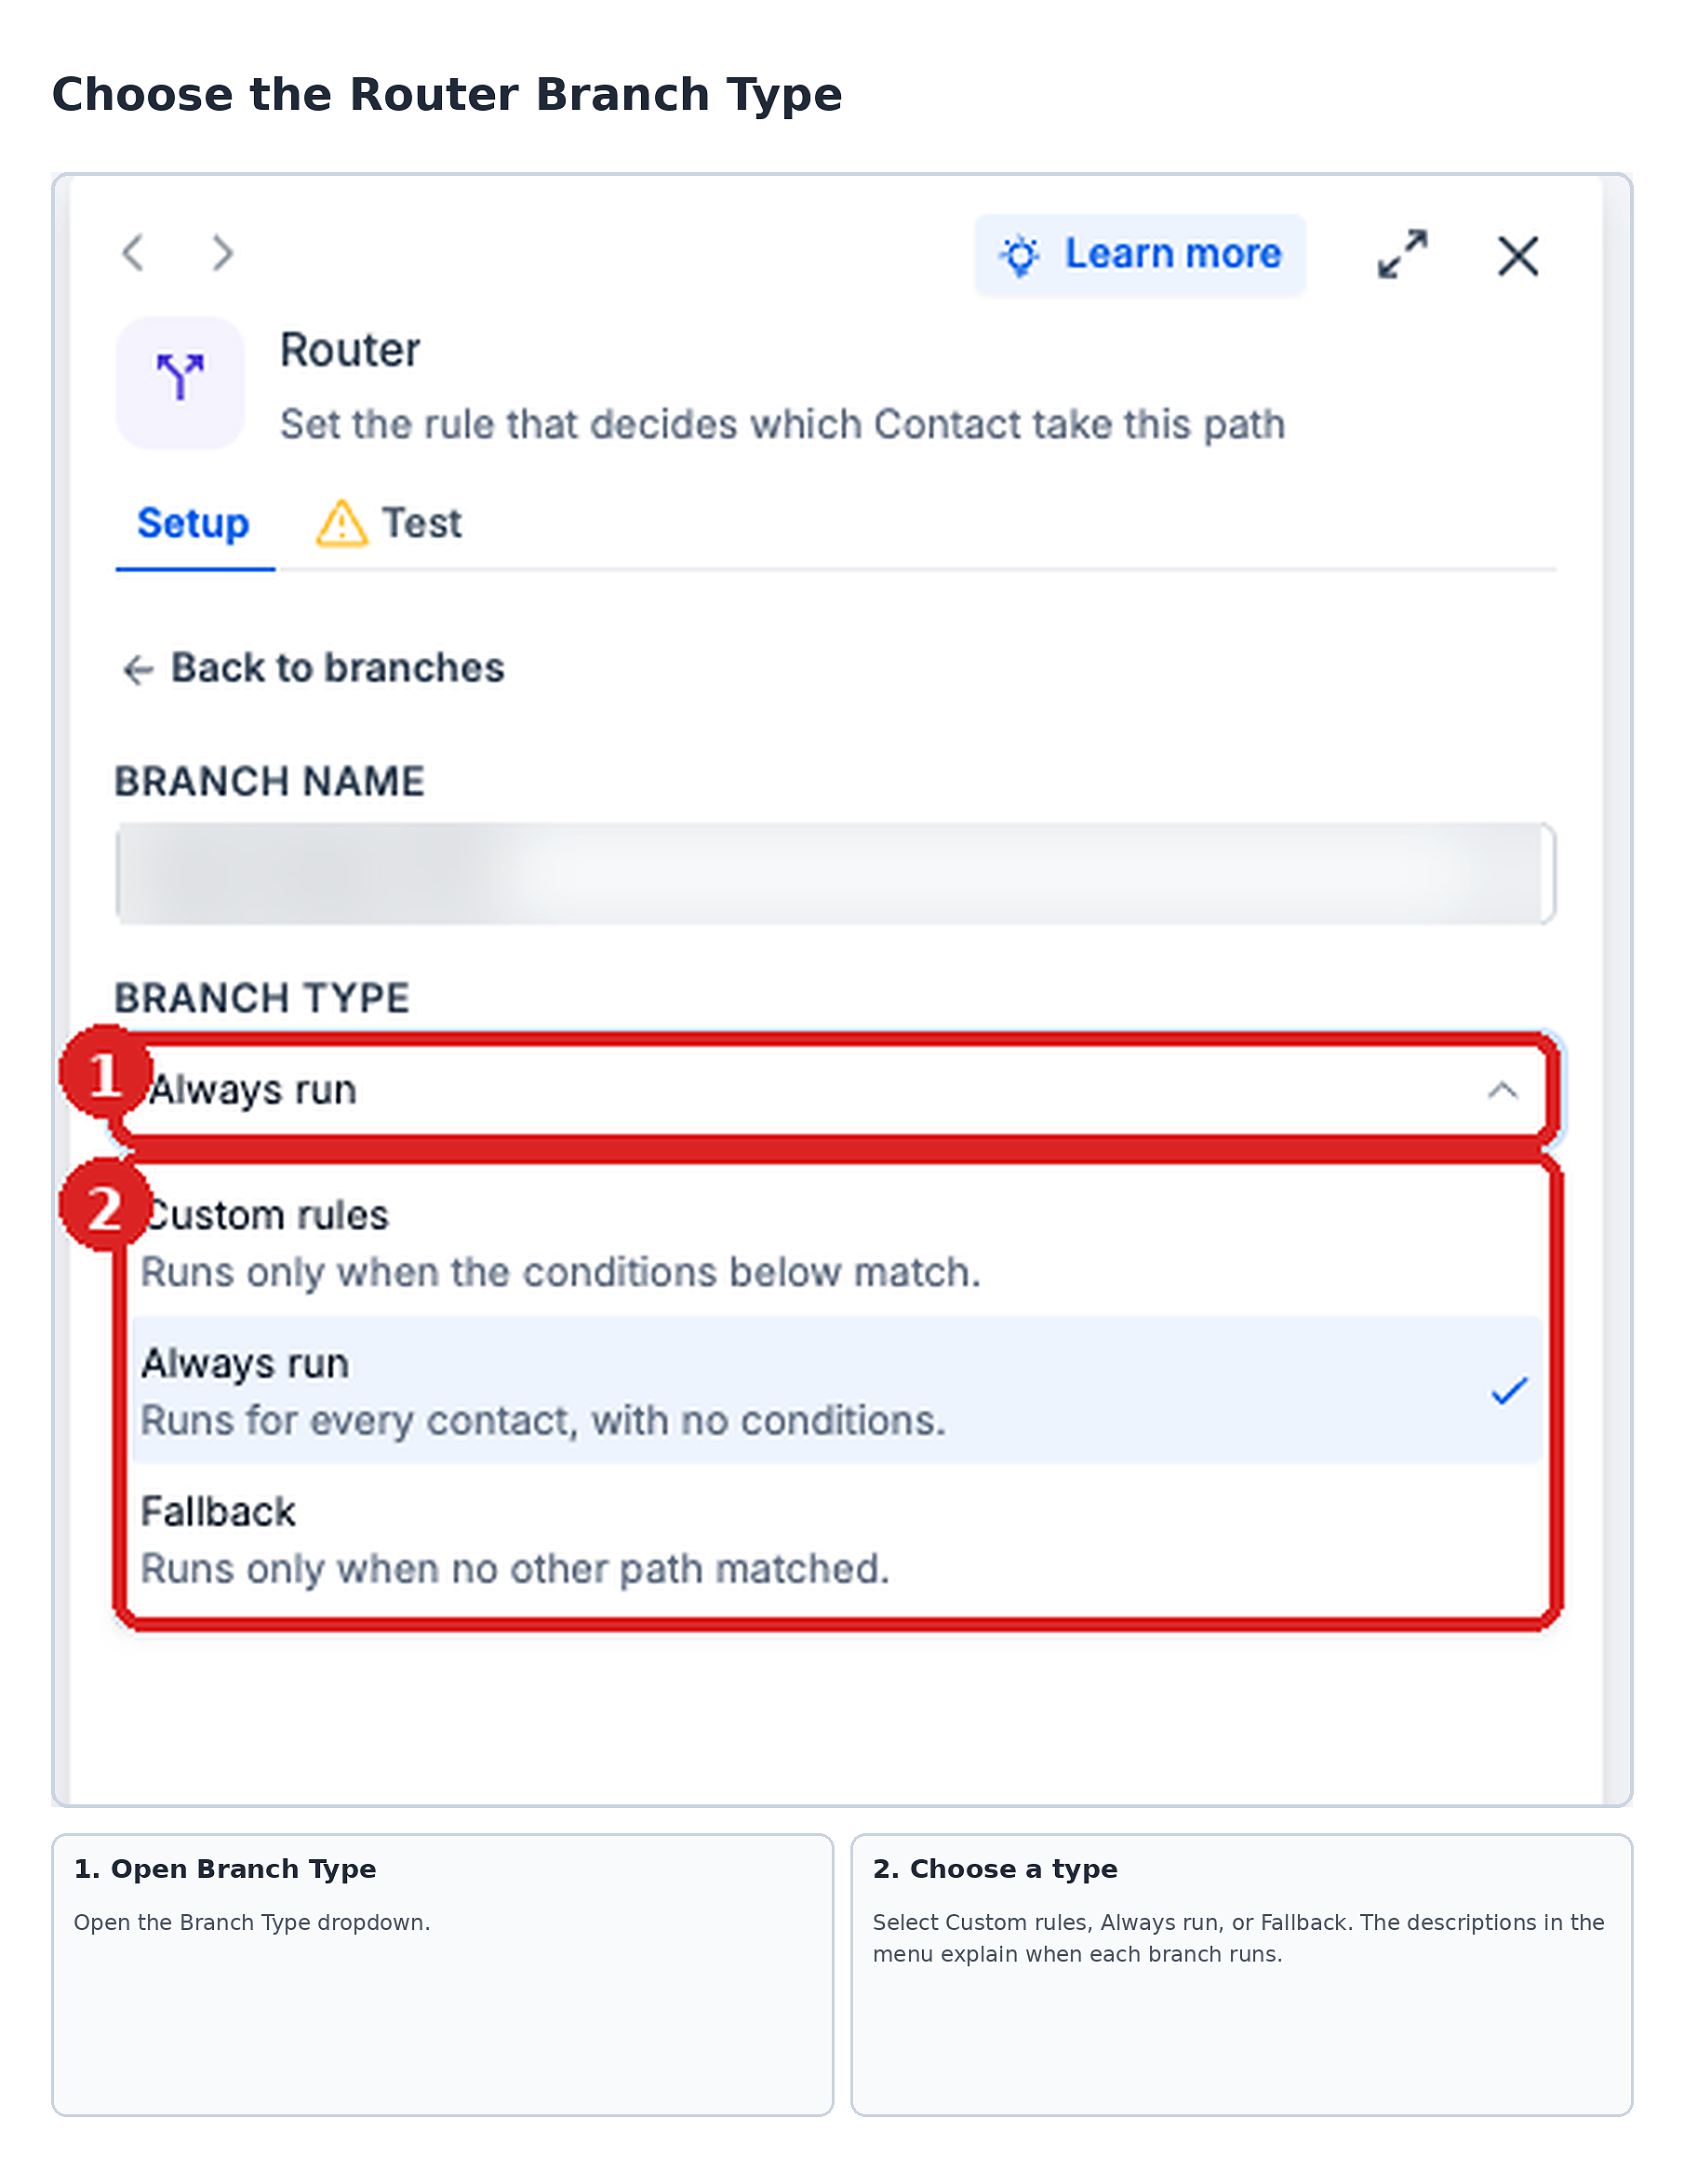
Step 4: Set the Conditions
For a branch using Custom rules, define the requirements a contact must meet before that branch can run. These rules appear under Only continue if.
- Select a contact field or custom field.
- Choose a supported operator, such as:
- is
- is not
- contains
- does not contain
- is any of (comma separated)
- is none of (comma separated)
- is not empty
- Enter the comparison value for the selected field, when required by the operator.
- Click Add condition or Add rule group if you need additional conditions.
- Save the branch.
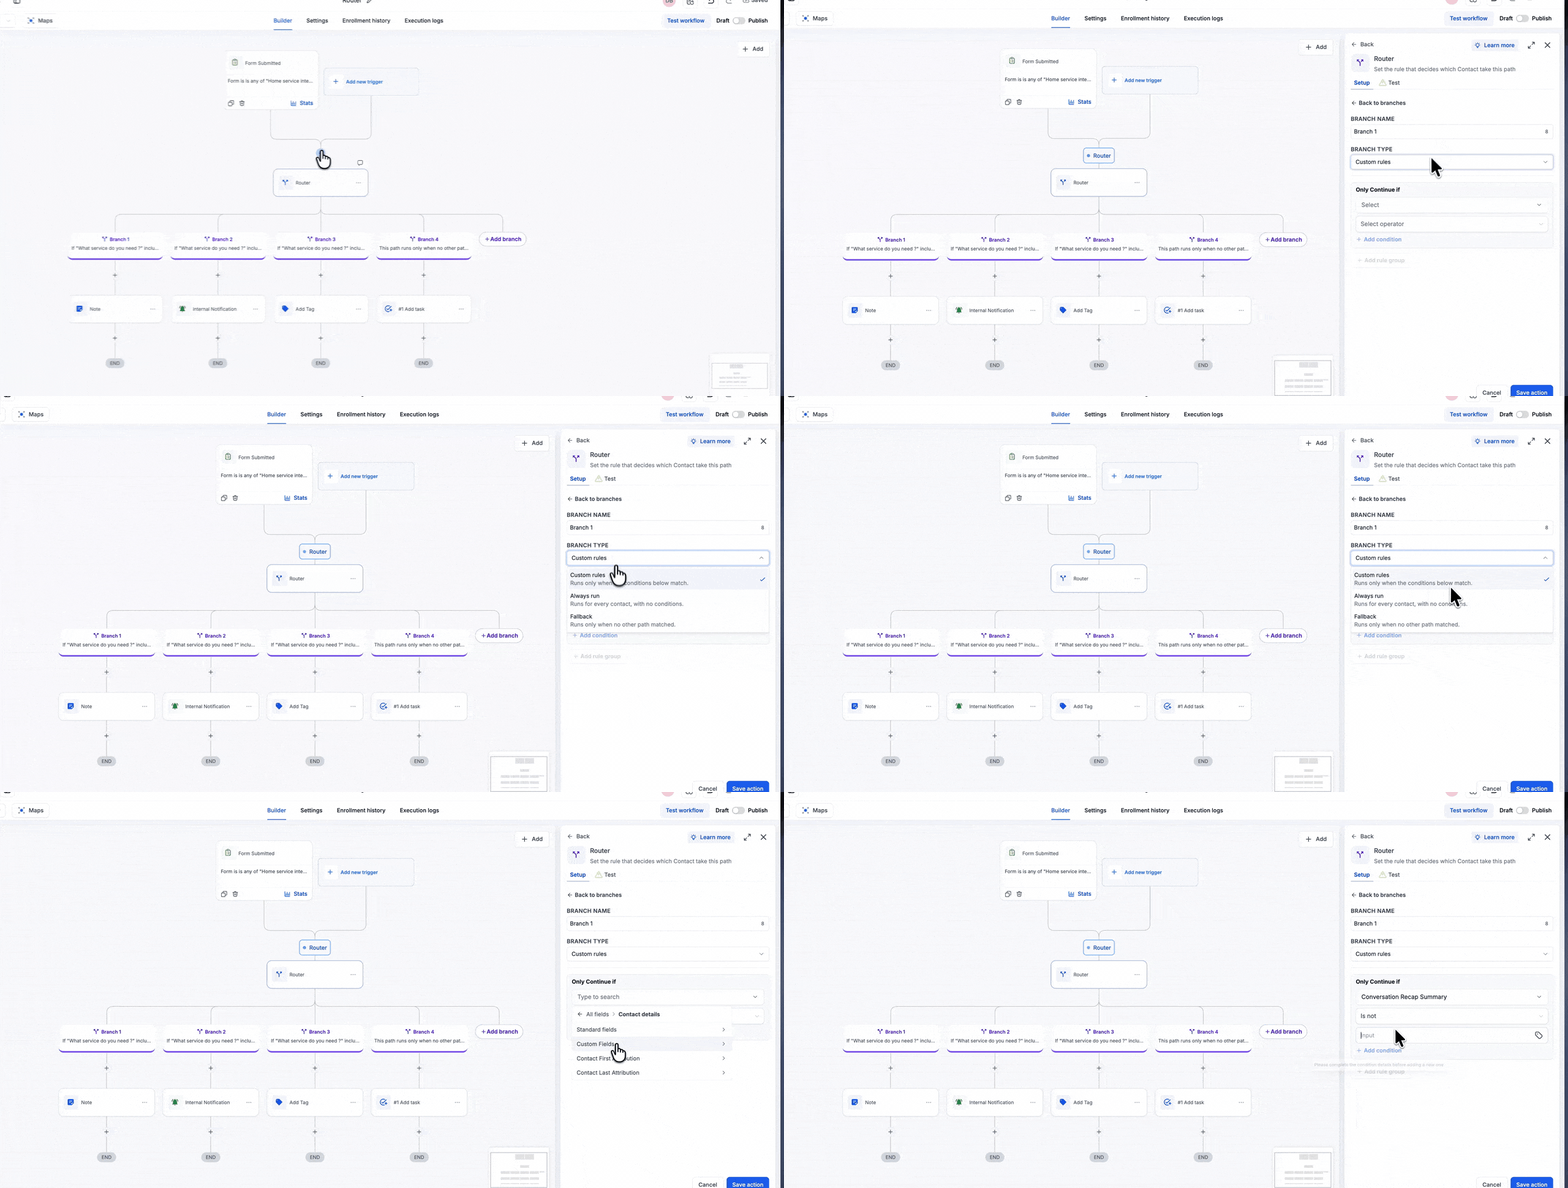
Router showing branches with different service conditions and a fallback path.
Step 5: Add More Branches
Add more branches when the workflow needs to evaluate additional conditions or run another set of actions.
- Click + Add branch on the canvas or Add branch in the Branches list.
- Enter the new Branch Name.
- Select the appropriate Branch Type.
- Configure the branch's conditions when using Custom rules.
- Repeat to add as many branches as your use case needs.
Step 6: Set the Run Order
Router processes matching branches sequentially from left to right. Arrange the branches in the order you want their actions to run.
- Open the Branches list in the Router panel.
- Find the drag handle beside the branch you want to move.
- Drag the branch higher or lower in the list.
- Review the workflow canvas to confirm the updated order.
To make a branch run first, drag it to the top of the Branches list.
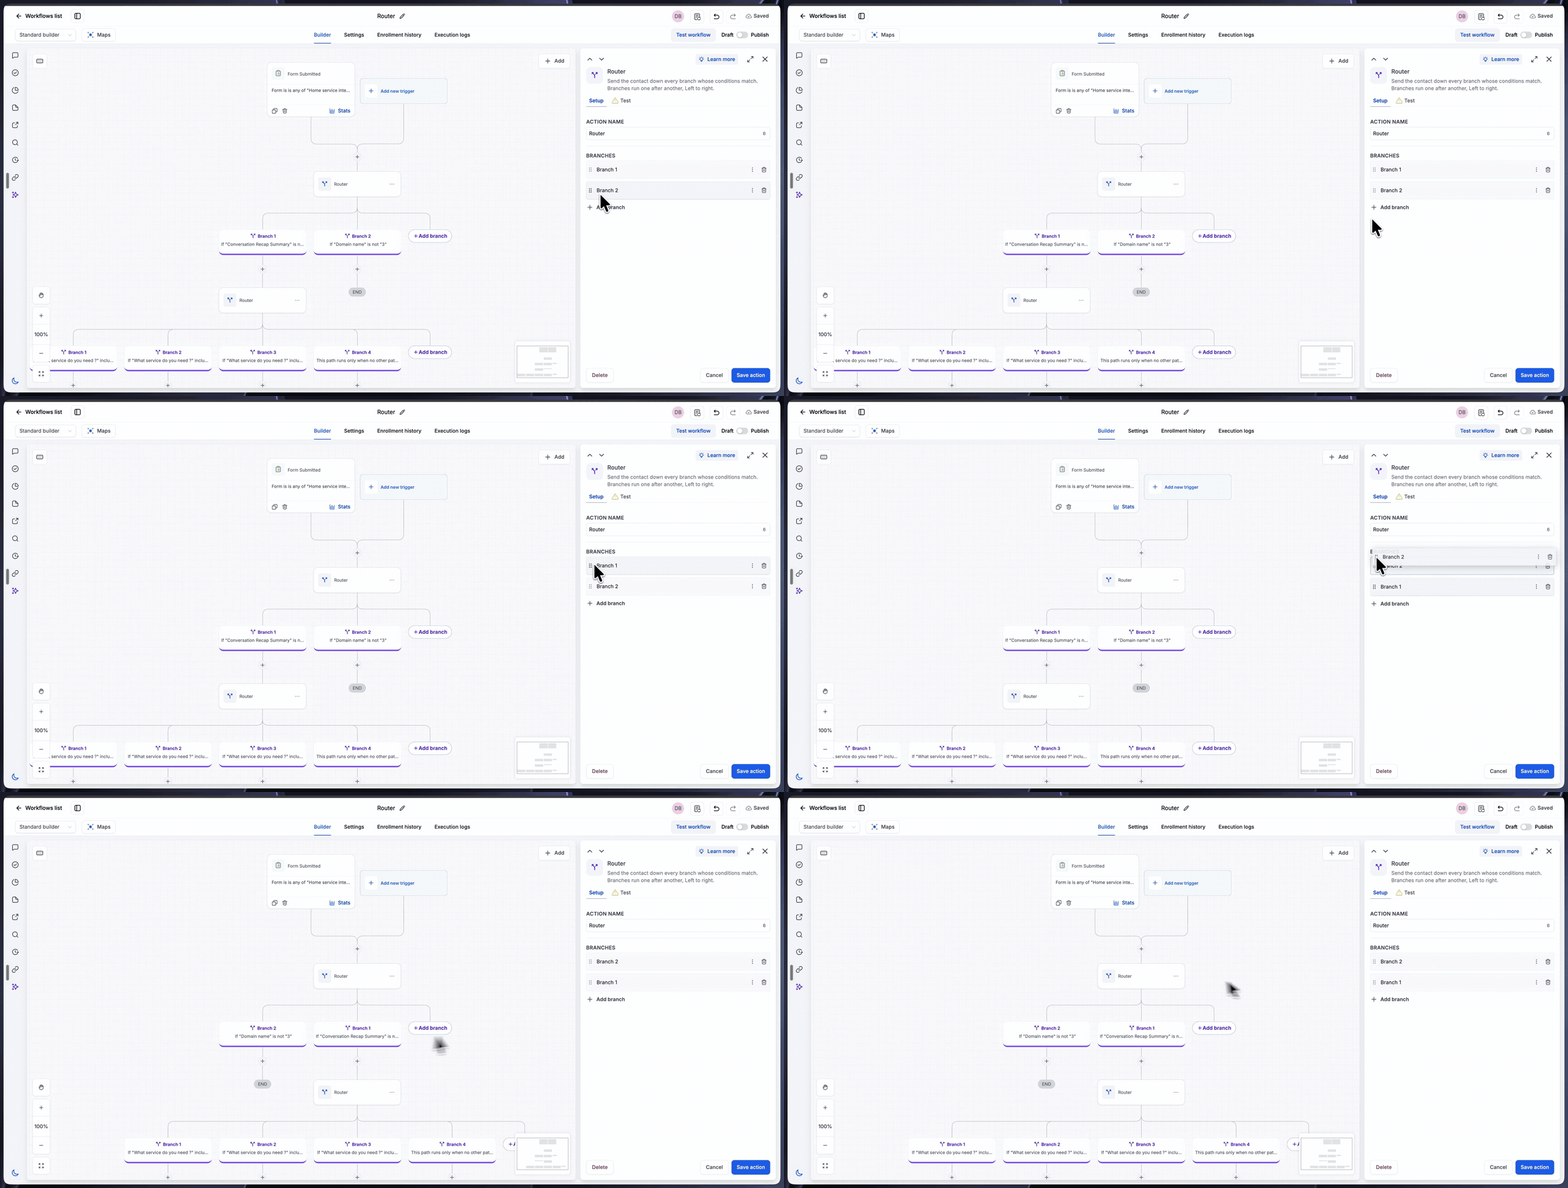
Use the drag handles in the Branches list to change which matching branch runs first.
Step 7: Save and Add the Next Steps
After configuring Router, add the actions that should execute under each branch.
- Click Save action.
- On the workflow canvas, click the + icon under a branch.
- Select and configure the action that branch should run.
- Repeat for other branches as needed.
Branch actions may include adding a note, sending an internal notification, applying a tag, or creating a task.
Router Behavior and Logic
Understanding branch matching, execution order, and fallback behavior helps you predict which actions a contact will enter and in what sequence. Router differs from If/Else because it processes every matching branch rather than only the first match.
| Rule | What Happens |
|---|---|
| Which branches run | Every branch whose conditions match runs. A contact who matches three branches enters all three. |
| Run order | Matching branches run one after another, from left to right. The order in the Branches list determines their execution order. |
| Custom rules | The branch runs only when the contact matches its configured conditions. |
| Always run | The branch runs for every contact, without conditions. |
| Fallback | The branch runs only when no other path matches. |
| Compared with If/Else | If/Else follows only the first matching branch. Router processes every matching branch. |
Testing the Router
Test Router with a workflow event to confirm which branches run and why. Whole-workflow testing allows you to inspect the Router step within the full workflow execution sequence.
Test the Workflow
Use the workflow testing tools to select an event and review how Router evaluates its branches.
- Open the workflow in the workflow builder.
- Click Test workflow in the upper-right corner.
- On the New test tab, select Test using events.
- Under Select Trigger, choose the workflow trigger.
- Under Select event, choose a recorded event.
- If necessary, enable Listen for events and generate a new event.
- Review the event data and click Start test run.
- When the test finishes, click the Router step on the canvas.
- Open Output to review branch conditions, their results, and the reasons they passed or did not match.
For example, if a contact selects HVAC, Plumbing, and Electrical, the output shows the matching conditions for all three branches.
Important: Workflow tests execute real actions. Use test data to avoid sending unintended messages or modifying customer records.
Review Router Action Test Results
Router also has an individual-action test view. This view helps you inspect the branch conditions evaluated for a test contact.
The Input area identifies branch conditions and their associated rules. The Output area can display whether conditions passed and why, including the contact's actual values.
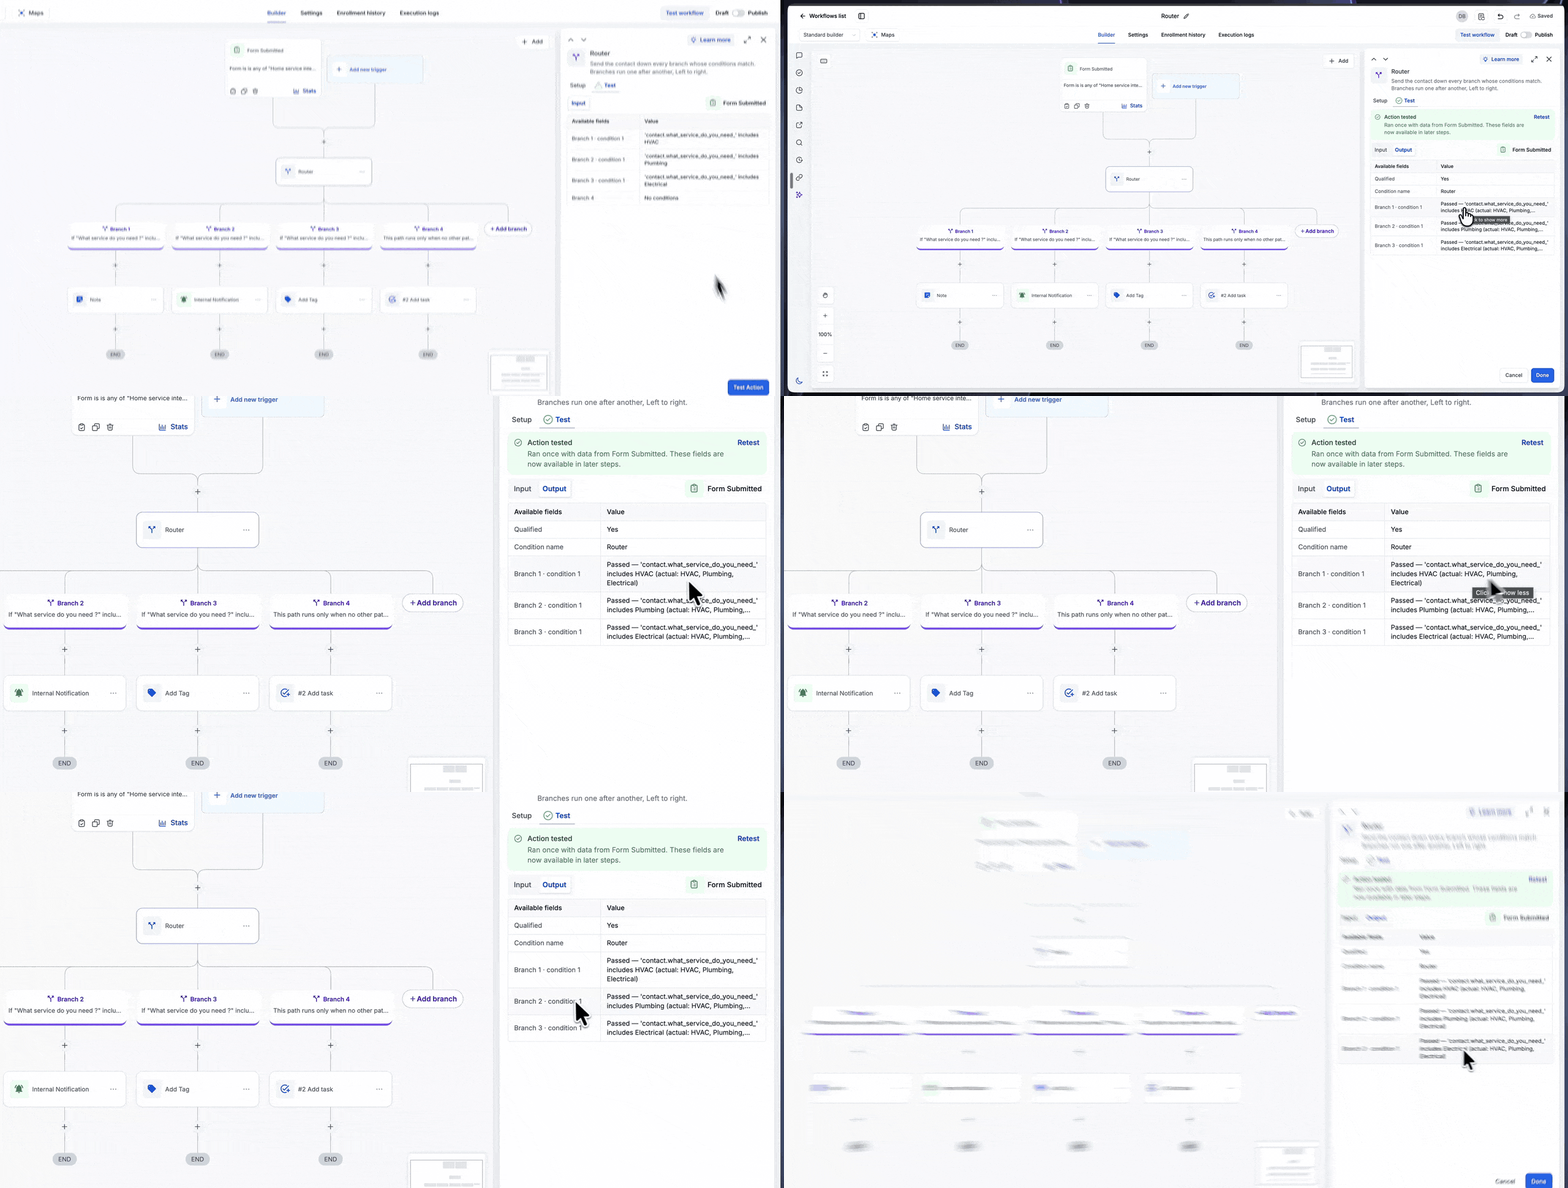
Router action's individual-action test view showing branch condition inputs. This image does not show the completed whole-workflow test output.
After confirming that the expected branches ran, save and publish the workflow.
Use Case: Route a Lead to Multiple Service Teams
A multi-service request is a practical example of why Router is useful. One lead may need several teams to complete different follow-up actions, and each relevant branch should run.
Scenario
A home services business asks visitors the following question on a form: "What service do you need?"
The lead can select more than one option: HVAC, Plumbing, Electrical, or Carpentry. Each service has its own team and follow-up steps.
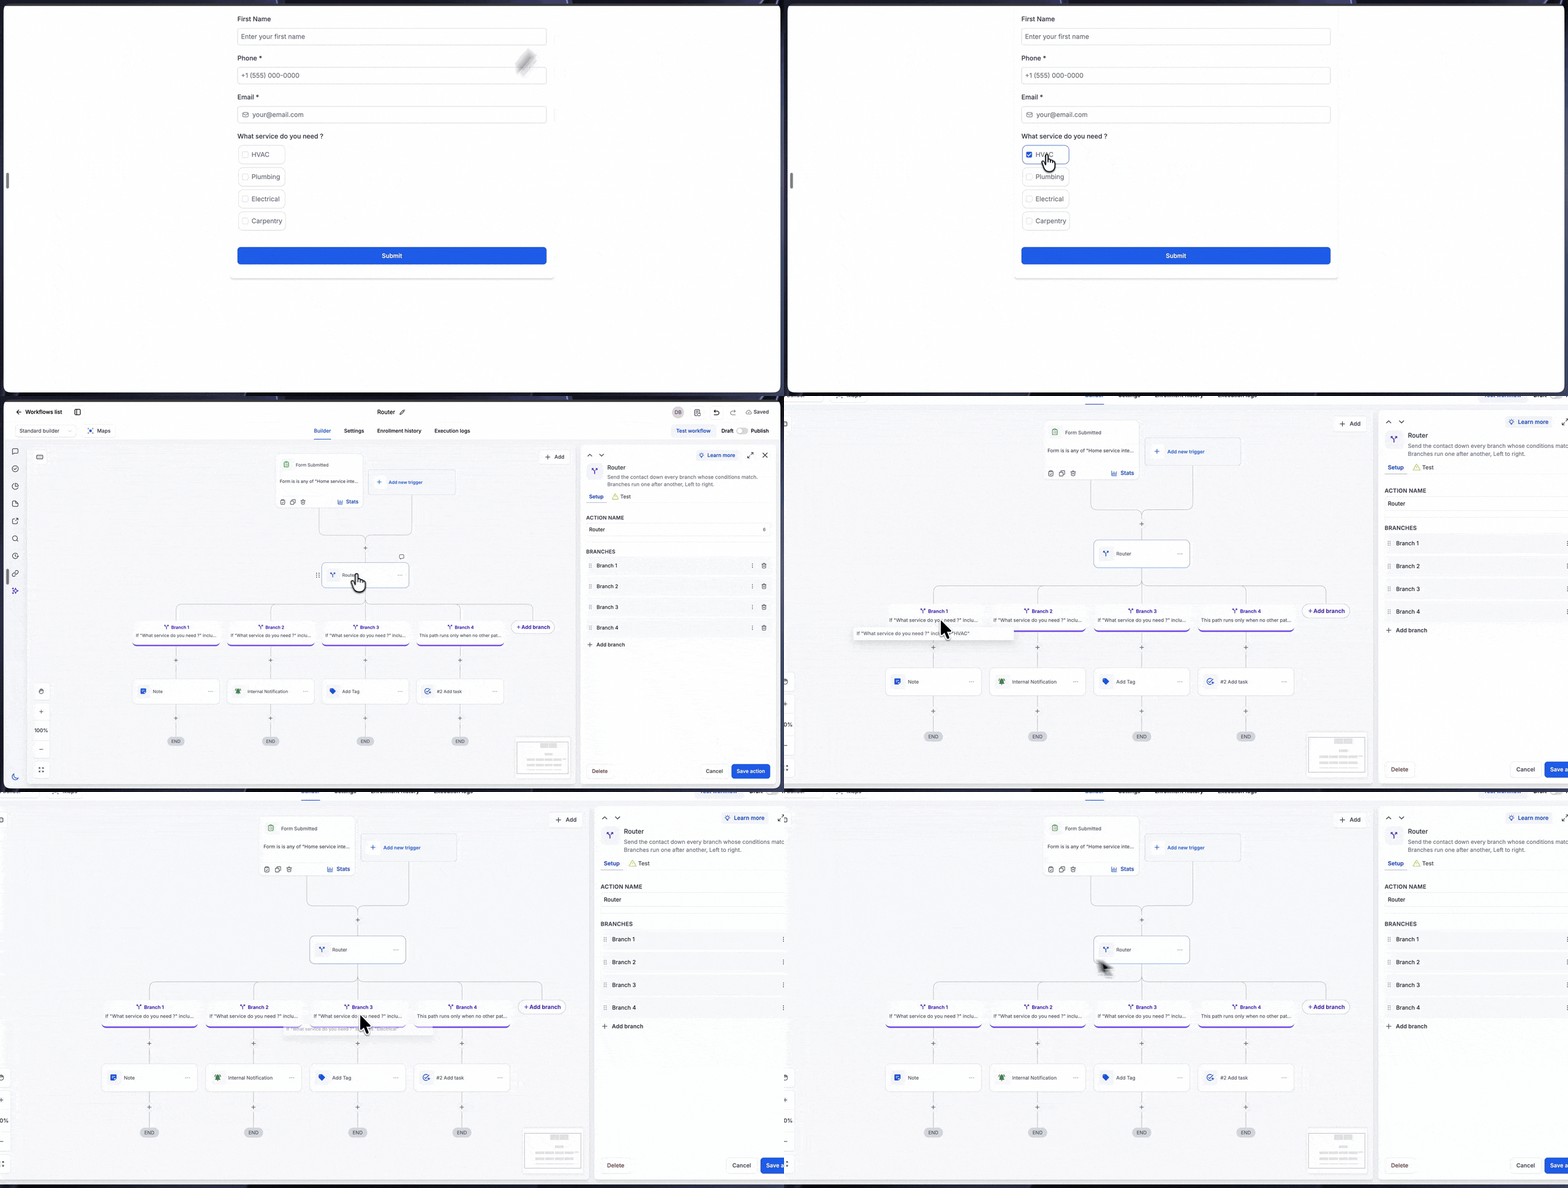
Example form where a lead can select more than one service.
Workflow Configuration
Use a Form Submitted trigger and a Router action to evaluate the services selected by the lead.
- Trigger: Form Submitted, using the home services form.
- Action: Router with four branches.
- Branch 1: Custom rules. The service selection contains HVAC.
- Branch 2: Custom rules. The service selection contains Plumbing.
- Branch 3: Custom rules. The service selection contains Electrical.
- Branch 4: Fallback, for leads that do not match any other branch.
- Inside Each Branch: Add the follow-up actions for the corresponding team, such as a note, internal notification, tag, or task.
- Result: A lead who selects HVAC, Plumbing, and Electrical enters Branch 1, Branch 2, and Branch 3, in that order.
With If/Else, only the first matching branch would run. In this example, that would be the HVAC branch.
Frequently Asked Questions
Q: What is the difference between Router and If/Else?
If/Else sends the contact into the first branch that matches and ignores the remaining branches. Router sends the contact into every matching branch, one after another, from left to right.
Q: In what order do the branches run?
Branches run from left to right, following the order in the Branches list. Drag a branch to the top of the list to make it run first.
Q: Do matching branches run at the same time?
No. Matching branches run sequentially, one after another.
Q: How do I make a branch run for every contact?
Set its Branch Type to Always run. The branch then runs for every contact without conditions.
Q: How do I handle contacts that do not match any branch?
Add a branch with Branch Type set to Fallback. It runs only when no other path matches.
Q: How can I check which branches a contact will enter?
Open Test workflow, select the trigger and a recorded event, and click Start test run. After the test finishes, select the Router step on the canvas and open Output to review branch conditions and their results.
Need Help?
If you have questions or need assistance with a feature, contact support for further guidance. To help resolve your issue efficiently, include a brief description of what you're trying to accomplish, the steps you've already taken, and any relevant screenshots or error messages.