
The Loop action in Workflows repeats a group of actions for each item in a list or each number in a range. Use it to process multiple records from one trigger without duplicating workflow steps or writing code. You can map data from the current item, choose sequential or parallel execution, and review the results of each iteration. This guide explains the complete setup process, testing options, and a practical example using opportunities, tasks, and notes.
TABLE OF CONTENTS
- What Is the Loop Action?
- Key Benefits of the Loop Action
- Prerequisites and Limitations
- Action Name
- Action Description
- Action Details
- How to Configure
- Behavior and Logic
- Testing the Loop
- Use Case: Process Multiple Service Requests
- Frequently Asked Questions
- Related Articles
- Need Help?
What Is the Loop Action?
The Loop action runs a group of workflow actions once for each item in a list or once for each number in a selected range.
Use Loop when a single workflow trigger provides several records that need to be processed separately. Instead of creating repeated sets of actions, you configure the actions once and place them inside the Loop.
For example, an inbound webhook containing three service requests can trigger a Loop that creates a separate opportunity, task, and note for each service.
Loop also supports a defined number range when you need to repeat actions a fixed number of times without using a list.
Key Benefits of the Loop Action
Loop makes it easier to process multiple items within one workflow. It reduces repeated configuration and lets you work with the specific data associated with each iteration.
- Process Multiple Items: Run the same group of actions for each item provided by a previous workflow step.
- Use Current-Item Data: Map the current item's fields through Custom values > Loop Item.
- Repeat a Fixed Number of Times: Use a range of numbers when your process does not require a list.
- Choose Execution Order: Run iterations sequentially or allow multiple iterations to run in parallel.
Reduce Repeated Configuration: Configure a group of actions once instead of adding the same actions repeatedly.- Review Individual Results: Inspect the status and action results for each iteration in the Loop's Test tab.
Prerequisites and Limitations
Before configuring Loop, determine whether your workflow will process a list of records or a range of numbers. This determines which input fields and current-item values will be available.
Prerequisites
Prepare the workflow and the input data that Loop will use.
- Access to Automation > Workflows.
- An existing workflow or a new workflow to configure.
- For list processing, a trigger or previous action that provides the list.
- For range processing, the starting and ending numbers.
- The workflow actions you want to repeat inside the Loop.
Limitations
Loop behavior depends on the selected input, execution mode, and placement of actions on the workflow canvas.
- List Input: A list must be available from a previous workflow step for a list-based Loop.
- Number Range: Range-based Loops use a number counter rather than list-item fields.
- Sequential Execution: Each iteration finishes before the next iteration begins.
- Parallel Execution: Multiple iterations can run at the same time. Do not rely on one iteration completing before another.
- Action Placement: Only actions inside the dashed Loop box repeat for each item or number.
- Workflow Testing: Workflow tests execute real actions. Use suitable test data to avoid unintended changes or messages.
Action Name
Action names identify individual steps on the workflow canvas. The default name helps you recognize the Loop when reviewing the workflow.
The action appears in the workflow builder as Loop.
Action Description
The action description summarizes what the Loop does when a workflow reaches this step.
Loop: Iterate over a list or a range of numbers and run the actions inside the Loop once for each item or number.
Action Details
The Loop configuration contains fields for selecting the input, defining a number range, and choosing how iterations execute. Some fields are required only for a specific Loop type.
| Field | Description | Mandatory |
|---|---|---|
| Action Name | The name displayed on the workflow canvas. Defaults to Loop. | Yes |
| Loop Over | Choose A list of items or A range of numbers. | Yes |
| Items | The list selected from a previous step, such as an array in an inbound webhook. | For list Loops |
| Start Number | The first number in the range. Default: 1. | For range Loops |
| End Number | The last number in the range. Default: 10. | For range Loops |
| Execution Mode | Sequential by default. Enable Parallel to run several iterations at the same time. | No |
How to Configure
Add the Loop after the trigger or action that provides its input data. Configure what the Loop processes, choose its execution mode, and place the repeated actions inside the Loop box.
Step 1: Add the Loop Action
Open the workflow builder and insert Loop at the point where repeated processing should begin.
- Go to Automation > Workflows.
- Open an existing workflow or create a new one.
- Add and configure the trigger that provides the input data.
- Click the + icon where the Loop should start.
- In the Actions panel, search for Loop.
- Select Loop.
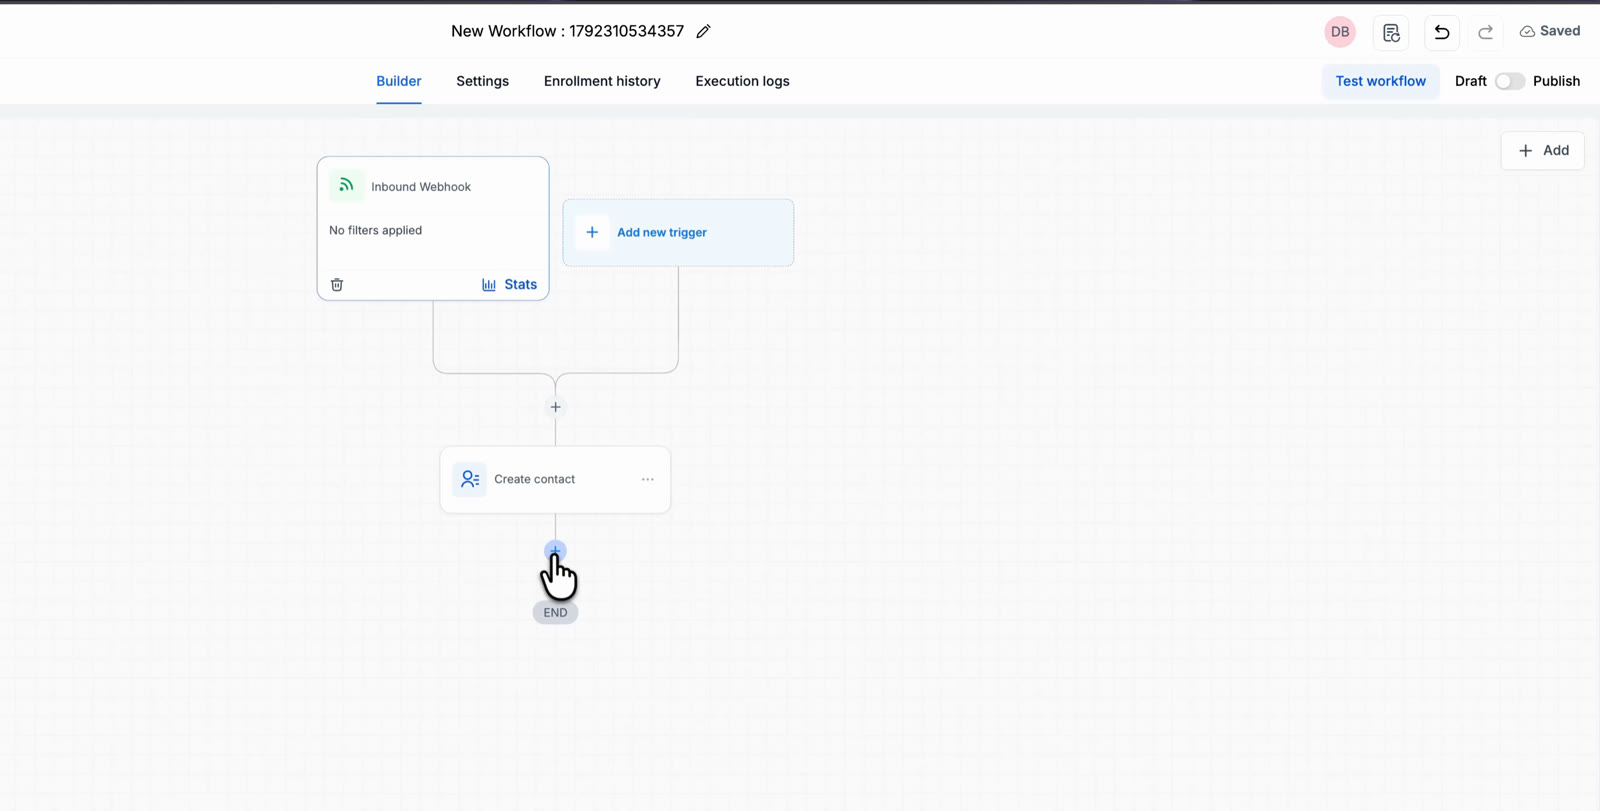
Click the + icon where the Loop should begin.
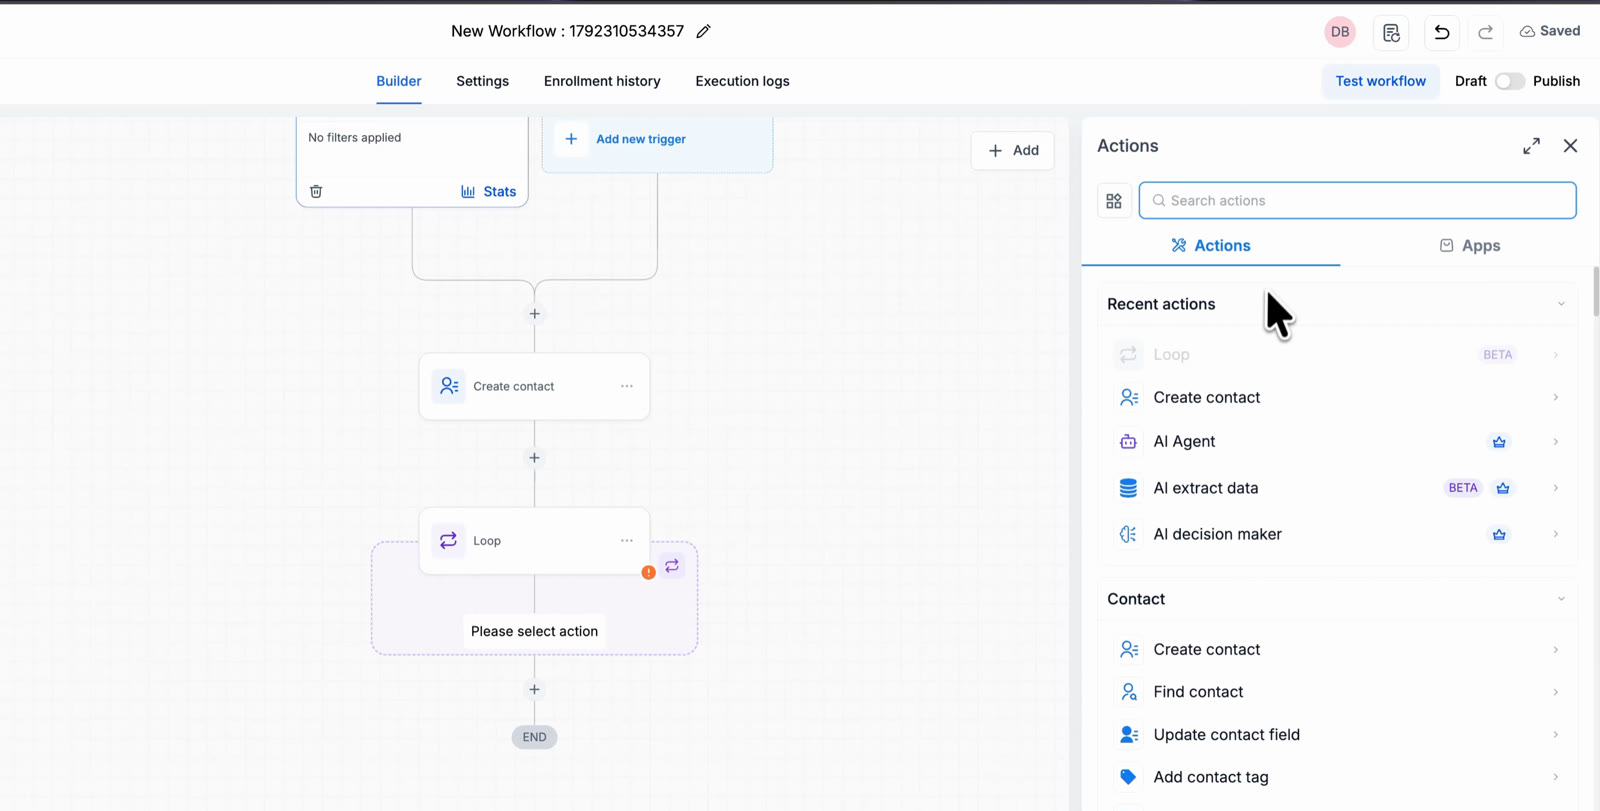
Select Loop from the Actions panel.
Step 2: Choose What to Loop Over
The Loop Over selection determines whether the action processes a list or repeats a defined number of times.
- Open the Loop configuration.
- Find Loop Over.
- Select the appropriate input type.
- A list of items: Repeat the actions for each item in a list provided by a previous step.
- A range of numbers: Repeat the actions once for each number between the configured starting and ending values.
Hover over the information icon beside a field to view its explanation.
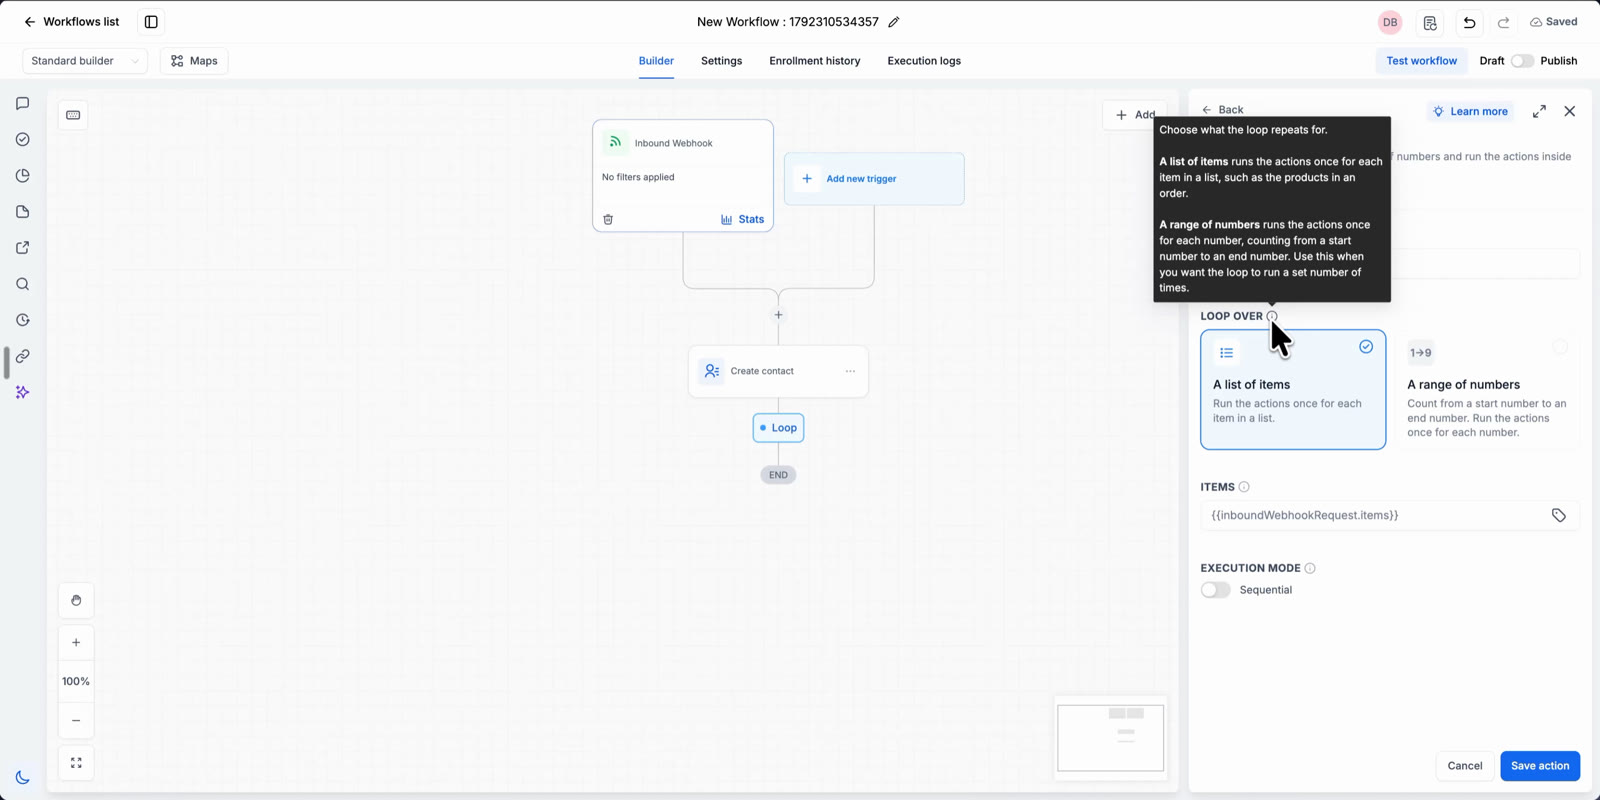
Choose the Loop input type and review the available field descriptions.
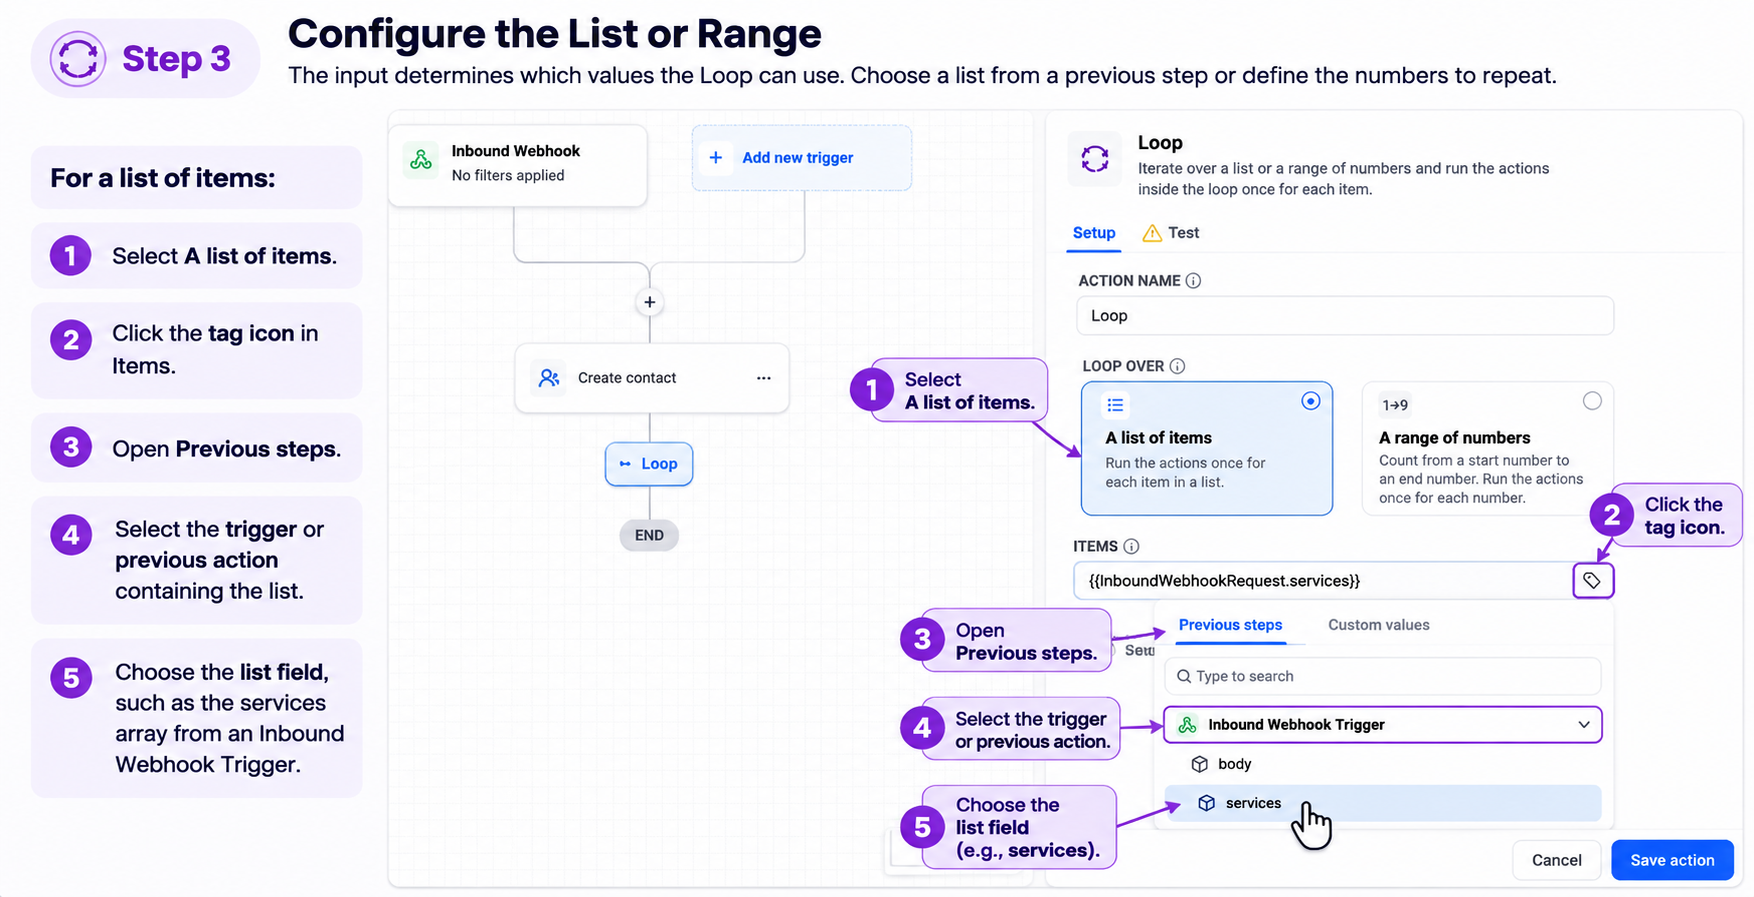
Step 3: Configure the List or Range
Specify the data that Loop should process. The required fields depend on the input type selected in the previous step.
For a List of Items
Choose the list from a previous workflow step so each iteration receives the next item from that list.
- Select A list of items.
- Click the tag icon in the Items field.
- Open Previous steps.
- Select the trigger or earlier action containing the list.
- Choose the list field, such as the services array from an Inbound Webhook Trigger.
Choose a list from a previous workflow step.
For a Range of Numbers
Use a number range when the same actions must repeat a specific number of times without processing separate list records.
- Select A range of numbers.
- Enter the Start Number.
- Enter the End Number.
- Review the helper text showing the total number of iterations.
For example, a range from 1 to 10 runs the actions inside the Loop 10 times.
Configure a number range and review the iteration count.
Step 4: Choose the Execution Mode
The execution mode determines whether each iteration waits for the previous one or whether several iterations can run at the same time.
- Find Execution Mode.
- Leave the toggle off to use Sequential execution.
- Enable the toggle to use Parallel execution.
- Sequential: The default mode. Each iteration finishes before the next begins.
- Parallel: Several iterations can run concurrently.
Parallel execution can reduce processing time when repeated actions call external systems. Use Sequential execution when a later iteration must wait for the previous iteration to finish.
Step 5: Save the Action
Saving the Loop adds its configured structure to the workflow canvas so you can place actions inside it.
- Review the Loop Over, input, and Execution Mode settings.
- Click Save action.
- Locate the Loop on the canvas.
The Loop appears with a dashed box for the actions that will repeat. The box initially contains a placeholder for selecting an action.
Step 6: Add Actions Inside the Loop
Place the actions you want to repeat inside the dashed Loop box. Use Loop Item values when those actions need data from the current list item.
- Click the + icon inside the dashed Loop box.
- Add the first action you want to repeat.
- Open a field that should use data from the current item.
- Click the tag icon.
- Select Custom values > Loop Item.
- Choose the appropriate field, such as Name, Estimated Value, Urgency, or Preferred Date.
- Save the action.
- Repeat the process to add any other actions that should run during each iteration.
Loop Item values change with each iteration, allowing the same action configuration to process a different item every time.
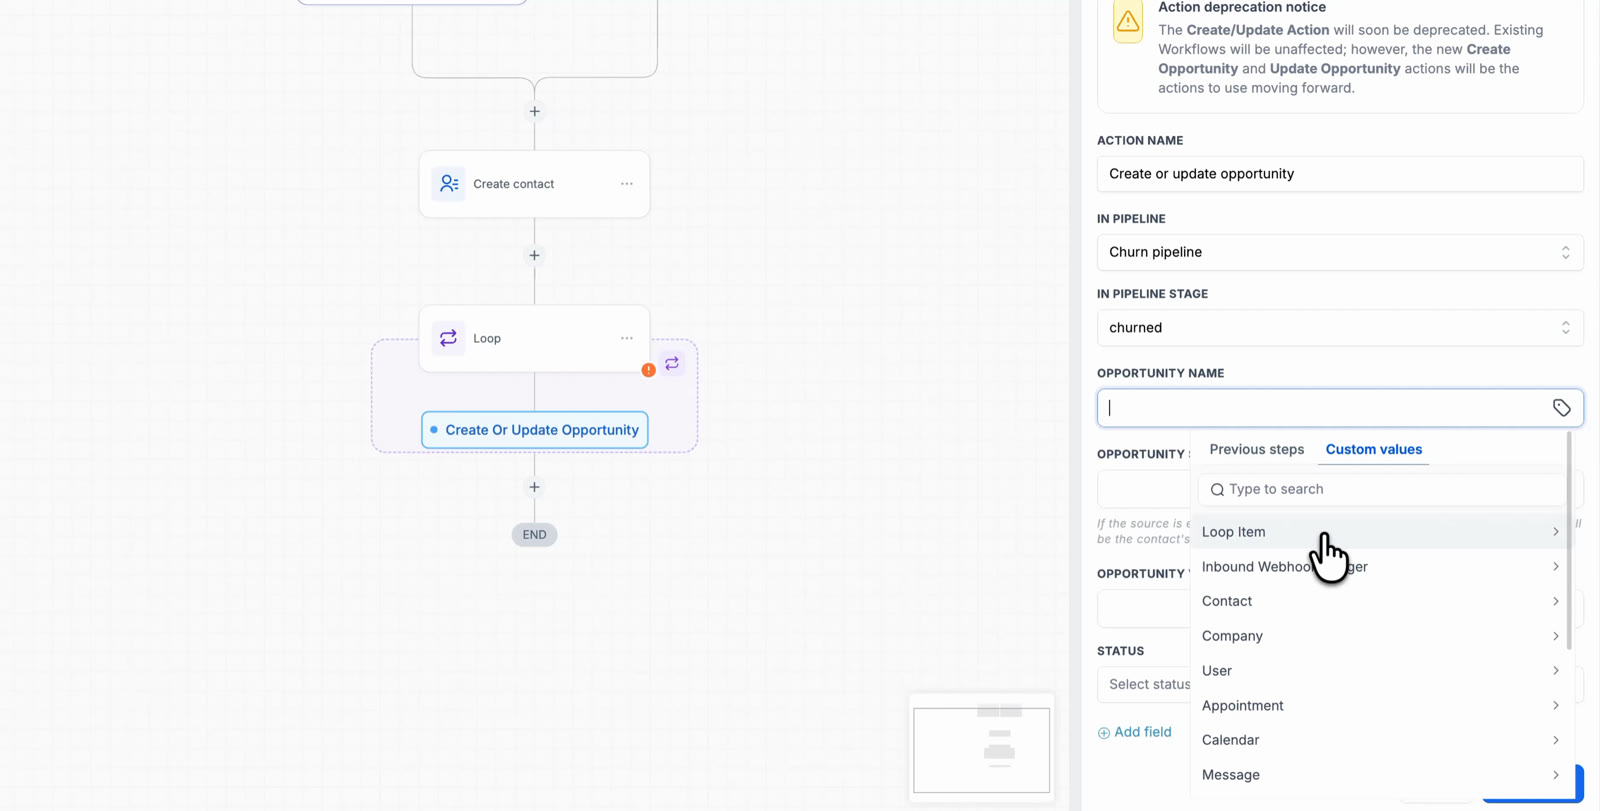
Select the current item's fields through Custom values > Loop Item.
Example: Create an Opportunity
Use a supported opportunity action inside the Loop when each list item should create a separate opportunity. Map the current item's name and estimated value to the corresponding opportunity fields.
Note: The following screenshot shows the older Create or update opportunity action. For new workflows, use Create Opportunity. The image demonstrates how Loop Item values can be mapped.
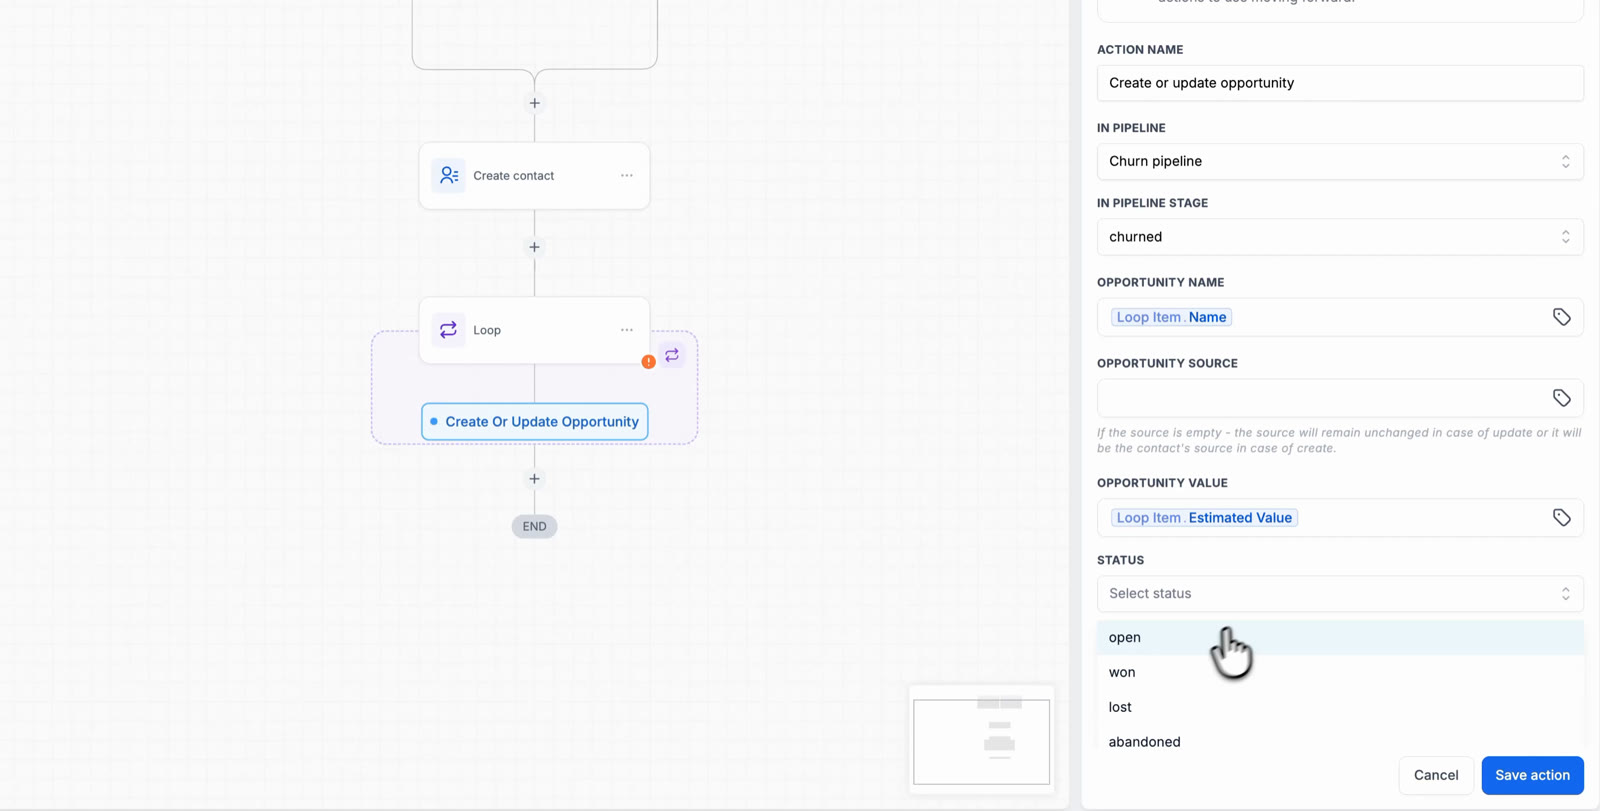
Map opportunity fields from the current Loop Item. This screenshot uses the older opportunity action.
Example: Add a Task
Use an Add task action when each list item should produce a separate task. Map the current item's information to the task's title, description, or due date.
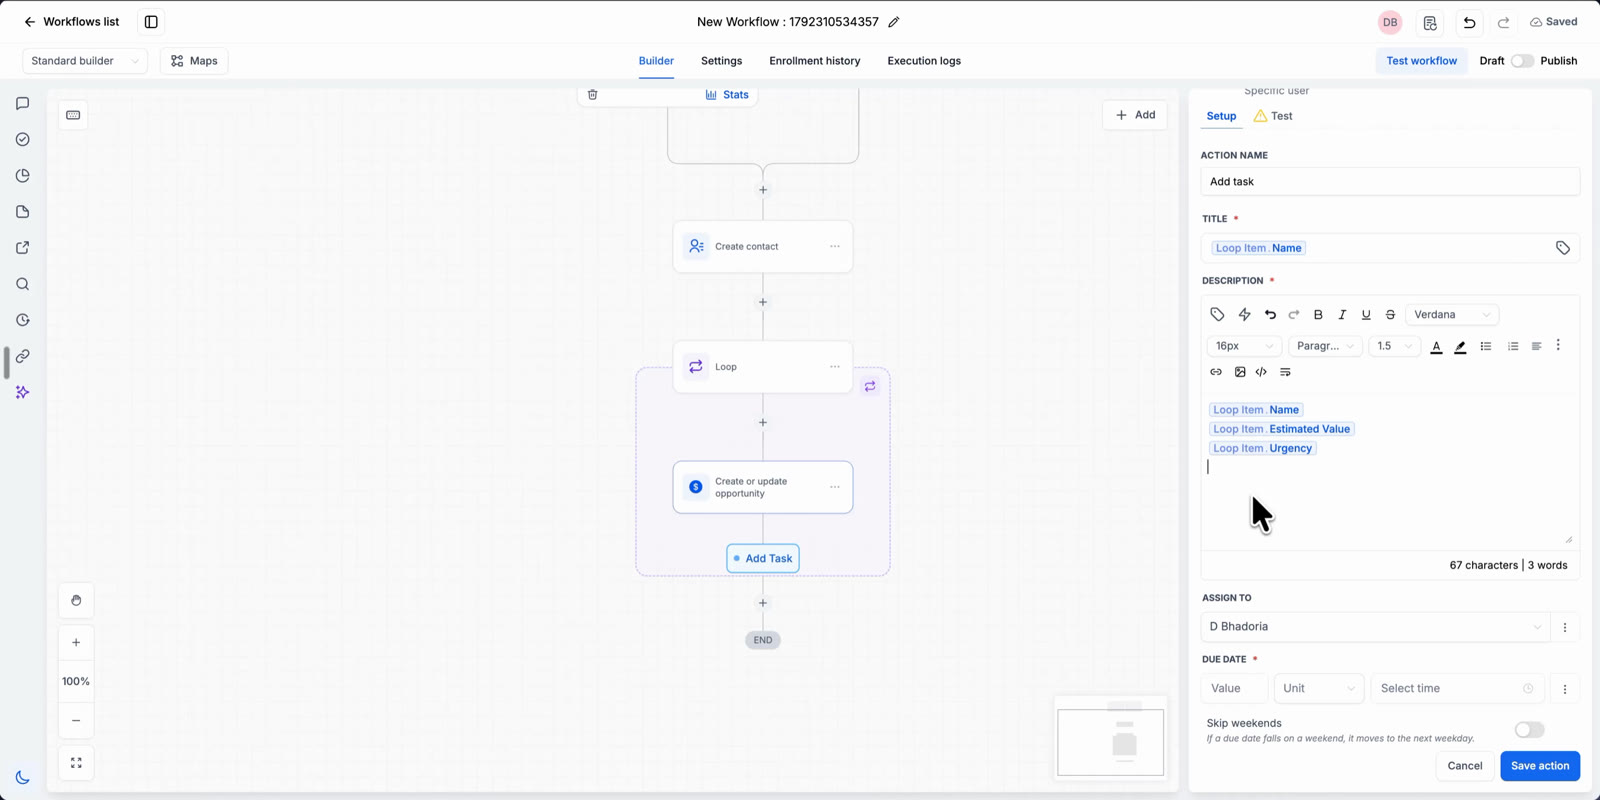
Map Loop Item fields to a task.
Example: Add Notes
Use an Add notes action when each list item should add details to the contact's record. Map fields such as the service name and urgency into the note content.
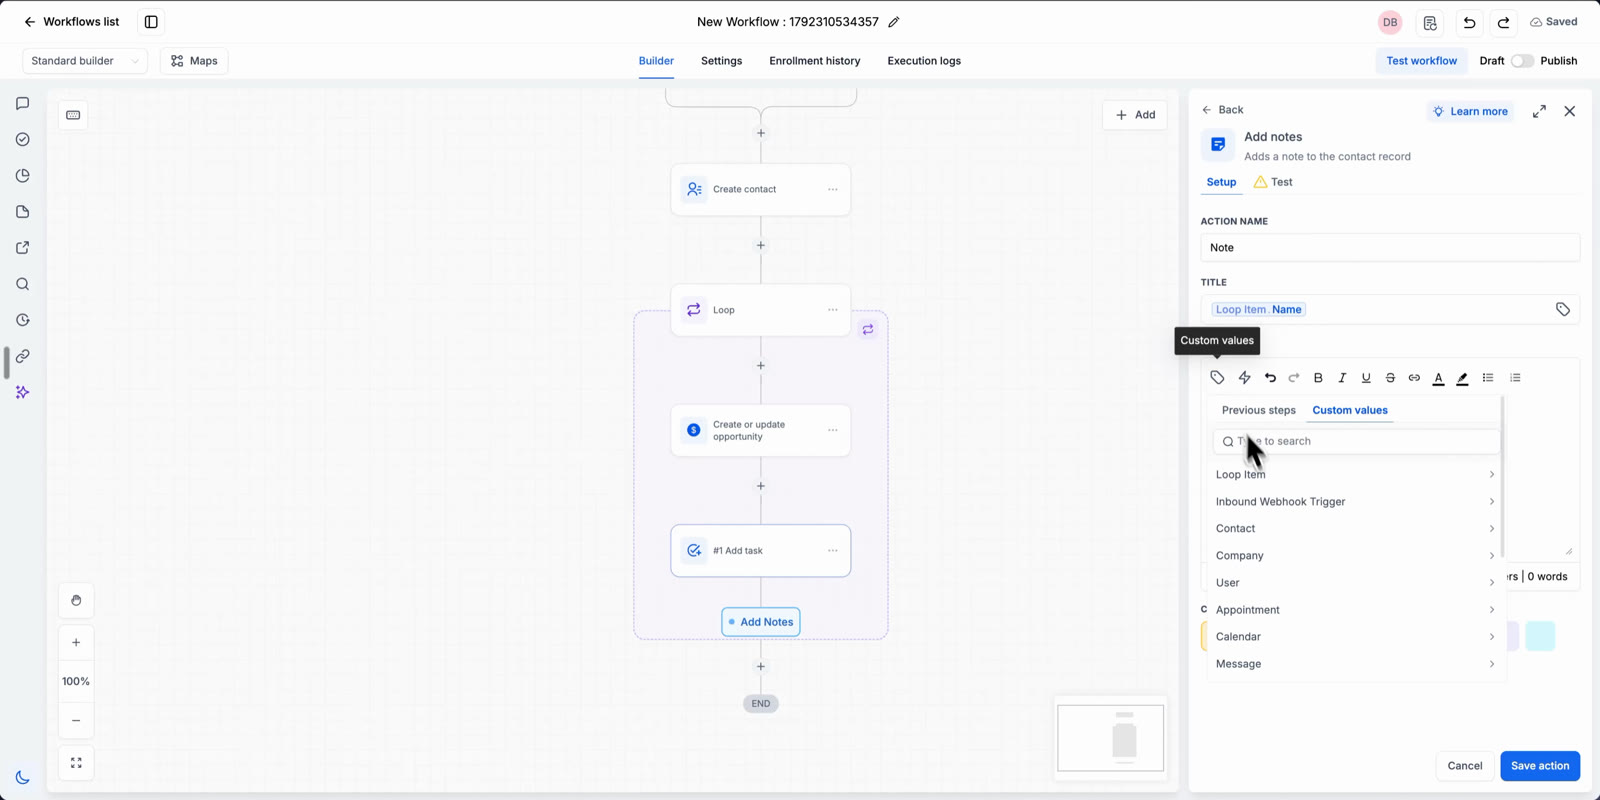
Use Loop Item values when adding notes.
Step 7: Review the Finished Loop
Confirm that every action is positioned correctly. The position of each action determines whether it runs once per iteration or once after the Loop completes.
- Review the dashed Loop box.
- Confirm that every action you want to repeat appears inside the box.
- Confirm that actions intended to run only after the Loop are placed below the box.
- Review the input mappings used inside each repeated action.
- Save the workflow and test it before publishing.
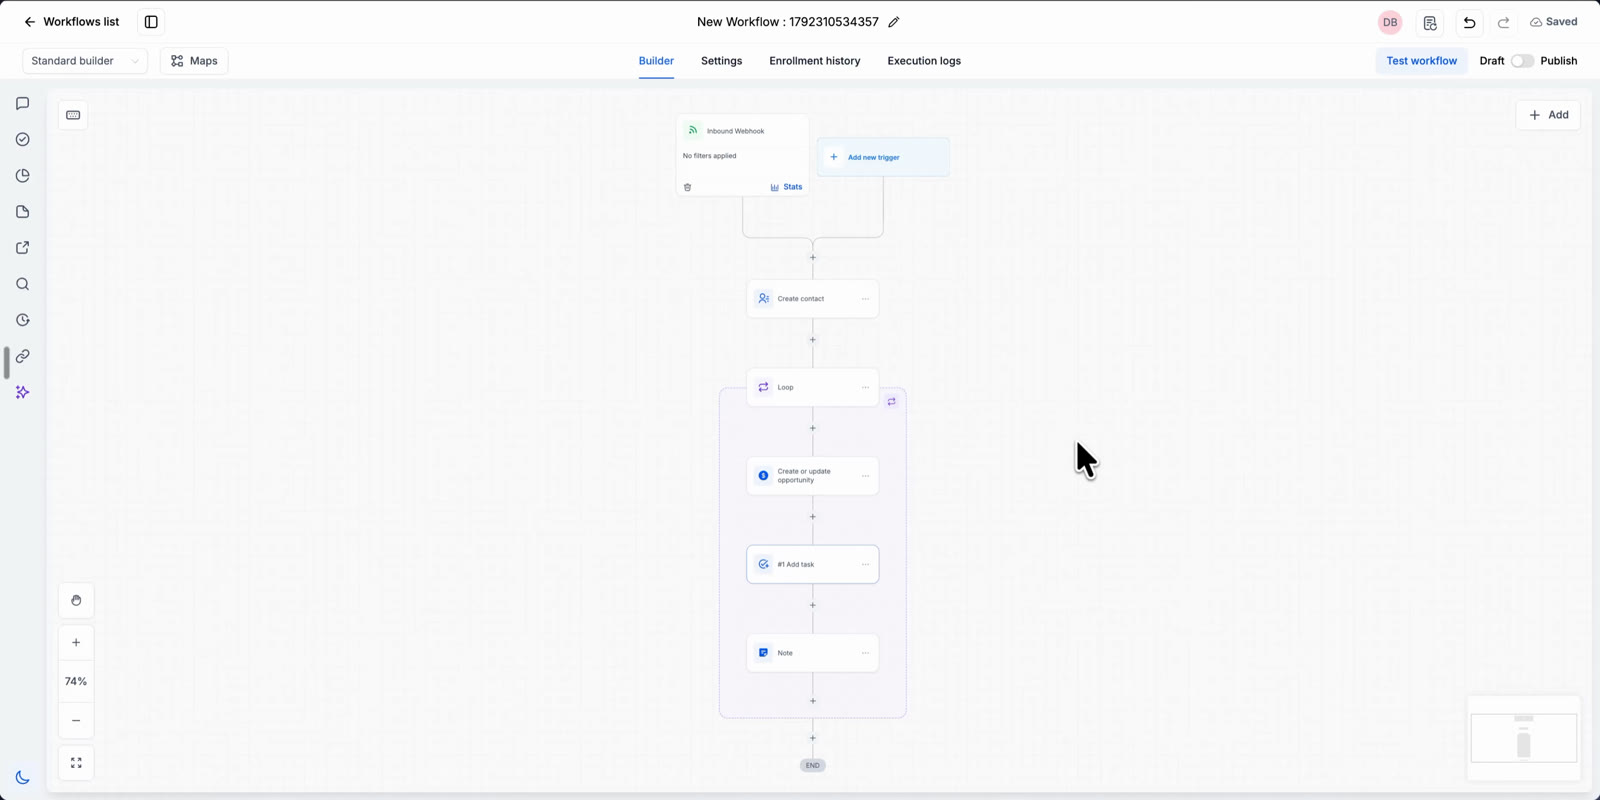
The example shows three actions placed inside the Loop.
Behavior and Logic
Loop behavior depends on the input type, execution mode, and action placement. Use the following rules to predict how actions will run and which values will be available in each iteration.
| Rule | What Happens |
|---|---|
| Number of Iterations | One iteration runs for each list item or each number in the selected range. |
| Sequential Mode | Each iteration completes before the next begins. |
| Parallel Mode | Several iterations can run at the same time. |
| Loop Item in a List Loop | Provides fields from the current item. The field values change with each iteration. |
| Loop Item in a Range Loop | List-item fields are empty. Use the loop counter under Custom values > Loop Item to reference the current number. |
| Actions After the Loop | Run once after all Loop iterations finish. |
Example: A list containing three services produces three iterations. Actions inside the dashed Loop box run once for each service, while actions placed after the Loop run once when all three iterations have finished.
Testing the Loop
Test the workflow to confirm that the correct input data reaches the Loop and that each iteration runs the intended actions. Review both the overall Loop result and individual action results before publishing.
Run a Workflow Test
Use an event containing representative data to verify the Loop's input and execution behavior.
- Open the workflow containing the Loop.
- Click Test workflow in the upper-right corner.
- On the New test tab, select Test using events.
- Under Select Trigger, choose the workflow trigger.
- Under Select event, choose a recorded event.
- If a suitable event is unavailable, enable Listen for events and generate a new event.
- Review the event data.
- Click Start test run.
- When the test finishes, select the Loop step on the canvas.
- Open its Test tab.
Important: Workflow tests execute real actions. Use test data to avoid unintended messages, opportunity creation, task assignments, or changes to customer records.
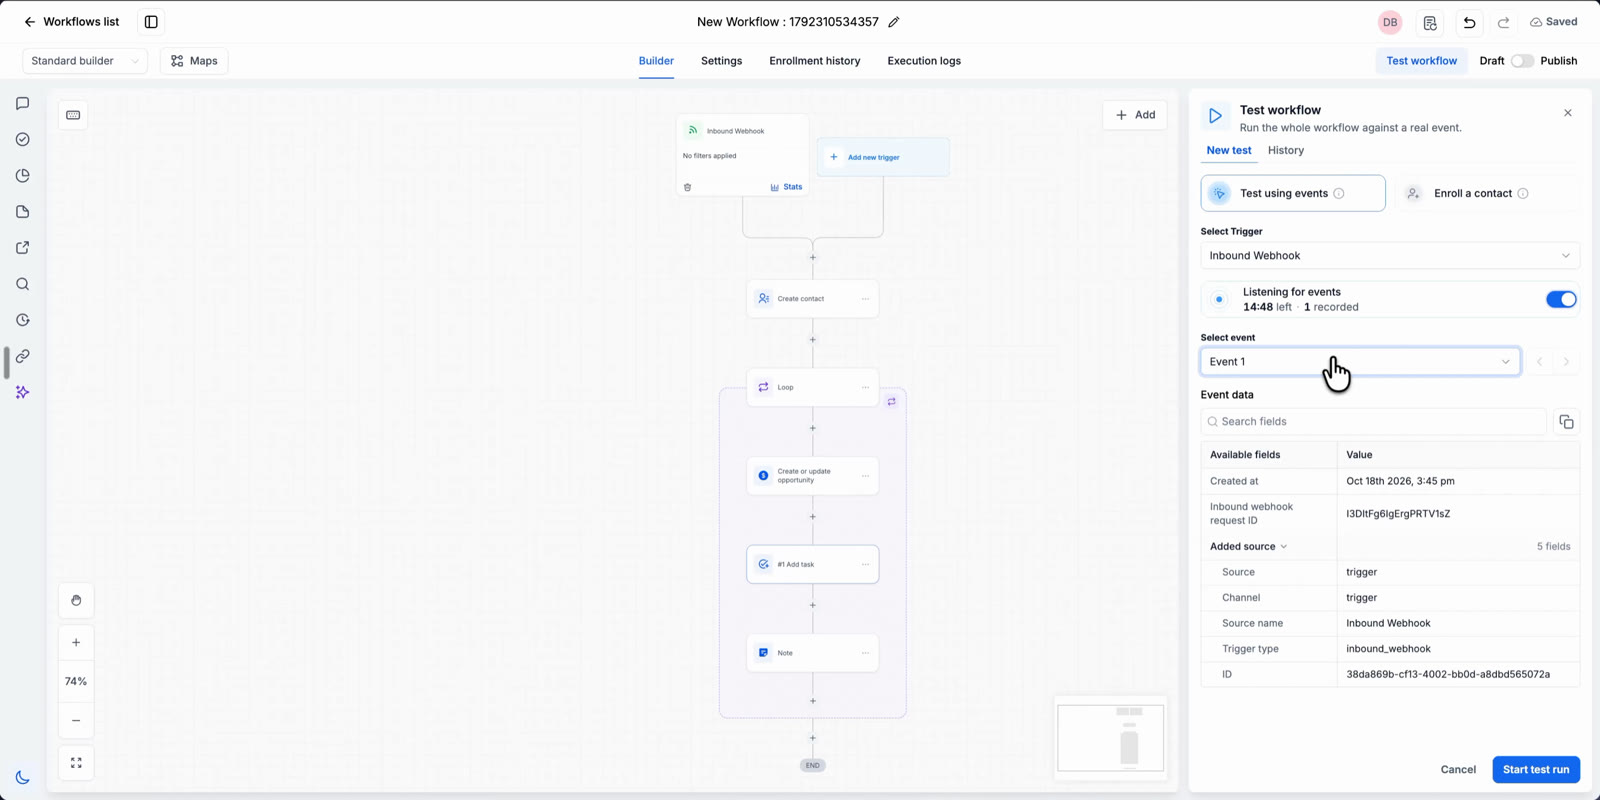
Test the workflow using an Inbound Webhook event.
Review Each Iteration
The Loop's Test tab displays the overall result and the details of the individual iterations. Use this information to identify incorrect input values or failed actions.
The available test information includes:
- Input: Action Name, Items, Mode, and Loop Over values.
- Output: Items, Succeeded, Failed, and Duration for the Loop.
- Iterations: Each iteration, its status, and the actions executed inside it.
Use the arrows to move between iterations. Click the open icon beside an action to inspect that action's Input and Output for the selected iteration.
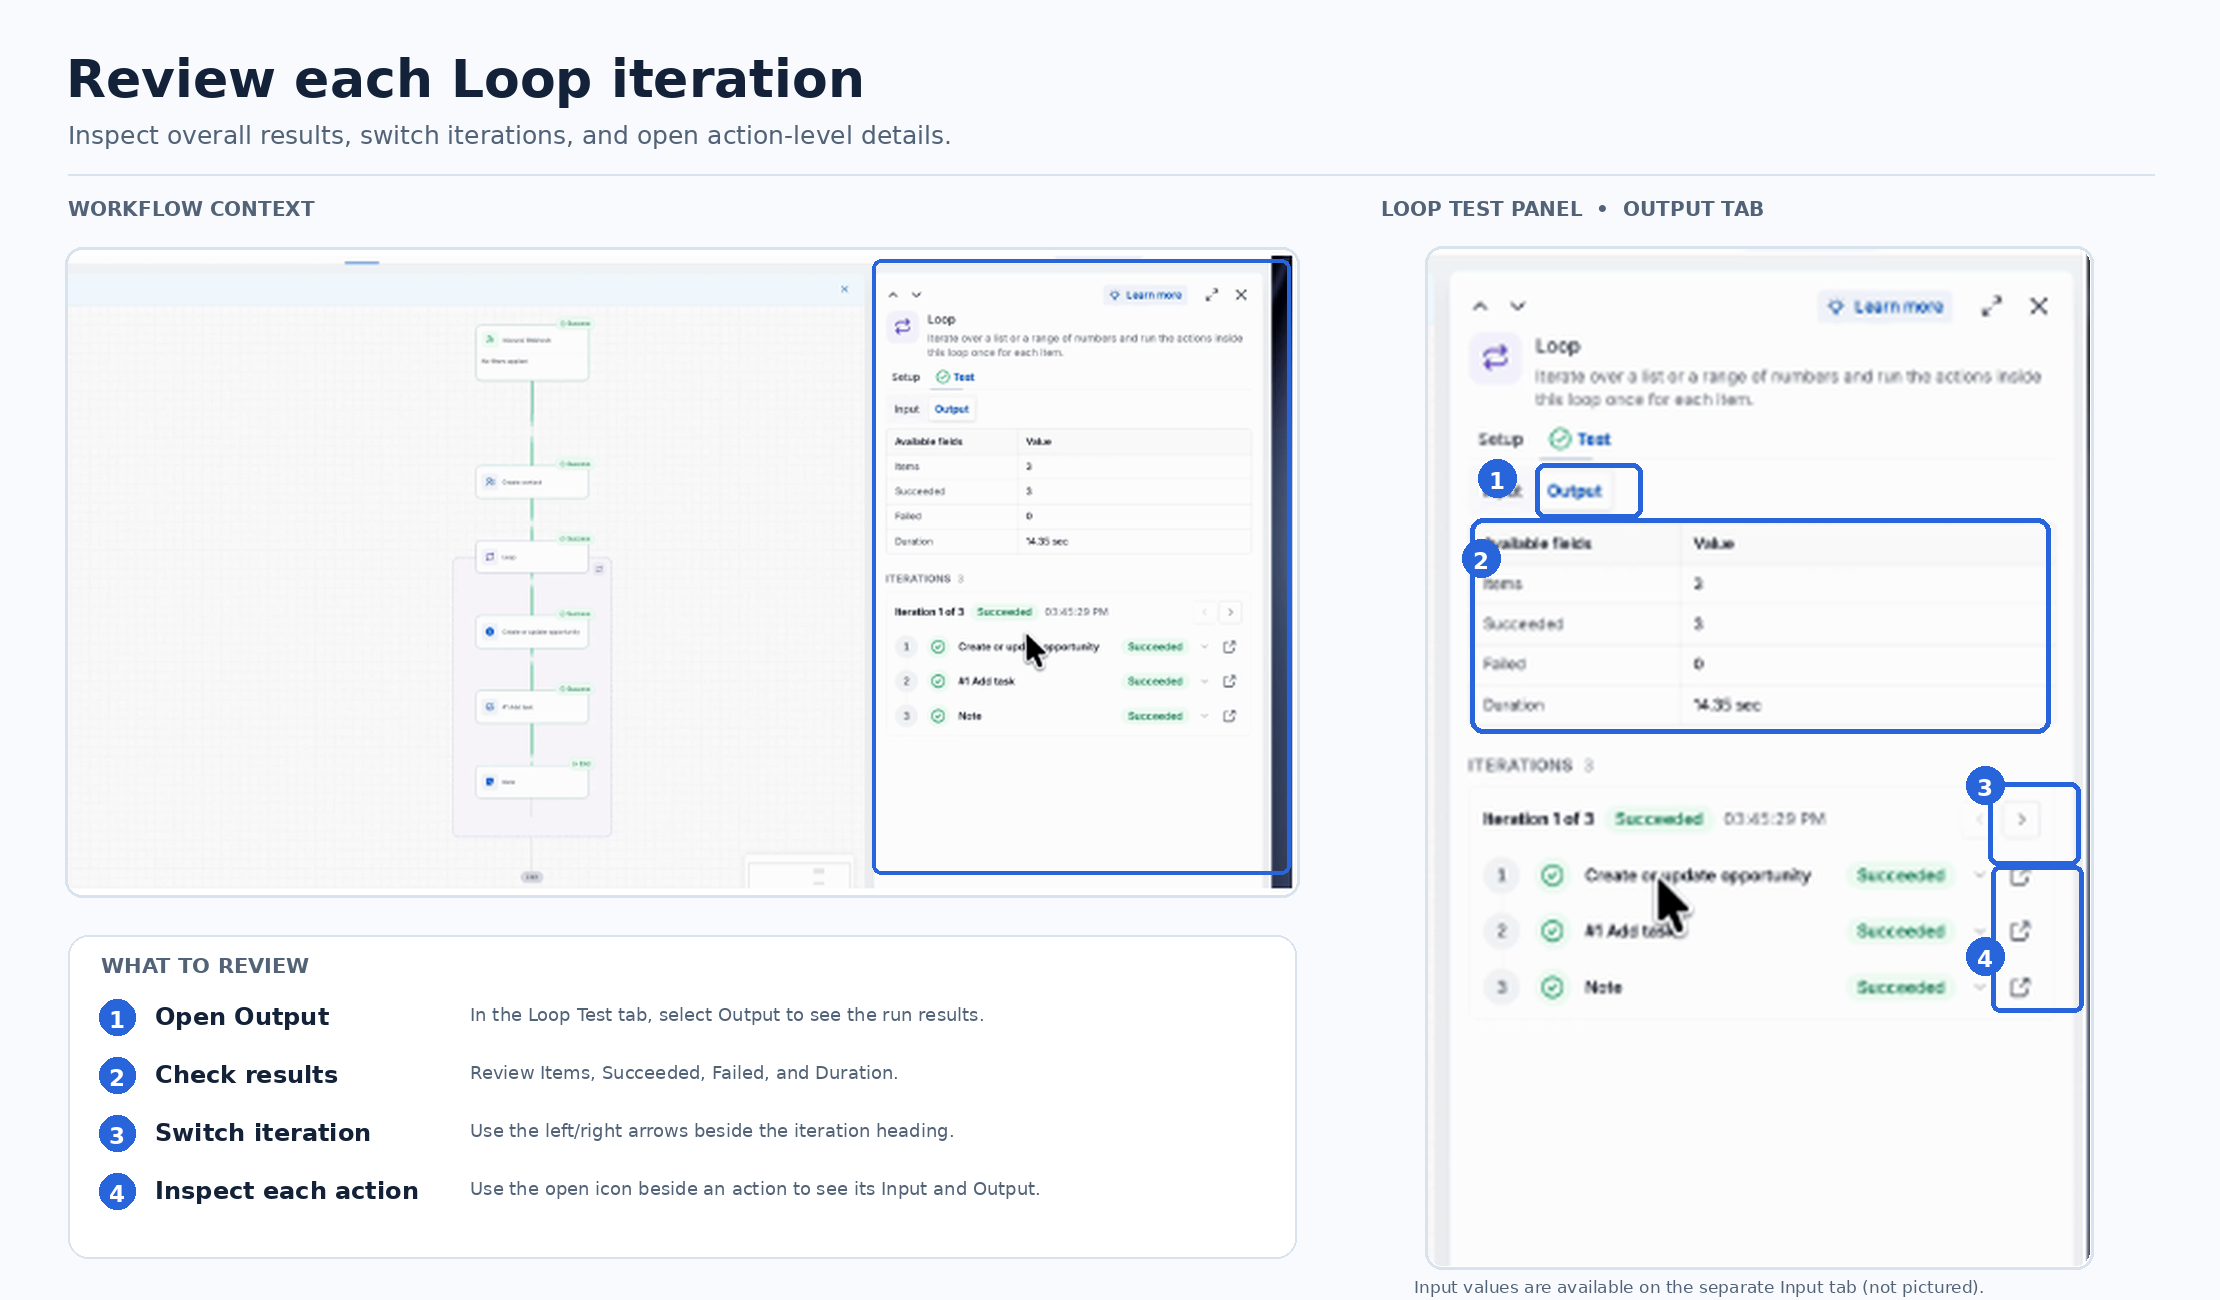
Review the individual Loop iterations and the actions performed inside each one.
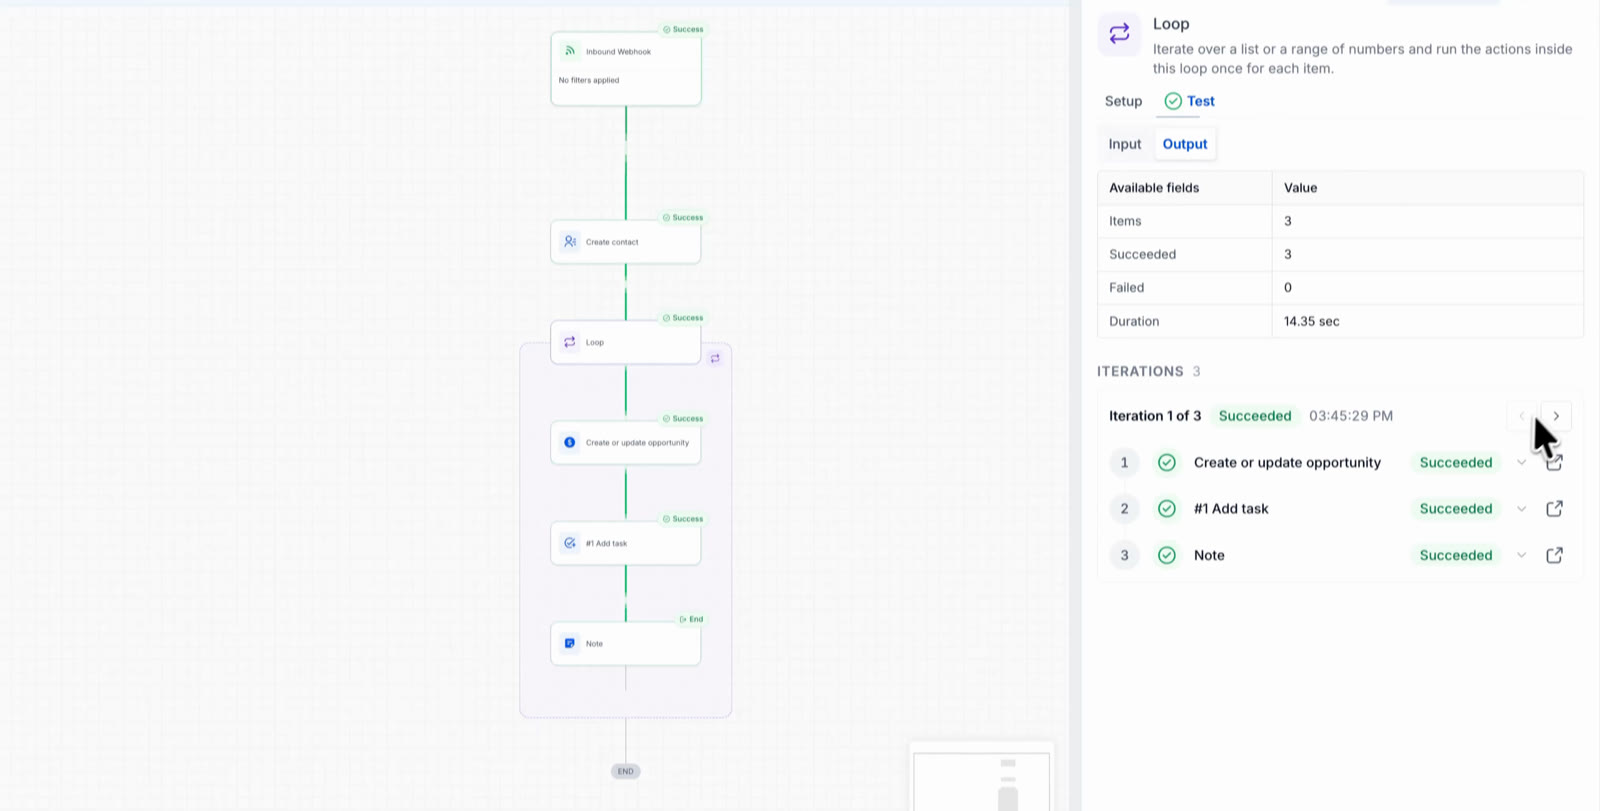
Example output: 3 items, 3 succeeded, and 0 failed.
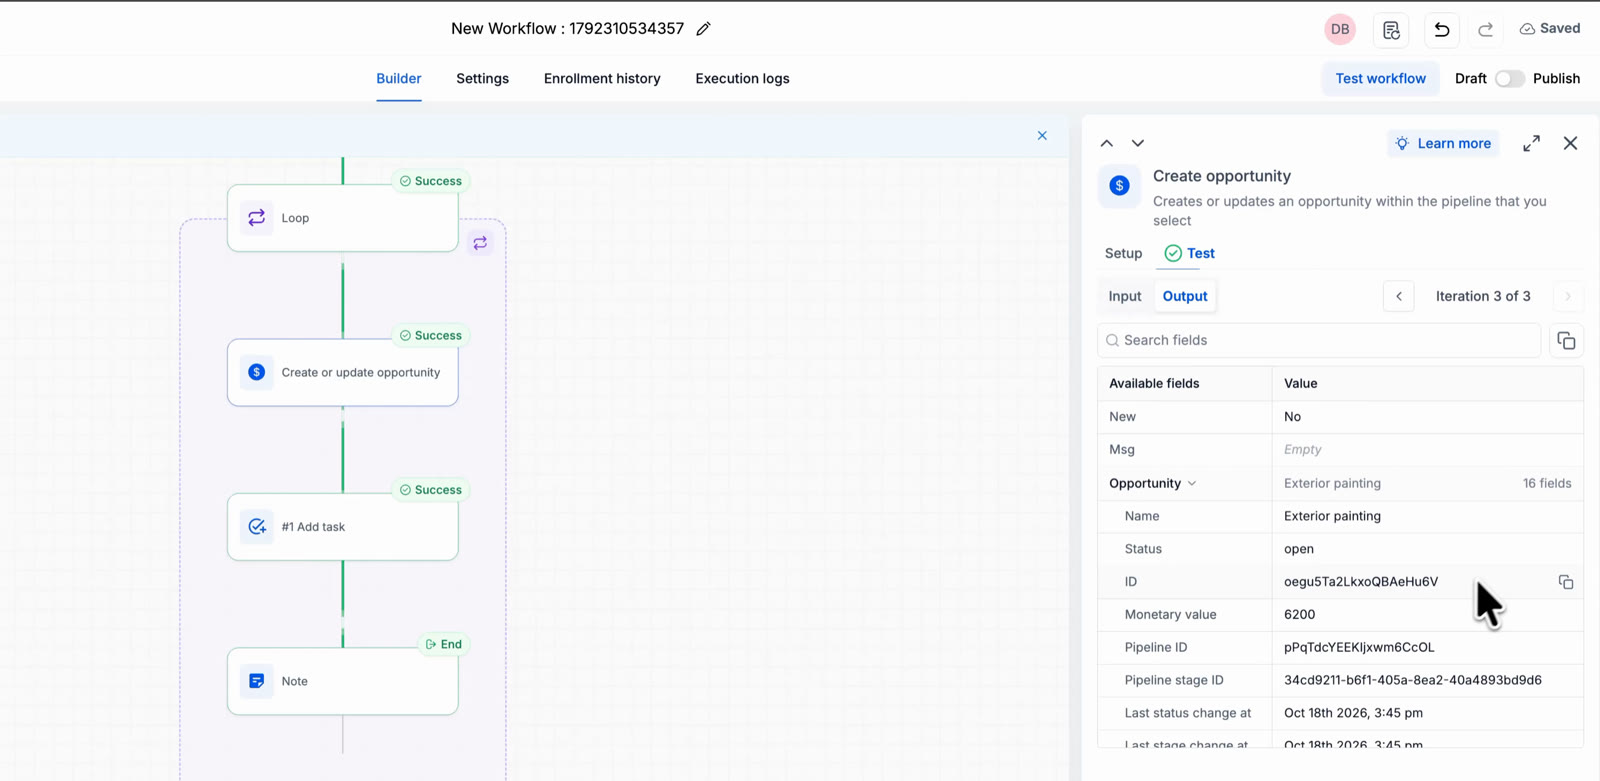
Inspect an action's Input and Output for a specific iteration. This screenshot uses the older opportunity action.
After confirming the expected results, save and publish the workflow when you are ready to activate it.
Use Case: Process Multiple Service Requests
A home services business receives an inbound webhook containing contact details and three requested services: Roof repair, Gutter cleaning, and Exterior painting. The business wants to create a separate opportunity, task, and note for each service.
Loop makes it possible to process the services individually within the same workflow.
- Inbound Webhook: Receive the contact details and a services list containing three items.
- Create Contact: Map First Name, Email, and Phone from the webhook data.
- Loop: Select A list of items under Loop Over. In Items, choose the services array from the Inbound Webhook Trigger.
- Create Opportunity: Inside the Loop, select the appropriate pipeline and stage. Map Opportunity Name to Loop Item > Name and Opportunity Value to Loop Item > Estimated Value. Enable Duplicate Opportunity when separate opportunities are required for the same contact.
- Add Task: Map Loop Item > Name to the task title. Use the relevant service fields in the description and Loop Item > Preferred Date for the due date.
- Add Notes: Map the service name and Loop Item > Urgency into the note content.
- Result: The Loop processes all three services. When multiple-opportunity creation is properly configured, the workflow can create three opportunities, three tasks, and three notes.
Important: If multiple opportunities are required for the same contact in the same pipeline, open Settings > Objects > Opportunities and enable Allow Multiple Opportunities per Contact. Review the Duplicate Opportunity option in the Create Opportunity action when applicable.
These settings serve different purposes. One determines whether multiple opportunities are allowed for the same contact, while the other controls the workflow action's duplicate-creation behavior.
Test the workflow with a sample contact and three services to confirm that the expected separate records are created.
Frequently Asked Questions
Q: What is Loop Item?
Loop Item represents the current item being processed. Use Custom values > Loop Item to map its fields into actions inside the Loop. The values change with each iteration.
Q: How many times will the Loop run?
Once for each item in the selected list or once for each number in the specified range. For a number range, the helper text shows the expected iteration count.
Q: What is the difference between Sequential and Parallel?
Sequential processes one iteration at a time, finishing each iteration before beginning the next. Parallel allows multiple iterations to run concurrently.
Q: Can I use Loop Item with a range of numbers?
Yes. Use the loop counter under Custom values > Loop Item to reference the current number. List-item fields are empty in a range-based Loop.
Q: Where can I review each iteration?
After running a workflow test, select the Loop step and open its Test tab. Use the Iterations list and open icon to inspect the results of individual actions.
Q: Where do list items come from?
From a previous workflow step that provides a list, such as an Inbound Webhook Trigger. Select the list using the tag icon in the Loop's Items field.
Q: Do actions placed below the Loop run for every item?
No. Only actions inside the dashed Loop box repeat. Actions below the box run once after the Loop finishes.
Need Help?
If the Loop does not produce the expected results, review the input data, configuration, action placement, and execution details before contacting support.
- Incorrect Iteration Count: Check the selected list or number range and review the iteration-count helper text.
- Missing Loop Item Values: Confirm that the Items field points to the correct list and that the action maps fields from Custom values > Loop Item.
- Actions Do Not Repeat: Make sure the actions are inside the dashed Loop box rather than below it.
- Unexpected Processing Order: Review the selected Execution Mode. Use Sequential when iterations must finish one at a time.
- Failed Iterations: Open the Loop's Test tab and inspect the failed iteration and its action results.
- Opportunities Are Missing: Review the Create Opportunity action, duplicate-opportunity options, and the setting that permits multiple opportunities for the same contact.
- Unexpected Record Changes: Review the actions executed during the test and confirm that suitable test data was used.
If the issue continues, contact support. Include the workflow configuration, expected iteration count, actual result, relevant action Input and Output values, and any screenshots or error messages.