
Test Workflow lets you test workflow triggers, individual actions, and complete workflows using real event data. Review inputs, outputs, and execution results to identify issues before publishing. You can monitor test runs on the workflow canvas and revisit previous results from the History tab. This guide explains how to run tests, inspect results, understand statuses, and retry previous executions.
TABLE OF CONTENTS
- What Is Test Workflow?
- Key Benefits
- Prerequisites and Getting Started
- Ways to Test
- Test a Trigger
- Test an Action
- Test the Whole Workflow
- Review History and Retry a Run
- Run and Step Statuses
- Things to Know
- Use Case
- Frequently Asked Questions
- Need Help?
What Is Test Workflow?
Test Workflow helps you check workflow behavior before using it in a live automation. You can test a single trigger using a recorded event, test an individual action using event data, or run a complete workflow step by step.
During a full test, each step displays its execution status on the workflow canvas. You can open individual steps to review their inputs, outputs, and any errors.
Tests execute real workflow actions. A successful test helps confirm that the tested steps and execution path behave as expected, but it does not guarantee every possible workflow scenario will succeed.
Key Benefits
Test Workflow helps you identify configuration problems, review how data moves between steps, and confirm expected behavior before publishing an automation.
- Real Event Data: Test workflows using recorded events and actual input values rather than relying only on sample information.
- Individual Step Testing: Test a trigger or a single action without running the complete workflow.
- Live Execution Progress: Watch the status of each step as a full-workflow test runs on the canvas.
- Input and Output Inspection: Open individual steps to review the data they received, the results they produced, and any errors.
- Test History and Retries: Review previous test runs and retry a test using its recorded trigger data and action configuration.
- More Reliable Publishing: Validate the workflow paths you have tested before enabling live execution.
Prerequisites and Getting Started
Before running a test, open the workflow you want to inspect and confirm that its testing controls are available. Testing executes configured actions using real data, so use controlled events and test contacts where appropriate.
Getting Started
- Go to Automation > Workflows.
- Open the workflow you want to test.
- Review the configured triggers and actions in the workflow builder.
- Use the available testing controls to test a trigger, an individual action, or the complete workflow.
Important: Tests execute real actions. A test may send messages, create records, update contact information, or perform other configured operations. Use controlled test data to avoid unintended customer-facing changes.
Note: If the testing controls described in this guide are unavailable, contact support to confirm feature availability.
Ways to Test
Test Workflow supports testing with recorded events or by selecting a contact. Choose the method that fits the trigger and the type of workflow behavior you want to verify.
| Option | What It Does | When to Use It |
|---|---|---|
| Test using events | Select an existing recorded event or enable Listen for events to capture a new event. Listening lasts 15 minutes. | Use this option when you can generate the trigger event, such as submitting a form. |
| Enroll a contact | Run the test for a selected contact as though the trigger fired for that contact. | Use this option when generating the actual trigger event is not practical. |
Test a Trigger
Trigger testing helps you verify that a workflow receives the expected event data. The following example uses a Form Submitted trigger and a real form submission.
Step 1: Open the Test Tab
Open the trigger's testing controls to select how you want to provide event data.
- In the workflow builder, click the trigger on the canvas.
- In the panel that opens, select the Test tab next to Setup.
- Choose Test using events.
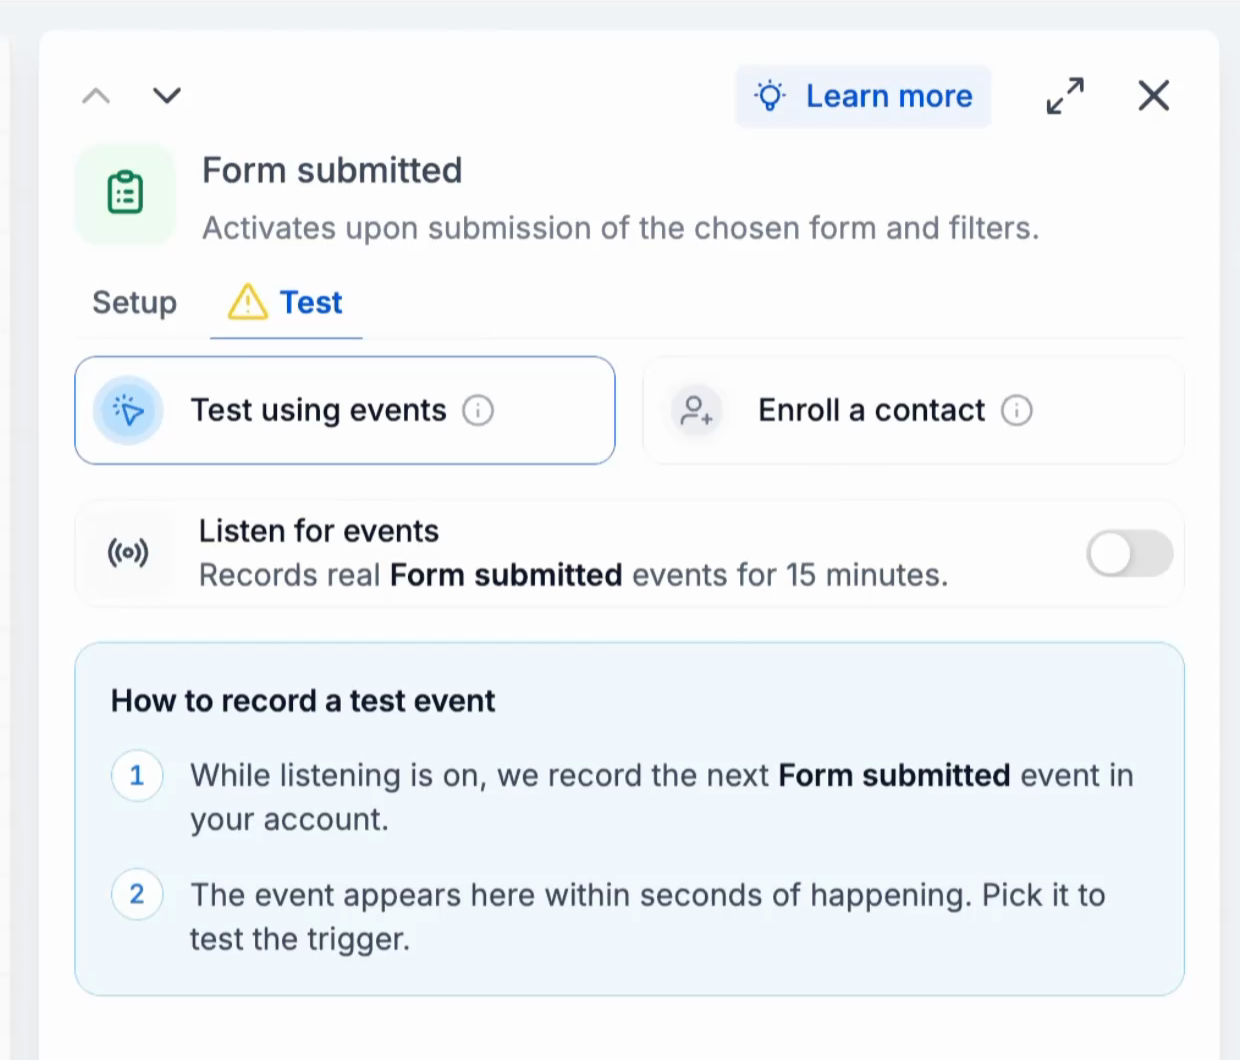
The Test tab on a Form Submitted trigger.
Step 2: Turn On Listen for Events
Listening captures new events that match the trigger so you can use their data in a test.
- Turn on Listen for events.
- Review the remaining listening time shown in the panel.
- Check the recorded event count as new events arrive.
The listening period lasts 15 minutes.
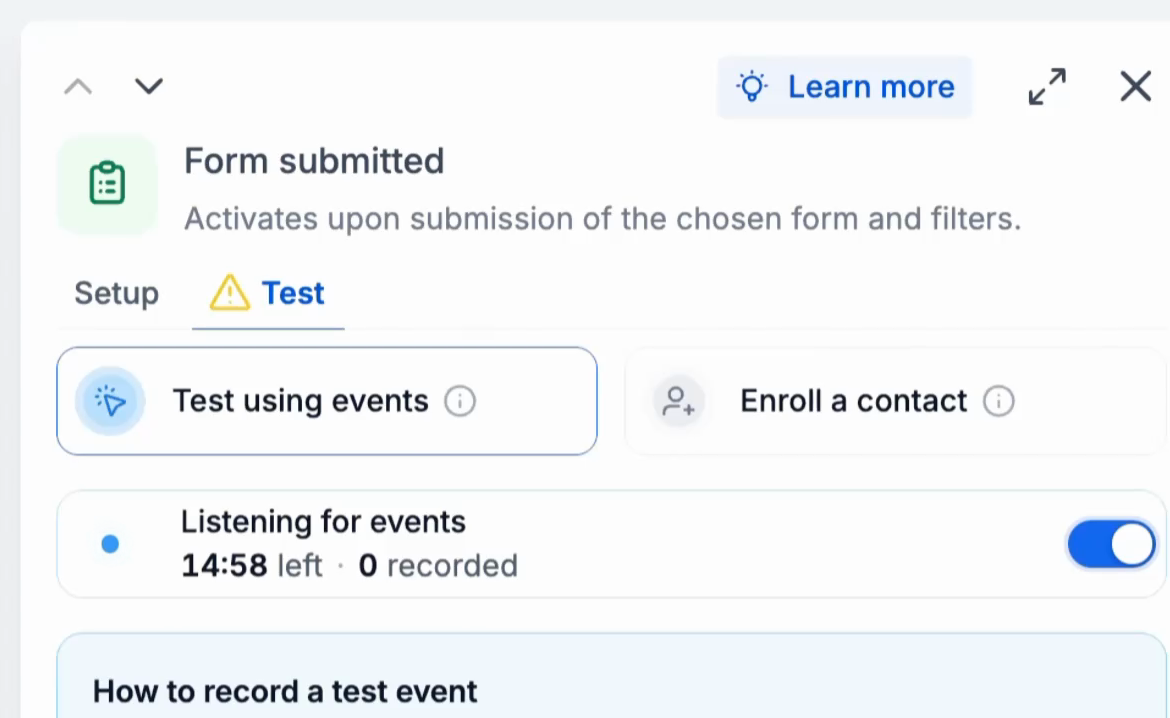
Listening for events, with the remaining time and recorded event count.
Step 3: Fire the Trigger
Generate an event that meets the trigger conditions. In this example, submitting the configured form provides a real event for testing.
- Open the form associated with the Form Submitted trigger.
- Submit the form using controlled test information.
- Return to the trigger's Test panel.
- Find the recorded event under Select event.
- Select the event you want to test.
- Review the information displayed under Event data.
Event data includes the information captured by the trigger, such as submitted form fields and contact details.
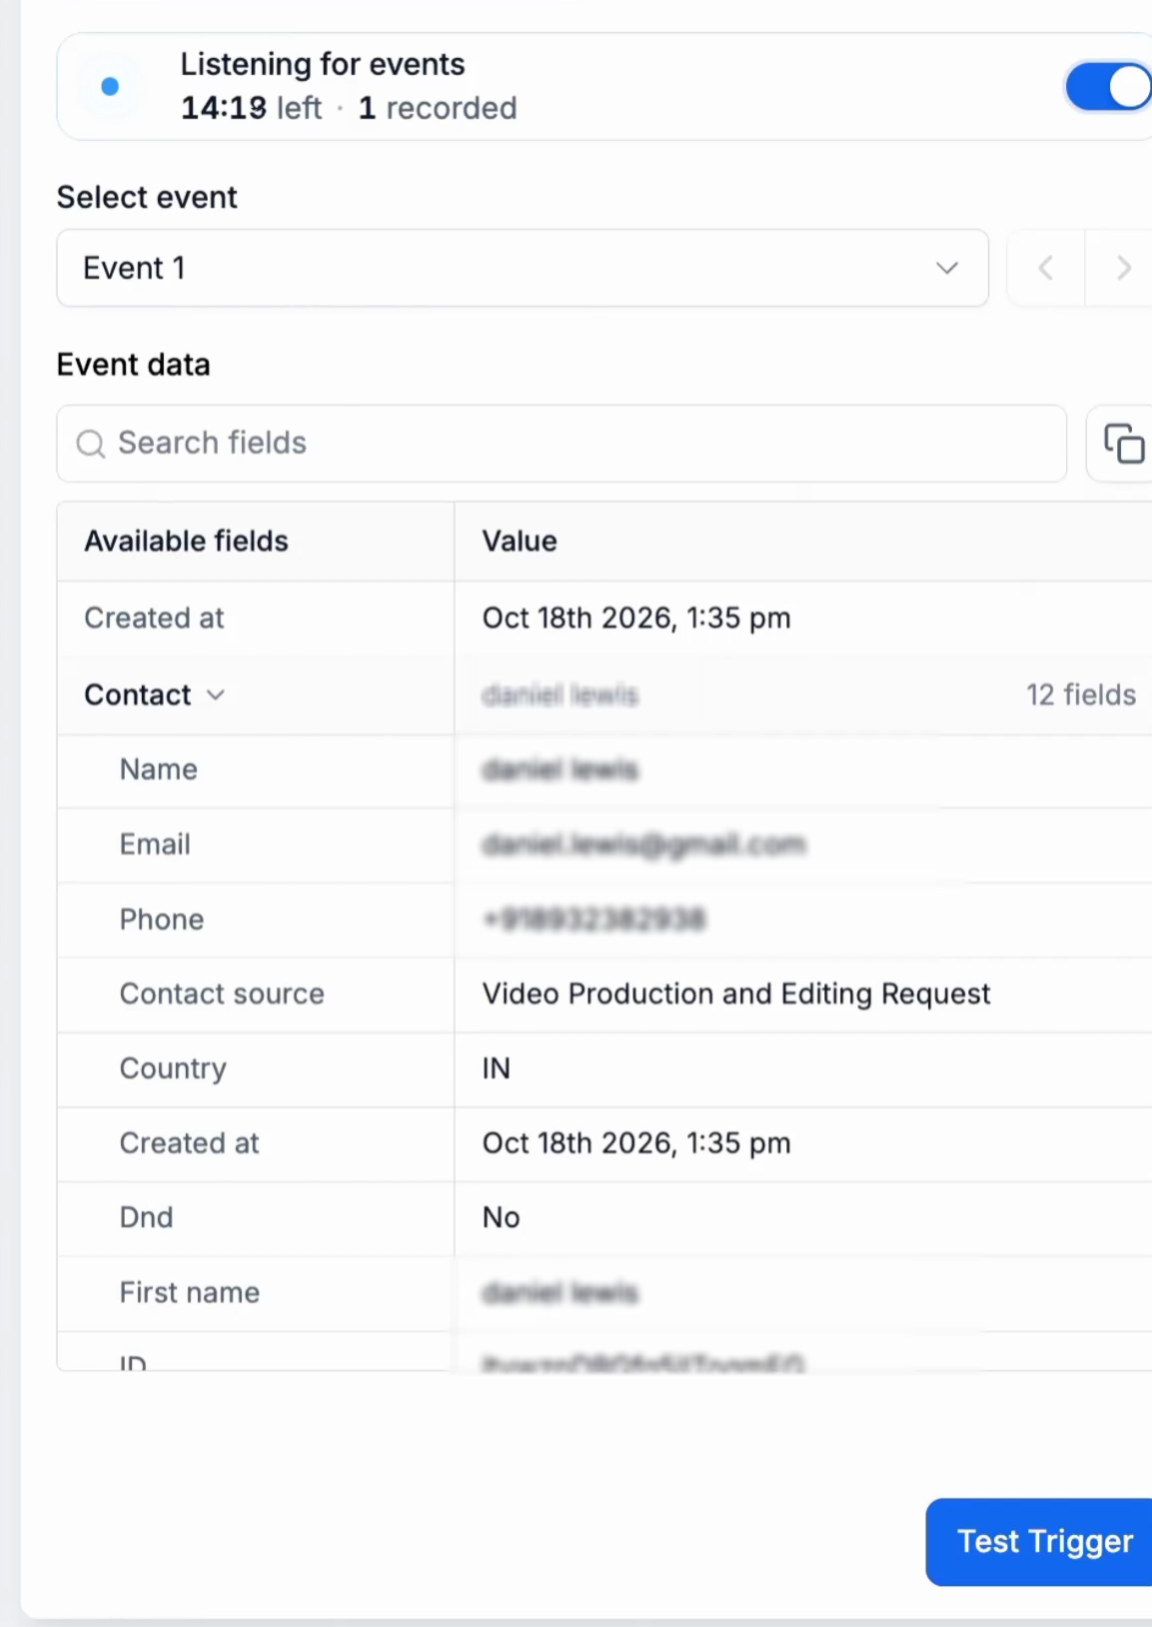
A recorded event and its event data.
Step 4: Click Test Trigger
Testing the trigger verifies the selected event and makes its data available for later action tests.
- After reviewing the event data, click Test Trigger.
- Review the trigger test result.
- When successful, confirm that the panel displays Trigger tested.
- Review the pinned event associated with the successful test.
The pinned event supplies input data when you test individual actions farther down the workflow.
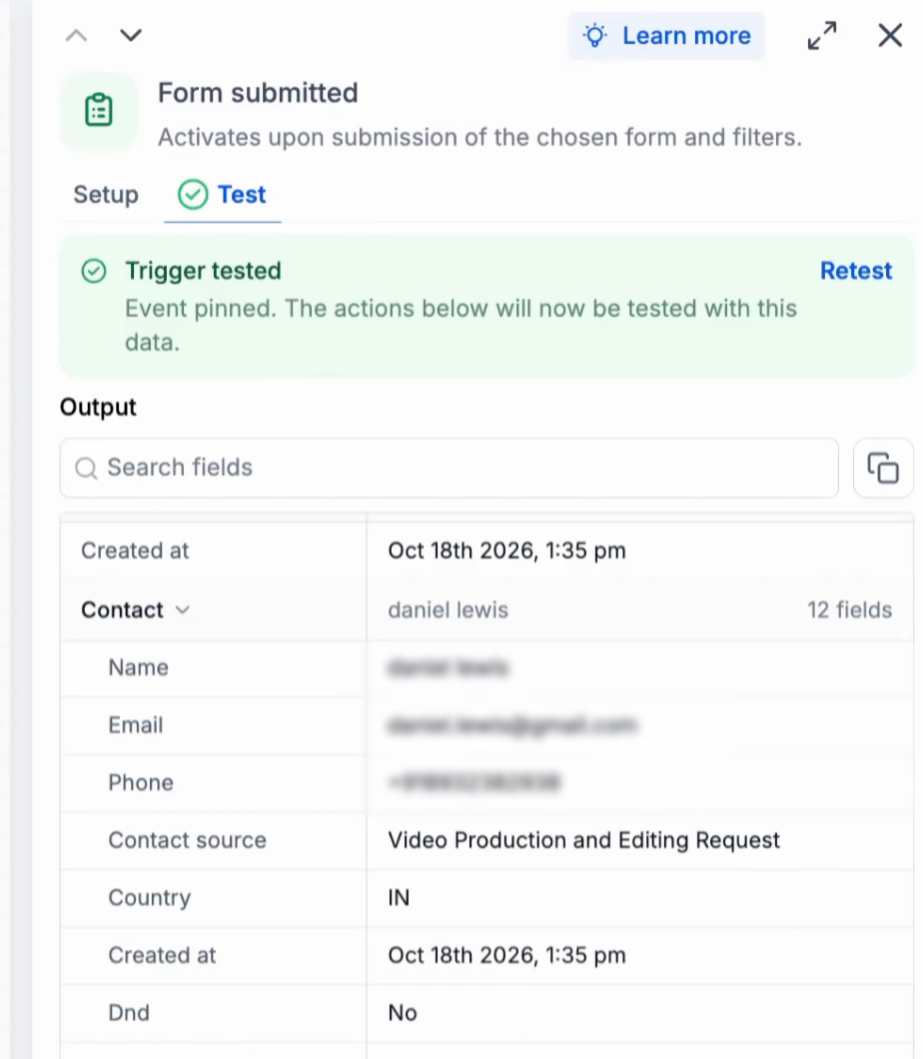
Trigger tested, with the pinned event available as output.
Note: Click Retest to test the trigger again using a different event.
Test an Action
Action testing helps you verify how one workflow action behaves with actual trigger data. You can inspect its inputs and outputs without running the entire workflow.
Before you begin: Test the workflow trigger and click Test Trigger with a selected event. This pins the event data required for the individual action test.
Step 1: Review the Action Setup
Confirm that the action is configured correctly before executing it.
- Click the action you want to test on the workflow canvas.
- Open the Setup tab.
- Review the configured action fields.
Fields containing custom values, such as Contact Full Name, use values from the pinned event during the test.
Step 2: Run the Action Test
Review the input values generated from the pinned event, then execute the selected action.
- Open the action's Test tab.
- Review the Input section.
- Confirm that the action will use the intended values.
- Click Test action.
Important: The action executes for real. Check the input data before testing actions that send messages, create opportunities, or update records.
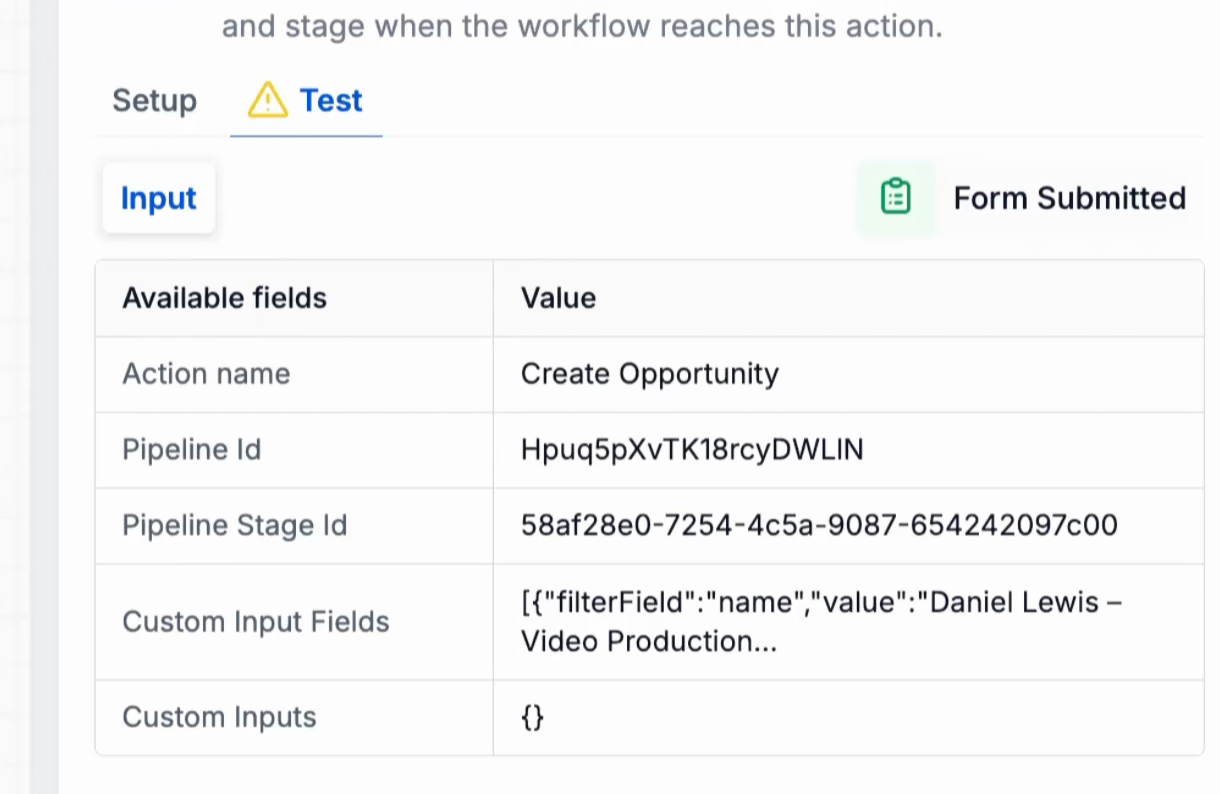
The action's input values populated from the pinned event.
Step 3: Check the Output
After testing, inspect the output to confirm what the action did and which values are available to later workflow steps.
- Review the action test status.
- When successful, confirm that the panel displays Action tested.
- Switch to Output.
- Review the returned fields and values.
For example, a Create Opportunity action can return a success result, a message, and the ID of the created opportunity.
The returned output fields can be used by later workflow steps.
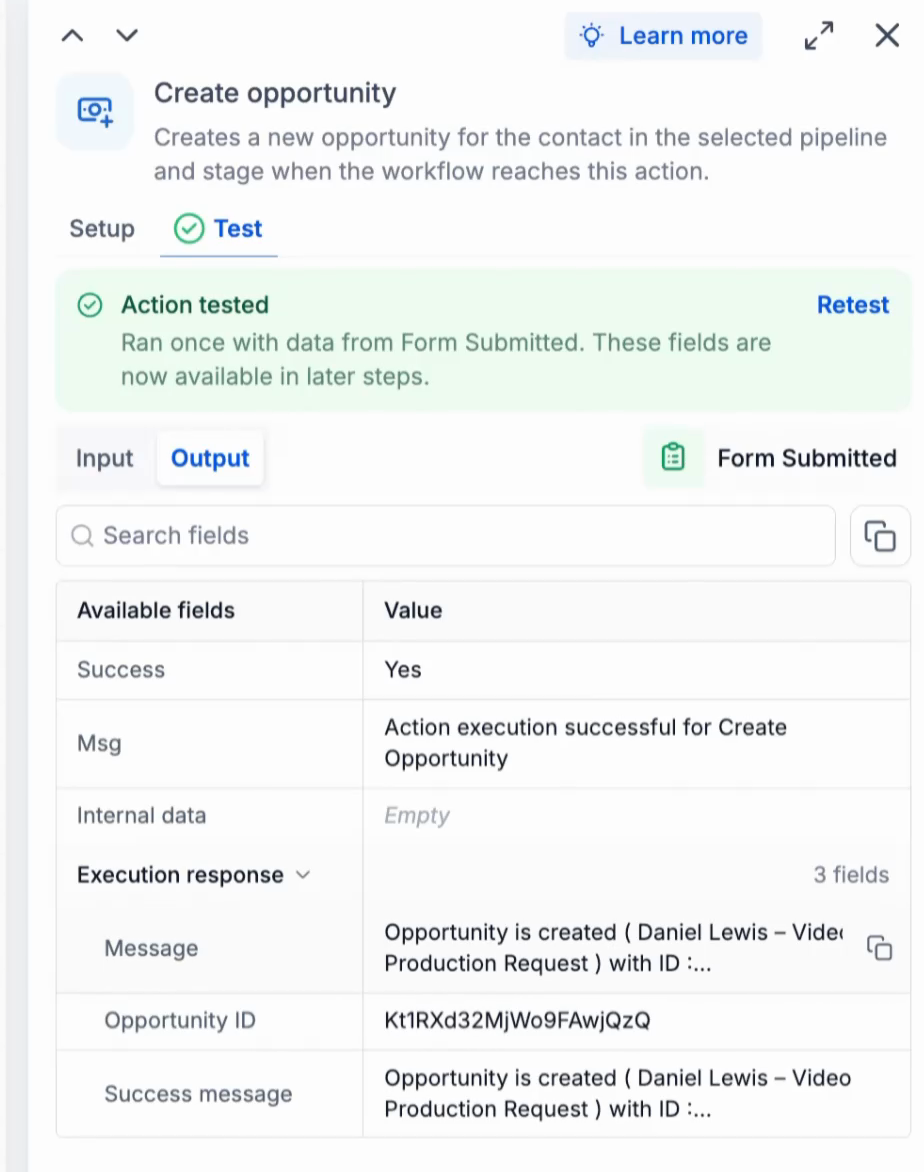
Action tested, with the output of Create Opportunity.
Note: Testing Create Opportunity creates a real opportunity in the configured pipeline.
Test the Whole Workflow
A full-workflow test executes the selected workflow path and displays step-by-step progress. Use it to review how triggers, actions, and their associated data work together.
Step 1: Open Test Workflow
Open the testing panel from the workflow builder.
- Open the workflow you want to test.
- Click Test workflow in the upper-right corner of the builder.
- Review the New test tab in the Test workflow panel.
Step 2: Choose the Trigger and Event
Select the data source and the trigger you want to use for the full-workflow test.
- Choose Test using events or Enroll a contact.
- Under Select Trigger, choose the trigger to test.
- If using events, choose a recorded event under Select event.
- Alternatively, turn on Listen for events to capture a new event.
- Review the selected event data.
- Click Start test run.
Important: A full-workflow test can execute multiple real actions. Review the selected event or contact carefully before starting.
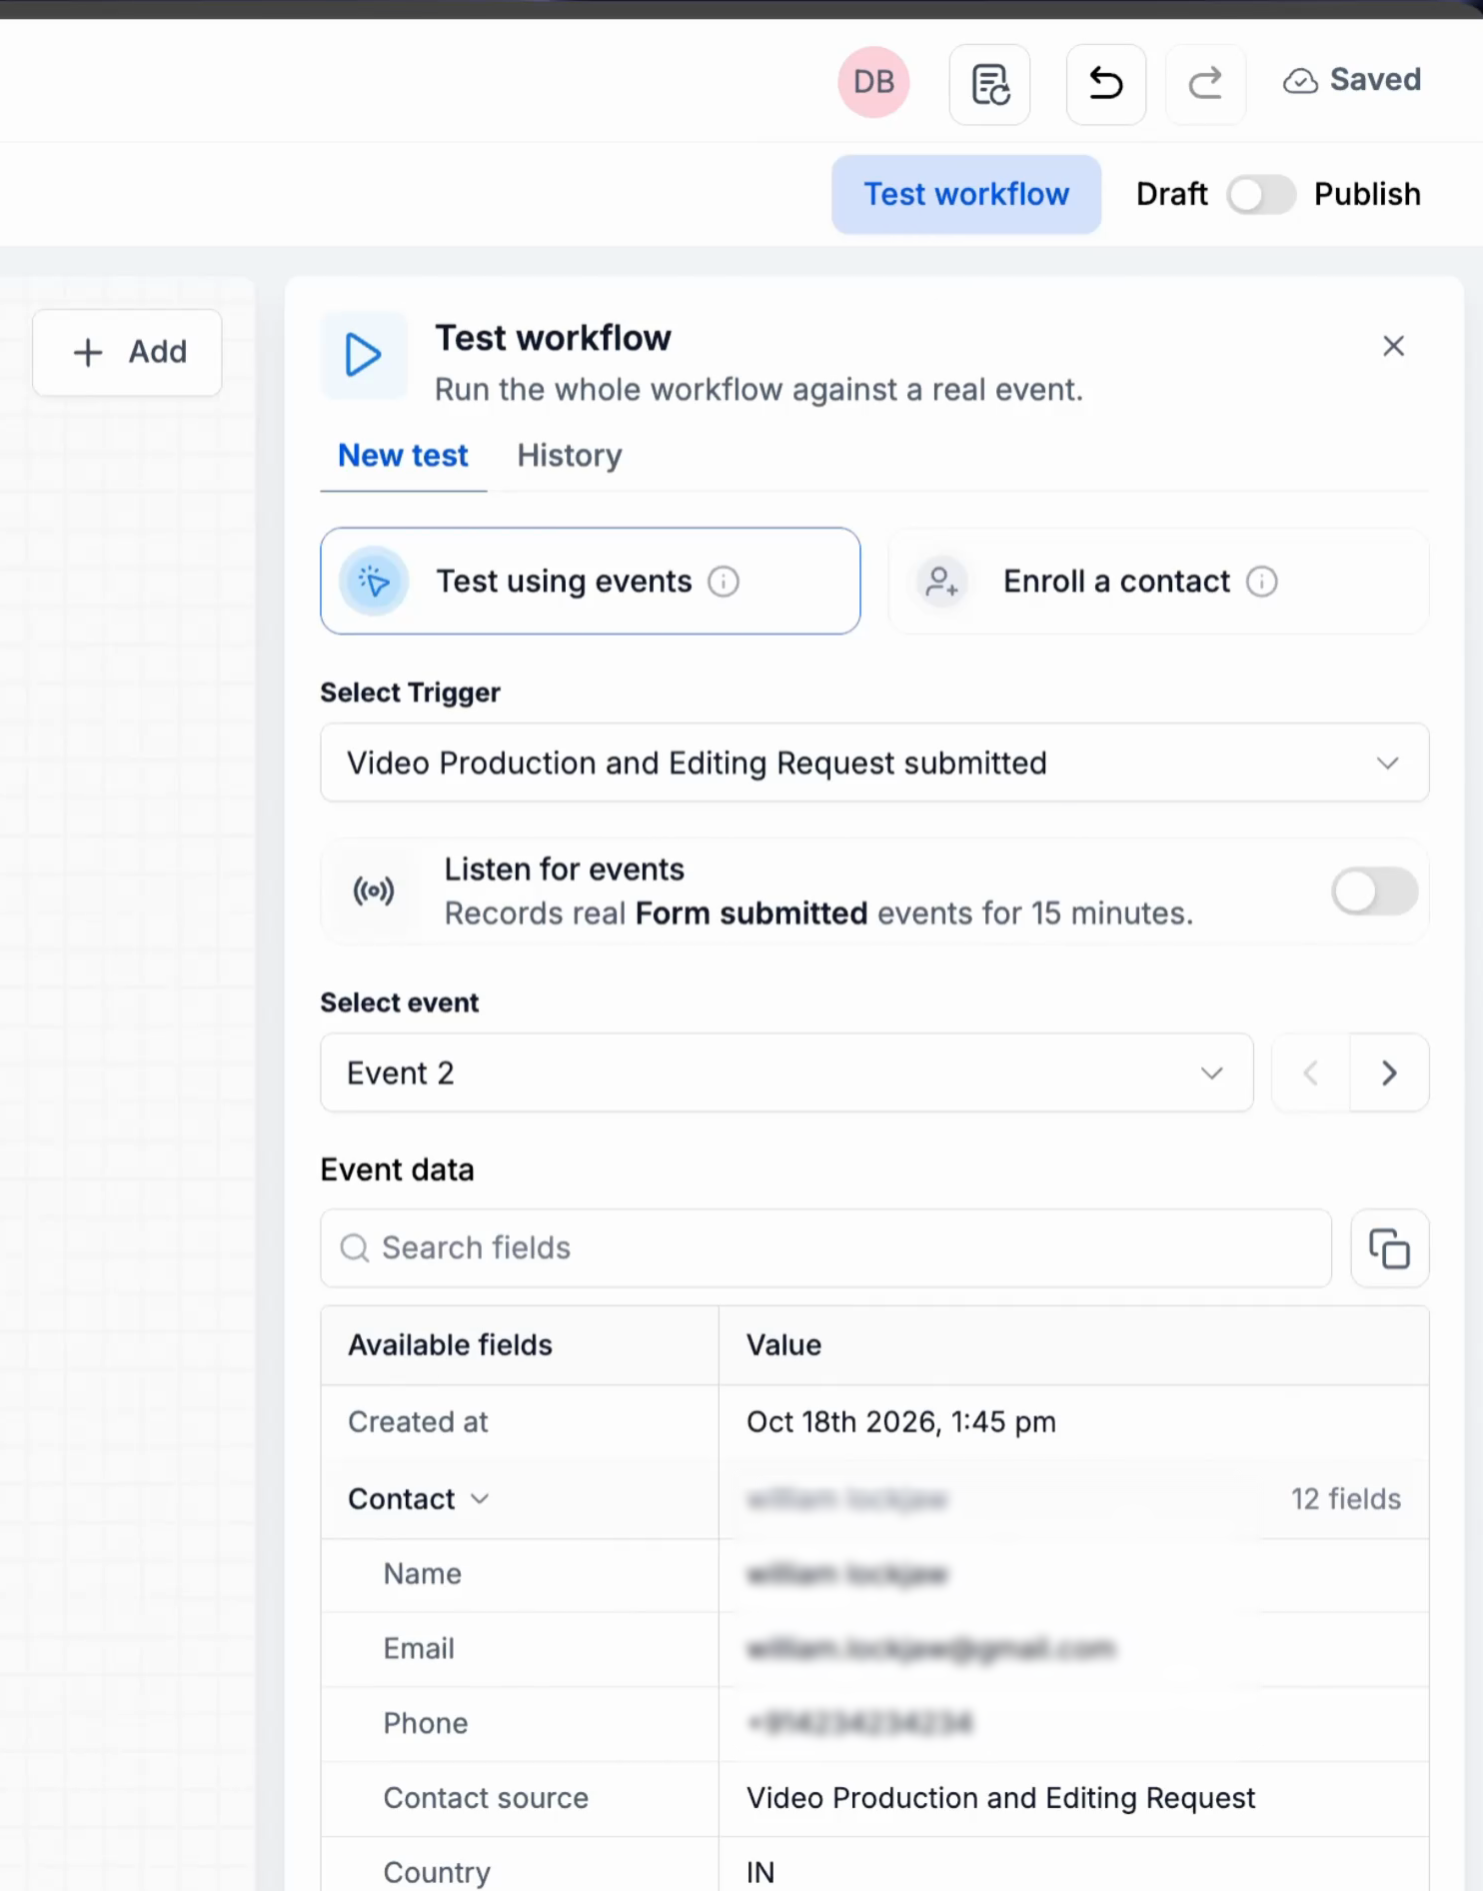
The Test workflow panel with the trigger and event selected.
Step 3: Watch the Run
As the workflow executes, review the status of each action on the canvas.
The workflow runs through its steps, showing their progress as execution continues. Completed steps display their results, while the current step indicates that it is running.
The History tab also shows the active run with the status Test running.
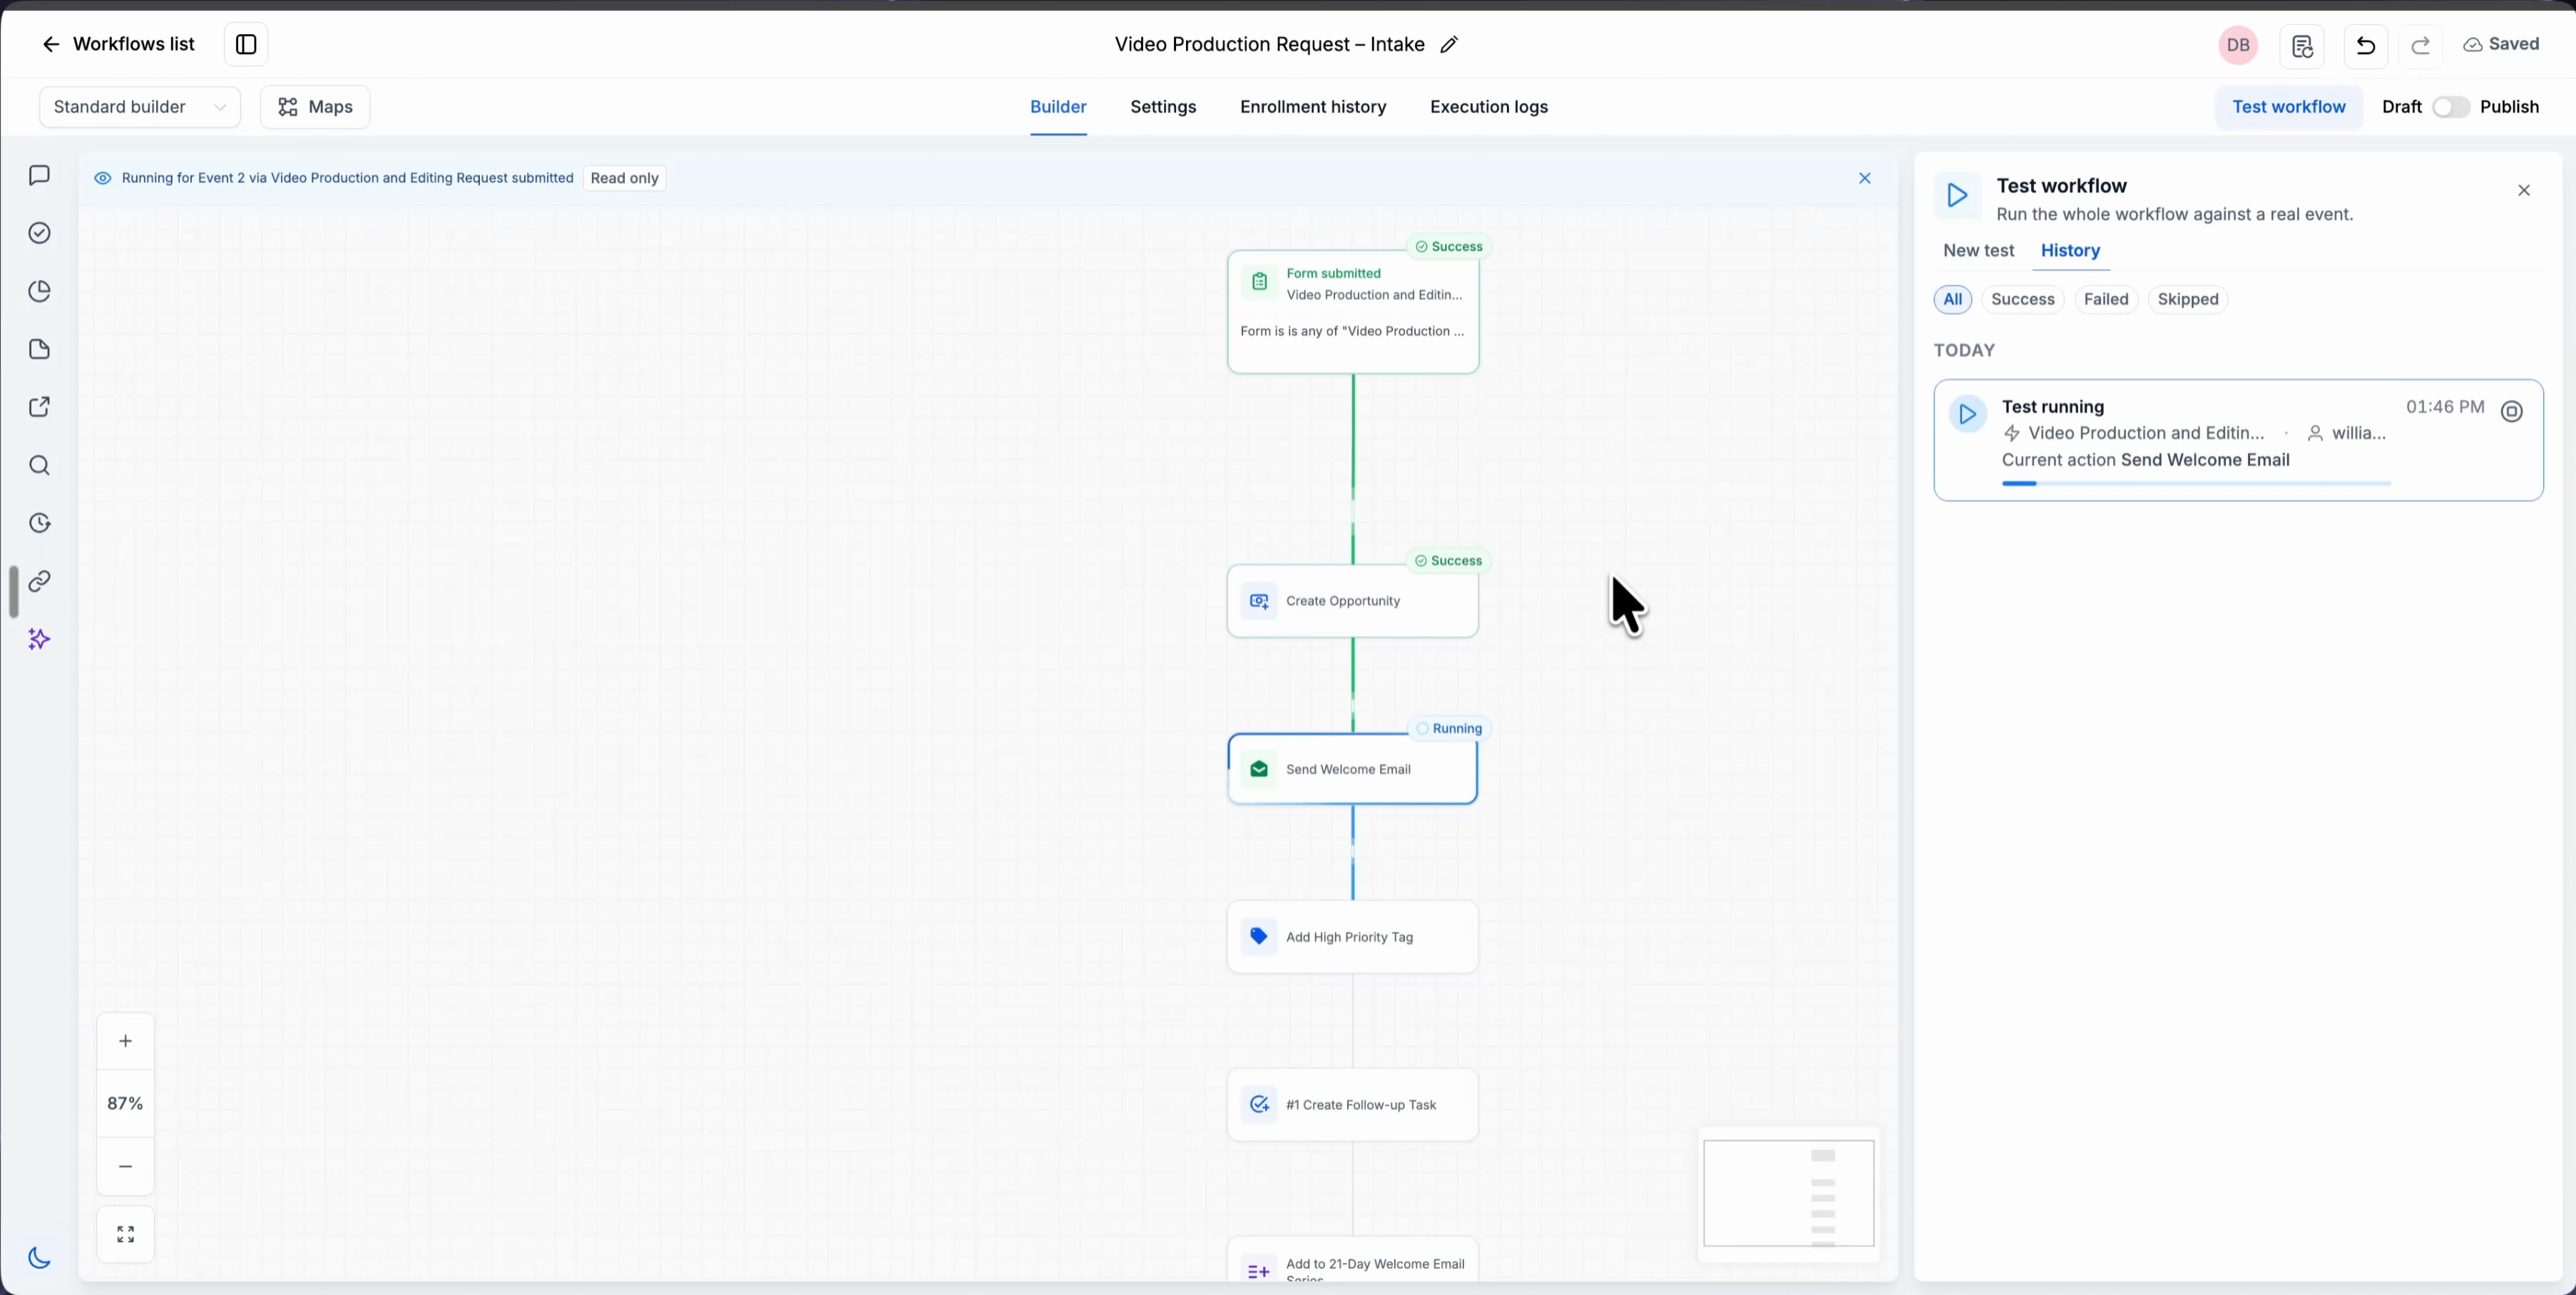
A test run in progress, with completed steps and the currently running action.
Step 4: Review the Result
After the run finishes, inspect the execution results to determine which steps succeeded, failed, or were skipped.
- Review the status displayed on each workflow step.
- Open the History tab to review the final run status.
- Click any step on the canvas to inspect its Input and Output.
- Use the step results to identify the cause of any unexpected behavior.
The final run status may indicate Completed with skipped steps when the workflow finishes without executing every step.
The workflow canvas is read-only while you are reviewing a test run.
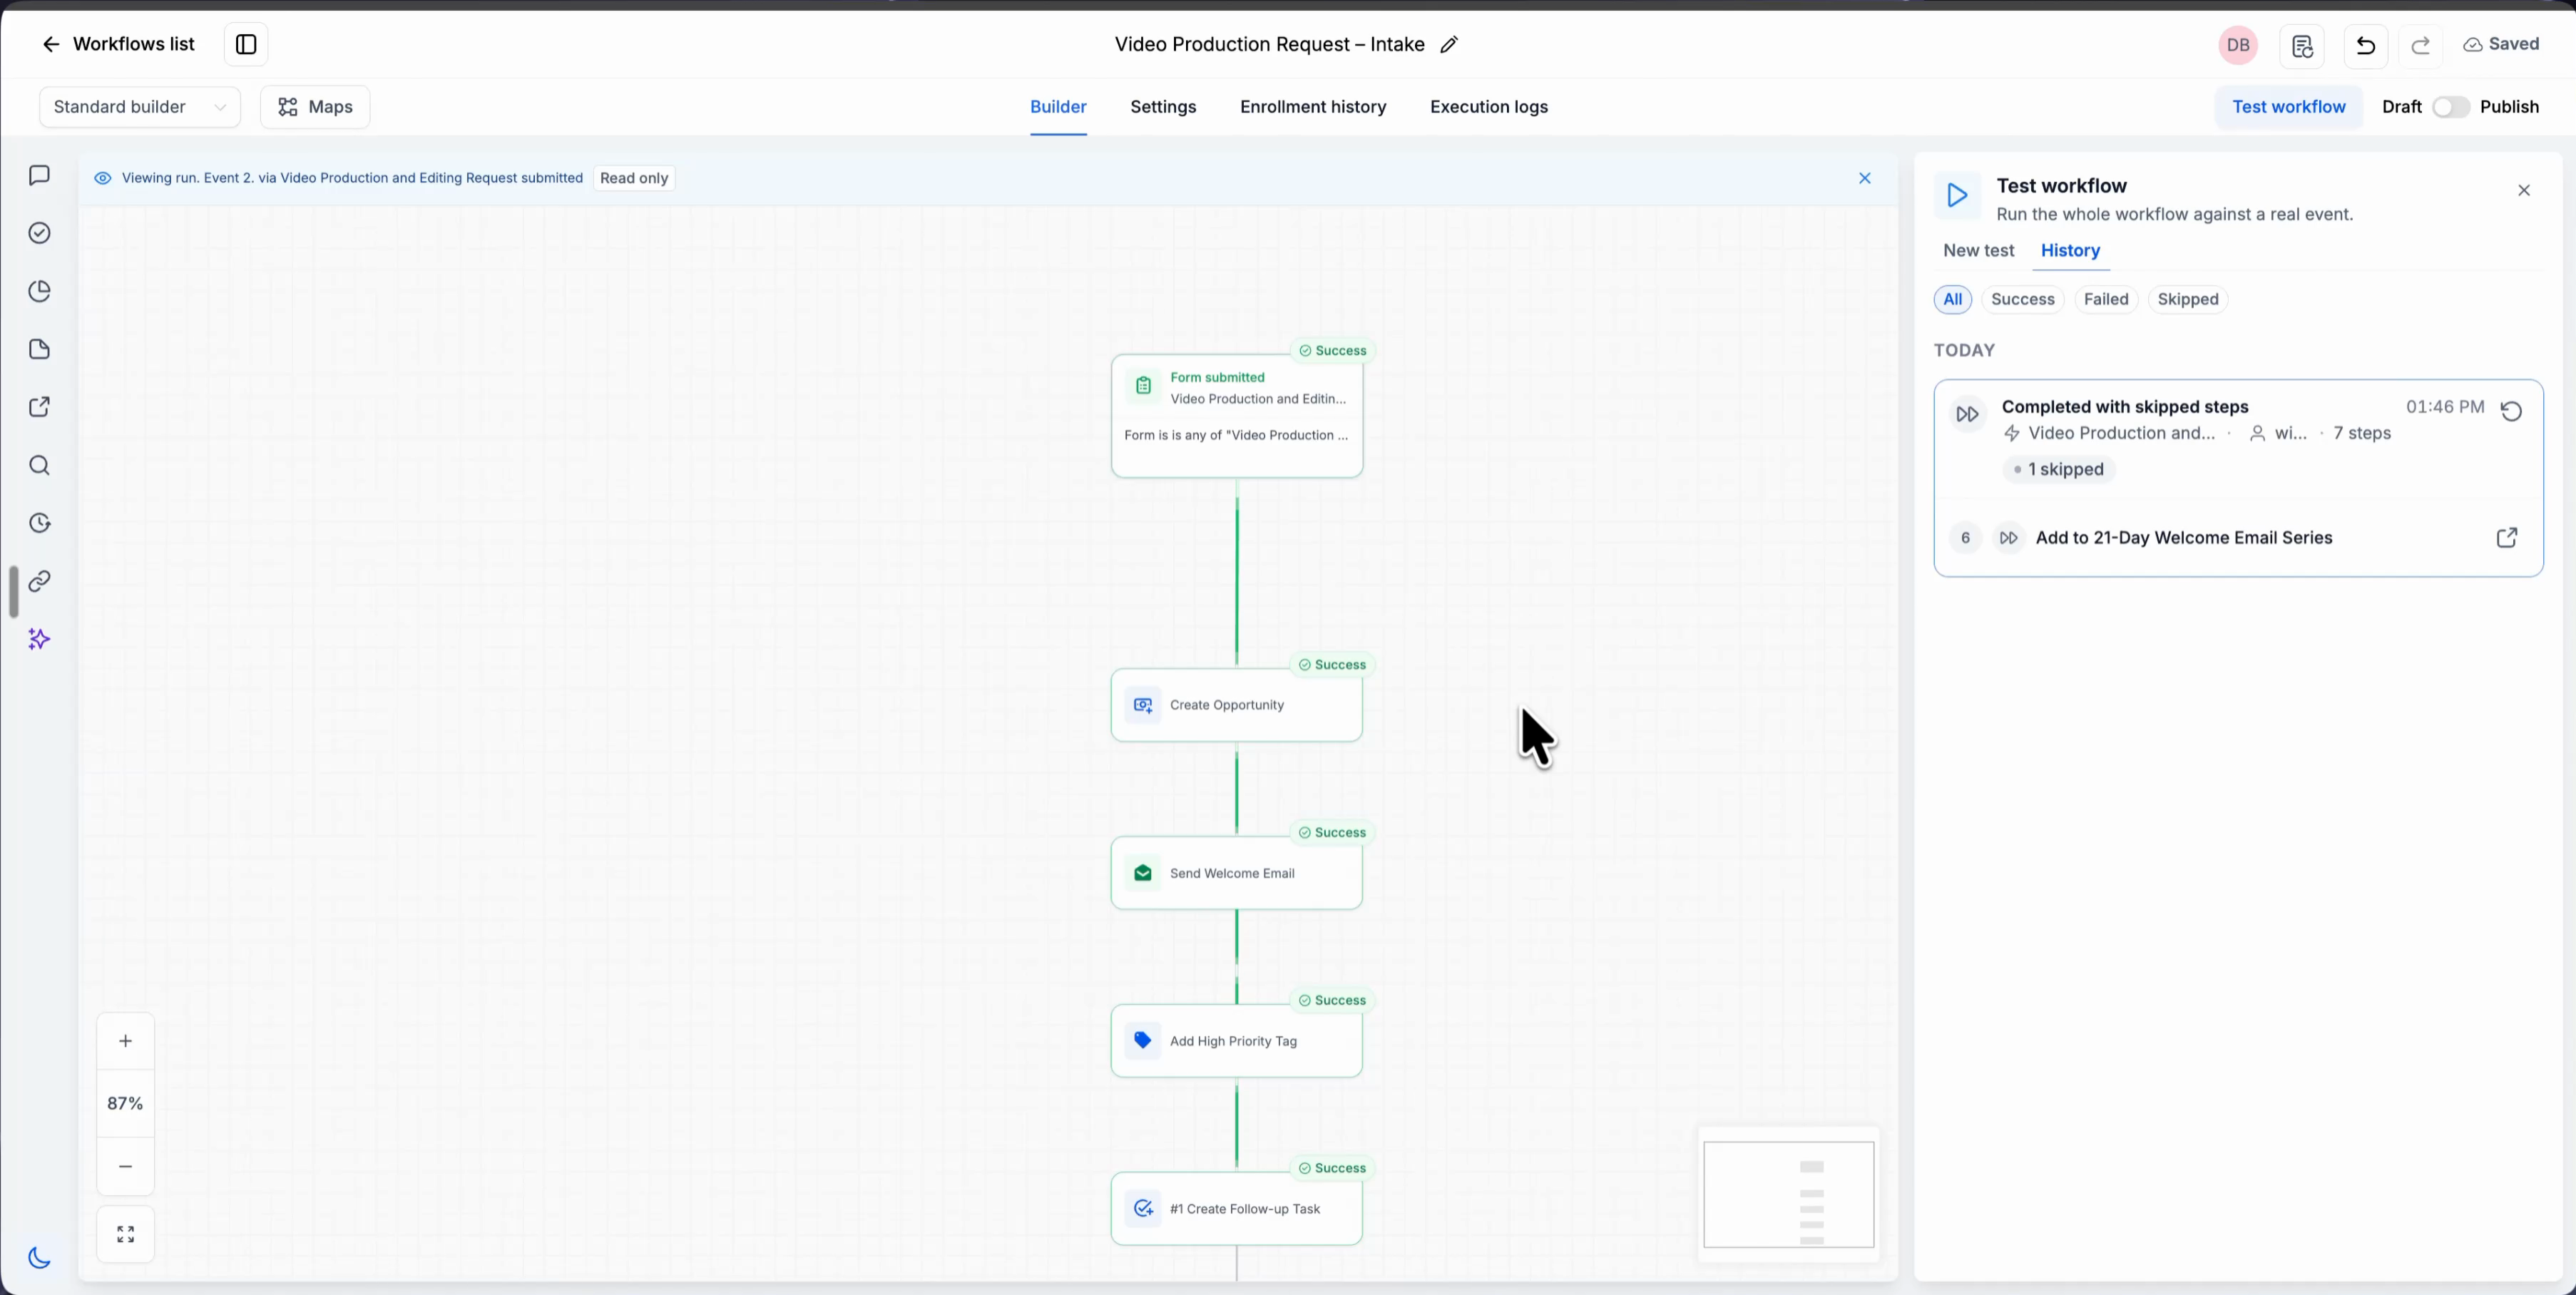
A completed test run showing step statuses on the canvas and the result in History.
Click a step to review the values it received and the results it returned.
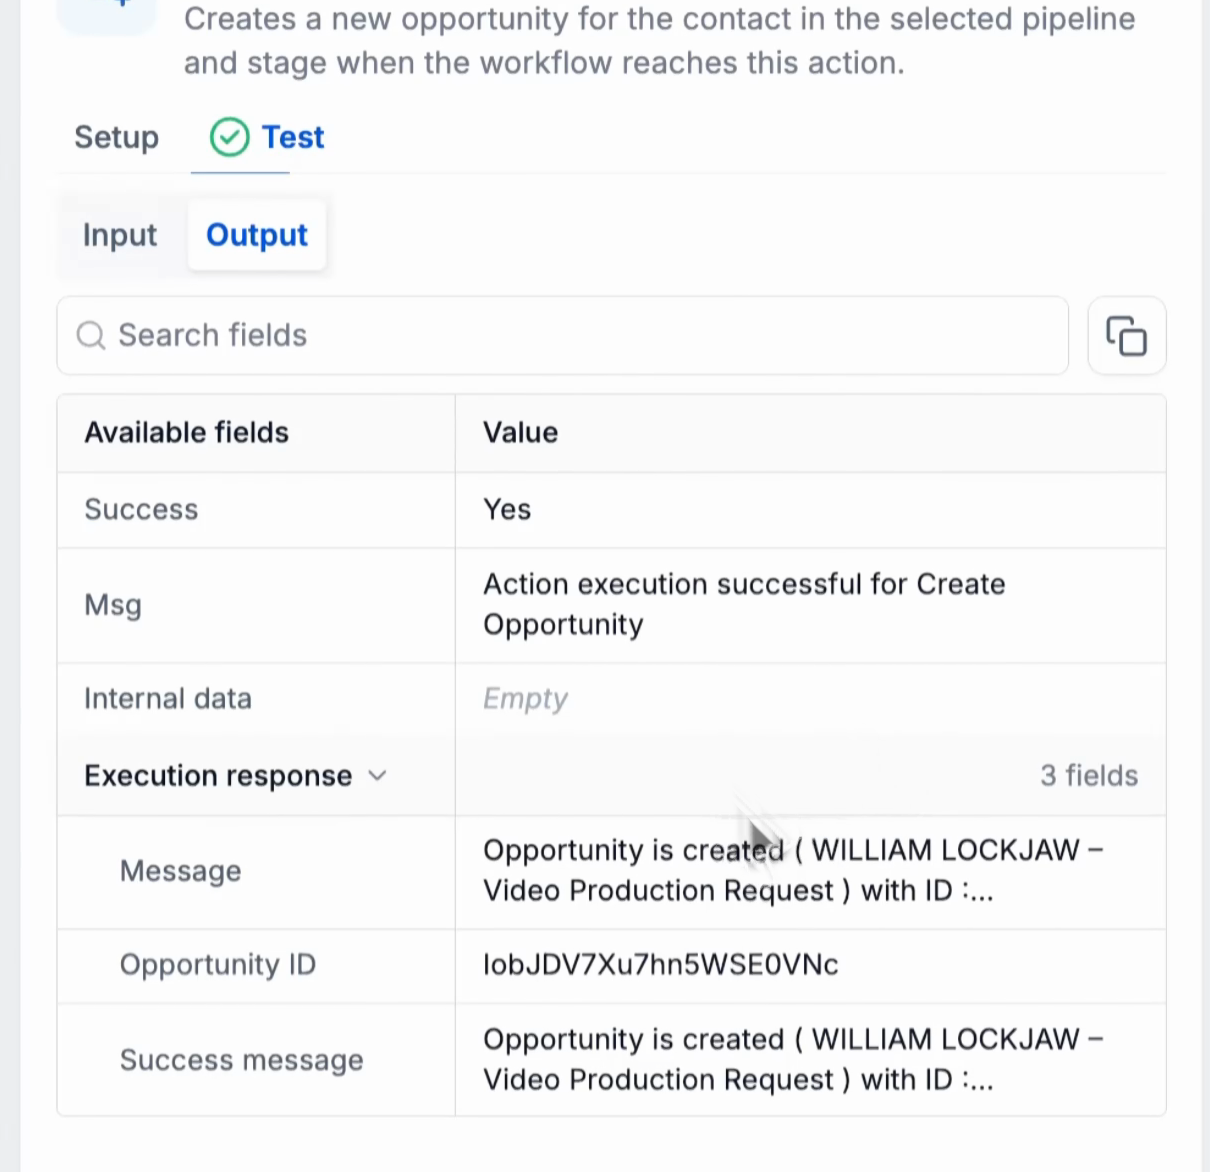
The output of an individual step from a test run.
Step 5: Save and Publish When Ready
After reviewing the results, make any necessary adjustments and save the workflow.
- Review the completed test and confirm that the expected steps succeeded.
- Make any necessary configuration changes.
- Save the workflow.
- When ready for live execution, set the workflow status to Publish.
Note: Testing is optional. You can save and publish a workflow without running a test.
Review History and Retry a Run
The History tab records workflow test runs so you can revisit their results. It also provides a way to repeat a previous test without manually selecting the same data again.
Review Previous Test Runs
Use History to review earlier executions and filter the results by status.
- Click Test workflow in the workflow builder.
- Open the History tab.
- Review the listed test runs and their statuses.
- Use the available filters:
- All
- Success
- Failed
- Skipped
- All
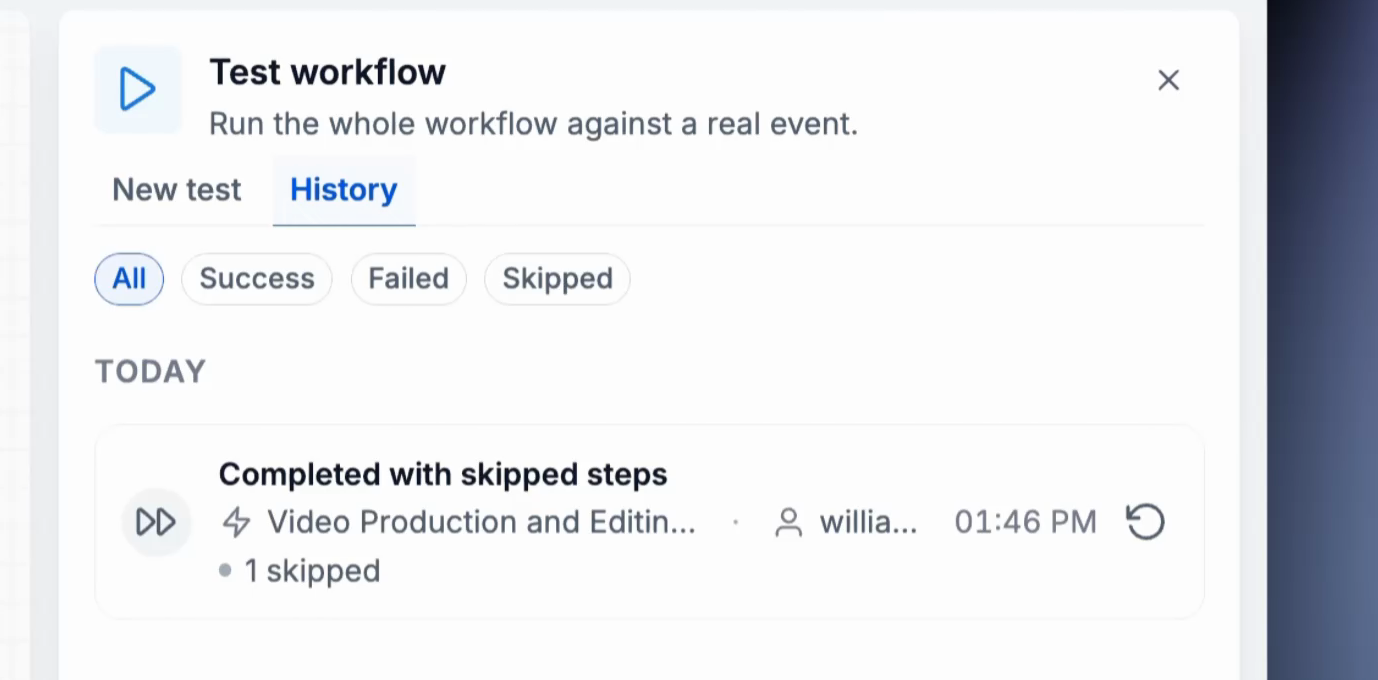
The History tab displaying a previous test run.
Retry a Test Run
Retrying a test repeats the selected execution using the same recorded trigger data and action configuration.
- Open the History tab.
- Find the test run you want to repeat.
- Hover over the run.
- Click Retry run.
- Review the new run in History.
Each retry appears as a separate entry in the test history.
Important: Retrying a test executes the actions again. This may send additional messages, create duplicate records, or repeat other configured changes. Review the expected effects before retrying.
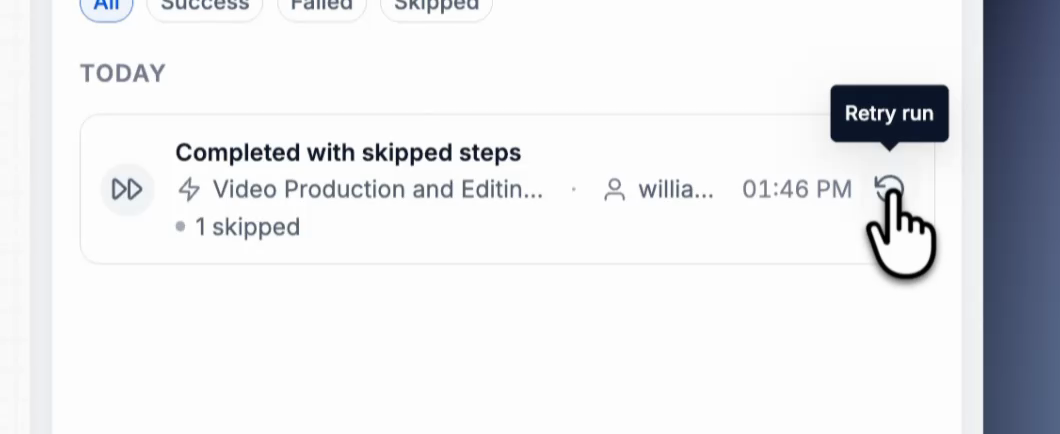
Retry run displayed on a previous test execution.
Run and Step Statuses
Test Workflow displays execution statuses so you can identify whether a test is still running, completed successfully, failed, or skipped certain steps.
| Status | Meaning |
|---|---|
| Test running | The workflow test is in progress. History identifies the currently running step. |
| Success | The step executed and finished without reporting an error. |
| Failed | The step executed and returned an error. Open the step to inspect its output. |
| Action skipped | The action did not execute during this test run. |
| Completed with skipped steps | The workflow test finished, but one or more steps were skipped. |
Things to Know
Review these behaviors before running tests, especially when a workflow sends communications or changes records.
- Tests Execute Real Actions: Emails can be sent, opportunities can be created, and existing records can be updated.
- Testing Is Optional: You can save and publish a workflow without completing a test.
- Pinned Events Stay Available: A pinned event remains available for action testing until you retest the trigger with another event.
- Listening Lasts 15 Minutes: If no matching event arrives during the listening period, enable Listen for events again and generate a new event.
- Retrying Repeats Actions: A retry executes the test again and may repeat its effects.
- Successful Tests Validate the Tested Path: A successful execution demonstrates the behavior of the selected event and workflow path, not every possible scenario.
Use Case
This example shows how a video production team can test a customer-request workflow before publishing it. The workflow starts when a customer submits the Video Production and Editing Request form.
Scenario: Testing a Video Production Request Workflow
A video production team builds a workflow that performs the following actions after a form submission:
- Creates an opportunity in a pipeline.
- Sends a welcome email.
- Adds a High Priority tag.
- Creates a follow-up task.
Testing the Workflow
The team uses controlled test data to verify the trigger and actions.
- Open the Form Submitted trigger.
- Turn on Listen for events.
- Submit the request form using test information.
- Select the recorded event and click Test Trigger.
- Open the Create Opportunity action and test it using the pinned event.
- Confirm that the opportunity appears in the expected pipeline with the correct information.
- Open Test workflow and run the complete workflow using another recorded event.
- Review each step's result and correct any problems before publishing.
The completed test helps the team confirm that the exercised workflow path creates the expected records and performs its configured actions.
Frequently Asked Questions
Q: Does a test send real emails or create real records?
Yes. Tests execute the configured actions. Testing Send Email sends an actual email, and testing Create Opportunity creates an opportunity. Use controlled test information to avoid unintended customer communications or record changes.
Q: What if no event arrives while I'm listening?
Listen for events records matching events for 15 minutes. If no event arrives, enable listening again and generate the trigger event, such as submitting the configured form.
Q: Can I test without firing a real trigger event?
Yes. Choose Enroll a contact in the available testing controls. The test runs for the selected contact as though the trigger fired for that contact.
Q: Do I need to test the trigger before testing an individual action?
Yes. Individual action testing uses input data from the pinned trigger event. Test the trigger first, then use its pinned event data to test actions.
Q: Do I need to test every step before publishing a workflow?
No. Testing is optional. You can save and publish a workflow without running a test.
Q: Where can I review previous workflow tests?
Click Test workflow and open the History tab. Review previous executions and use the available filters for All, Success, Failed, and Skipped.
Q: What happens when I click Retry run?
Retry run repeats the test using the same recorded trigger data and action configuration. The retry appears as a new entry in History and executes the configured actions again.
Need Help?
If a workflow test does not start, produces an unexpected result, or fails during execution, review the trigger event, action inputs, and execution results. These checks can help identify configuration issues before you publish the workflow.
- Test Workflow Is Unavailable: Open Automation > Workflows and select the workflow you want to test. If the documented testing controls are missing, contact support to confirm feature availability.
- No Trigger Events Are Recorded: Confirm that Listen for events is enabled and generate an event that matches the trigger. Listening lasts 15 minutes. If the period expires, enable listening again and repeat the event.
- Cannot Test an Individual Action: Test the workflow trigger first. Select a recorded event and click Test Trigger to pin the event data. Then open the action's Test tab.
- Action Uses Unexpected Values: Review the pinned trigger event and the action's Input section. Confirm that the configured fields contain the expected values before running another test.
- A Workflow Step Failed: Open the failed step on the test canvas. Review its Input and Output sections to identify the returned error or unexpected result.
- Some Actions Were Skipped: Review the completed test run and the status of each step. Open the relevant steps to inspect the available execution details.
- Cannot Find a Previous Test: Click Test workflow and open the History tab. Review previous runs or use the available status filters.
- A Retried Test Repeated an Action: The Retry run option executes the test again using the same trigger data and action configuration. It can send additional messages, create records, or repeat other configured actions.
Important: Workflow tests execute real actions. Use controlled test data and review the expected effects before starting or retrying a test.
If the issue continues, contact support with the workflow name, selected trigger, affected action, test-run status, relevant error details, and screenshots. Avoid including sensitive contact information or private credentials.