
The Wait action in workflows helps control when the next step in a workflow should happen. It can pause a contact for a fixed duration, wait until a specific date, follow a recurring schedule, wait around an appointment or booking, hold for a reply from the contact or a team member, wait for a contact action, or continue only when custom conditions are met. This guide explains each Wait option, how to configure it, and when to use it so your workflow timing stays accurate, relevant, and easy to manage.
TABLE OF CONTENTS
- What is the Wait Action in Workflows?
- Key Benefits of the Wait Action in Workflows
- Wait Action Details
- When Should You Use the Wait Action?
- How To Set Up the Wait Action
- Configure a Set Period of Time
- Configure a Specific Date and Time
- Configure a Recurring Schedule
- Configure an Upcoming Appointment or Booking
- Configure the Contact to Reply
- Configure the Contact to Take an Action
- Configure Specific Conditions to be Met
- Configure a User to Reply
- Examples of the Wait Action
- Frequently Asked Questions
- Need Help?
What is the Wait Action in Workflows?
The Wait action gives you control over timing inside an automation. Instead of sending every message or running every workflow step immediately, you can pause contacts until the timing, event, reply, action, or condition makes sense for the customer journey.
The Wait action holds a contact in the workflow for:
- A specified amount of time, such as 1 day, 1 hour, or 5 minutes.
- A specific date and time, such as December 4 at 9:00 AM, either entered directly or pulled from a contact field.
- A recurring schedule, such as every Tuesday, the 15th of each month, or January 1 every year.
- An upcoming appointment, service booking, or invoice due date, such as 1 hour before a scheduled appointment.
- Until a condition is met, such as when a contact replies or a specific event occurs.
- Until a member of your team replies to the contact, with an optional timeout if no one responds.
- During a specified time window, such as between 9:00 AM and 5:00 PM on weekdays.
This helps ensure your communication and workflow steps happen at the right moment, improving efficiency and creating a better experience for contacts.
Key Benefits of the Wait Action in Workflows
The Wait action helps you deliver messages and run workflow actions at appropriate times. Choosing the correct wait condition keeps automation aligned with contact activity, scheduled events, and team responses.
- Improved timing: Pause contacts until the right moment before sending messages, assigning tasks, updating records, or continuing workflow steps.
- More relevant communication: Send follow-ups based on replies, trigger link clicks, email engagement, appointment times, invoice due dates, or custom conditions.
- Flexible scheduling: Use fixed delays, specific dates, recurring schedules, appointment-based timing, reply waits, action waits, or condition-based waits.
- Dynamic personalization: Use custom variables so dates, times, units, or durations can change based on each contact's record.
- Controlled delivery windows: Resume contacts only on selected days, during selected hours, or when additional date filters are met.
- Better workflow organization: Name each Wait step clearly so timing logic is easier to review, test, and maintain.
- AI-assisted editing: Use Workflow AI Builder to update supported time delays, window settings, reply conditions, timeout branches, and wait configurations through conversation.
Wait Action Details
The available Wait options determine which event or condition releases a contact to the next workflow step. Review the settings below to choose the correct configuration.
| Wait For | Description | Advanced |
|---|---|---|
| A set period of time | Holds the contact for a fixed duration before continuing. | 1. Time period and Unit: Seconds, minutes, hours, or days. 2. Standard or Dynamic value: Dynamic accepts a custom variable. 3. Advance Window: Resume On, Resume Between Hours, Additional Filter. |
| A specific date and time | Holds the contact until an exact date and time. The date can be fixed or pulled dynamically from a custom variable. | 1. Date and time: Follows the account's date format preference. 2. Standard or Dynamic value 3. When should the Contact proceed: On this date and time, Before this date, After this date. 4. If this date has already passed: Continue to next action, Exit Contact from automation, Go to specific step, or Skip all outbound communication actions till next wait or event start date action. |
| A recurring schedule | Holds the contact until the next occurrence of a repeating pattern, such as every Tuesday, the 15th of each month, or January 1 every year. | 1. Frequency: Weekly, Monthly, or Yearly. 2. Weekly: On these days and Time. 3. Monthly: Specific day or Nth weekday of selected months, plus Time. 4. Yearly: On this date every year, plus Time. 5. When should the Contact proceed: On this date and time, Before this date, After this date. Preview the next five scheduled recurrences. |
| An upcoming appointment or booking | Holds the contact until before, at, or after a scheduled appointment, service booking, or invoice due date. | 1. Type: Appointment / Calendar Event, Service Booking, or Invoice Due Date. 2. When should the Contact proceed: At the scheduled time, Before, or After. Set the duration in months, days, hours, and minutes. 3. If this date has already passed: Continue to next action, Go to specific step, Exit Contact from automation, or Skip all outbound communication actions till next wait or event start date action. |
| The contact to reply | Holds the contact until they reply on a selected channel, such as SMS or Email. | 1. Reply To channel: SMS, Email, or another supported channel. 2. Timeout: On or off, with an optional duration. |
| The contact to take an action | Holds the contact until they click a trigger link or interact with a sent email. | 1. What action: Clicks a trigger link or Email event, such as open, click, or bounce. 2. Selection: Trigger link or email step. 3. Timeout: On or off, with an optional duration. |
| Specific conditions to be met | Holds the contact until a custom segment built from available fields evaluates as true. | 1. Conditions: Joined using AND/OR logic. 2. Controls: Add Segment and Add Condition. 3. Timeout: On or off, with an optional duration. |
| A user to reply | Holds the contact until a team member replies on a selected channel. | 1. Reply channel: SMS, Email, or another supported channel. 2. Which user: Optional selection of the assigned user or specific users. 3. Timeout: On or off, with an optional duration. |
When Should You Use the Wait Action?
The Wait action is useful whenever workflow timing should depend on a delay, schedule, appointment, customer behavior, or custom qualification logic. These use cases help automation feel timely and aligned with each contact's journey.
- Timely follow-ups: Send an email or SMS at an appropriate time after a customer inquiry.
- Conditional triggers: Hold a contact until a specific condition is met, such as completing a form or making a payment.
- Controlled scheduling: Avoid sending messages during off-hours or weekends by resuming only during specified times.
- Date-driven reminders: Hold until a renewal date, contract expiration, or anniversary stored on a contact record.
- Recurring touchpoints: Reach contacts on a repeating cadence, such as every Monday, the first of the month, or once a year.
- Pre-appointment reminders: Send a message before an appointment, service booking, or invoice due date.
- AI-assisted workflow editing: Use Workflow AI Builder to edit supported Wait configurations, timeout branches, time delays, and reply conditions.
- Response-time monitoring: Wait for a team member to reply, then use a timeout path to escalate when no one responds.
How To Set Up the Wait Action
A well-configured Wait action helps contacts pause and resume at the intended time. Naming the action clearly, selecting the correct wait type, configuring fallback behavior, and testing the workflow can help prevent timing issues.
- Go to Automation.
- Click Workflows.
- Click + Create Workflow in the top-right corner.
- Select + Start from scratch.

- Set up the trigger for the workflow. For example, use Contact created.
- Click the + icon to add a workflow step.
- In the actions menu, scroll down or search for Wait.
- Select the Wait action.
- Name the action with a descriptive label, such as Wait - 1 Day After Sign-Up.
- Select what the contact should wait for. Choose from the following eight options:
- A set period of time: Example: 2 days, 6 hours, or 30 minutes.
- A specific date and time: Example: December 4 at 9:00 AM.
- A recurring schedule: Example: Every Tuesday or the 15th of each month.
- An upcoming appointment or booking: Example: 1 hour before an appointment.
- The contact to reply: Wait for a contact response on a supported channel.
- The contact to take an action: Example: Click a trigger link or open an email.
- Specific conditions to be met: Build a custom segment using available fields.
- A user to reply: Wait until a team member responds to the contact.
- A set period of time: Example: 2 days, 6 hours, or 30 minutes.
- Configure the selected Wait option.
- Save the Wait action and workflow changes. Review the configuration, test the workflow, and publish it when ready.

Tip: When a Wait action is placed directly after a Send action, such as SMS, Email, or WhatsApp, The contact to reply moves to the top of the options list.
Tip: When the workflow trigger is appointment-based, An upcoming appointment or booking displays an information banner referencing the trigger appointment.
Configure a Set Period of Time
Fixed delays are useful when every contact should wait the same amount of time or when the duration should be calculated dynamically from a custom variable.
- Select A set period of time.
- Enter the Time period, such as 1, 5, or 30.
- Select the Unit, such as seconds, minutes, hours, or days.
- Use the three-dot menu next to Time period or Unitto switch between:
- Standard: A fixed value entered manually.
- Dynamic: A custom variable resolved at runtime.
- Standard: A fixed value entered manually.
- To limit when contacts can resume, toggle on Advance Window.
- Configure the available Advance Window options:
- Resume On: Choose specific weekdays.
- Resume Between Hours: Define a time window or exact start time.
- Additional Filter: Add granular date conditions, such as a specific day, month, or year.
- Resume On: Choose specific weekdays.
- Save the Wait step.

Configure a Specific Date and Time
Specific date waits are useful for reminders, renewals, anniversaries, contract dates, or any workflow action that should run around a known date.
- Select A specific date and time.
- Choose the exact Date and time the contact should wait for. The picker follows the account's date format preference.
- Use the three-dot menu next to the field to choose:
- Standard: A fixed date you select.
- Dynamic: A custom variable that reads the date from a contact field at runtime.
- Standard: A fixed date you select.
- If using Dynamic, enter a custom variable that resolves to a valid date.
- Under When should the Contact proceed?, choose:
- On this date and time
- Before this date
- After this date
- On this date and time
- If choosing Before this date or After this date, enter the required duration.
- Under If this date has already passed, choose:
- Continue to next action
- Exit Contact from automation
- Go to specific step
- Skip all outbound communication actions till next wait or event start date action
- Continue to next action
- Save the Wait step.

Configure a Recurring Schedule
Recurring schedules are useful for repeated touchpoints that should happen on a weekly, monthly, or yearly cadence. They help you avoid creating separate workflows for each scheduled occurrence.
- Select A recurring schedule.
- Choose a Frequency:
- Weekly
- Monthly
- Yearly
- Weekly
- For Weekly, select one or more days under On these days, then choose a time.
- For Monthly, choose either:
- A specific day of the month, such as Day 1 or Day 15.
- The 1st, 2nd, 3rd, 4th, or Last weekday of selected months.
- For Monthly, select the month or months and choose a time.
- For Monthly, stack multiple ordinals if needed, such as the 1st and 3rd Tuesday.
- For Yearly, choose the month and day under On this date every year, then choose a time.
- Under When should the Contact proceed?, choose:
- On this date and time
- Before this date
- After this date
- On this date and time
- Review the Next 5 scheduled recurrences preview to verify the schedule.
- Save the Wait step.

Configure an Upcoming Appointment or Booking
Appointment and booking waits help schedule reminders, follow-ups, and due-date communications relative to a specific event.
- Select An upcoming appointment or booking.
- Choose the Type:
- Appointment / Calendar Event
- Service Booking
- Invoice Due Date
- Appointment / Calendar Event
- Service Booking is hidden if Service Booking is disabled for the location.
- Under When should the Contact proceed?, choose:
- At the scheduled time
- Before
- After
- At the scheduled time
- If choosing Before or After, enter the duration in months, days, hours, and minutes.
- Under If this date has already passed, choose:
- Continue to next action
- Go to specific step
- Exit Contact from automation
- Skip all outbound communication actions till next wait or event start date action
- Continue to next action
- Save the Wait step.

Configure the Contact to Reply
Reply-based waits help control when a workflow continues based on whether a contact responds to a message.
- Select The contact to reply.
- Choose the Reply To channel, such as SMS or Email. A corresponding Send Email or Send SMS action must appear before this Wait step.
- Toggle Timeout on if the contact should move forward after a set duration even without a reply.
- Configure the timeout duration when Timeout is enabled.
- Save the Wait step.

Configure the Contact to Take an Action
Action-based waits help a workflow react to engagement, such as a trigger link click or an email event.
- Select The contact to take an action.
- Choose the action:
- Clicks a trigger link
- Email event, such as open, click, bounce, or another supported email event.
- Clicks a trigger link
- Select the trigger link or email step.
- Toggle Timeout on if the contact should continue after a set duration when the required action does not occur.
- Configure the timeout duration when enabled.
- Save the Wait step.

Configure Specific Conditions to be Met
Condition-based waits allow contacts to continue only after matching specific rules, qualification criteria, engagement behavior, or field values.
- Select Specific conditions to be met.
- Use Add Condition to create individual rules.
- Use Add Segment to create grouped logic blocks.
- Join conditions using AND/OR logic.
- Add as many segments and conditions as needed.
- The contact moves forward as soon as any one segment evaluates as true.
- Toggle Timeout on to release the contact after a set duration if no segment is satisfied.
- Configure the timeout duration when enabled.
- Save the Wait step.

Configure a User to Reply
User-reply waits help track whether a member of your team responds to a contact. They are useful for monitoring response-time expectations and escalating unanswered conversations.
- Select A user to reply.
- Choose the Reply channel, such as SMS or Email.
- Optionally choose which user should count: the contact's assigned user or specific users. Leave the user selection open to accept a reply from any user.
- Configure the optional Timeout:
- Timeout on: Continue when a qualifying reply is received or the timeout expires, whichever happens first.
- Timeout off: Wait until a qualifying team-member reply is received.
- With Timeout enabled, place no-response escalation actions on the timeout branch.
- Timeout on: Continue when a qualifying reply is received or the timeout expires, whichever happens first.
- Configure the timeout duration if enabled.
- Save the Wait step.
Note: The Wait action resolves when the team member's reply is delivered, not merely when the message is sent.
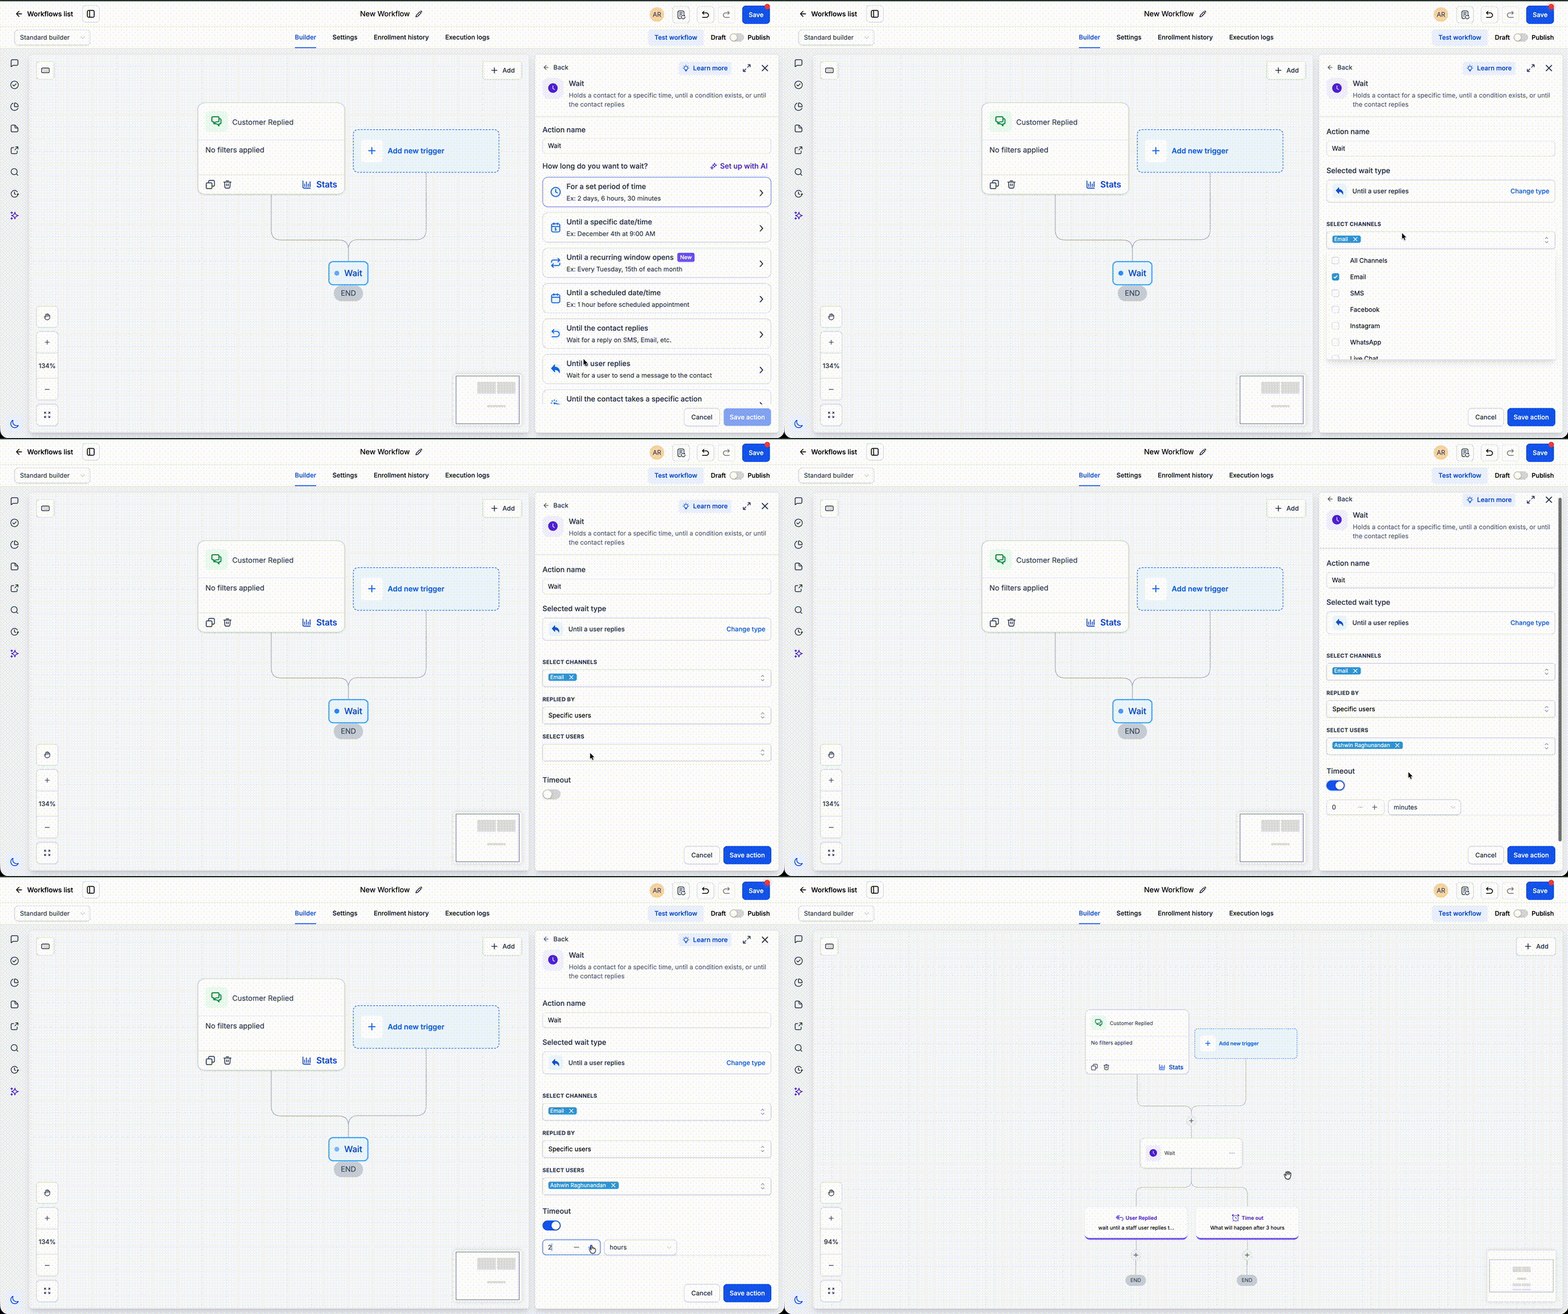
Examples of the Wait Action
The following examples show how fixed delays, recurring schedules, and response-based waits can support everyday communication workflows.
Example 1: Welcome Email After Sign-Up
Scenario: A new customer signs up on your website.
- Trigger: The automation starts when a new contact is created.
- Wait: Add a 1-hour delay before sending the email.
- Action: Send a personalized welcome email.
Result: The customer receives a welcome message after the configured delay.

Example 2: Thank You Email After a Course Sign-Up
Scenario: A new contact signs up for a course.
- Trigger: The automation begins when the course sign-up condition is met.
- Wait: Hold for 2 minutes before sending the first email.
- Action: Send a "Thank You for Signing Up" email with course information.
Result: The contact receives the thank-you email after the configured delay.

Example 3: Abandoned Cart Recovery
Scenario: A customer adds items to their cart but does not complete the purchase.
- Trigger: The cart is abandoned for 20 minutes.
- Wait: Pause for another 10 minutes.
- Action: Send a reminder email with a discount offer.
Result: The reminder is sent after the configured waiting period. This creates an opportunity to encourage the customer to complete the purchase.
Example 4: Monthly Membership Renewal Reminder
Scenario: A membership site wants to remind active members on the first day of each month.
- Trigger: A contact receives the Active Members tag.
- Wait: Use A recurring schedule set to Monthly, Day 1, at 9:00 AM.
- Action: Send a monthly summary email and SMS reminder.
Result: Contacts receive the reminder when the configured monthly schedule is reached.
Example 5: Escalate if No Team Member Replies
Scenario: A contact sends a message and your team should respond within five minutes.
- Trigger: Start the workflow when the contact sends a message, for example using Customer Replied.
- Wait: Add A user to reply with Timeout set to five minutes.
- Action: On the timeout branch, notify the owner or manager and create a follow-up task.
Result: The workflow monitors the response window and can escalate unanswered conversations.
Frequently Asked Questions
Q: What happens if I edit a workflow while contacts are already in a Wait action?
Contacts already in the Wait action keep their existing wait. Changing the Wait action does not update the wait for contacts already in that step.
Changes to steps after the Wait action can apply when those contacts continue through the workflow. This includes updates to existing actions and newly added actions.
Q: What's the difference between Segments and Conditions in a Wait action?
Conditions are individual rules, such as a contact's job title or tag. Segments group conditions using AND/OR logic. A contact exits the Wait step when any one segment is satisfied.
For example, one segment could check whether a contact opened a proposal email and is a decision-maker. Another could check whether the contact attended a strategy call and has an approved budget. If either segment is satisfied, the wait ends.
Q: What happens if the event or appointment date has already passed?
The workflow follows the selected If this date has already passed option:
- Continue to next action: Skips the wait and continues.
- Go to specific step: Moves to a selected workflow step.
- Exit Contact from automation: Removes the contact from the workflow.
- Skip all outbound communication actions till next wait or event start date action: Bypasses applicable outbound communication actions until the next wait or event start date action.
Q: What happens when multiple Segments contain conflicting conditions?
Segments are evaluated independently. No segment has priority. The contact moves forward when any one segment evaluates as true.
For example:
- Segment 1: Tag equals VIP.
- Segment 2: Tag does not equal VIP AND Email Opened equals True.
Matching either segment ends the wait.
Q: When should I use Standard instead of Dynamic?
Use Standard when the same fixed value should apply to every contact, such as waiting for two days.
Use Dynamic when the value should be read from a contact field at runtime, such as an individual renewal date. The custom variable must resolve to a valid value for the selected field.
Q: How does a recurring schedule decide which occurrence to wait for?
The workflow uses the next matching occurrence of the configured Weekly, Monthly, or Yearly schedule. Review Next 5 scheduled recurrences to verify the dates and times in the workflow's timezone.
Q: What's the difference between Appointment / Calendar Event, Service Booking, and Invoice Due Date?
- Appointment / Calendar Event: Waits relative to a scheduled appointment or calendar event linked to the contact.
- Service Booking: Waits relative to a service booking. This option is hidden if Service Booking is disabled for the location.
- Invoice Due Date: Waits relative to the due date on the contact's invoice.
Q: Why does the order of Wait options change sometimes?
The selection screen can prioritize relevant options based on context. When the Wait action follows a Send action, such as SMS, Email, or WhatsApp, The contact to reply moves to the top of the list.
The complete set of supported Wait options remains available.
Q: Can I edit a Wait action with Workflow AI Builder?
Yes. Workflow AI Builder supports conversational edits for Wait actions, including supported wait settings, timeout branches, and wait configurations.
Q: What's the difference between The contact to reply and A user to reply?
The contact to reply waits for the contact to respond to your message.
A user to reply waits for a team member to respond to the contact. Use this option for response-time monitoring and escalation workflows.
Need Help?
If a contact remains in a Wait action longer than expected or the workflow resumes at the wrong time, review the configured Wait conditions, timeout, and schedule. These checks help identify common timing and configuration issues.
Verify the following:
- Wait Type: Confirm that the selected Wait option matches the behavior you want.
- Time and Date: Review the duration, date, time, and relevant timezone settings.
- Advance Window: Check whether selected weekdays, hours, or additional filters are delaying the contact.
- Dynamic Values: Confirm that custom variables resolve to valid dates, times, or numerical values.
- Past-Date Behavior: Review the selected option under If this date has already passed.
- Reply Conditions: Confirm that the correct conversation channel and user selection are configured.
- Timeout: Check whether Timeout is enabled, whether its duration is correct, and which path runs when it expires.
- Segments and Conditions: Verify that AND/OR logic and field values match the intended rules.
- Workflow Status: Confirm that the workflow has been saved, published, and triggered as expected.
- Execution Results: Review the workflow's execution logs to determine when the contact entered the Wait action and what happened afterward.
If the issue continues, contact support and provide:
- Workflow Name: Identify the affected workflow.
- Wait Configuration: Include the selected Wait type, duration, timeout, and relevant conditions.
- Expected Behavior: Describe when the contact should have resumed.
- Actual Behavior: Describe what happened and when.
- Execution Details: Include relevant workflow logs, screenshots, or displayed errors.
Do not share passwords, access tokens, or other sensitive credentials.