
Global Settings in Services centralizes the most important configuration choices for your Services module. Use these settings to apply consistent rules for booking pages, payments, scheduling, notifications, and third-party calendar behavior. This guide explains the available settings, how they affect service bookings, and where to configure them.
TABLE OF CONTENTS
- What are Global Settings in Services?
- Key Benefits of Global Settings
- Prerequisites and Limitations
- How to Open Global Settings
- In-App Settings
- Booking Page Settings
- Payment Settings
- Service Settings
- Service Booking Title for Mobile Appointments
- Additional Settings
- Notifications
- Third-Party Calendar Settings
- Related Services Booking Enhancements
- Frequently Asked Questions
- Need Help?
What are Global Settings in Services?
Global Settings allow you to configure essential options that apply across your services. They provide one place to manage the customer booking experience and shared service-booking behavior.
The settings are organized into the following areas:
- In-App Settings: Configure calendar display preferences, physical business locations, resources, and add-ons.
- Booking Page: Manage your customer-facing booking page, forms, and confirmation experience.
- Payment Settings: Configure payment modes, currency, and available booking payment options.
- Service Settings: Control appointment intervals, scheduling notice, booking windows, and booking behavior.
- Additional Settings: Manage contact assignment, event tracking, and booking-page timezone behavior.
- Notifications: Configure how customers and staff receive booking updates.
- Third-Party Calendar Settings: Control supported calendar invitations and appointment notes.
Key Benefits of Global Settings
Centralized configuration helps maintain a consistent booking experience across your services. These settings also reduce the need to repeat shared configuration changes for individual services.
- Centralized Control: Apply booking, payment, scheduling, and notification rules from one place.
- Consistent Customer Experience: Keep booking-page layouts, labels, and choices consistent across services.
- Faster Updates: Adjust shared behavior, such as staff selection or payment visibility, without editing each service.
- Easier Service Management: Add services that use existing locations, staff, and resources without rebuilding shared booking settings.
Prerequisites and Limitations
Some settings depend on other Services features or apply only in specific booking configurations. Review these conditions before changing your Global Settings.
- Physical Locations: Enable Multiple Locations is intended for businesses that offer services at more than one physical location.
- Service Booking: The Service Booking option is unavailable when that feature is disabled for the location.
- Consent Checkbox: The built-in consent checkbox is available with the Default Form.
- Sticky Contacts: Pre-populated contact information uses browser cookies and should be enabled only when customers complete their own booking forms.
- Available-Day Counting: Count available days only applies to Range based booking windows.
- WhatsApp Custom Values: WhatsApp booking notifications support booking-level custom values, but not individual service-level custom values.
How to Open Global Settings
Open Global Settings from the Services area to review and update shared booking options. Each settings section contains controls for a different part of the booking experience.
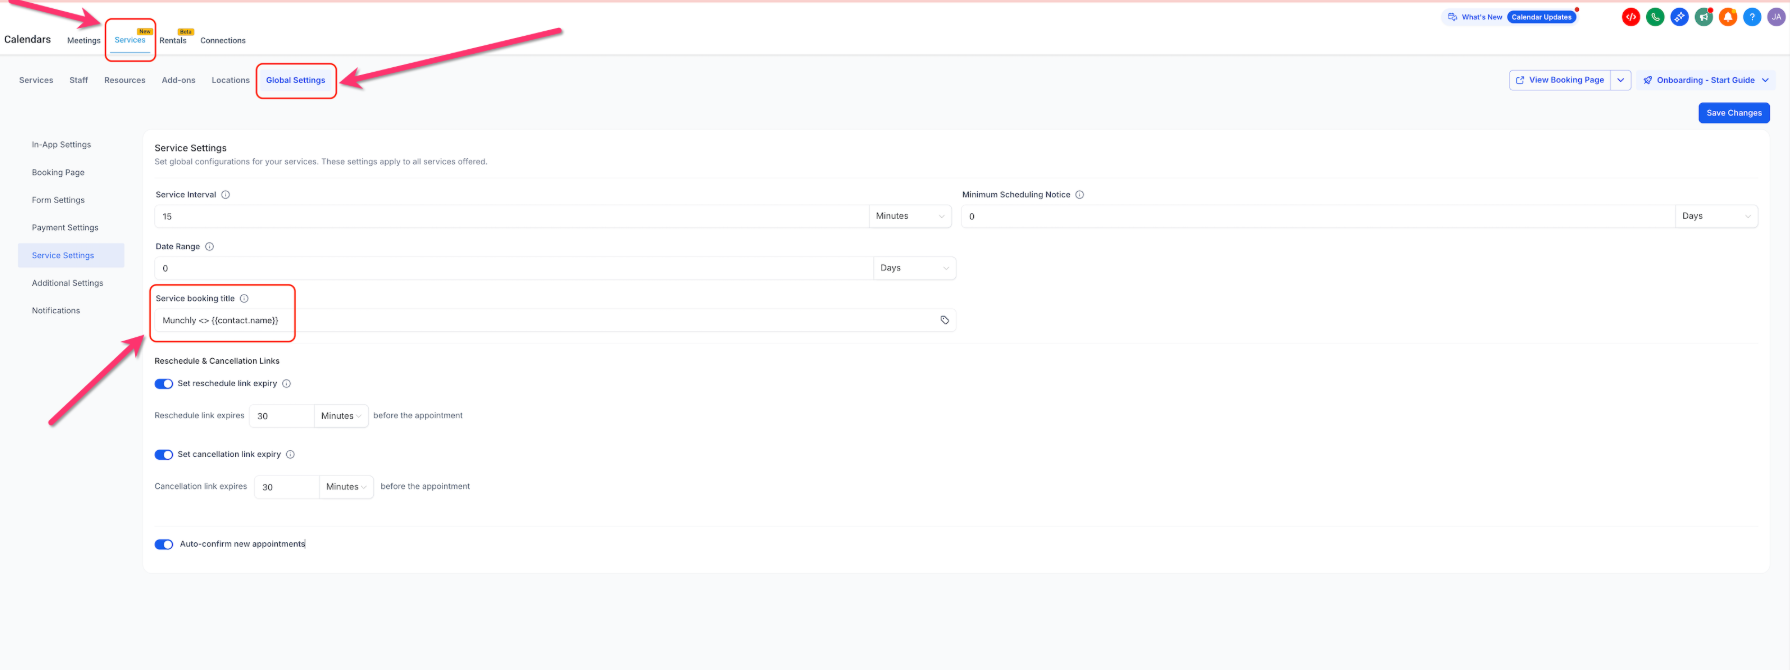
- Go to Calendars.
- Open Services.
- Select Global Settings.
- Choose the section you want to configure, such as In-App Settings, Booking Page, or Service Settings.
- Review your changes and click Save Changes.
In-App Settings
In-App Settings control shared Services preferences, including calendar display options and support for business locations, resources, and add-ons.
- View Options: Choose the first day of the calendar view: Monday, Saturday, or Sunday.
- Enable Multiple Locations: Enable this option when your business offers services at multiple physical locations. Customers can select the location where they want to book.
- Enable Resources: Enable this option to manage resources such as rooms, spaces, or equipment. Resource scheduling helps prevent conflicting bookings. Enabling this setting adds a Resources tab for configuration.
- Enable Add-ons: Enable this option to offer optional extras during service booking. Enabling it adds an Add-ons tab.

Booking Page Settings
Booking Page Settings determine how customers browse services, complete booking forms, and see booking confirmations.
This area includes Customize Booking Page, Additional Settings, Forms, and Confirmation Page.
Customize Booking Page
Customize the appearance and navigation of your booking page so customers can find services and complete bookings more easily.
- Company Name & Logo: Add your company name and upload the logo displayed on your booking page.
- Service Images:Choose whether service images appear on the booking page.
- With Images: Display uploaded service images on service cards.
- Without Images: Hide service images and use a text-focused presentation.
- With Images: Display uploaded service images on service cards.
- Account Slug: Configure the unique identifier used as the base for service URLs.
- Browse By:Control how customers discover services.
- Browse by Category: Customers select a category before choosing an available service.
- Browse All Services: Customers view available services and can use categories to filter them.
- Booking Page Order: Choose the order in which customers make selections. For businesses with multiple physical locations, select whether customers choose the service or location first.
- Booking Page Layout: Display services in a card view, a list view, or allow customers to choose their preferred view.
- Filter & Sort Menu Placement: Display filtering and sorting controls horizontally at the top, vertically on the left, or use Top Tabs for service categories.
- Theme: Choose a light or dark theme for the booking page.
- Language: Select the language shown to customers on the booking page.
- Primary Color: Set the color used for buttons, date selection, and other actions.
- Background Color: Choose the booking page's background color.
- Service Selection Button Label: Customize the button text displayed when customers select a service, such as "BOOK."
- Final Booking Button Label: Set the text on the button customers use to complete the booking, such as "Schedule Appointment."
- Preview: Preview the booking page with your changes applied.
- Insert Custom Code: Add custom CSS to further customize the appearance of your booking page. Paste the code and save your changes.

Additional Booking Page Settings
These settings control staff selection and how customers move between services during the booking process.
- Allow customers to pick who they book with: Enable this option to let customers choose a staff member. Otherwise, the system assigns a staff member based on availability and round-robin logic.
- Hide the "Any Available" option from Staff Selection page: When staff selection is enabled, hide the Any Available option to require customers to select a specific staff member.
- Allow Multiple Service Selection: This option is enabled by default and allows customers to book more than one service during the same booking journey. Disable it to limit bookings to one service at a time.
- Auto-Assign Staff Based On: Choose the assignment preference used when a customer does not select a particular staff member.
- Allow Customers to Explore Other Services: This option is enabled by default. It allows customers who open a direct service or category link to browse additional services and categories. Disable it to keep customers within the service or category they originally opened.

Forms
Forms collect customer details during booking. You can use the default booking form or select a custom form for your Services page.
- Select Form: Choose the form displayed when customers book services. You can select the Default Form, which collects First Name, Last Name, Phone, and Email, or create a custom form under Sites > Forms.
- Pre-populate Fields (Sticky Contacts): This feature uses browser cookies to remember customer information and pre-populate form fields for returning customers. Enable this only when customers complete their own booking forms. If multiple customers use the same browser, saved information could be overwritten or shown incorrectly.
- Consent Checkbox: Enable this option to collect customer consent during booking. You can customize the consent message. This option is available when using the Default Form.

Confirmation Page
The Confirmation Page settings control what customers see after completing a service booking.
You can show a custom message on the default confirmation page or redirect customers to another page.
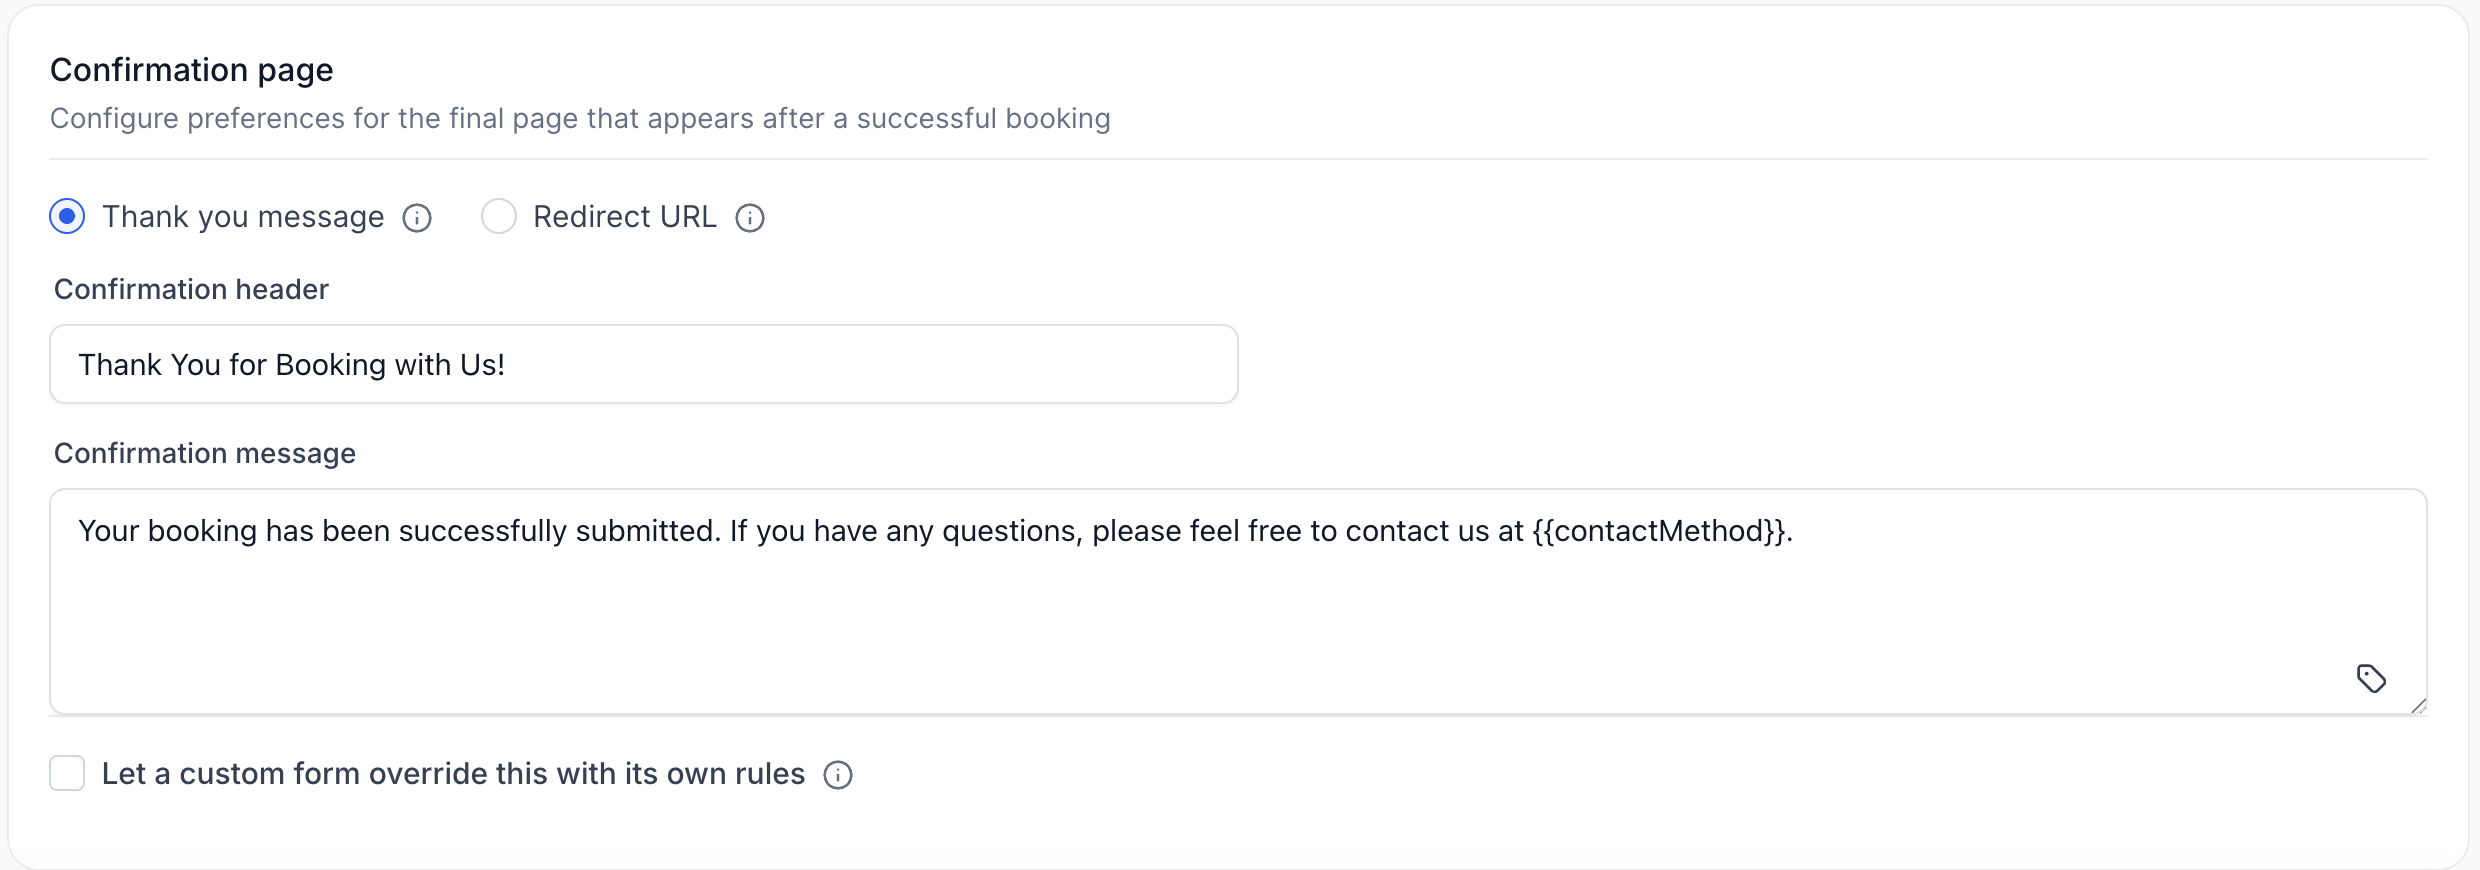
Let a custom form override this with its own rules: Enable this option when you want the selected custom form to control the confirmation experience.
When this setting is enabled:
- If the form's On Submit action is Thank you message or Redirect URL, that action determines the confirmation experience.
- If the form's On Submit action is Order confirmation, or no applicable On Submit action is configured, the Confirmation Page settings are used as the fallback.
- The custom form's conditional rules, including redirects, custom messages, and lead disqualification, also apply after booking.
Note: Show/hide field conditions from a custom form apply during booking regardless of whether custom form confirmation overrides are enabled.
Payment Settings
Payment Settings control how payments are handled during the Services booking experience. These options include payment modes, currencies, and supported checkout methods.
- Test Mode vs. Live Mode: Use Test Mode to simulate the booking and payment process. Switch to Live Mode when you are ready to accept real payments.
- Currency: Select the currency displayed and used for payments. This setting applies across services.
- Booking Payment Options:Choose how customers complete payment during the booking process.
- Online Payment: Customers pay online when booking.
- Allow deposit or full payment choice: When a service has a deposit configured, enable this option to let customers choose between paying the deposit and making the full payment. When disabled, services with a configured deposit retain the deposit-only checkout experience.
- Buy Now, Pay Later (BNPL): When a supported BNPL method is available, selecting full payment allows the provider to finance the complete booking.
- Pay in Person: Customers pay when they arrive. No card details are collected during booking.
- Card on File Only: Card details are collected securely during booking, without charging the customer at that time.
- Online Payment: Customers pay online when booking.
- Hide Payment Amount: Hide the payment amount on the booking page. This setting applies when Pay in Person or Card on File Only is selected.
- Coupon Codes: Enable this option to let customers enter coupon codes during booking. Create valid coupons under Payments > Coupon Codes before enabling the field.
- Taxes: Tax settings for Services are configured at the individual service or associated product level, rather than in Global Settings. Once configured, applicable tax information appears in the booking details.
Service Settings
Service Settings control the timing and availability of service bookings. These options help determine when customers can book and how appointment schedules are managed.
- Service Interval: Determines the spacing between available booking time slots. For example, a one-hour interval displays slots at 9:00 AM and 10:00 AM. A 30-minute interval displays slots at 9:00 AM, 9:30 AM, and 10:00 AM.
- Minimum Scheduling Notice: Defines the minimum amount of advance notice required to book. For example, with a two-hour notice requirement, customers cannot book a 10:00 AM appointment after 8:00 AM on the same day.
- Booking Window:Controls how far into the future customers can view availability and book services. Choose between the following options:
- Range based: Displays a rolling number of booking days from the current date. For example, a 30-day range allows customers to view availability within the next 30 days.
- Date-based: Uses a fixed start and end date rather than a rolling window.
- Range based: Displays a rolling number of booking days from the current date. For example, a 30-day range allows customers to view availability within the next 30 days.
- Count available days only:When using a Range based booking window, enable this option to count only days included in the service's availability schedule. The system skips days outside the schedule and begins counting after the minimum scheduling notice period.
When the option is disabled, the booking window counts all calendar days, including days without availability.
Example: Count Available Days Only
- Today: Wednesday, August 12
- Minimum Scheduling Notice: 2 days
- Service Availability: Monday through Friday
- Booking Window: 5 days, Range based
- Count available days only: Enabled
- The system applies the notice period first, then counts five scheduled available days.
- In this example, the booking page displays August 14, 17, 18, 19, and 20.
- Today: Wednesday, August 12
- Service Booking Title: Customize the appointment title created through the Services booking page. Use supported custom values, such as
{{contact.name}}, to include customer information dynamically. - Cancellation & Reschedule:Configure booking cancellation, rescheduling, and confirmation behavior.
- Allow Cancellation: Enable cancellation and configure when the cancellation link expires before the appointment.
- Allow Rescheduling: Enable rescheduling and configure when the rescheduling link expires before the appointment.
- Auto Confirm New Appointments: Automatically mark new bookings as confirmed. When disabled, appointments remain unconfirmed until reviewed.
- Allow Cancellation: Enable cancellation and configure when the cancellation link expires before the appointment.

Service Booking Title for Mobile Appointments
The Service Booking Title setting helps keep appointment names consistent across booking channels. When configured, it also affects new service appointments created through the mobile app.
New mobile service bookings use the configured Services booking title in the Appointment Title field.
If the Service Booking Title is empty or not configured, the mobile app uses the contact's name as the fallback appointment title.
This behavior applies to new service bookings created in the mobile app.
Additional Settings
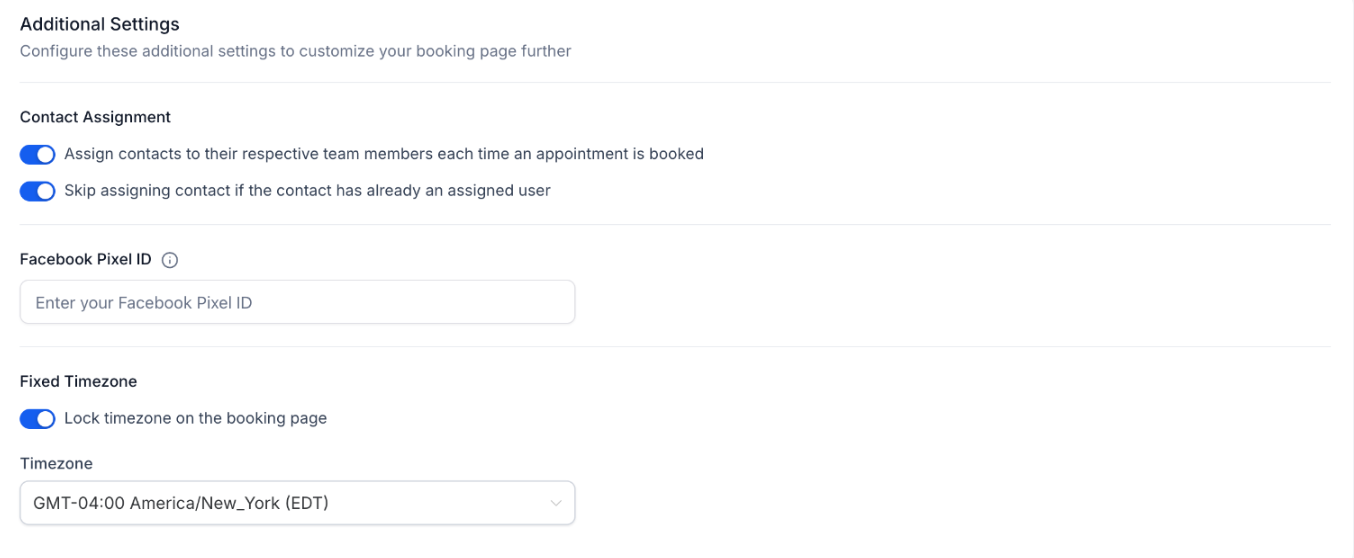
Additional Settings provide controls for contact assignment, booking event tracking, and timezone behavior.
- Contact Assignment:Control whether bookings update the contact's assigned user.
- Assign contacts to service staff members upon booking: When enabled, the contact's assigned user changes to the staff member handling the appointment. For example, if a contact is assigned to User A but books a service with User B, the contact becomes assigned to User B.
- Skip assignment if the contact already has an assigned user: Prevent reassignment when a contact already has an owner. Only contacts without an assigned user are assigned to the appointment's staff member.
- Assign contacts to service staff members upon booking: When enabled, the contact's assigned user changes to the staff member handling the appointment. For example, if a contact is assigned to User A but books a service with User B, the contact becomes assigned to User B.
- Facebook Pixel ID: Enter your Facebook Pixel ID to track supported events during the service-booking process.
- Lock timezone on the booking page: Prevent customers from changing the displayed booking timezone. This can be useful for in-person services because appointment times remain displayed in the configured timezone regardless of the customer's physical location.
Notifications
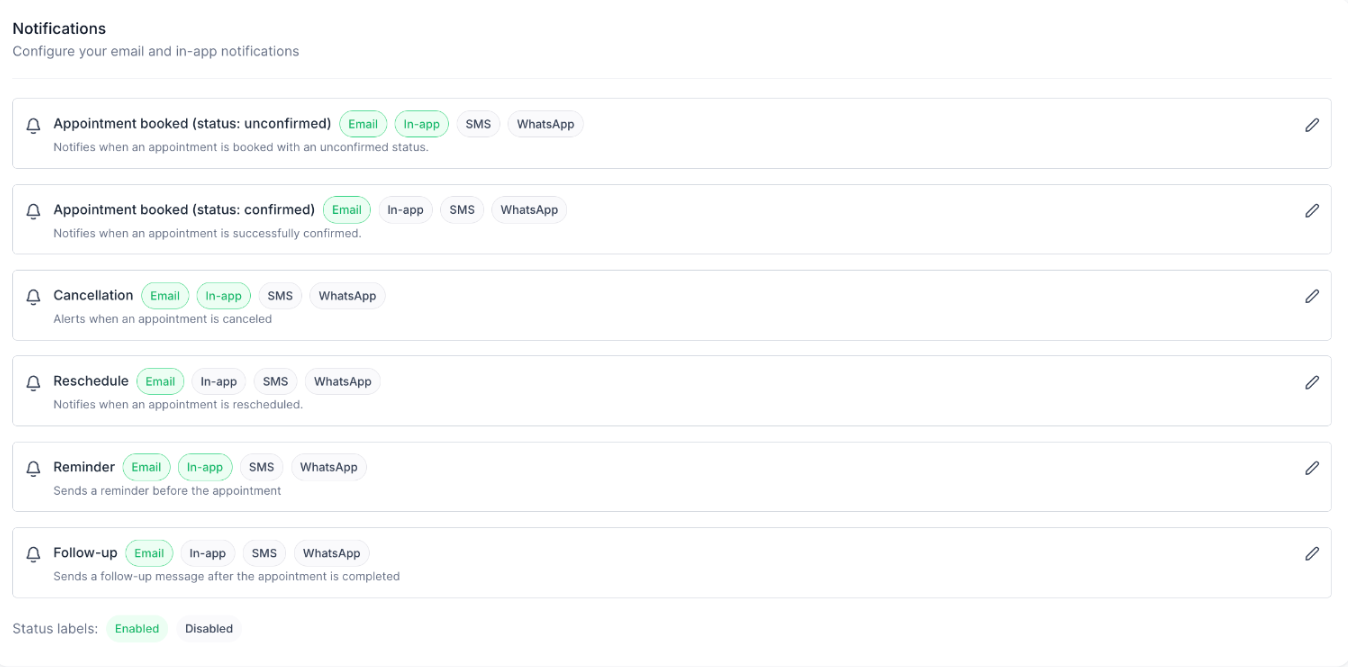
Notifications keep customers and staff informed about booking activity. Configure notification types, delivery channels, recipients, and message content based on your booking process.
Notification Types
Six main notification types are available for different stages of the appointment lifecycle.
- Appointment Booked (Unconfirmed Status): Sent when an appointment is created with Unconfirmed status.
- Appointment Booked (Confirmed Status): Sent when an appointment is booked with Confirmed status or an existing appointment changes to Confirmed.
- Cancellation Email: Sent when an appointment is canceled, marked as a no-show, or deemed invalid.
- Reschedule Email: Sent when the appointment date or time changes.
- Reminder Email: Sent before an appointment based on the configured time, such as one day or one hour earlier.
- Follow-Up Email: Sent after an appointment based on the configured timing.
Delivery Channels
Select the channels used to notify contacts and assigned users about supported booking events.
- Email: Send messages to contacts and assigned users.
- In-App: Display alerts in the web or mobile app for assigned users.
- SMS: Send text notifications to contacts and assigned users.
- WhatsApp: Send booking notifications and updates to customers.
Note: WhatsApp notifications support booking-level custom values, but not individual service-level custom values. If a customer books multiple services together, supported dynamic values can describe the overall booking but not each service separately.
Third-Party Calendar Settings
Third-party calendar settings control how service appointments interact with external calendars, such as Google and Outlook.
These settings help attendees receive appointment invitations, updates, and relevant booking information.
- Calendar Sync & Invites: Allow supported Google or Outlook calendar connections to add appointments to attendees' calendars. Invitations and update emails are sent when appointments are booked, rescheduled, or canceled.
- Appointment Notes: Add custom notes that appear in third-party calendar invitations. Examples include meeting links, preparation instructions, and other appointment details.
Tip: Use Appointment Notes to include information that attendees should be able to review directly in their calendar events.

Related Services Booking Enhancements
Services settings work alongside other scheduling features that affect availability, calendar connections, and the booking experience.
When reviewing your overall booking configuration, also consider:
- Staff Availability: Review the schedules of staff members assigned to services.
- Third-Party Calendar Connections: Review linked calendar configuration for appointment visibility and updates.
- Booking Page Customization: Review service presentation and customer booking-page options.
Frequently Asked Questions
Q: What's the advantage of using Global Settings instead of editing each service?
Global Settings applies shared defaults across services. You can update booking, payment, scheduling, and notification behavior from one place.
Q: When should I use Global Settings versus editing an individual service?
Use Global Settings for shared booking-page behavior, forms, notifications, and scheduling windows. Edit individual services for their own duration, variations, assigned staff, resources, or add-ons.
Q: Do direct links for specific services or staff reflect changes made in Global Settings?
Yes. Service, staff, and category sharing links are filtered views of the same booking experience. Changes to applicable Global Settings carry through to these pages.
Q: How can I preview the booking page after updating Global Settings?
Use the booking-page preview to review your changes before sharing the booking link with customers.
Q: Does Count available days only work with Date-based booking windows?
No. The setting applies only to Range based booking windows. Date-based booking windows use fixed start and end dates.
Need Help?
If your Services booking page or appointments do not behave as expected, review the relevant Global Settings and save any necessary corrections.
Check the following:
- Booking Page: Verify service visibility, layout, browsing order, and staff selection.
- Forms: Confirm the selected booking form, consent options, and custom form confirmation behavior.
- Scheduling: Review Service Interval, Minimum Scheduling Notice, Booking Window, and staff availability.
- Available Days: If Count available days only is enabled, check the availability schedules and confirm the booking window uses Range based.
- Payments: Confirm the correct payment mode, currency, and checkout options are selected.
- Notifications: Review the enabled notification types, delivery channels, recipients, and timing.
- Calendar Connections: Check supported third-party calendar settings when invitations or appointment updates are missing.
- Saved Changes: Confirm that you clicked Save Changes after updating the settings.
If the issue continues, contact support with the affected service name, relevant settings, expected behavior, actual results, and screenshots showing the issue.
Do not share passwords, access tokens, or other sensitive credentials.