
Services helps you create bookable offerings so customers can schedule appointments online. Use variations to present multiple options under a single service, add-ons to personalize bookings, and resources to help prevent scheduling conflicts. This article explains how to access the Services panel, organize categories, manage service settings, and create a new service.
TABLE OF CONTENTS
- What are Services?
- Key Benefits of Creating Services
- Prerequisites and Limitations
- How to Access the Services Panel
- Creating and Managing Categories
- Service Management Features
- What are Add-ons?
- What are Resources?
- Accessing Resources
- How to Create a New Service
- Best Practices
- Frequently Asked Questions
- Need Help?
What are Services?
Services is where you define what your business offers to customers, such as coaching sessions, spa treatments, or fitness programs. It helps you create service listings that customers can book online while keeping scheduling and service information organized.
You can manage when services are offered, which staff members provide them, and how they appear on the booking page. Optional add-ons, resource management, and categories help you create flexible booking experiences.
Services supports:
- Multiple Physical Locations: Offer services at different business locations.
- Service Variations: Provide different service options, such as shorter or longer sessions.
- Add-ons: Let customers select optional extras alongside their main service.
- Resource Management: Coordinate shared rooms, stations, equipment, and other resources.
- Booking Payments: Manage supported payment collection options when configuring a service.
Key Benefits of Creating Services
Understanding each Services feature makes setup easier and helps keep your booking page accurate. The following options support flexible scheduling and a more organized customer experience.
- Variations: Offer multiple versions of a service, such as sessions with different durations, without creating separate service listings.
- Add-ons: Present optional extras during booking so customers can personalize their appointments.
- Resources: Reserve shared rooms, stations, or equipment to help avoid conflicting bookings.
- Processing Time and Buffers: Configure timing within and around appointments to support preparation, processing, and cleanup.
- Staff and Availability: Assign team members to services and manage when they are available.
- Categories: Organize related services and control their display order on the booking page.
- Private Services: Hide selected services from public listings and share them through direct links.
- Custom URL and Preview: Configure a booking link and preview the customer experience before sharing it.
Prerequisites and Limitations
Before creating services, review the staff, availability, and resource requirements. These settings determine whether customers can find and book the services you create.
- Services Access: The Services panel must be available in your calendar interface.
- Staff Assignment: Assign at least one staff member to make a service bookable.
- Staff Availability: Assigned staff members must have availability configured for customers to book the service.
- Private Services: Private services do not appear in public booking listings. They can be shared using their direct service links.
- Resource Capacity: Resource availability and capacity can affect which appointments can be scheduled.
- Inventory Tracking: Inventory for products linked to services is not automatically synchronized with the service-booking lifecycle.
How to Access the Services Panel
The Services panel is the starting point for creating, organizing, editing, and previewing your service offerings. It provides a central list of services and access to management tools.
Within the Services panel, you can find:
- A searchable and sortable list of existing services.
- An option to create new services.
- Service names, durations, and assigned staff members.
- Categories displayed on the left for organizing services.
- A three-dot menu with Edit, Duplicate, Delete, and Share actions.
- A View Booking Page link for previewing the customer-facing experience.
Open the Services Panel
Use the calendar settings navigation to open the Services workspace.
- Click Calendars in the left navigation menu.
- Select Calendar Settings from the calendar navigation.
- Choose the Services tab to open the Services panel.
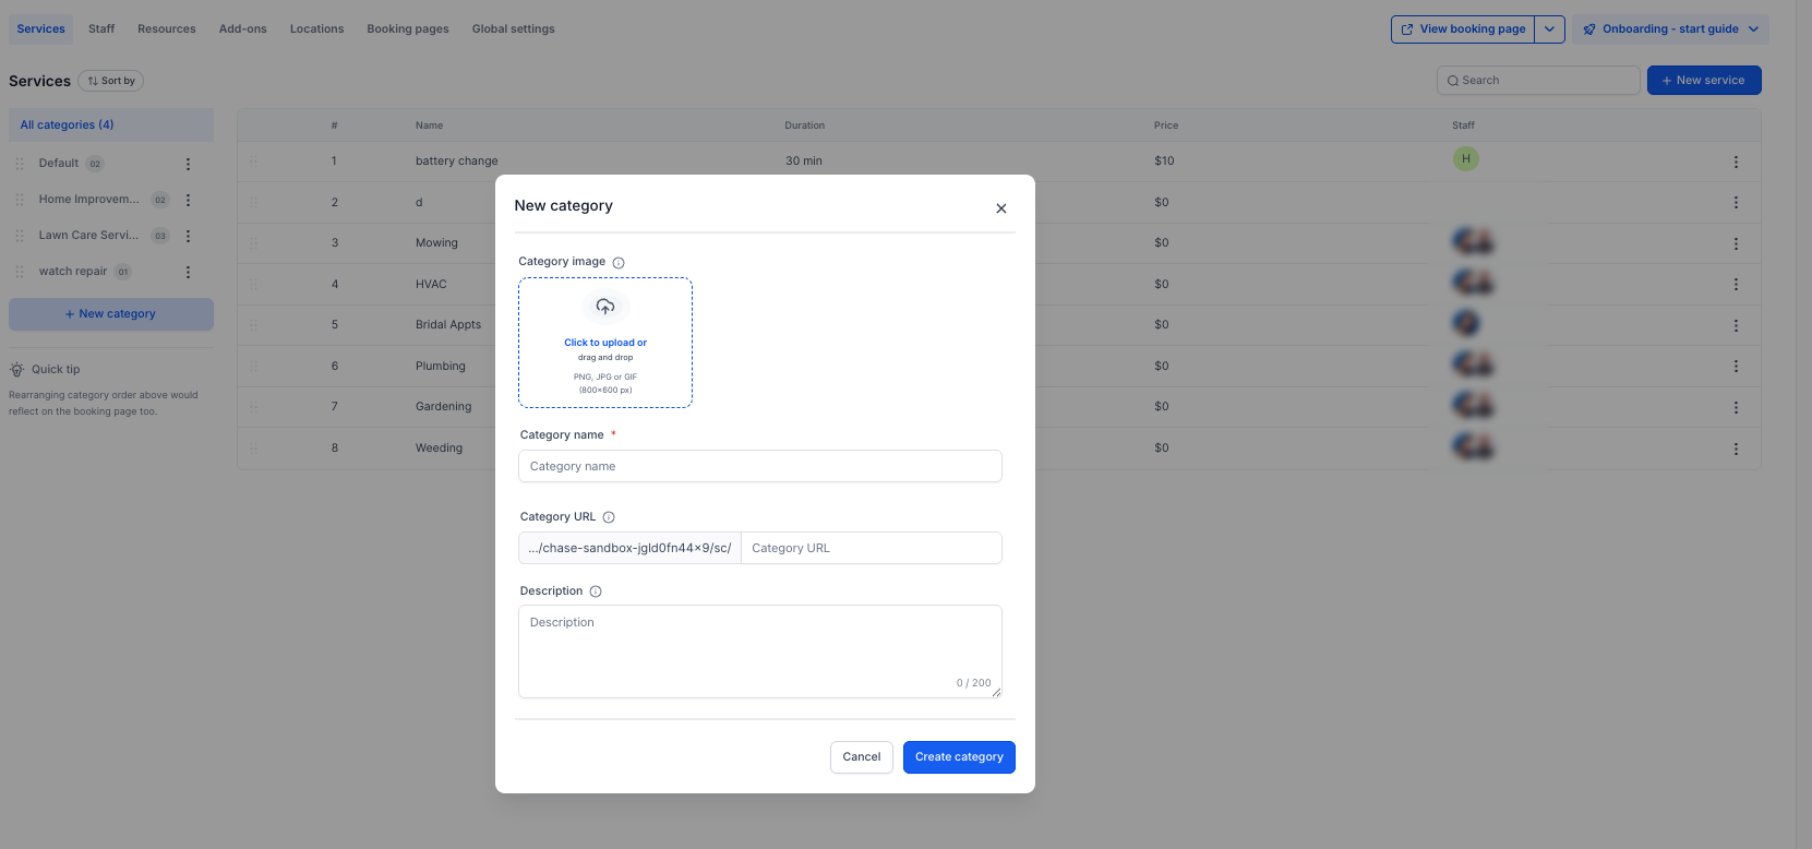
Creating and Managing Categories
Service categories group similar or related services so customers can browse your offerings more easily. Categories appear on the booking page, with services listed under their assigned categories.
To manage categories:
- Open Calendars > Calendar Settings > Services.
- Click + New Category to create a category.
- Use the three-dot (⋮) menu beside a category to edit it.
- Drag categories to rearrange their order. The new order is reflected on the customer-facing booking page.
If you do not select a category for a new service, the service is placed in the default category.
Service Management Features
The Service Editor lets you review and update the configuration of an existing service. Its sections organize service details, add-ons, and required resources.
To open the Service Editor:
- Go to Calendars > Calendar Settings > Services.
- Locate the service you want to update.
- Click the three-dot (⋮) menu next to the service.
- Select Edit.
The Service Editor includes:
- Service Details: Configure basic information, staff, duration, processing time, buffers, and variations.
- Add-ons: Attach optional extras to the service.
- Resources: Associate rooms, stations, equipment, or other assets needed to deliver the service.
What are Add-ons?
Add-ons are optional extras that customers can select alongside a main service. They help personalize appointments with additional features, treatments, or related items.
For example, a customer booking a massage may choose an additional treatment. Add-ons can appear on the customer-facing booking page or remain available only to staff when creating appointments.
How Add-ons Appear on the Booking Page
The visibility and configuration of an add-on determine how it affects the customer's booking experience.
- Customer-Facing Add-ons: Display as optional selections when a customer books a service.
- Additional Duration: An add-on with a configured duration can extend the overall booking time.
- Hidden Add-ons: Do not appear on the public booking page but can be selected by staff in the appointment editor.
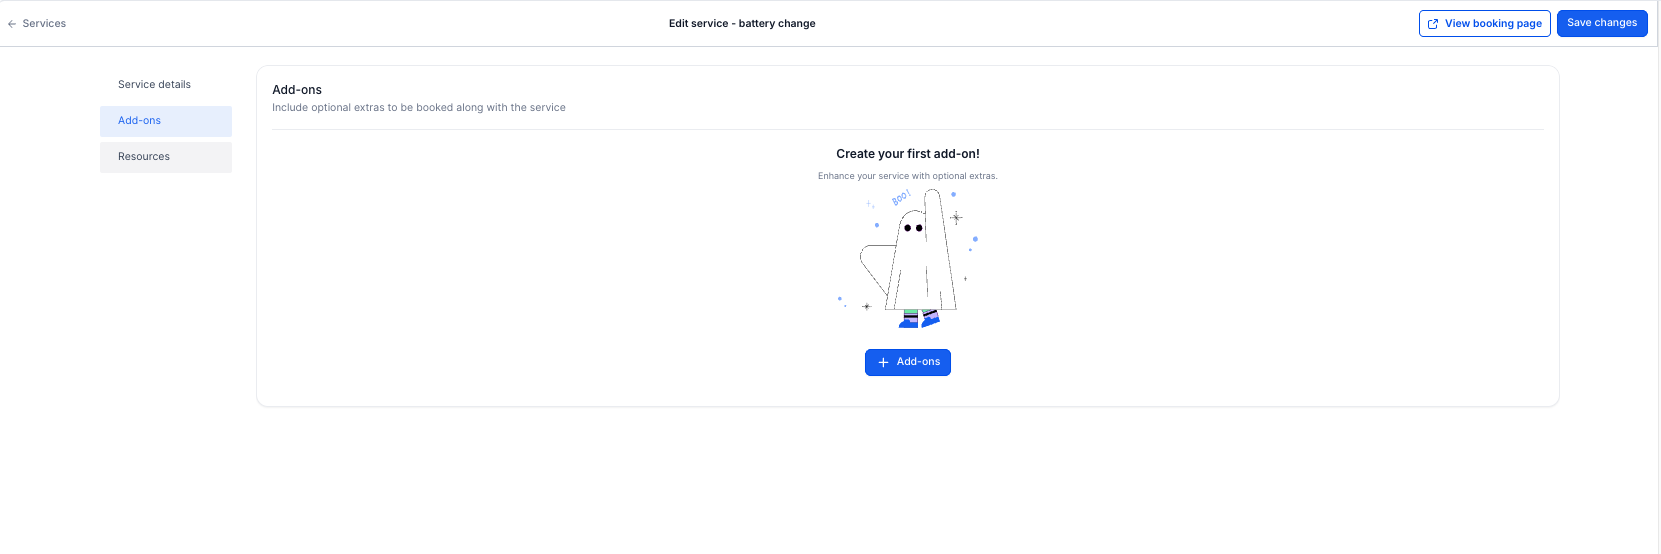
Accessing Add-ons
Open the Add-ons section of a service to view and manage its optional extras.
- Go to Calendars > Calendar Settings > Services.
- Locate the service you want to edit.
- Click the three-dot (⋮) menu and select Edit.
- Open the Add-ons tab.
- Review the add-ons linked to the service, including their names, durations, and maximum quantities.
- Create a new add-on or edit an existing add-on as needed.
- Save your changes.
What are Resources?
Resources are shared assets such as rooms, chairs, stations, or tools that must be available for a service to take place.
Assigning resources to services helps prevent conflicting reservations and supports accurate capacity management.
A resource can be associated with one or more services and configured using the following information:
- Physical Location: Identify the business location where the resource is available.
- Capacity: Specify how many appointments or people the resource can accommodate.
For example, a resource named Room 1 may be used by several services but have a capacity of four people at a time. Capacity can be configured for the relevant physical location.
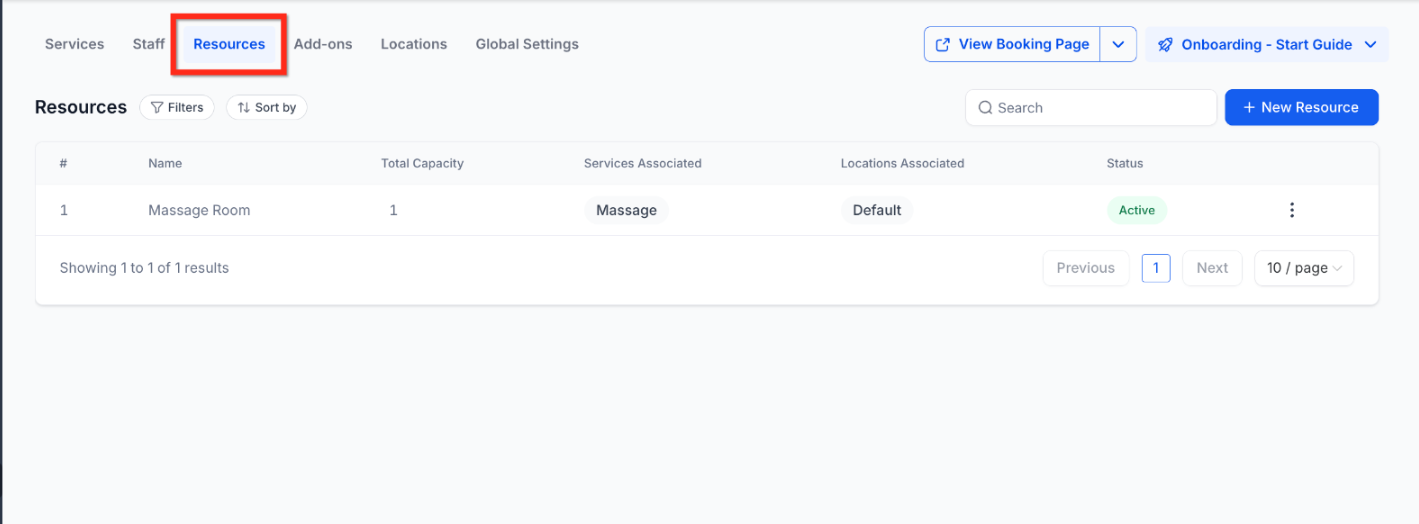
Accessing Resources
Use the Resources area to review the assets associated with your services and their available capacity.
- Go to Calendars > Calendar Settings > Services.
- Locate the service you want to edit.
- Click the three-dot (⋮) menu and select Edit.
- Open the Resources tab.
- Review the resources associated with the service.
- Use the main Resources list to review available resource capacity, associated services, physical locations, and status.
- Create or edit resources as needed and save your changes.
How to Create a New Service
Creating a service involves entering the basic information, assigning staff, configuring appointment timing, reviewing optional settings, and previewing the booking page.
Step 1: Click + New Service
Start from the Services panel to create a new bookable offering.
- Go to Calendars > Calendar Settings > Services.
- Click + New Service in the upper-right corner.
Step 2: Add Basic Details
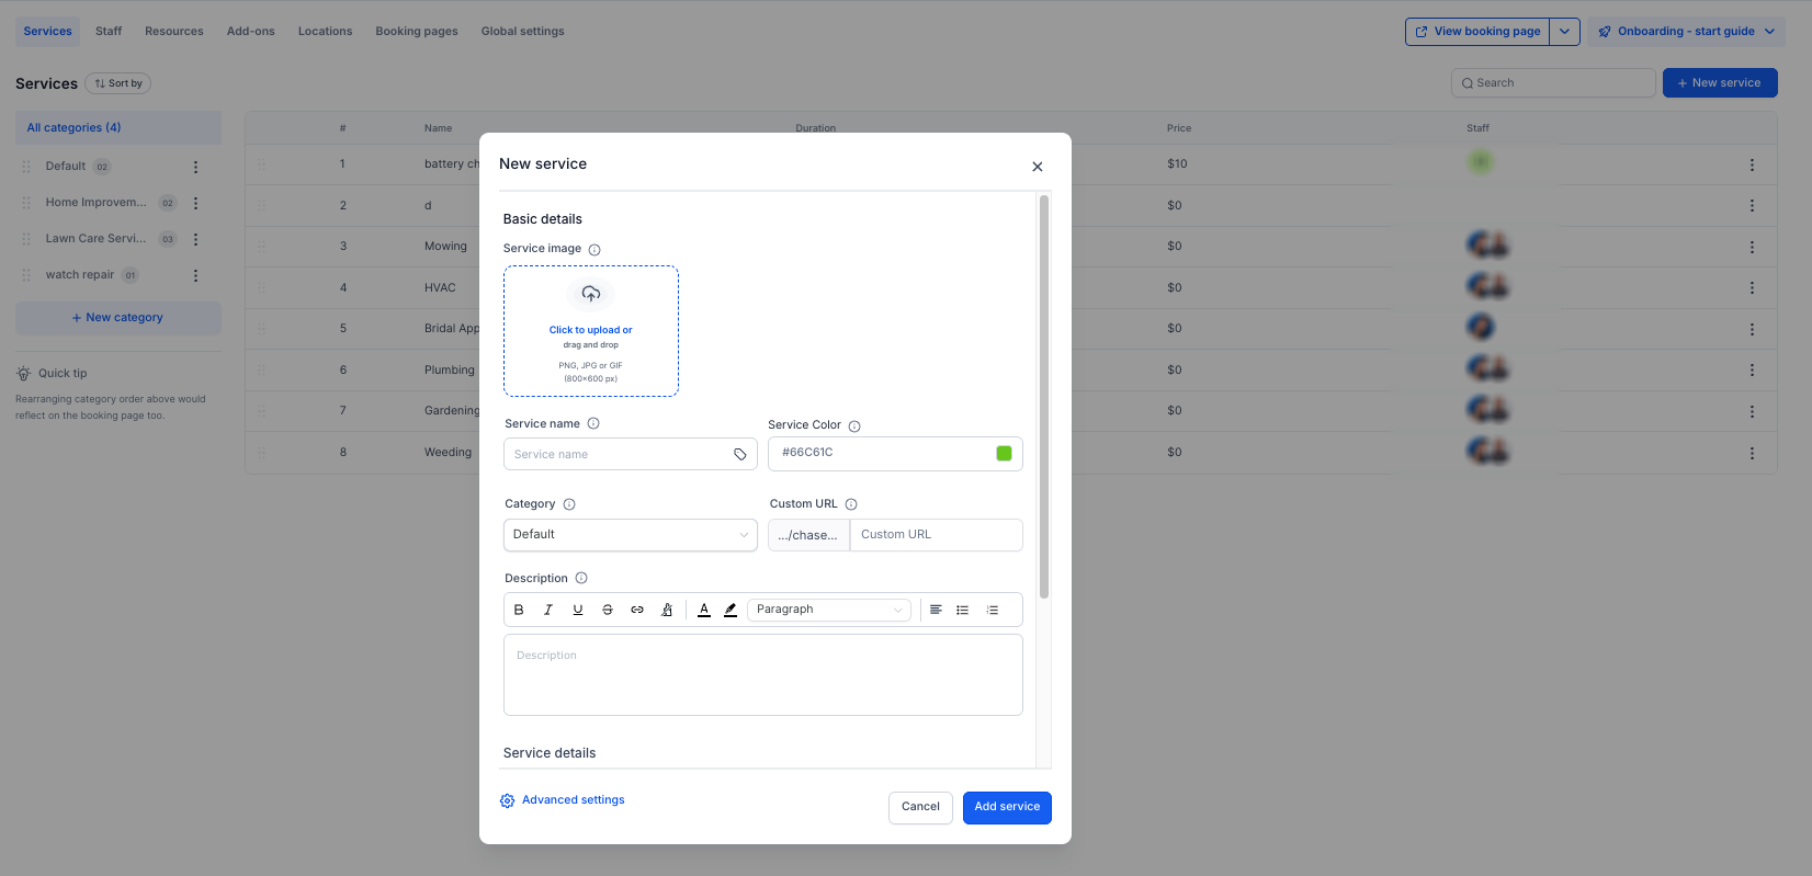
Basic Details describe the service to customers and determine how it appears in your calendar and booking interface.
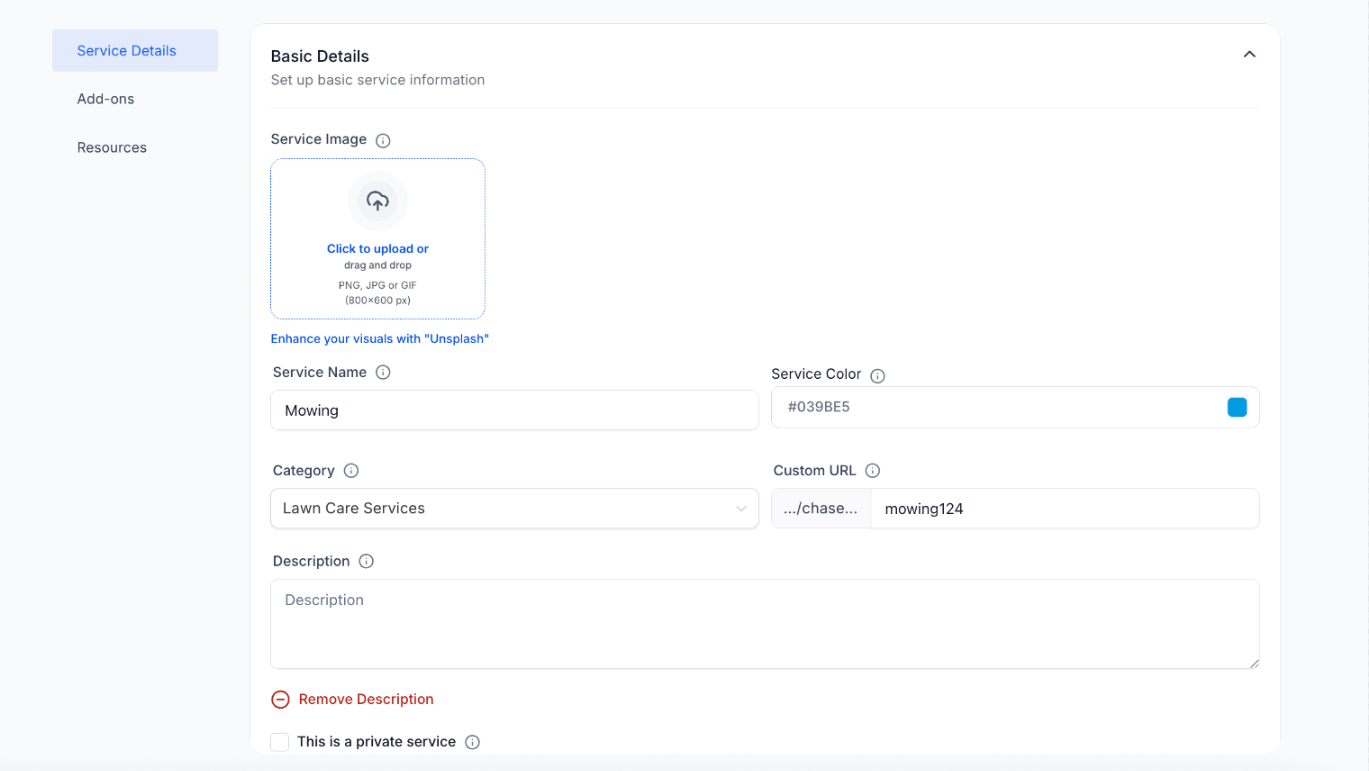
Complete the following fields:
- Service Image: Upload an image that represents the service. Choose a file from your device or Media Library.
- Service Name: Enter the service name displayed to customers.
- Service Color: Assign a color to help identify the service in your calendar.
- Category: Choose the category that should contain the service. If no category is selected, the service is added to the default category.
- Custom URL: Configure a unique booking link for the service.
- Description: Add a summary of the service. The rich text editor supports formatting such as bold, italic, underline, strikethrough, lists, hyperlinks, colors, headings, and text alignment.
- Private Service: Enable this option to hide the service from public booking listings. The service can still be shared through its direct booking link.
- Staff Members: Assign the staff members who can provide the service. At least one staff member must be assigned for the service to be bookable.
- Duration: Set how long the service lasts.
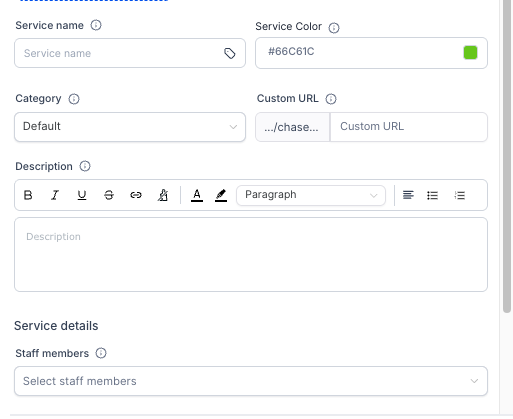
After completing the basic details, click Advanced Settings to configure additional service options.
Step 3: Configure Service Details
Service timing settings help control appointment duration, processing periods, and the gaps needed between bookings.
- Duration: Enter the total time required for the service.
- Processing Time:Divide the service into three phases:
- Initial: The first portion of the service.
- Processing: A period during which the service continues without requiring the staff member's active involvement.
- Final: The concluding portion of the service.
- Staff are reserved during the Initial and Final phases but may be available for other appointments during the Processing phase.
- Initial: The first portion of the service.
- Buffer Time: Add time before or after the appointment for preparation or cleanup.

Step 4: Review Payment Options
The Payment area contains supported payment collection settings for the service. Review these options when payment is part of your booking process.
- In Advanced Settings, locate the Payment section.
- Review the available payment collection settings.
- If appropriate, use Accept Partial Payment to configure partial payment collection during booking.
- Continue to the remaining service configuration options.
Step 5: Configure Variations (Optional)
Variations let you offer different versions of the same service within a single listing. They are useful when customers need to choose between different session lengths.
- Enable Variations.
- Add each variation's Name.
- Configure its Duration.
- Configure Processing Time if applicable.
- Add additional variations as needed.
Example: A service could offer three session lengths:
- 30-minute session
- 45-minute session
- 60-minute session

Step 6: Save and Preview
Save the service and review the customer-facing booking page before sharing its link.
- Review the service information, staff assignments, timing, and optional settings.
- Click Save Changes to apply your configuration.
- Select View Booking Page to preview the service.
- Confirm that the service name, description, available options, and booking experience appear as intended.
Best Practices
Following a consistent setup process helps customers find services and helps your team maintain accurate availability.
- Assign Staff: Add staff members and configure their availability so services can be booked.
- Organize Categories: Use descriptive categories to group similar services.
- Use Relevant Add-ons: Offer optional extras that complement the main service.
- Manage Resources: Configure resource capacity to help prevent conflicting reservations.
- Preview Before Sharing: Check the booking page after creating or updating a service.
Frequently Asked Questions
Q: Can I hide a service from the public booking page?
Yes. Enable This is a private service to hide the service from public booking listings. You can share its direct booking link with selected customers.
Q: How do categories affect the booking page?
Categories determine how services are grouped and displayed on the booking page. Rearranging categories in the Services panel also changes their order on the customer-facing booking page.
Q: What's the difference between processing time and buffers?
Processing time is part of the appointment while the service is still in progress. Buffer time is added before or after an appointment to allow for preparation, cleanup, or spacing between bookings.
Q: Does inventory tracking for products linked to services stay synchronized with appointments?
No. Inventory tracking for products linked to services is not managed or synchronized with the service-booking lifecycle.
Q: Do I need to assign staff to every service?
Yes. At least one staff member must be assigned to make a service bookable. The assigned staff member also needs configured availability.
Q: Can the same resource be used by multiple services?
Yes. A resource can be associated with multiple services. Its configured capacity and availability help prevent conflicting reservations.
Need Help?
If a service is not appearing on your booking page or customers cannot schedule it, review the service configuration before making additional changes.
Check the following:
- Service Visibility: Confirm whether the service is marked as private.
- Staff Assignment: Verify that at least one staff member is assigned.
- Staff Availability: Confirm that assigned staff have available booking times.
- Categories: Check the service's category and its position on the booking page.
- Resources: Review resource assignments and capacity if booking times are unavailable.
- Add-ons and Variations: Confirm that the intended options are configured for the service.
- Saved Changes: Verify that your latest configuration was saved.
- Booking Page Preview: Use View Booking Page to check what customers see.
If the issue continues, contact support with the service name, expected behavior, actual results, and relevant screenshots or error messages.
Do not share passwords, access tokens, or other sensitive credentials.