
A dedicated sending domain helps align your email activity with a domain you control instead of relying entirely on shared sending infrastructure. Proper setup can improve authentication alignment, protect sender reputation, and create a more consistent sending identity. This guide explains how to add a dedicated sending domain, verify its DNS records, assign it to supported email types, and troubleshoot common setup issues.
TABLE OF CONTENTS
- What Is a Dedicated Sending Domain?
- Key Benefits of a Dedicated Sending Domain
- What Recipients May See Without a Dedicated Sending Domain
- Dedicated Sending Domain vs. From and Reply-To Addresses
- Before You Begin
- How to Verify DNS Records
- How to Add DNS Records Manually
- Best Practices for Email Deliverability
- Troubleshooting Dedicated Sending Domains
- Domain Is Not Verifying
- An Existing DNS Record Conflicts With Setup
- A Wildcard DNS Record Causes a Conflict
- The Domain Is Verified but SSL Is Still Pending
- Frequently Asked Questions
- Need Help?
What Is a Dedicated Sending Domain?
A dedicated sending domain is a domain or subdomain that is authenticated specifically for sending email. It creates a stronger connection between your business identity and the infrastructure used to deliver your messages.
For example, if your main domain is:
You could use a dedicated sending subdomain such as:
or:
A subdomain is generally recommended because it helps separate email-sending reputation from the primary domain used for your website and regular business inboxes.
Key Benefits of a Dedicated Sending Domain
A properly authenticated sending domain gives you more control over your email identity and makes sender reputation easier to manage.
- Stronger domain alignment: Authenticate email using a domain you control.
- More consistent sender identity: Reduce reliance on shared technical sending domains.
- Better reputation management: Separate automated or marketing email activity from your primary business domain.
- Flexible email routing: Assign verified domains to supported types of email activity.
- Improved authentication: DNS records help receiving mail servers confirm that email is authorized.
- Scalable configuration: Use multiple verified domains where supported to separate different types of sending activity.
What Recipients May See Without a Dedicated Sending Domain
Emails sent through shared sending infrastructure may display a technical sending domain in the message details. Depending on the recipient's email application, this information may appear beside labels such as via, mailed-by, or signed-by.
This does not necessarily indicate a problem with the email. It shows that shared sending infrastructure was used instead of a dedicated domain authenticated specifically for your account.
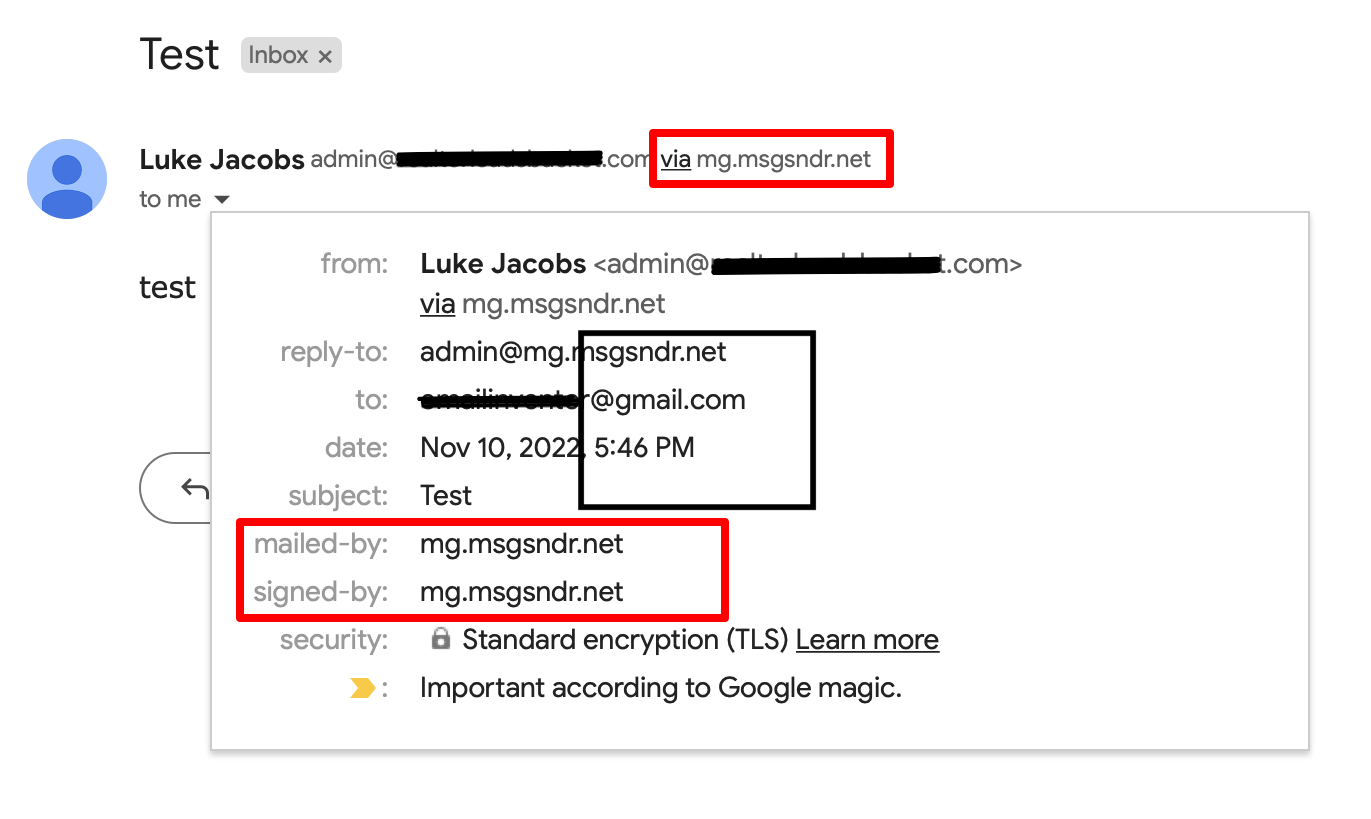
Open the message details in the recipient's inbox and review the via, mailed-by, or signed-by information to identify the technical sending domain.
Dedicated Sending Domain vs. From and Reply-To Addresses
The sending domain, From address, and Reply-To address serve different purposes. Understanding these differences helps ensure email identity and replies are configured correctly.
- Dedicated sending domain: Authenticates the infrastructure used to send the message.
- From address: The email address displayed as the sender.
- Reply-To address: The destination where customer replies are delivered.
The Reply-To address can be configured independently from the technical sending domain.
A dedicated sending domain is also different from a dedicated IP address. A dedicated IP is a separate sending-infrastructure option and is not required simply to configure a dedicated sending domain.
Before You Begin
Preparing your domain and DNS access before starting can make verification faster and reduce the chance of conflicting records.
Confirm that you have:
- A domain you control.
- Access to the domain's DNS settings.
- Permission to create or update DNS records.
- A dedicated subdomain selected for sending, when possible.
- Access to Settings → Email Services.
- Reviewed existing DNS records before making changes.
How to Set Up a Dedicated Sending Domain
Adding a dedicated sending domain creates the authentication records required to authorize email sending. Use the exact domain and DNS values generated during setup.
Open Email Services
Go to Settings → Email Services, then open the SMTP Service tab.
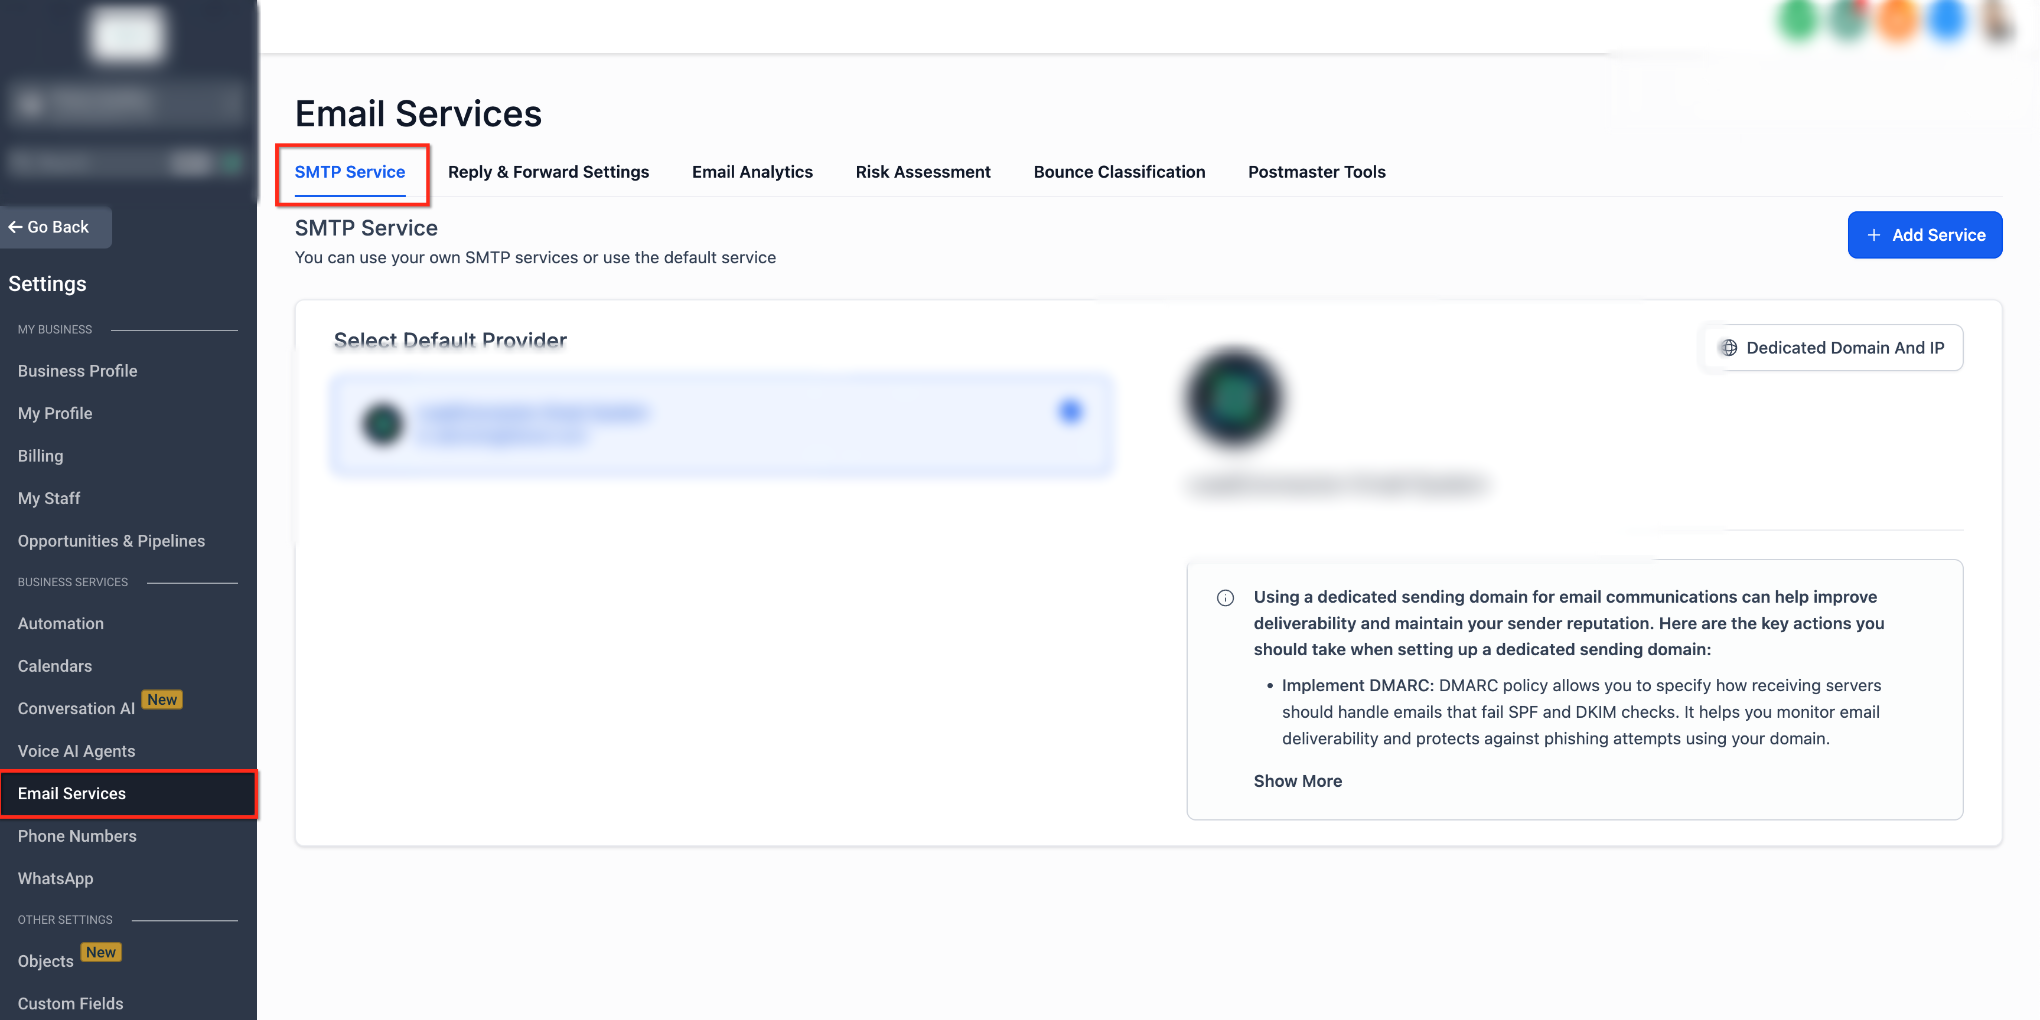
Navigate to Settings → Email Services and select SMTP Service to access the sending-domain settings.
Open Dedicated Domain Settings
Select Dedicated Domain And IP.
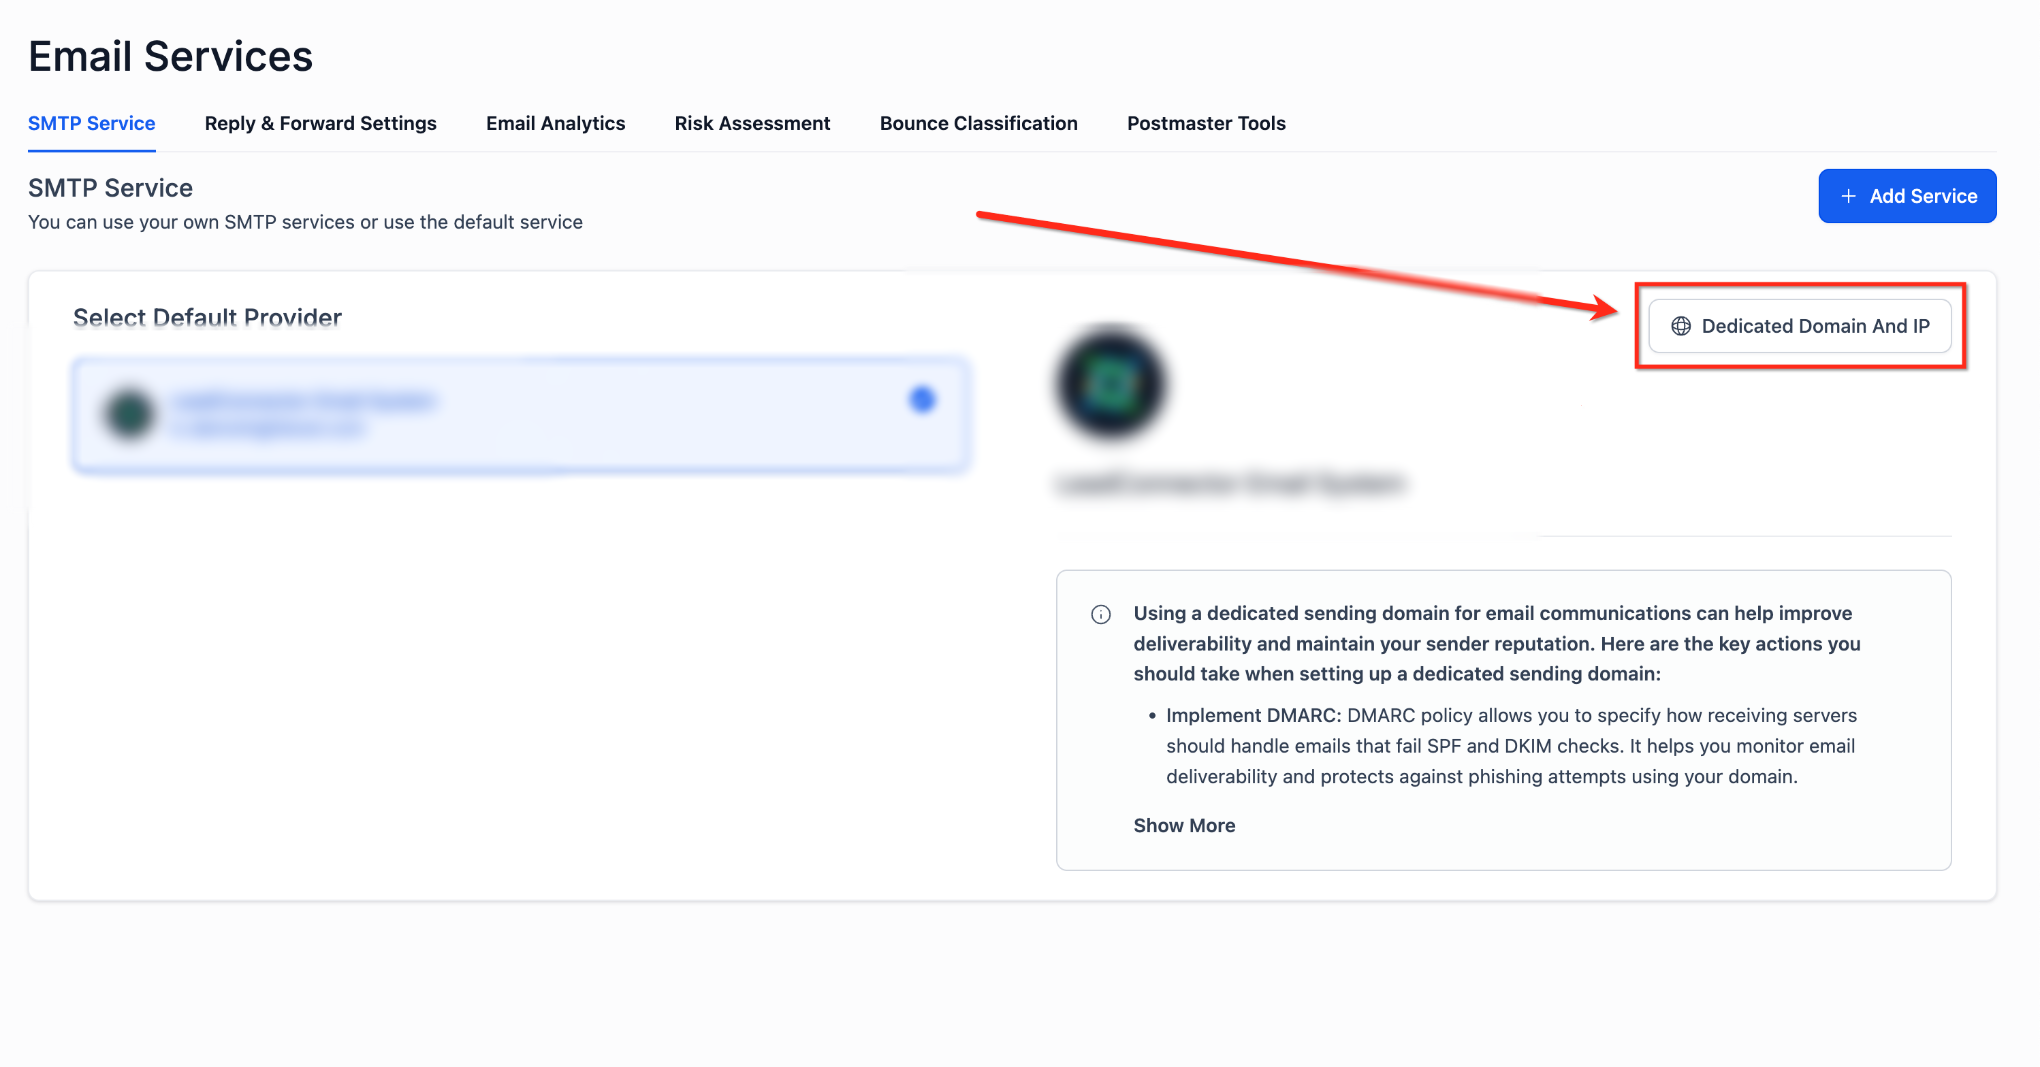
Click Dedicated Domain And IP to view existing domains and access the dedicated sending-domain configuration.
Add a Dedicated Domain
Open the Dedicated domain tab and click Add Domain. Existing domains and their verification status can also be reviewed from this page.
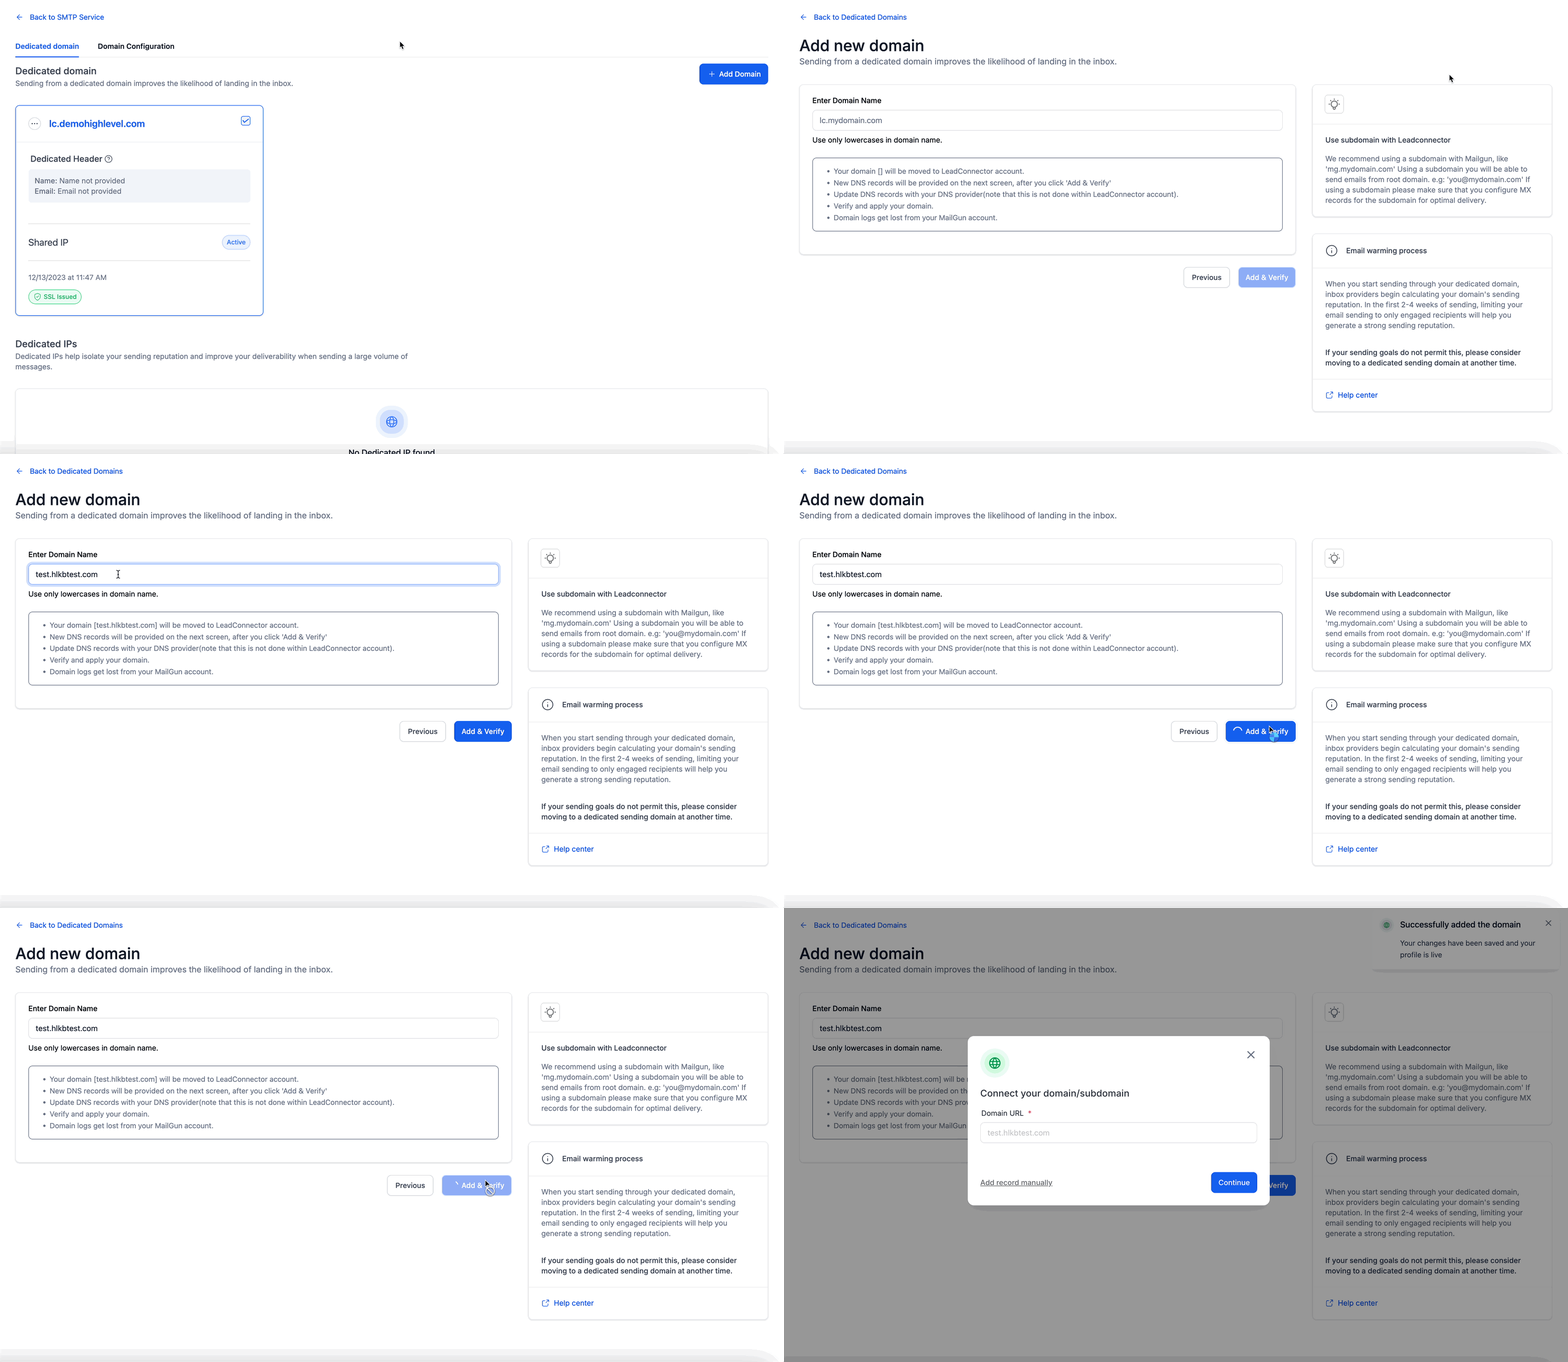
Click Add Domain to begin configuring a dedicated domain or subdomain for email sending.
Enter the Domain or Subdomain
Enter the domain you want to authenticate for sending.
A dedicated subdomain is recommended when possible, for example:
Use lowercase characters and avoid selecting a subdomain that already supports another service. Continue to generate the DNS records required for authentication.
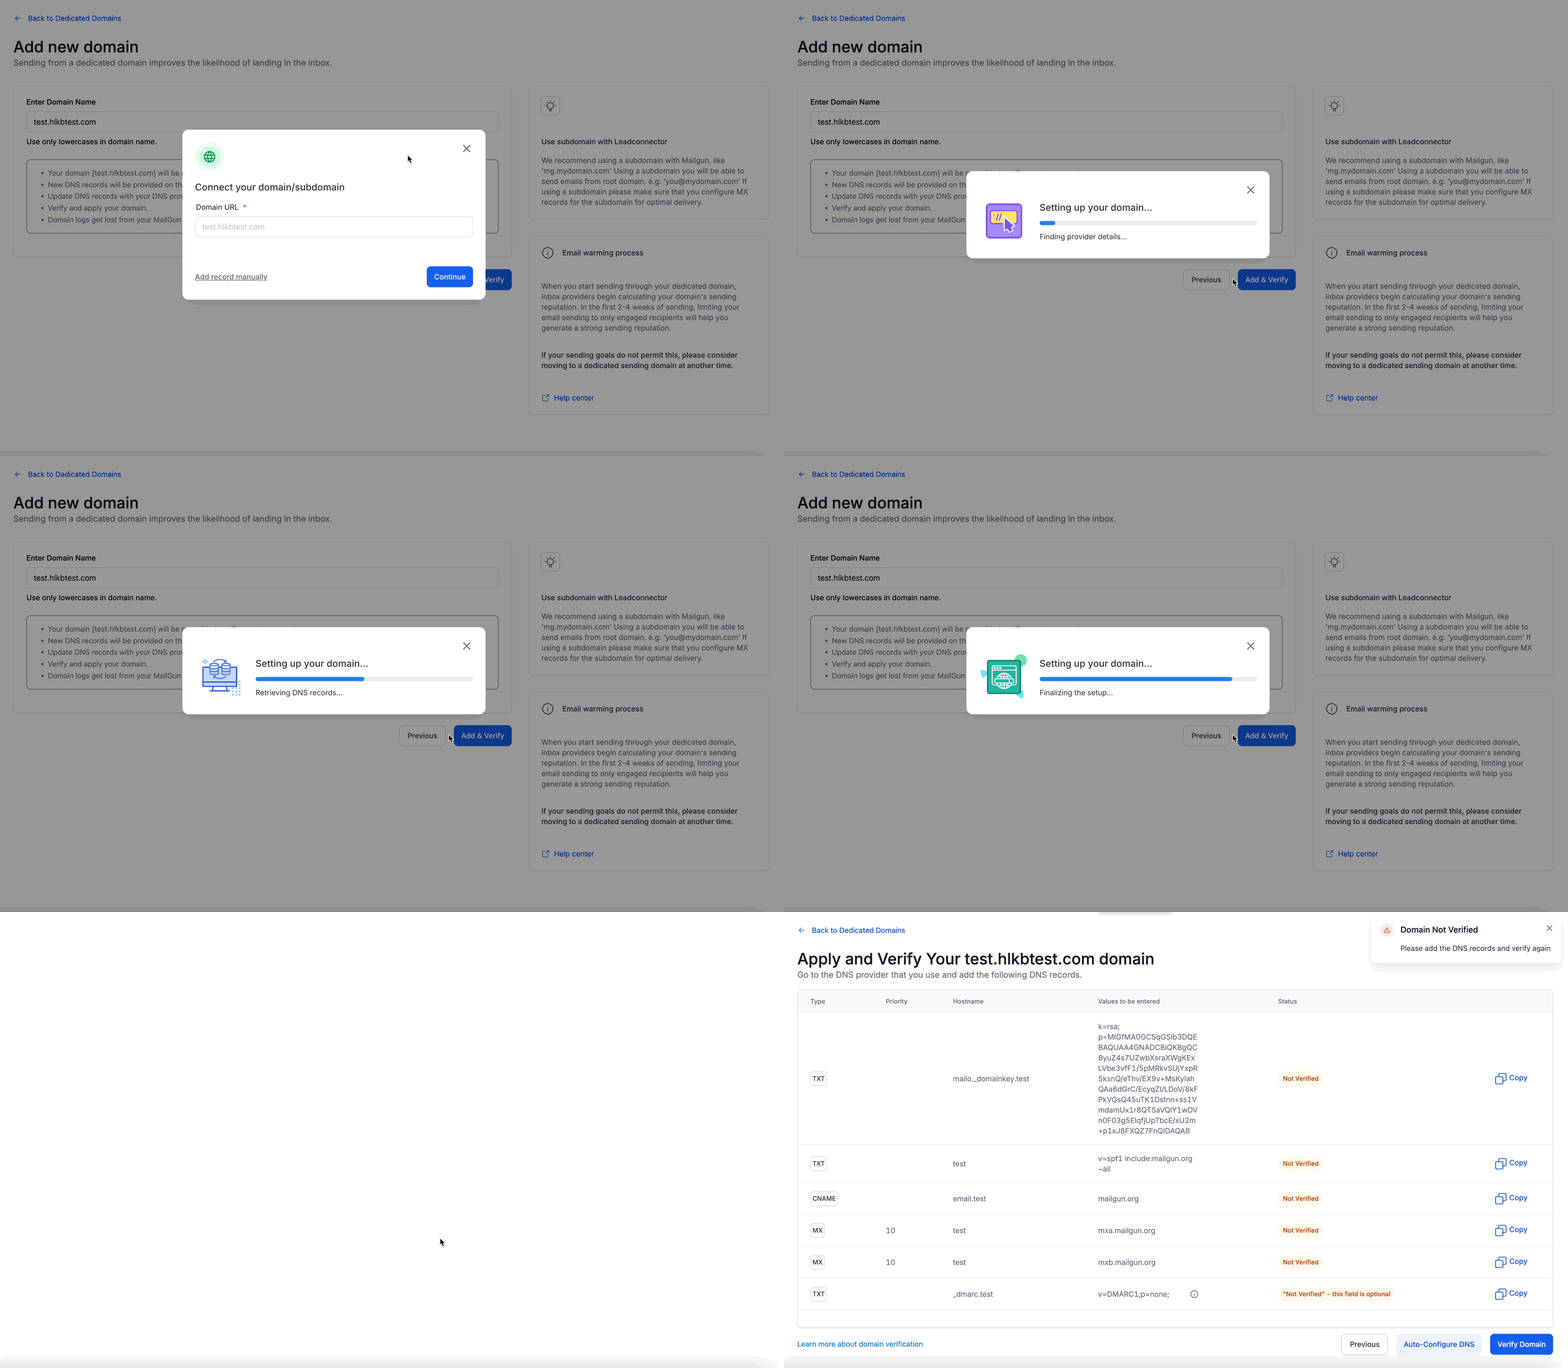
Enter the domain or subdomain you want to authenticate, then continue to generate the required DNS records.
How to Verify DNS Records
DNS verification confirms that you control the domain and authorizes it for email sending. Every required record must match the values generated during setup.
The verification screen may include records such as:
- TXT: Commonly used for authentication and domain policies.
- CNAME: Used to connect specific subdomains or supported email functions.
- MX: Used for supported mail-routing functions.
- DKIM: Helps verify that messages were authorized by the sending domain.
- SPF: Identifies servers authorized to send on behalf of the domain.
- DMARC: Defines how receiving servers should handle certain authentication failures.
Copy the Type, Priority, Hostname, and Value exactly as displayed for each required record.
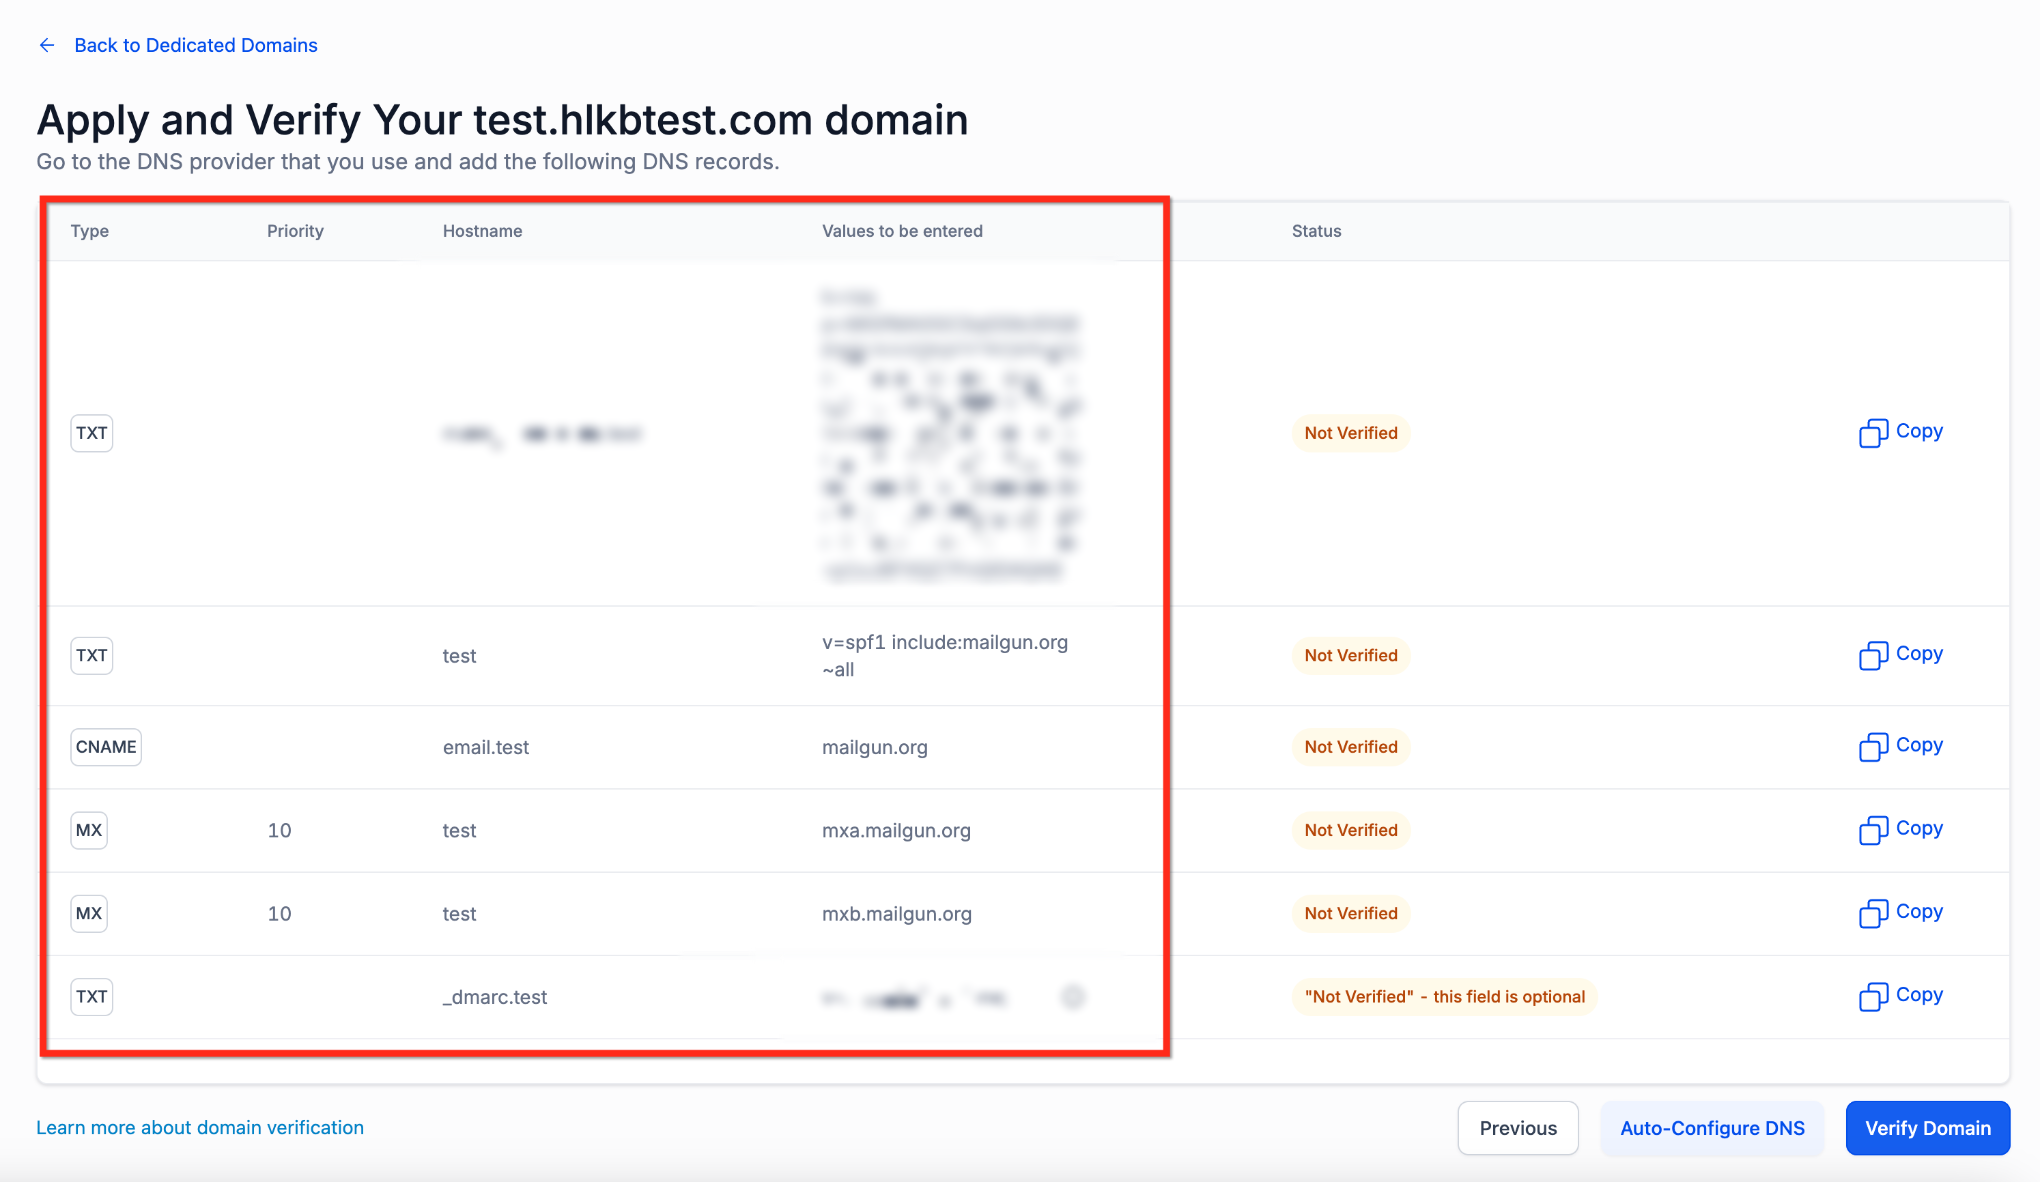
Review each generated DNS record and copy the exact values into your domain's DNS manager. Return to the verification page after all required records have been added.
After updating the DNS records, select Verify Domain.
Once verification succeeds, the domain becomes available for supported email assignments.
How to Assign a Domain to Email Types
Domain assignments determine which verified sending domain is used for different types of email. This can help separate transactional, conversational, and marketing sending activity.
Return to Email Services
Go back to Settings → Email Services → SMTP Service.
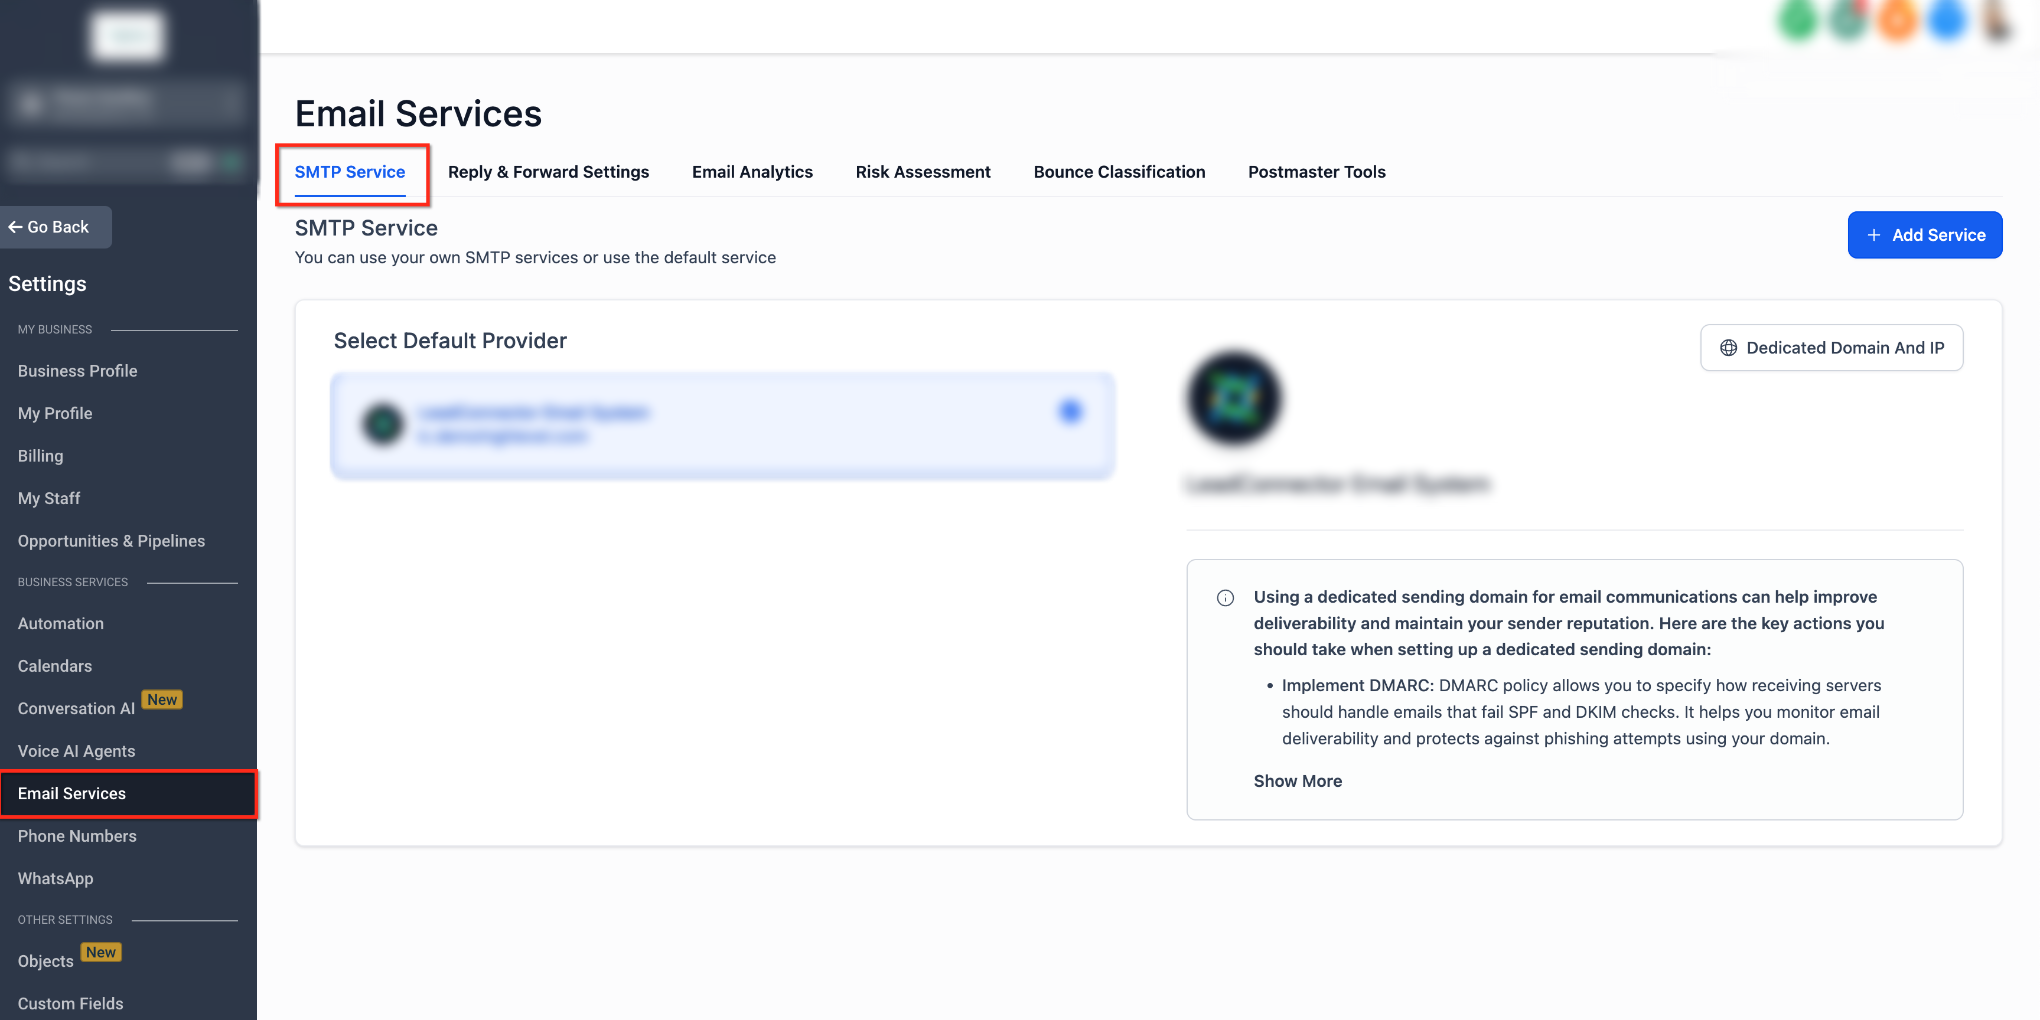
Open Email Services and return to the sending-domain settings after your domain has been successfully verified.
Configure Domain Assignments
Open Dedicated Domain And IP, then select Domain Configuration.
Depending on the features available in your account, verified domains may be assigned to email categories such as:
- Calendar emails
- Payment emails
- One-to-one conversations
- Bulk email
- Campaign emails
- Workflow emails
- Default sending activity
Select the verified domain you want to use for each supported category.
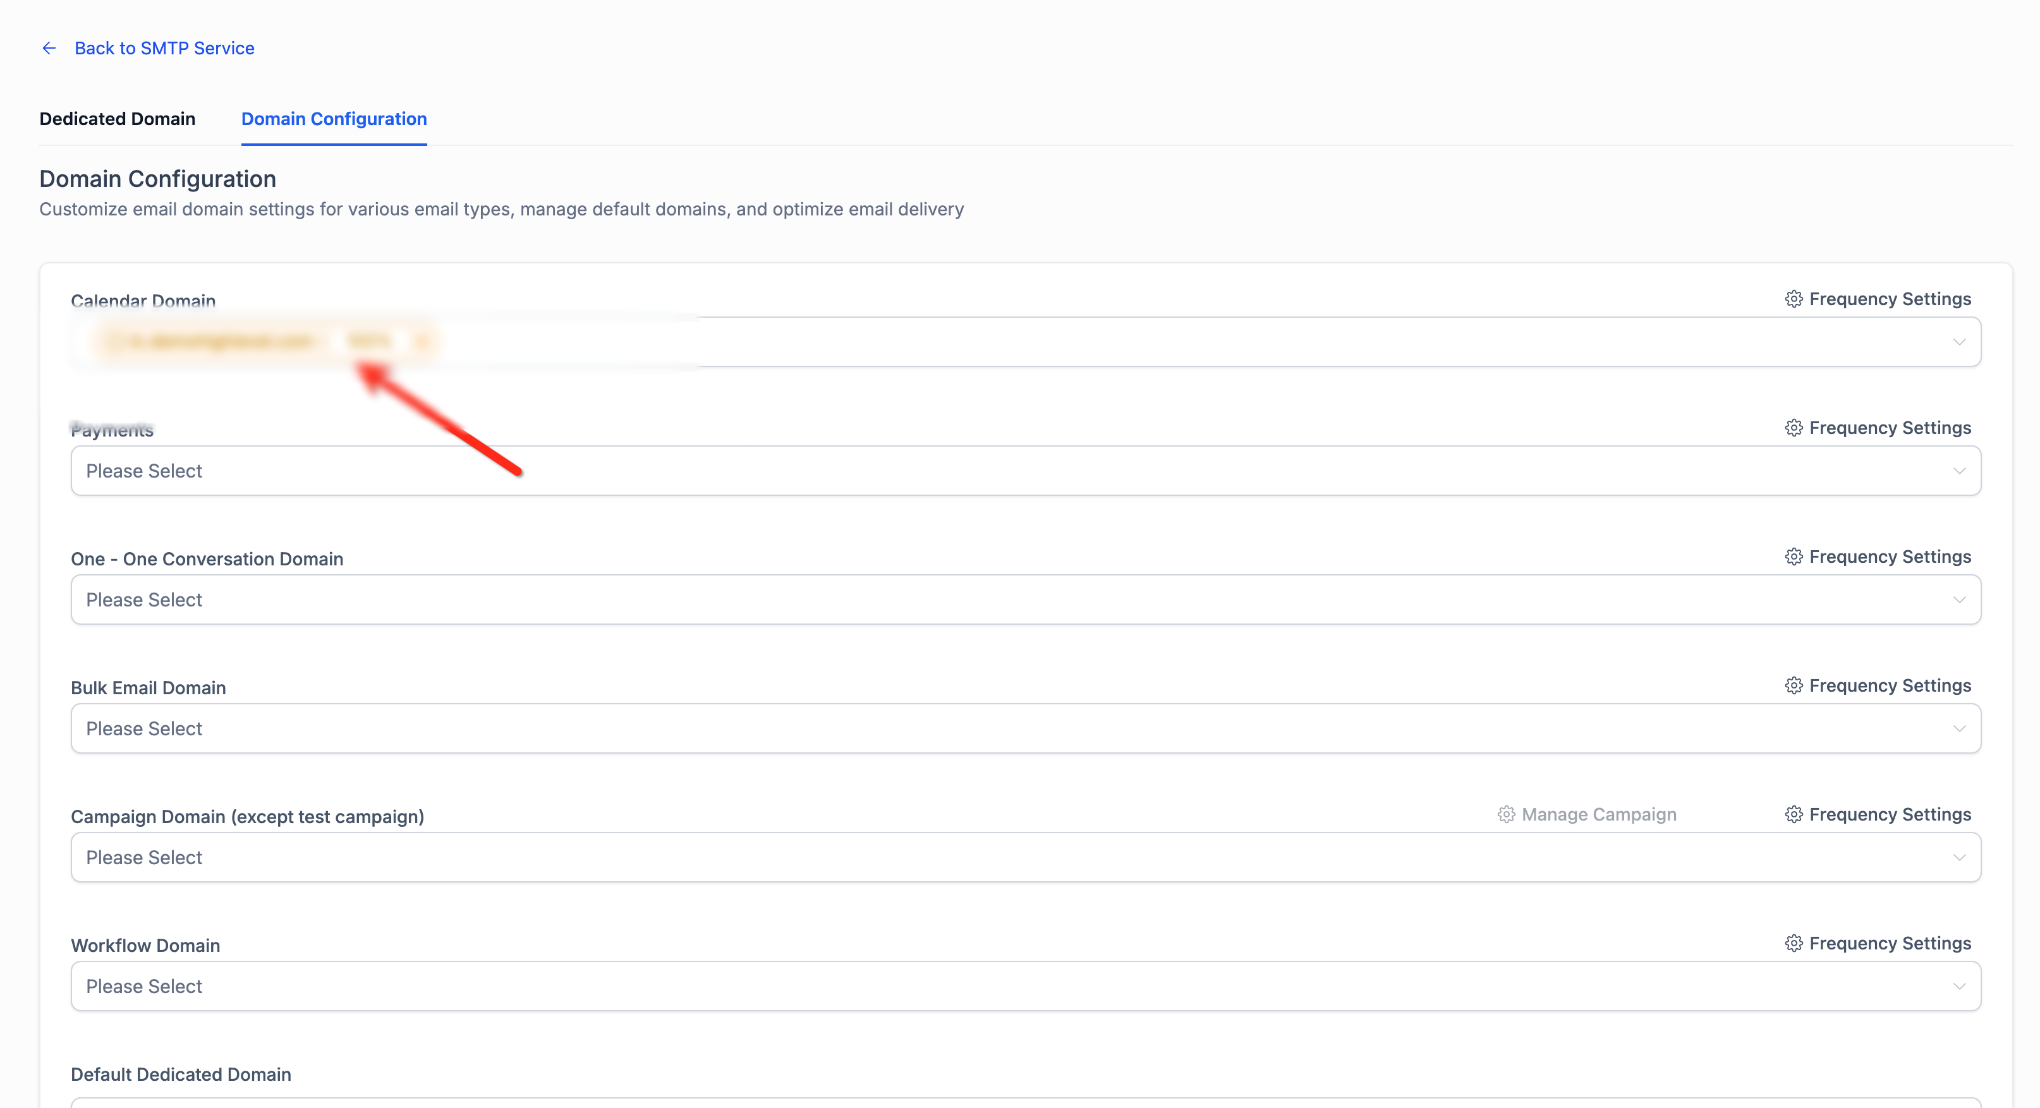
Choose the verified domain that should handle the selected email category. Where percentage-based distribution is available, confirm that the complete distribution totals 100%.
When multiple domains are supported for the same category, frequency controls may allow sending volume to be distributed across them.
Changes to domain assignments affect future sending activity and do not change email that has already been sent.
How to Add DNS Records Manually
Manual DNS configuration is useful when automatic domain configuration is unavailable or when you prefer to manage authentication records directly through your DNS settings.
During domain setup, select Add record manually when the option is available.
The required records will appear with the record type, host, and value that must be entered into your DNS manager.
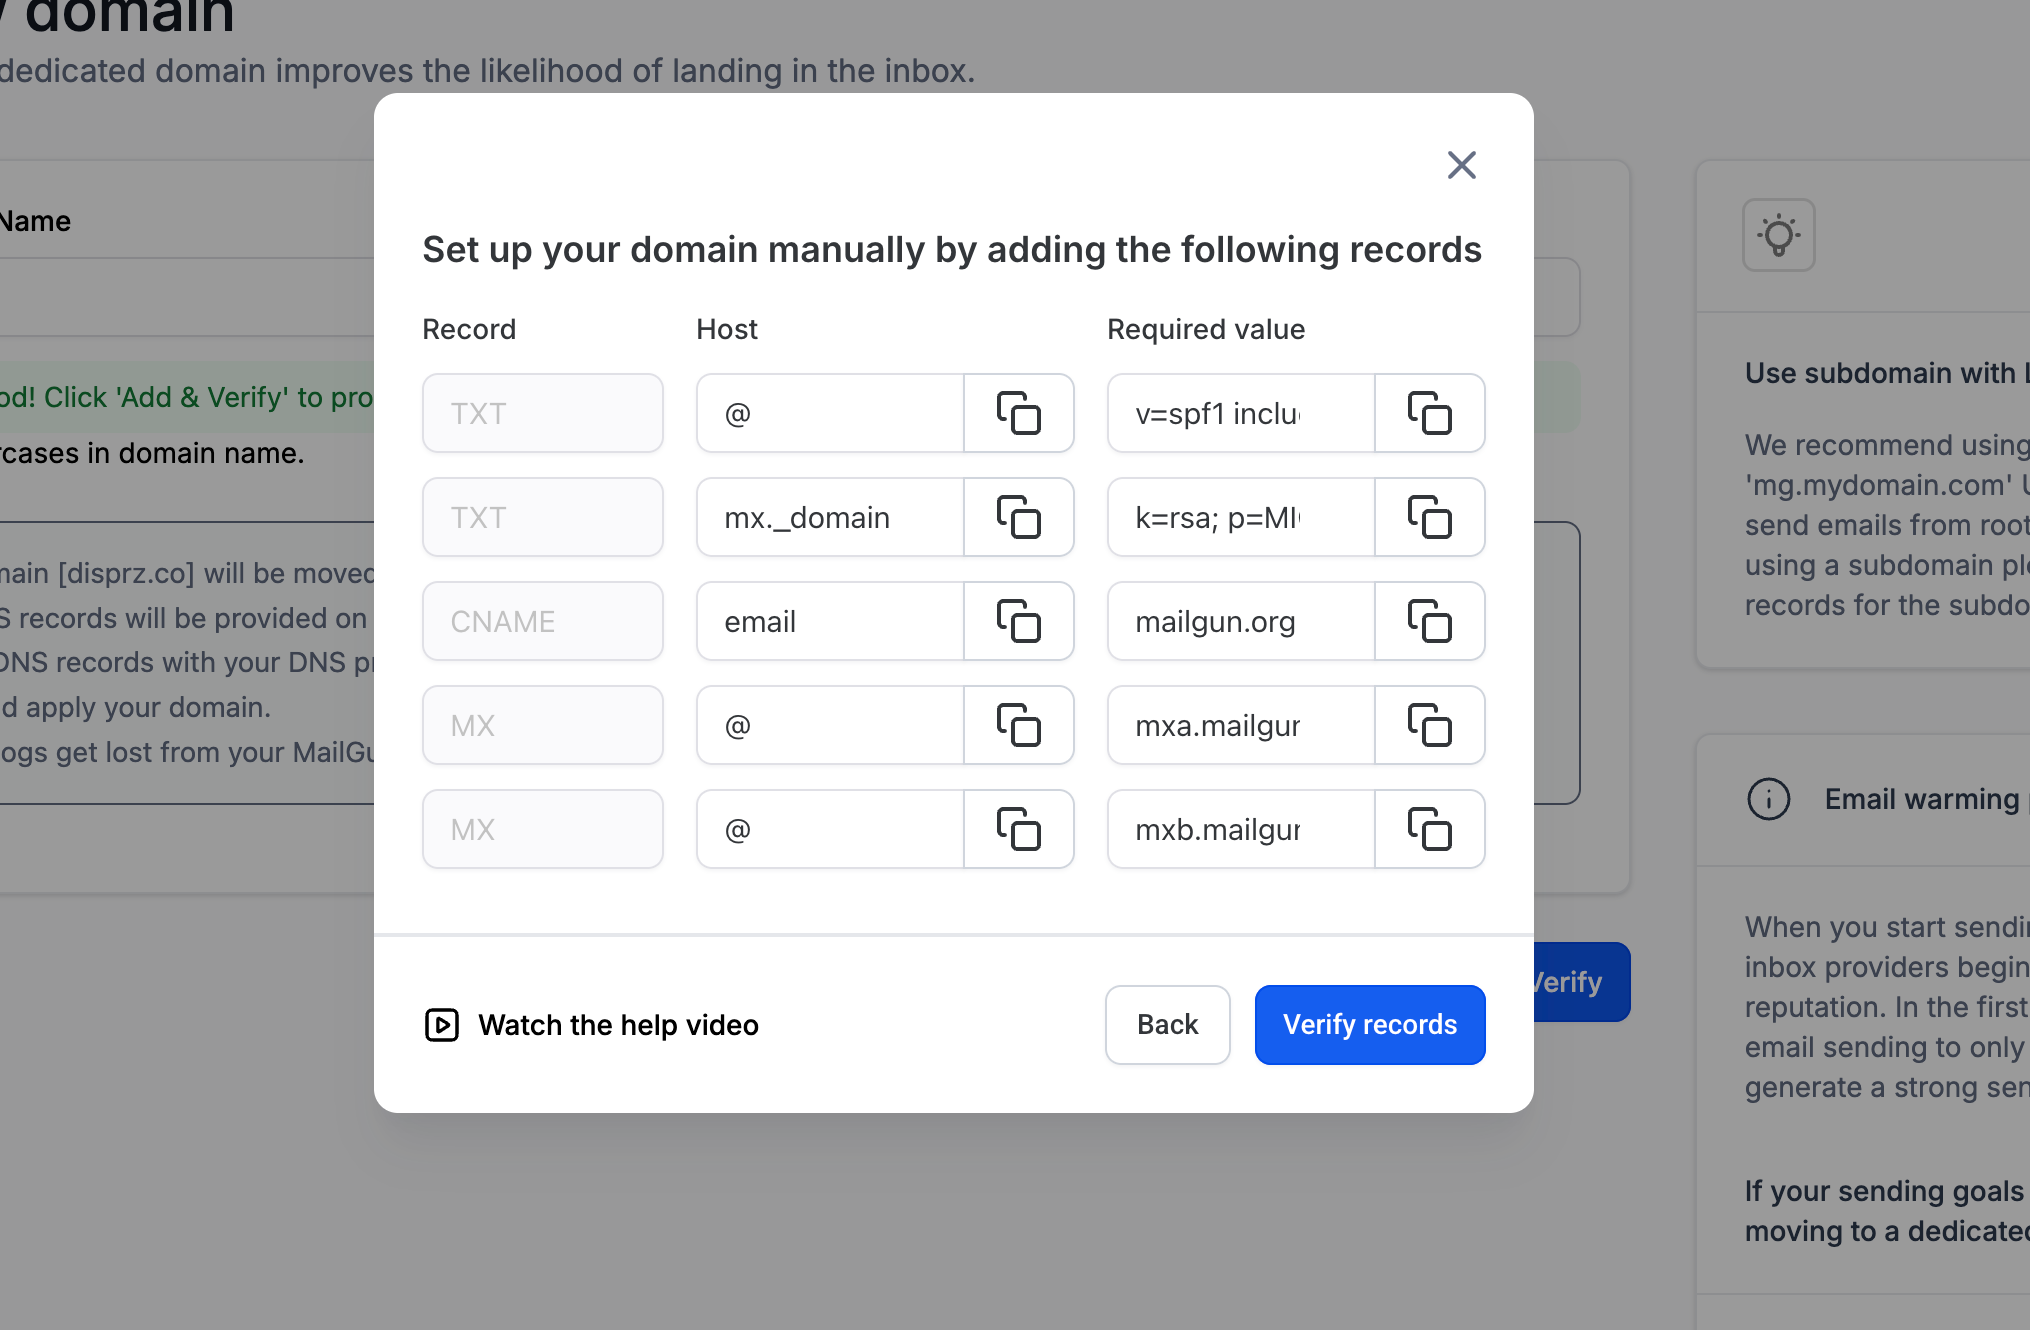
Copy each Record, Host, and Required value into the matching fields in your DNS manager. After saving all required records, return to the setup screen and click Verify records.
Do not modify the generated values unless your DNS provider requires a specific host-format adjustment. If you are unsure how root or subdomain host values should be entered, confirm the correct format with your domain administrator before saving.
Best Practices for Email Deliverability
A dedicated sending domain provides the technical foundation for authenticated email, but long-term deliverability also depends on how the domain is used.
- Use a dedicated subdomain for sending when possible.
- Send primarily to recipients who requested or expect your email.
- Avoid immediately sending very large volumes from a newly configured domain.
- Increase sending volume gradually when establishing new sending history.
- Keep recipient lists current and remove invalid addresses.
- Monitor bounce rates, spam complaints, and recipient engagement.
- Keep authentication records active and accurate.
- Avoid frequently changing sending domains without a clear reason.
- Keep sender names and From addresses recognizable to recipients.
Troubleshooting Dedicated Sending Domains
Most setup problems are caused by missing DNS records, conflicting records, incomplete propagation, or incorrect host formatting. Checking these areas first can often resolve verification issues without changing the domain itself.
Domain Is Not Verifying
Confirm that:
- Every required DNS record has been added.
- Record types match the generated instructions.
- Host names are entered correctly.
- Record values were copied completely.
- MX priorities match the required values when applicable.
- DNS changes have had enough time to propagate.
- The DNS manager has not automatically modified the host name.
Allow up to 24–48 hours for DNS propagation when necessary.
An Existing DNS Record Conflicts With Setup
Do not immediately delete an existing record. First determine whether another active email or domain service depends on it.
- Identify what currently uses the record.
- Check whether another email service depends on it.
- Consider using a different sending subdomain.
- Confirm changes with your domain administrator when necessary.
Using a separate sending subdomain is often safer than changing records used by your primary business email.
A Wildcard DNS Record Causes a Conflict
Wildcard records can automatically apply to subdomains that have not been explicitly configured.
- Check whether a wildcard DNS record exists.
- Create explicit records for the dedicated sending subdomain when supported.
- Consult your domain administrator before changing wildcard behavior.
The Domain Is Verified but SSL Is Still Pending
SSL is normally issued automatically after successful domain verification.
- Confirm the domain still shows as verified.
- Run domain verification again.
- Allow additional time for the certificate to be issued.
- Recheck the DNS records if the status does not update.
Frequently Asked Questions
Q: Should I use my root domain or a subdomain for email sending?
A dedicated subdomain is generally recommended. It helps separate sending reputation from the domain used for your website and regular business email.
Q: Does a dedicated sending domain guarantee that my emails will reach the inbox?
No. It improves authentication and sender-domain alignment, but inbox placement still depends on reputation, engagement, message content, complaint rates, and other sending practices.
Q: How long does domain verification take?
Some domains verify within minutes, while DNS propagation can take up to 24–48 hours depending on your DNS configuration.
Q: Do I need a dedicated IP to use a dedicated sending domain?
No. A dedicated IP is a separate optional sending configuration and is not required simply to authenticate a dedicated sending domain.
Q: Can I use more than one dedicated sending domain?
Yes. Multiple verified domains can be configured where supported. Available assignments and distribution controls depend on the email category and account configuration.
Q: Why are some DNS records still showing as not verified?
Check that the record type, host, value, and priority exactly match the generated instructions. DNS propagation may also still be in progress.
Q: Can I delete an existing MX or SPF record if it conflicts with the new domain?
Do not remove an existing DNS record unless you know what service depends on it. Consider using a separate sending subdomain or confirming the change with your domain administrator first.
Q: What happens if my domain has a wildcard DNS record?
A wildcard may cause a subdomain to appear as already configured. Explicit DNS records for the dedicated sending subdomain may be required to override the wildcard behavior.
Q: What is the difference between the From address and Reply-To address?
The From address identifies the sender displayed to the recipient. The Reply-To address determines where replies are delivered and can be configured separately.
Q: Why can a recipient see a different technical domain in the message details?
This can occur when email is sent through shared sending infrastructure. Configuring and assigning a verified dedicated sending domain provides more consistent domain alignment for supported email.
Need Help?
If your dedicated sending domain is not verifying or email is not using the domain you expected, first review the DNS configuration and domain assignment.
Verify that:
- The correct domain or subdomain was added.
- Every required DNS record has been created.
- DNS record values exactly match the generated instructions.
- DNS propagation has completed.
- The domain shows a verified status.
- SSL has been issued after verification.
- The verified domain is assigned to the intended email category.
- Percentage-based domain assignments total 100% where applicable.
- Existing DNS records are not conflicting with the dedicated sending domain.
- A wildcard record is not interfering with the subdomain.
- The email was sent after the domain assignment was updated.
If the issue continues, collect the domain name, verification status, DNS record statuses, domain assignment settings, and screenshots of any displayed error before contacting support.