
TABLE OF CONTENTS
What is Meta Marketing Messages?
3. Subscriber Status and Opt-outs
4. Meta Marketing Campaign Creation Flow
5. Meta Marketing Campaign Analytics Flow
A step-by-step guide to connecting your Meta accounts, capturing opt-ins, handling opt-outs, sending campaigns, and reading results
Meta Marketing Messages lets you send paid promotional messages on Facebook Messenger to contacts who have opted in to hear from your Page. Unlike regular Messenger replies, marketing messages can be delivered at any time, not only within the 24-hour window after a contact's last message. Each delivered message is paid for through your connected Meta ad account. This guide walks you through connecting your Meta assets, capturing opt-ins, handling opt-outs, creating campaigns, and reading campaign results.
What is Meta Marketing Messages?
Meta Marketing Messages is a paid Messenger channel built on Meta's Marketing Messages API. You connect your Facebook Page and Meta ad account to CRM, collect consent from contacts with an opt-in request in Messenger, and then send broadcast campaigns — a title, a description, an optional image, and up to three link buttons — to those subscribers from Marketing → Marketing Messages. Delivery, reads, clicks, and spend for each campaign are reported back in CRM.
Key Benefits of Meta Marketing Messages
Reach subscribers any time: Marketing messages are not limited to Messenger's 24-hour window, so you can re-engage past customers with offers and announcements.
Pay only for delivered messages: Meta bills per message delivered to the subscriber's device, on the same Meta bill as your ads.
Consent captured in Automation: A workflow action sends the opt-in request automatically when a contact messages your Page.
Replies continue in Conversations: When a subscriber replies, a standard 24-hour messaging window opens and the chat continues in Conversations like any other Messenger conversation. Meta does not charge for your replies within that window.
Campaign reporting in CRM: See delivered messages, read rate, button clicks, and spend for every campaign without opening Meta Ads Manager.
Before You Start
Complete these prerequisites first. Campaigns can be saved as drafts without them, but they cannot be sent:
Supported country: Your business is in a country where Meta offers Marketing Messages (see the FAQ for the current list).
Meta Business access: A Facebook Page and a Meta ad account owned by the same Meta Business Portfolio, and Business Admin access to that portfolio (Section 1).
Facebook integration: The same Facebook Page connected to the sub-account through the Facebook integration (Settings → Integrations → Facebook), so its Messenger conversations reach Conversations and can trigger the opt-in workflow.
Payment method: A valid payment method on the connected ad account.
Subscribers: At least one contact who accepted the Messenger opt-in request (Section 2). Only these contacts can be selected as recipients; contacts cannot be imported or tagged into the subscriber list.
1. Integration
Before Marketing Messages can send anything, CRM needs a live connection to your Meta Business assets: the Facebook Page your contacts message, and the Meta ad account that will fund the sends. This is a one-time setup per sub-account.
Requirements
Business Admin access to the Meta Business Portfolio that owns both the Facebook Page and the ad account. Admin access to a Page that is only shared with your portfolio — common when an agency manages a client's Page — is not enough; the Business Admin of the owning portfolio must complete the setup.
The Facebook Page and the ad account belong to the same Business Portfolio. Mismatched ownership is the most common cause of a failed connection.
An ad account with a valid payment method and no outstanding restrictions.
The same Facebook Page connected through the Facebook integration card. Facebook Login for Business (below) authorizes paid Marketing Messages; the Facebook card brings the Page's Messenger conversations into Conversations. Marketing Messages needs both, for the same Page.
Step 1 — Open the Facebook Login for Business integration
From the sub-account, go to Settings → Integrations → All Integrations, find the Facebook Login for Business card, and click Connect. This is a separate card from the Facebook card next to it.
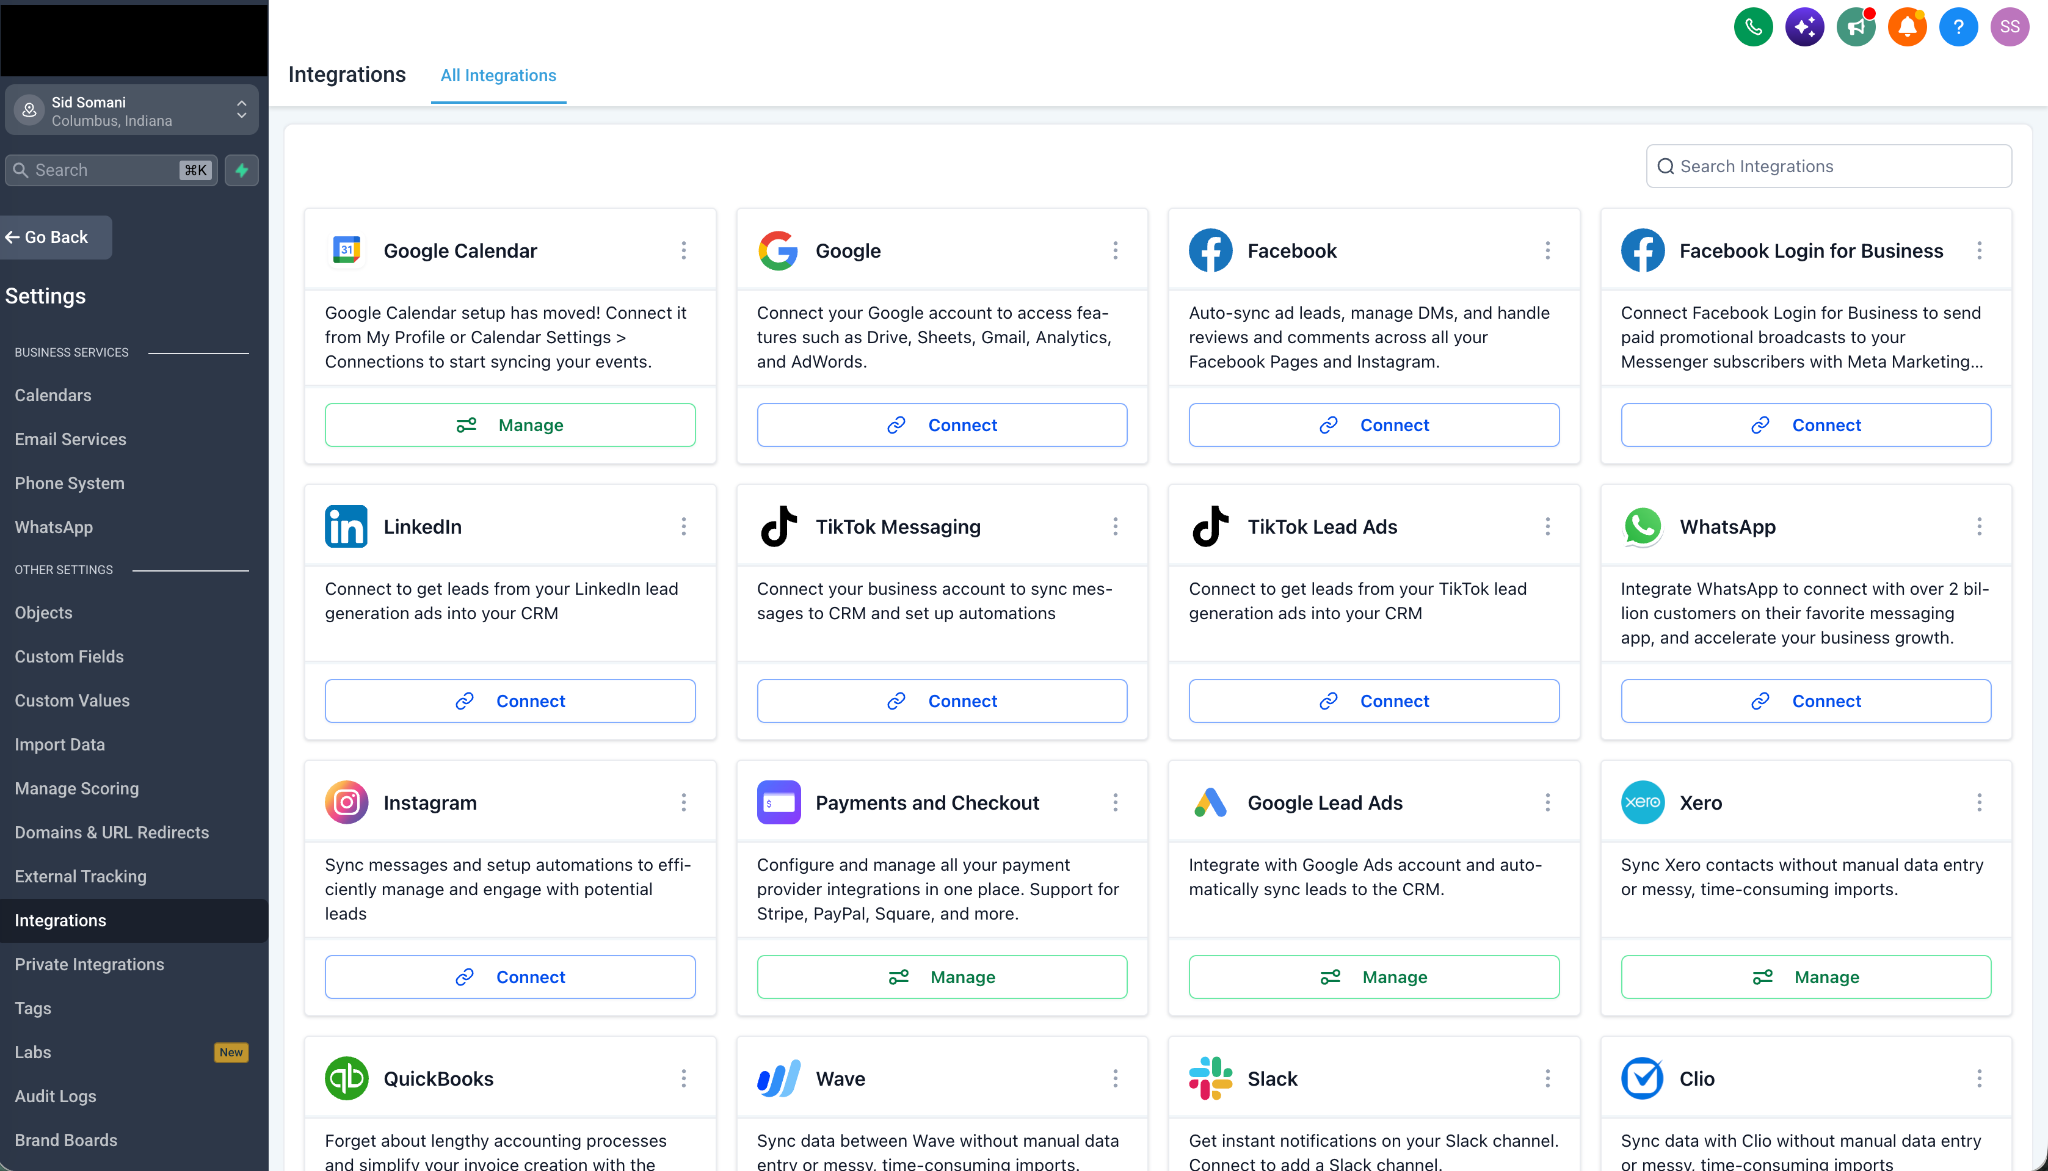
Settings → Integrations → All Integrations — the Facebook Login for Business card, next to the standard Facebook card.
Step 2 — Start the connection
Clicking Connect opens the Facebook Login for Business app on its External Connection tab. The first time, the tab shows Connection Pending. Click Connect to Facebook Login for Business to open Meta's authorization window.
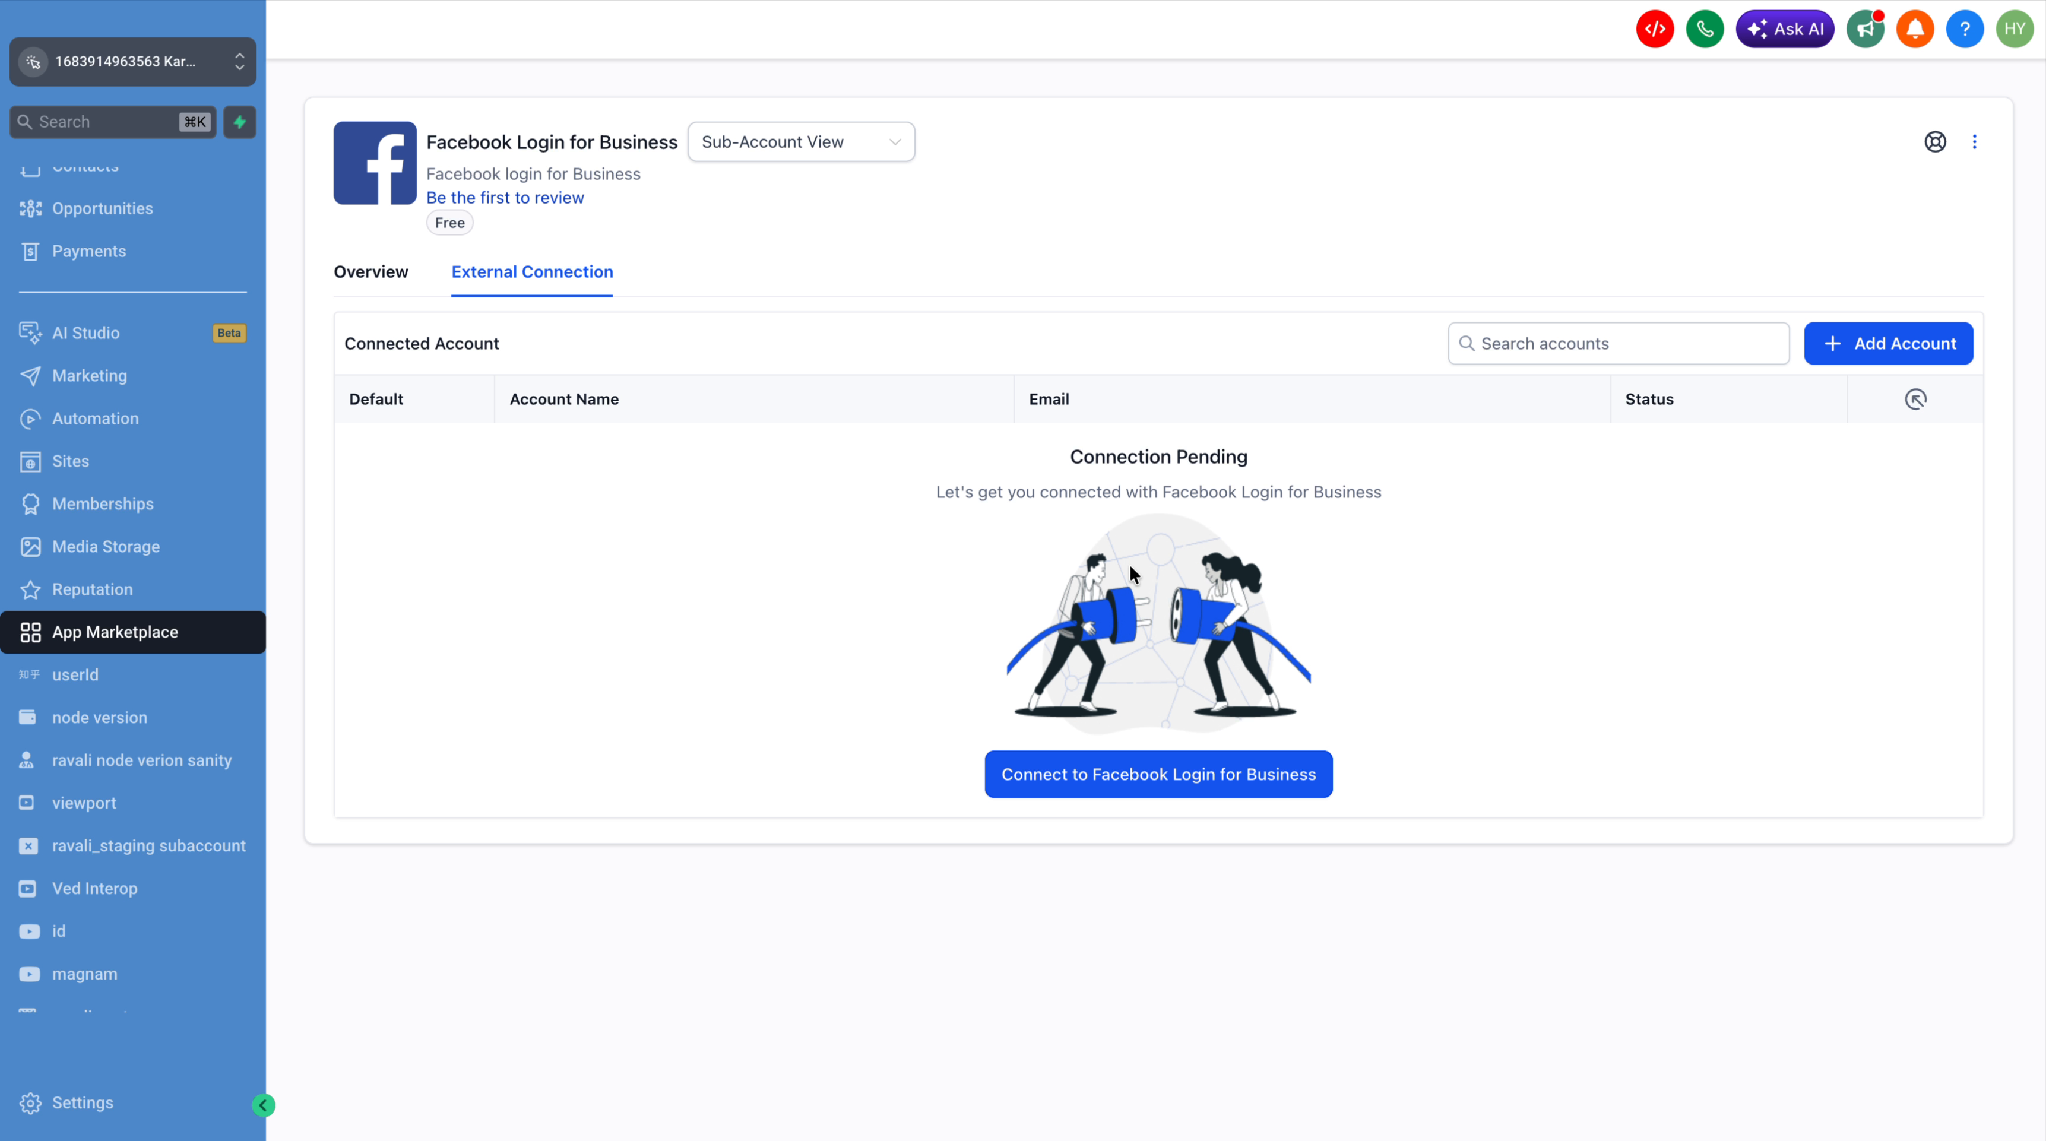
Facebook Login for Business → External Connection — Connection Pending, with the Connect to Facebook Login for Business button.
Step 3 — Authorize LeadConnector
Meta's window explains what the integration can do: send marketing messages, connect assets to your business portfolio, and add eligible people as subscribers. Click Continue. By continuing, you accept Meta's Beta Terms for Messenger Marketing Messages and the Meta Non-discrimination Policy.
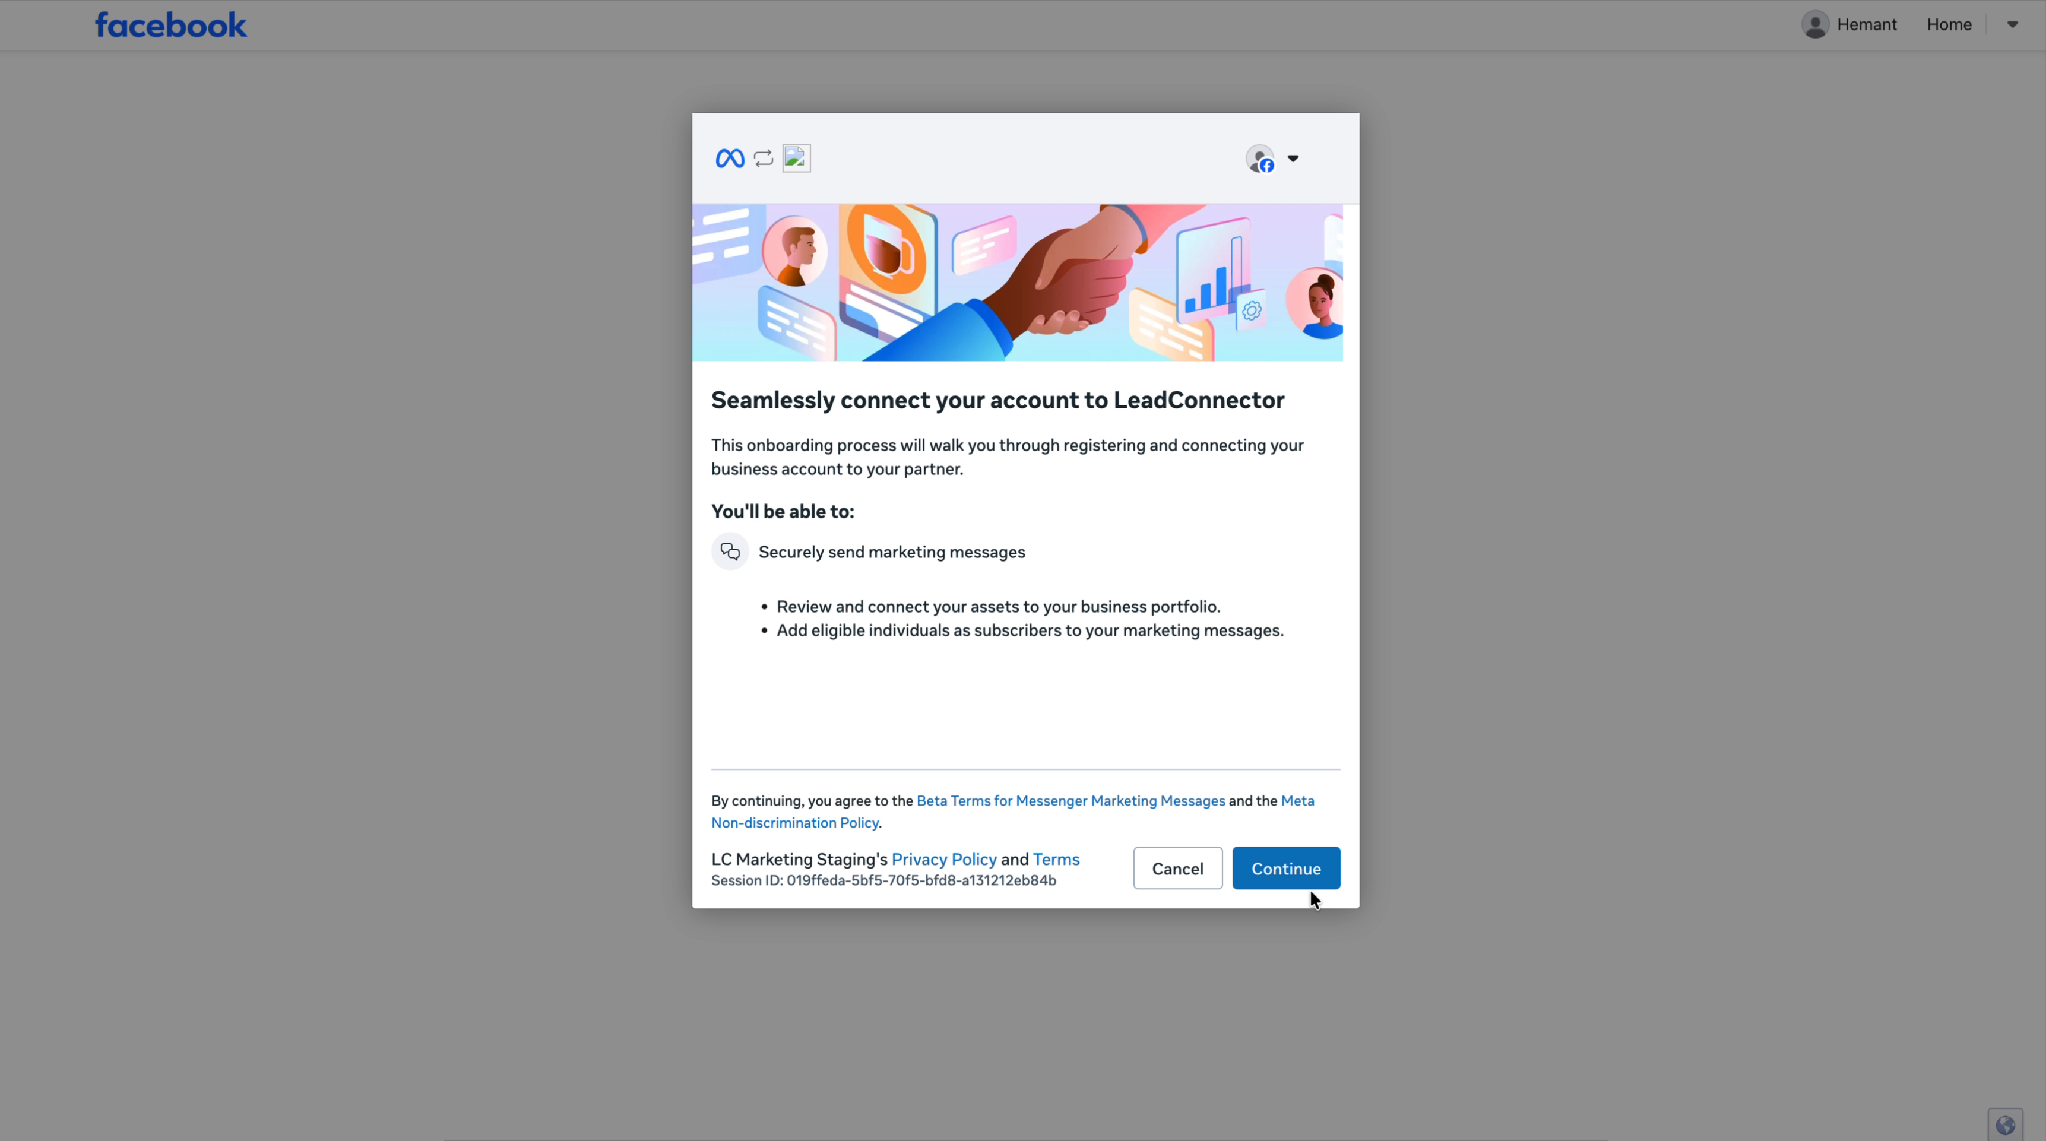
Meta connection window — “Seamlessly connect your account to LeadConnector,” listing what the integration enables before you continue.
Step 4 — Select your business portfolio, Page, and ad account
Select the Business portfolio that owns your assets, then the Page and Ad account this sub-account should use, and click Next. Assets you've shared with LeadConnector before are marked Previously shared.
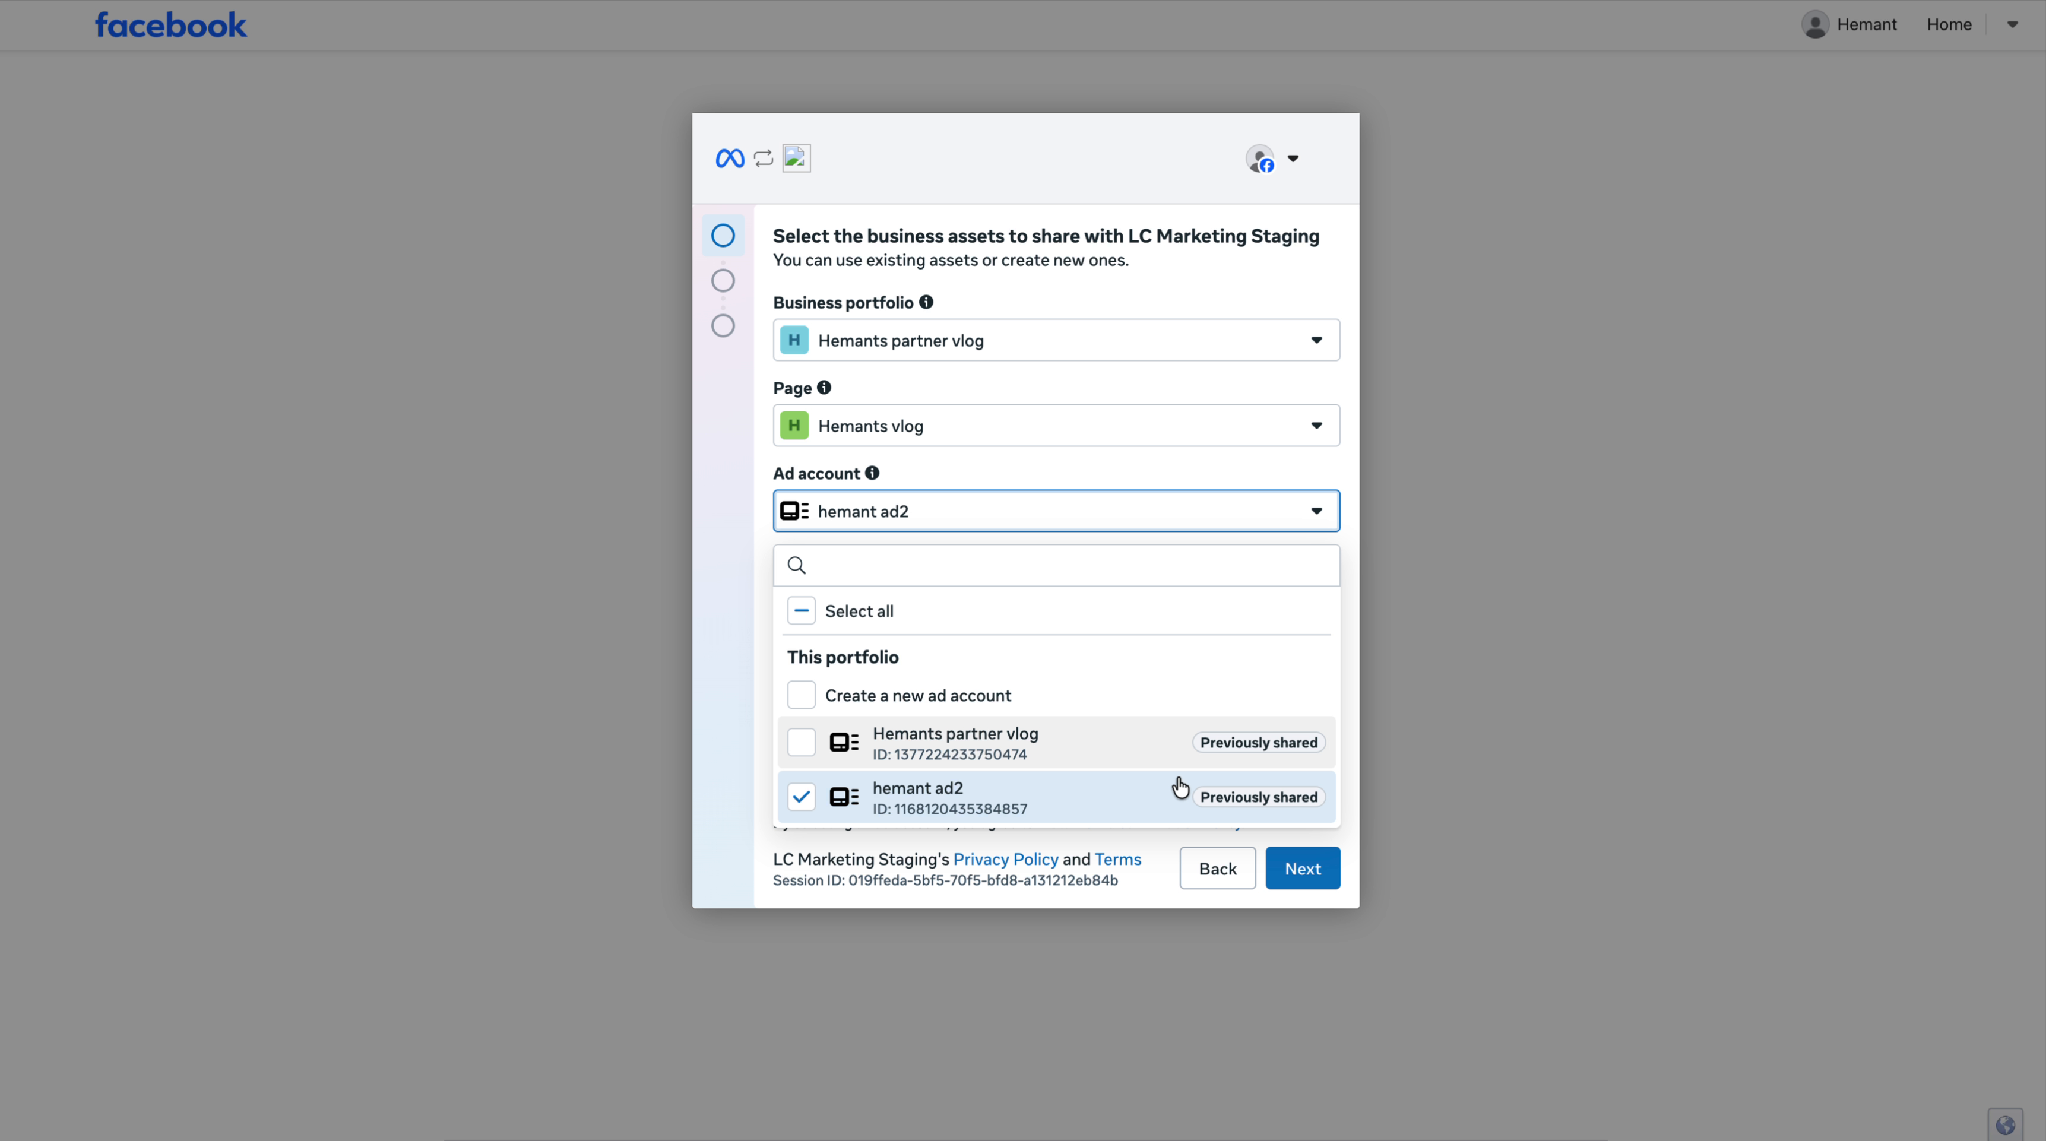
Select the business assets to share — Business portfolio, Page, and Ad account pickers, with the ad account list showing previously shared assets.
If your business portfolio doesn't already have a complete profile, Meta will ask you to fill in a Name, Country, and optional Website before continuing.
Step 5 — Set up audience growth for marketing messages
Meta then asks whether it should invite people to subscribe on your behalf. Both options are on by default: Send a one-off invitation invites people who have already chatted with your Page, and Automate future invitations invites people when they comment on your post, message you from an ad, or haven't messaged you in 48 hours. These invitations are sent by Meta, separately from the CRM opt-in workflow in Section 2, and you can change them later in Meta's Business settings. Click Next.
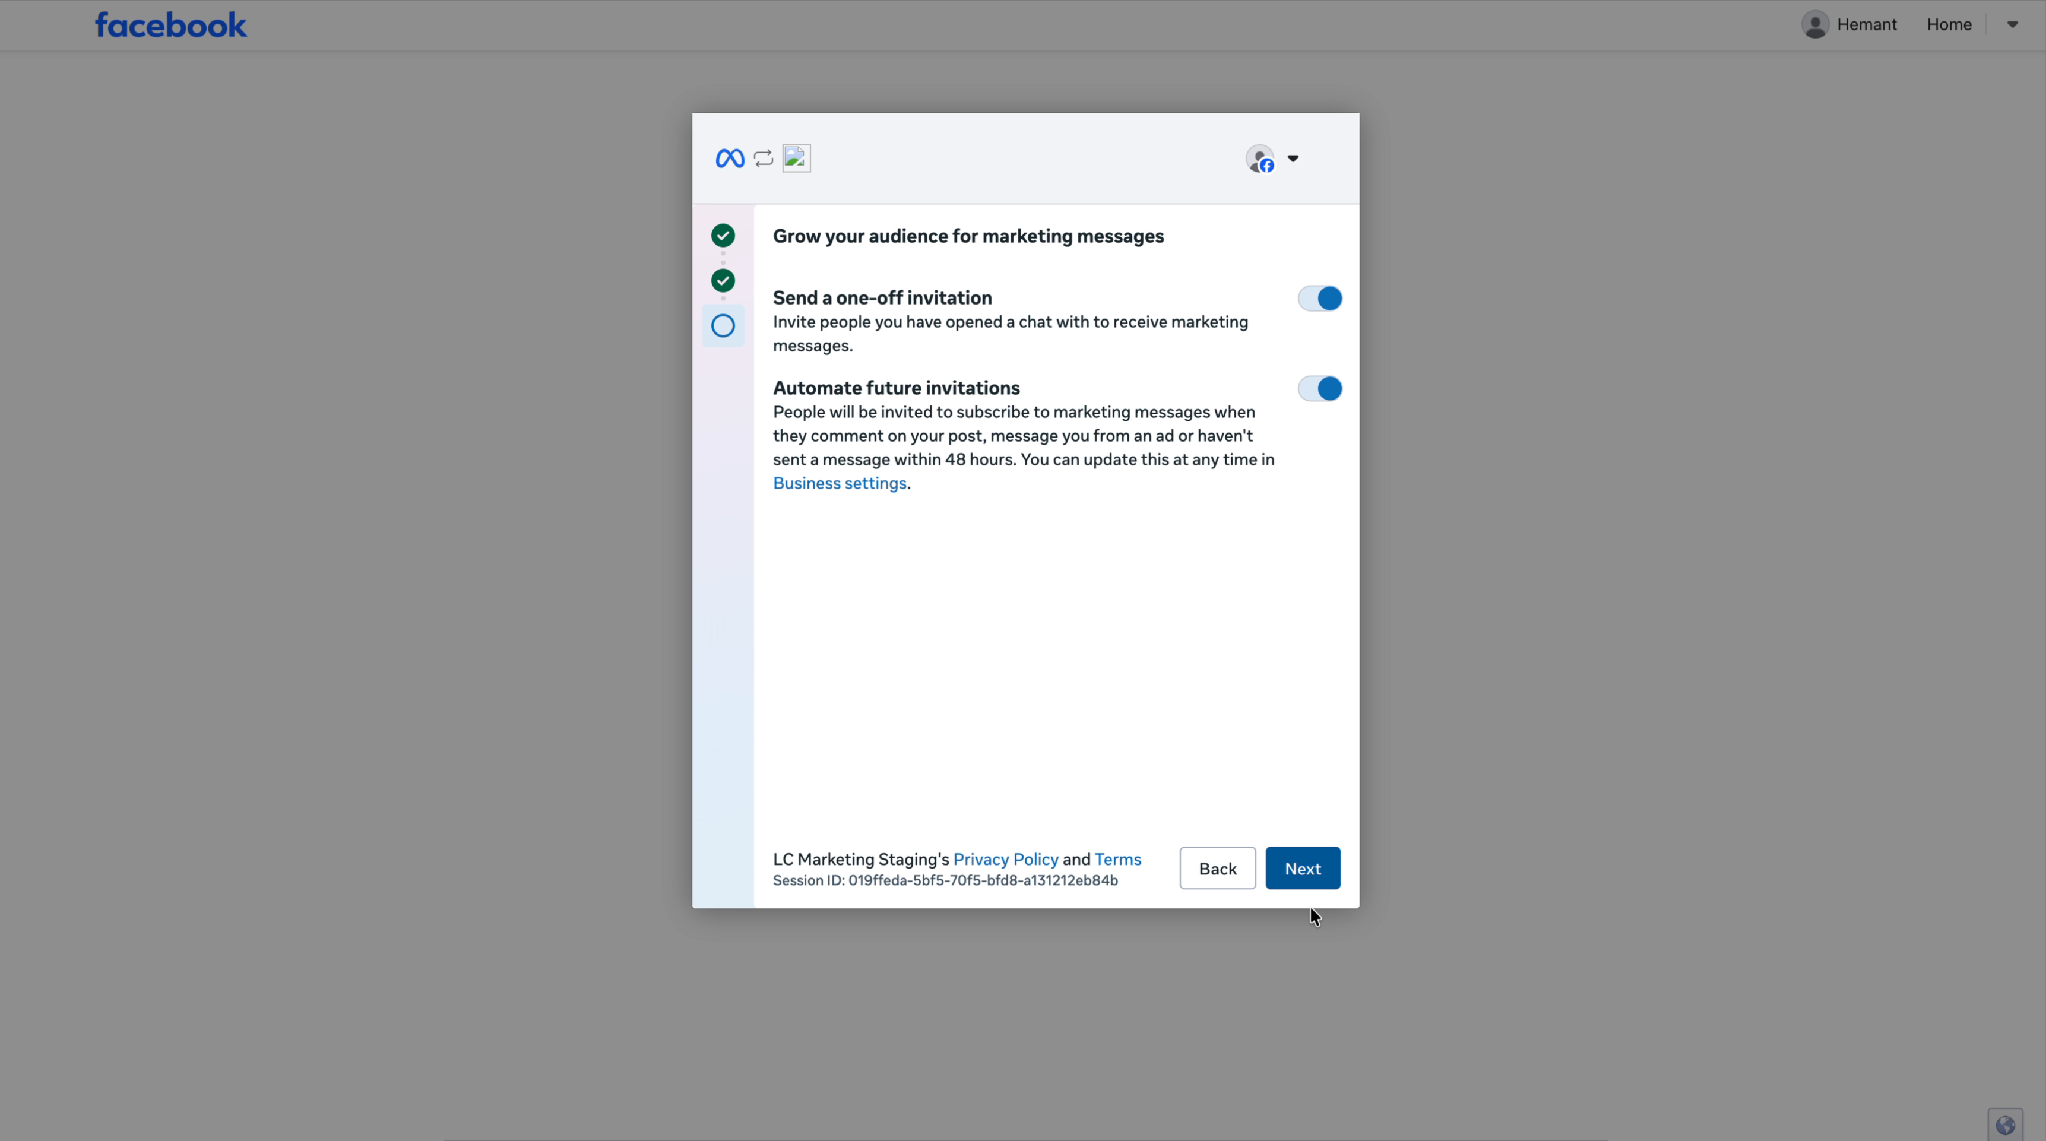
Grow your audience for marketing messages — Send a one-off invitation and Automate future invitations, both enabled by default.
Step 6 — Finish and confirm
Meta confirms that your account is connected to LeadConnector. Meta reviews your business against the Beta Terms for Messenger Marketing Messages and contacts you within 24 hours only if there is an issue. Click Finish to return to CRM.
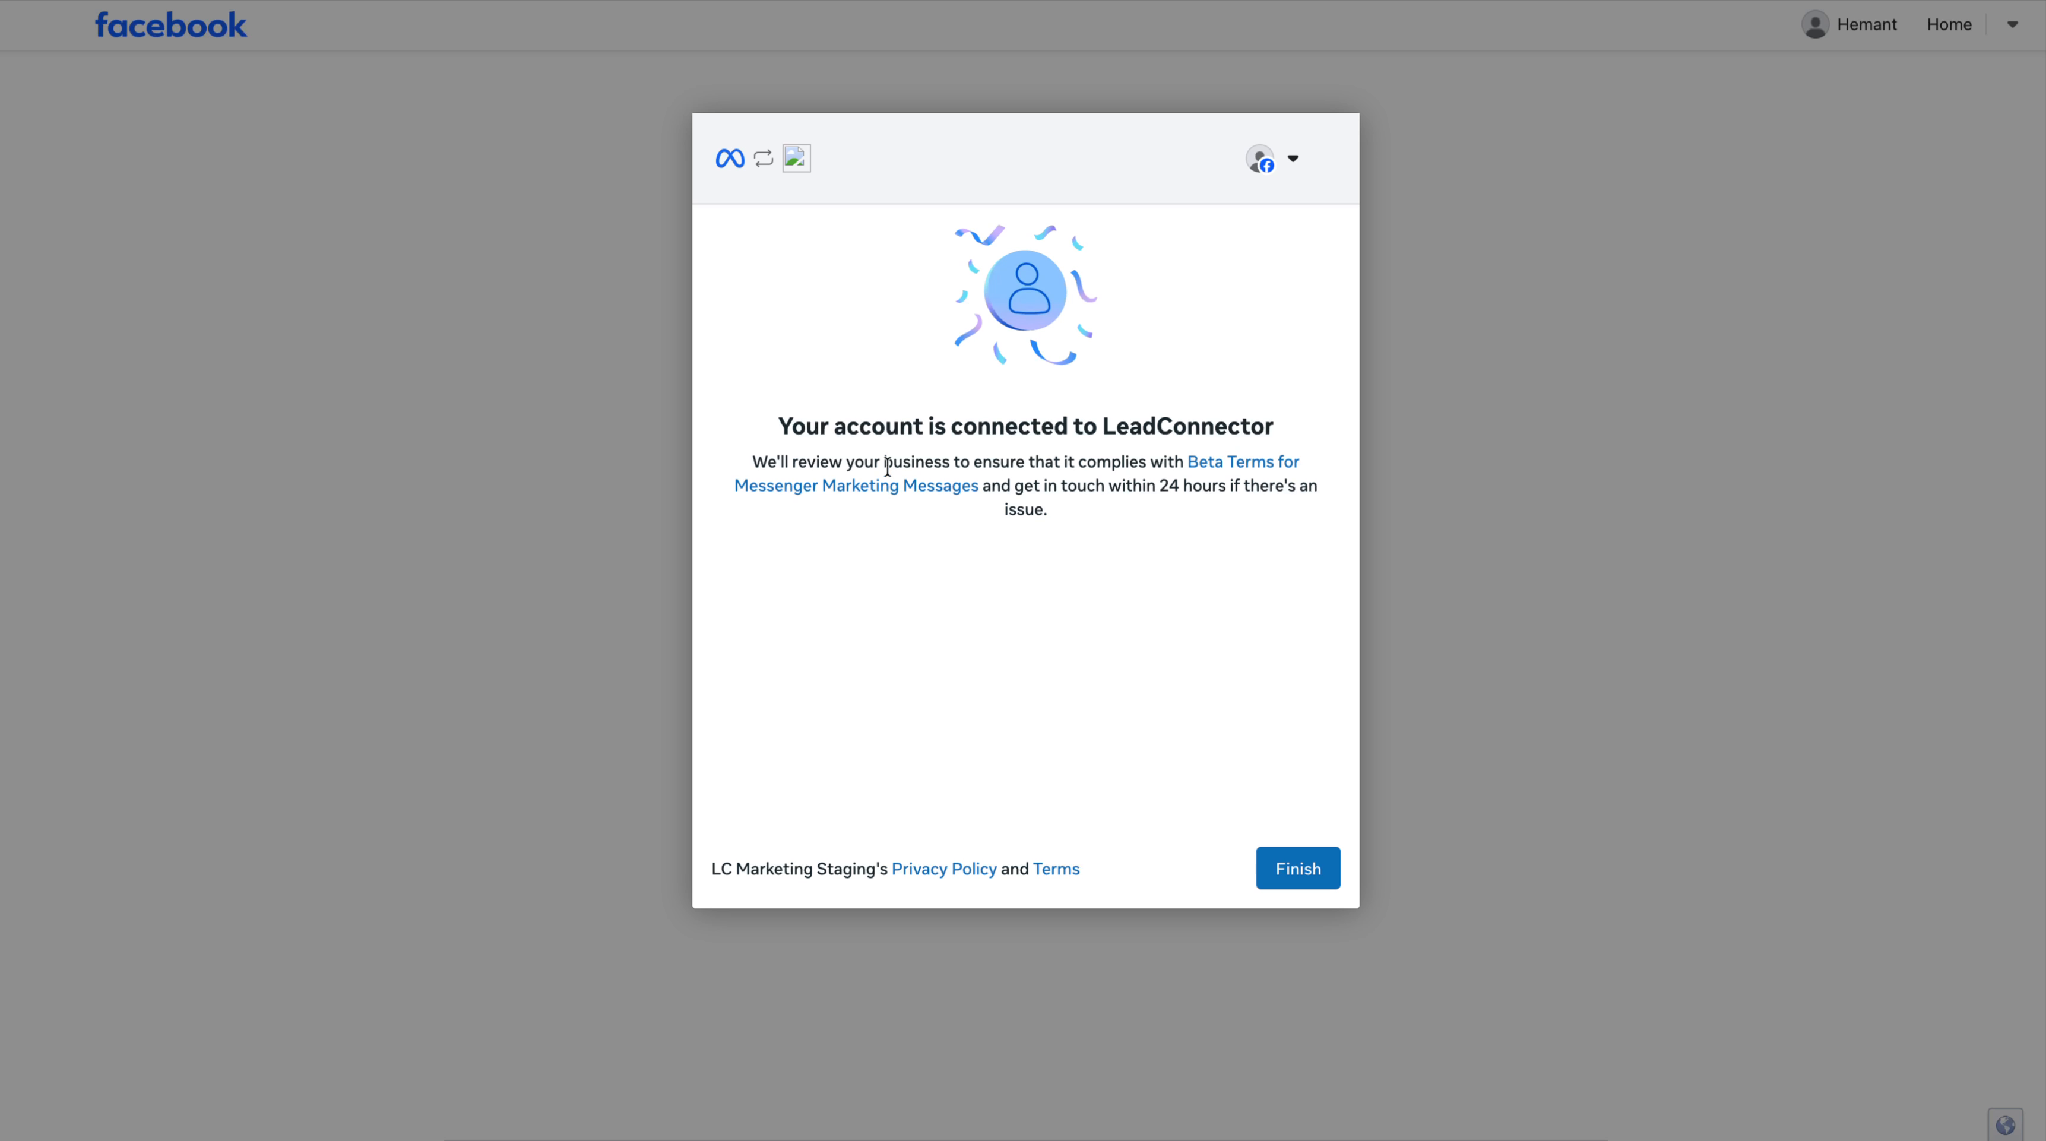
“Your account is connected to LeadConnector” — the final confirmation screen before clicking Finish.
Back in CRM, the External Connection tab lists the connected account with the status active.
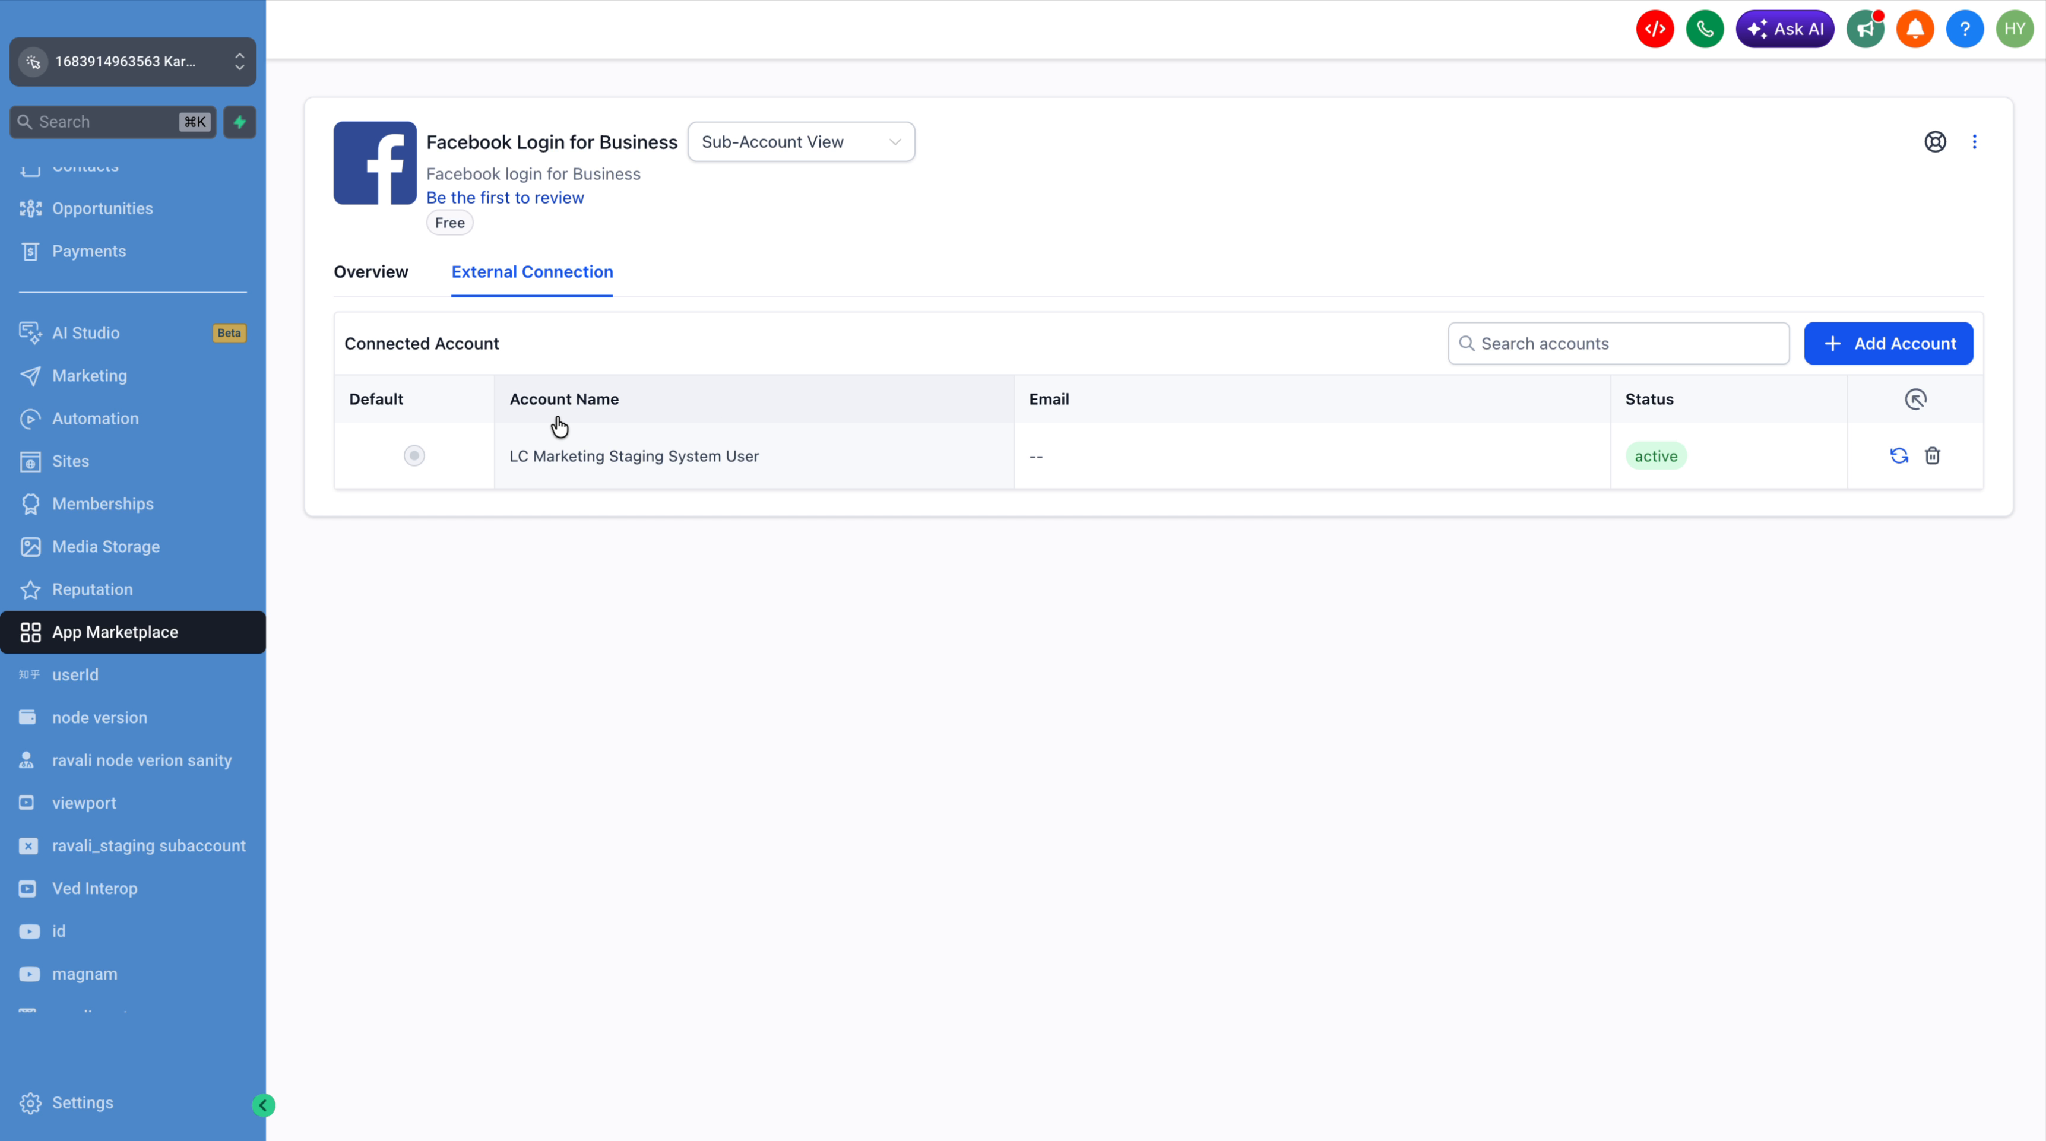
Facebook Login for Business → External Connection — the connected account showing status active.
2. Opt-in Capturing Flow
Meta only allows marketing messages to be sent to people who have explicitly opted in. In CRM, you capture opt-ins with an Automation workflow: when a contact messages your Page on Messenger, the workflow replies with a one-time opt-in request. Once the contact taps the button, they become a subscriber of your Page and can be selected as a campaign recipient.
Build the opt-in workflow
Go to Automation → Workflows and create a new workflow from scratch.
Add the Customer Replied trigger. Under Filters, add Reply channel, set it to Facebook messenger, and click Save trigger. This limits the opt-in request to Messenger conversations.
Add the Send opt-in message action directly after the trigger, with no Wait step in between. Configure it as described below and click Save action.
In the workflow's Settings tab, keep Allow re-entry turned off so each contact is sent the opt-in request only once (see the Important note below).
Switch the workflow from Draft to Publish and save it. The workflow does not run while it is in Draft.
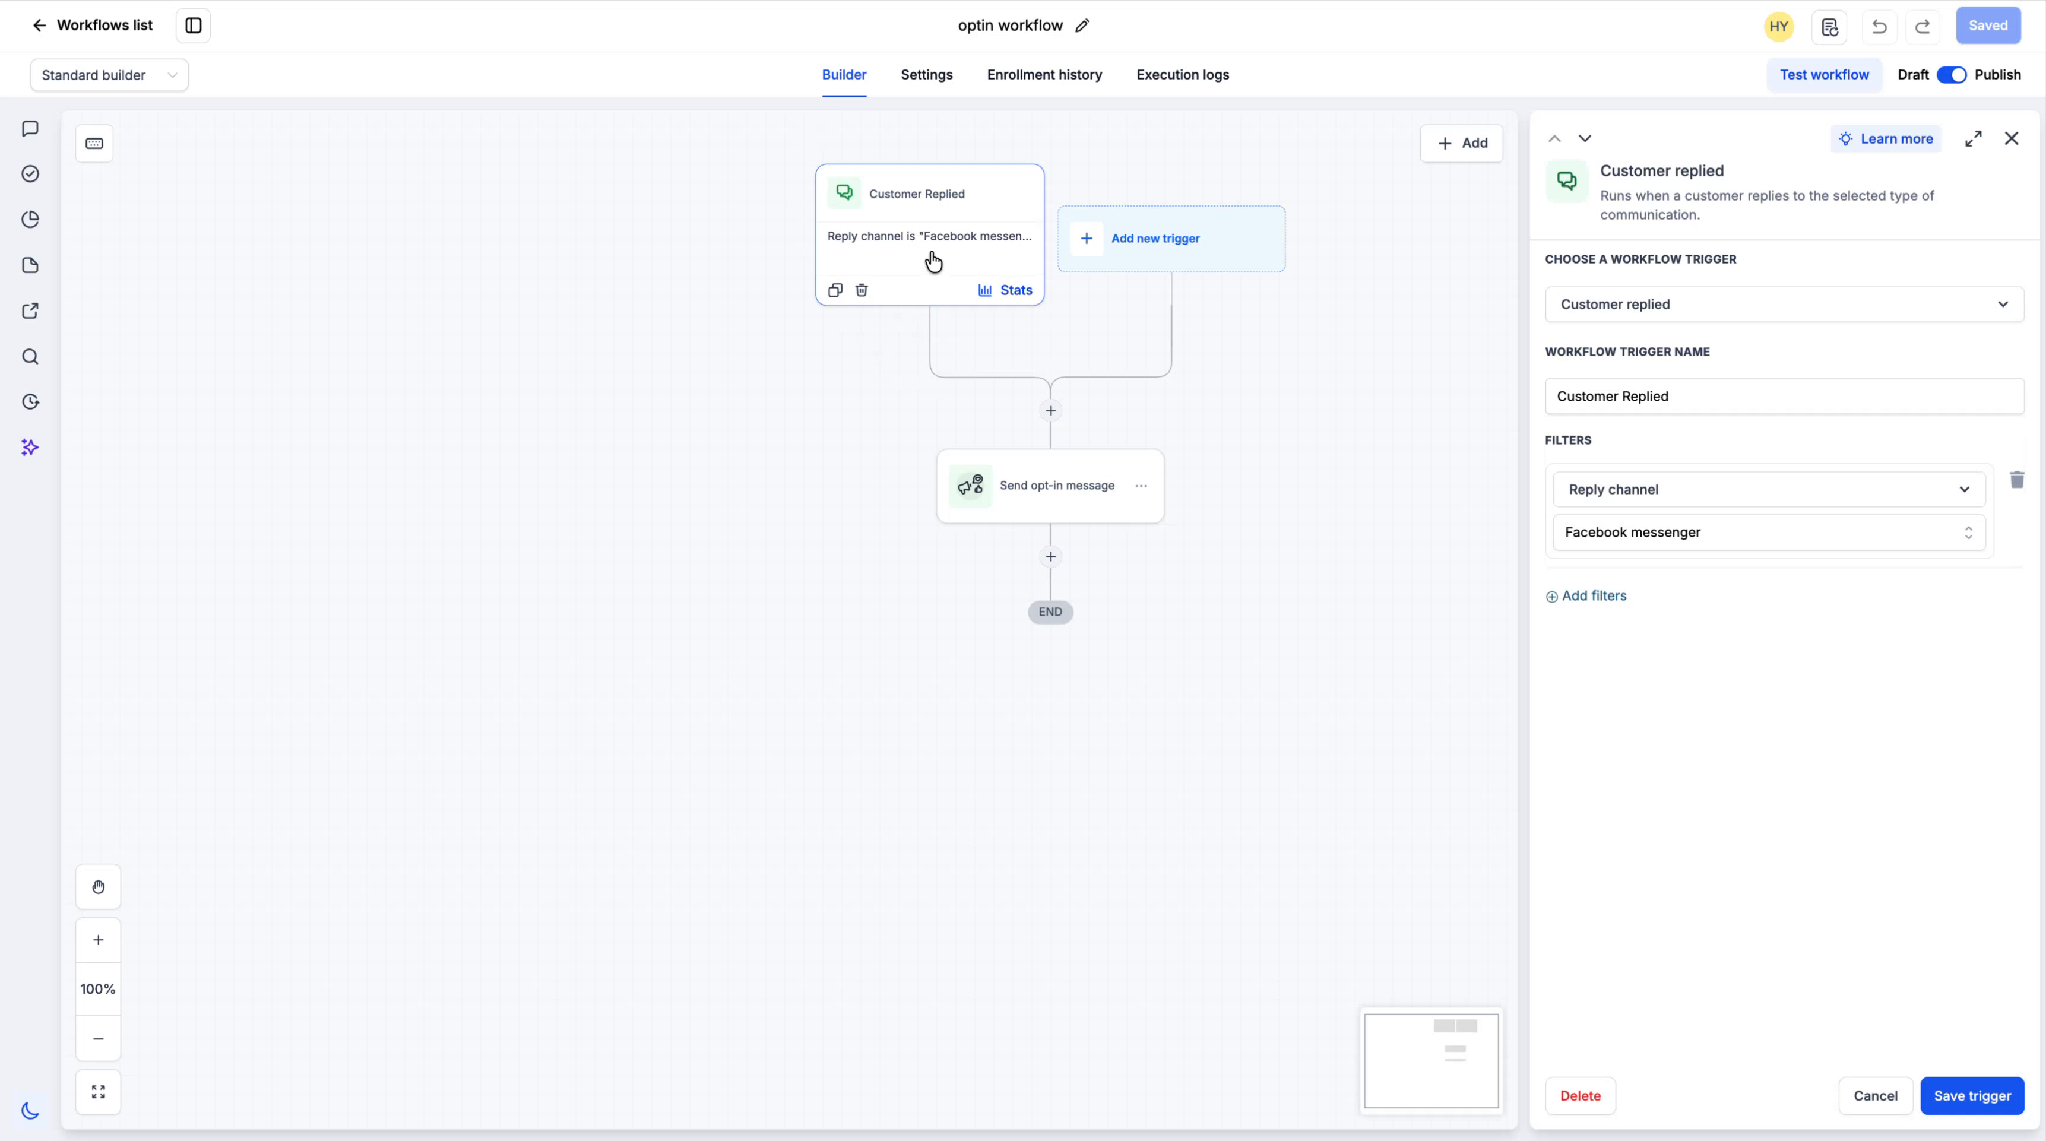
Automation → optin workflow — the Customer Replied trigger filtered to Reply channel = Facebook messenger, followed by the Send opt-in message action. The Draft/Publish toggle is at the top right.
Configure the Send opt-in message action
Fill in these fields:
Action name — an internal label for the step.
Title — the topic name contacts see on the request and in their subscription confirmation (for example, “Promotions and Updates”). Meta allows one opt-in request per topic per contact, so choose a title you intend to keep.
Sub text (required) — explains what the contact is agreeing to receive.
Image (optional) — upload a JPG, PNG, or GIF, choose one from the Media library, or enter a URL.
CTA label (required) — the button text, chosen from Meta's list of approved labels (for example, “Allow messages”).
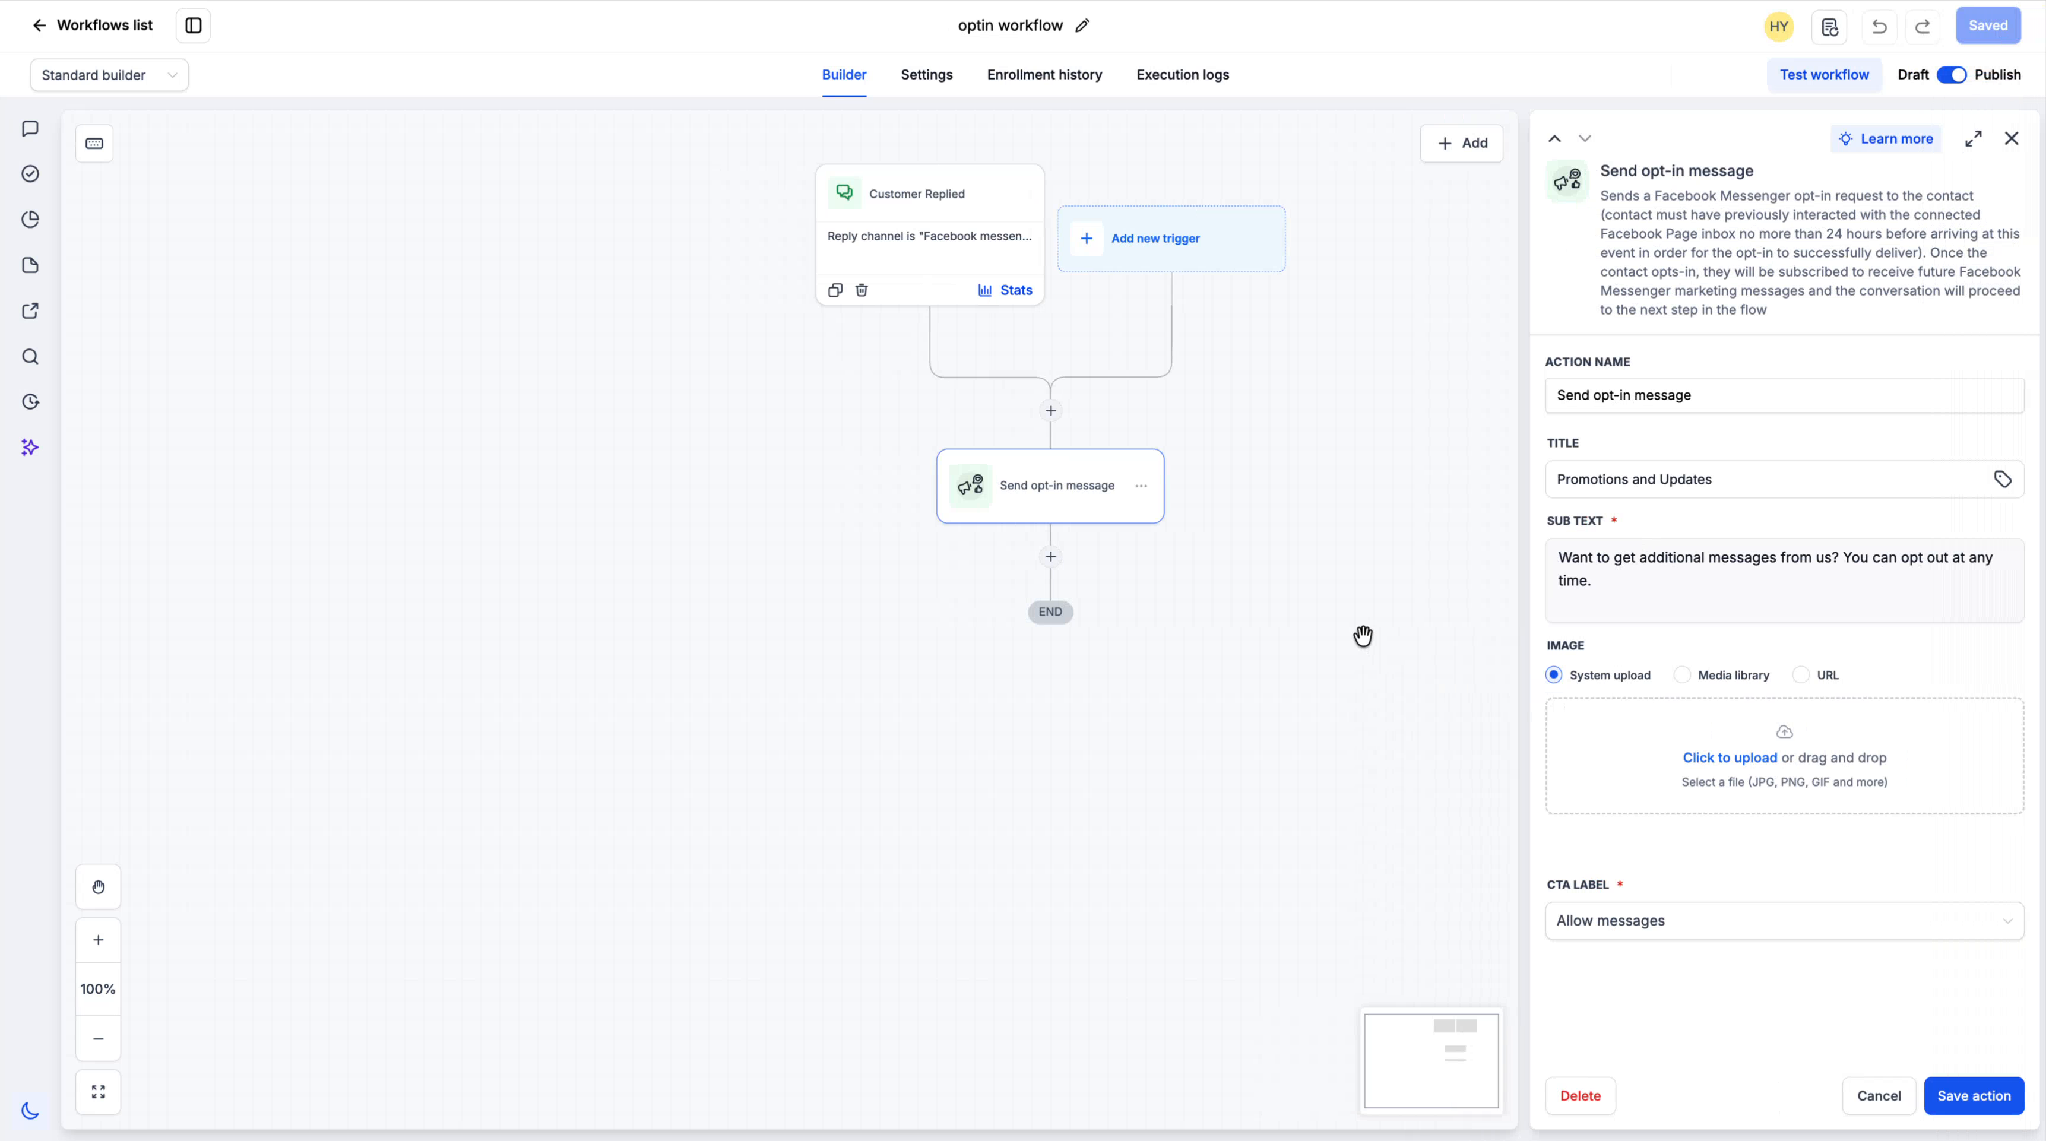
Send opt-in message action — Title “Promotions and Updates,” sub text, and CTA label “Allow messages.” The built-in description explains the 24-hour eligibility window and that accepting subscribes the contact to future Marketing Messages.
What the contact sees
The request appears in the contact’s Messenger thread. Meta adds a line saying your Page would like to send them messages that may be promotional, followed by a card with your Title (here, “Promotions and Updates”), your sub text, and the CTA button. The contact can opt out at any time.
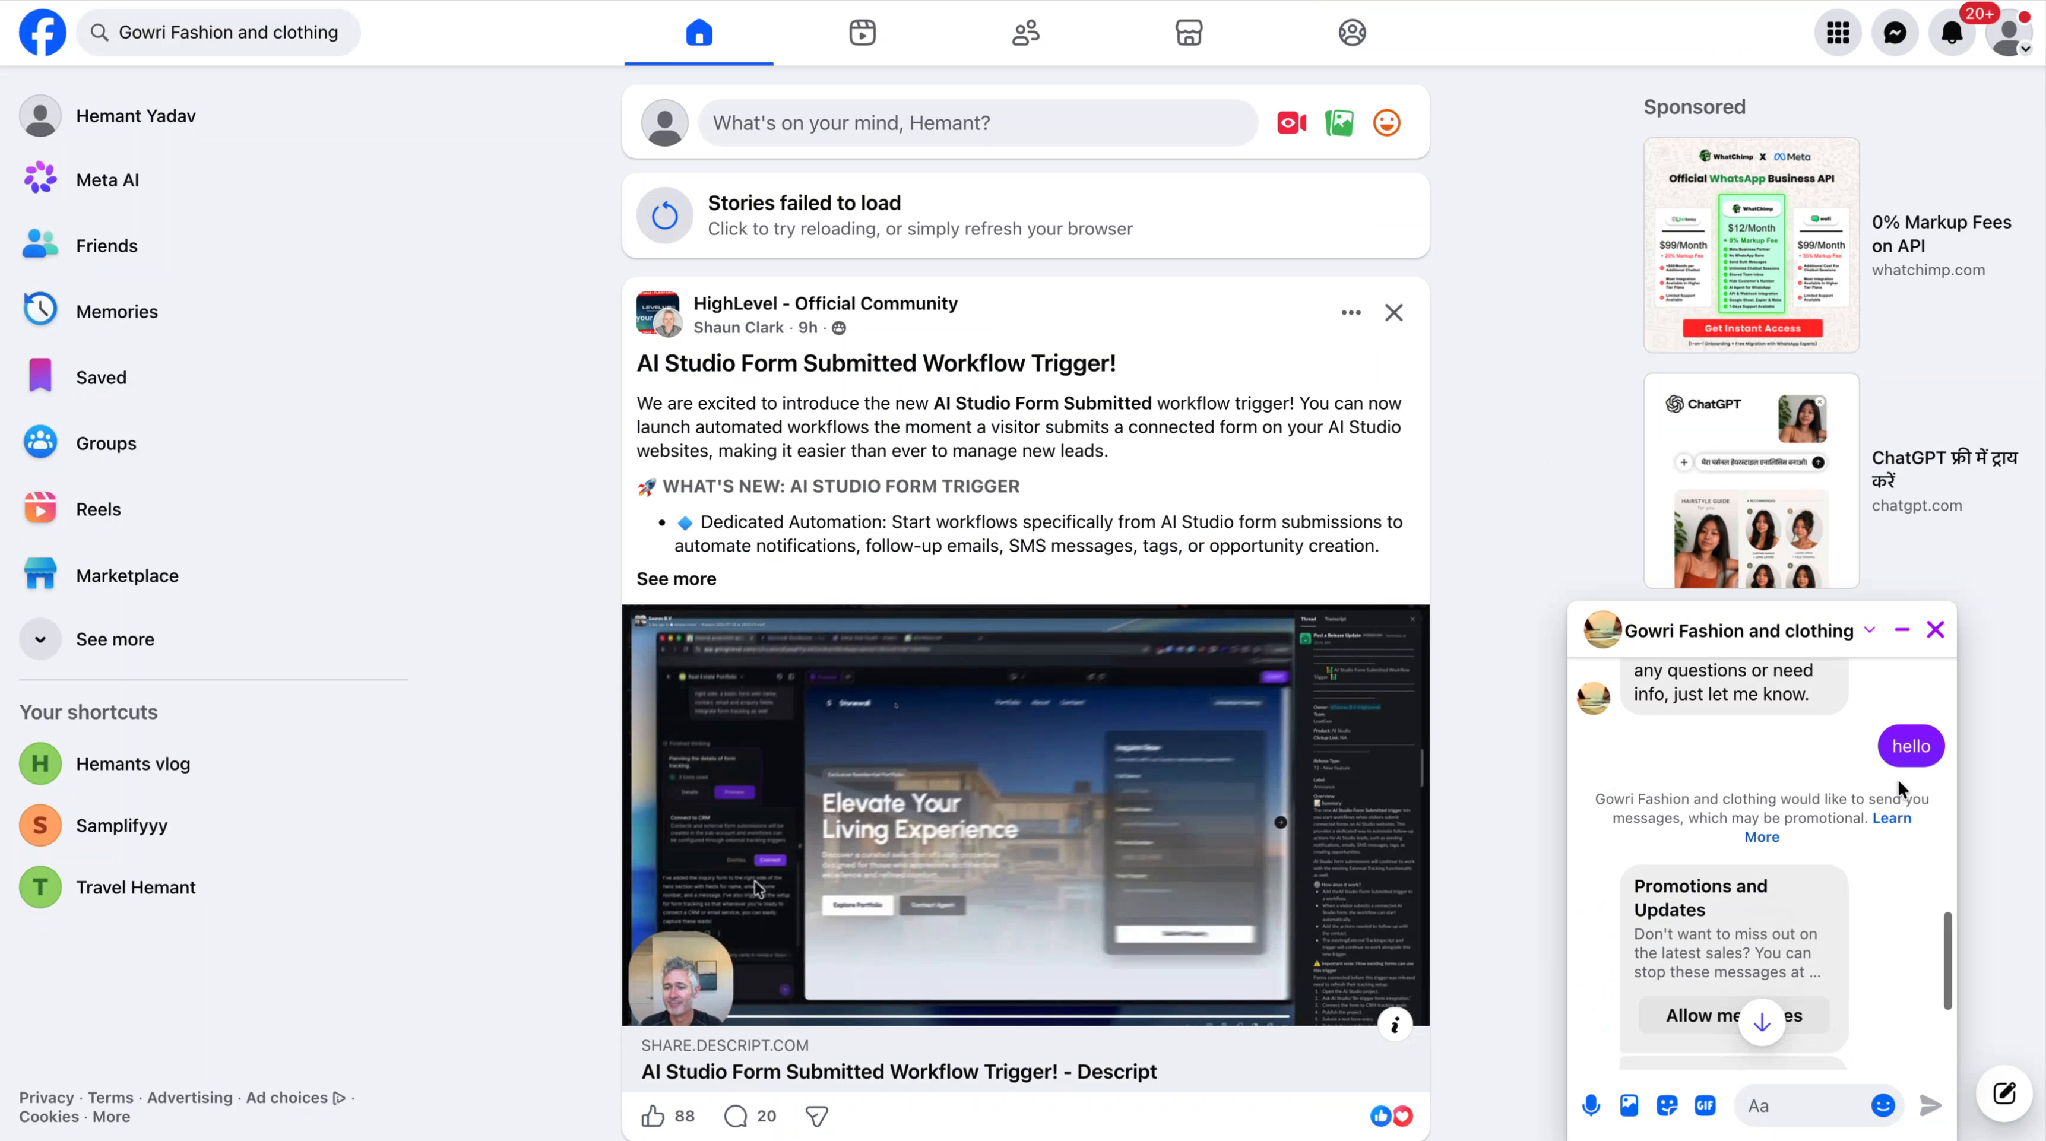
Messenger view — the opt-in prompt as the contact sees it, with the topic name and an Allow messages button.
Once they tap Allow messages, Messenger confirms the subscription inline and gives the contact a Manage link to change their preference later.
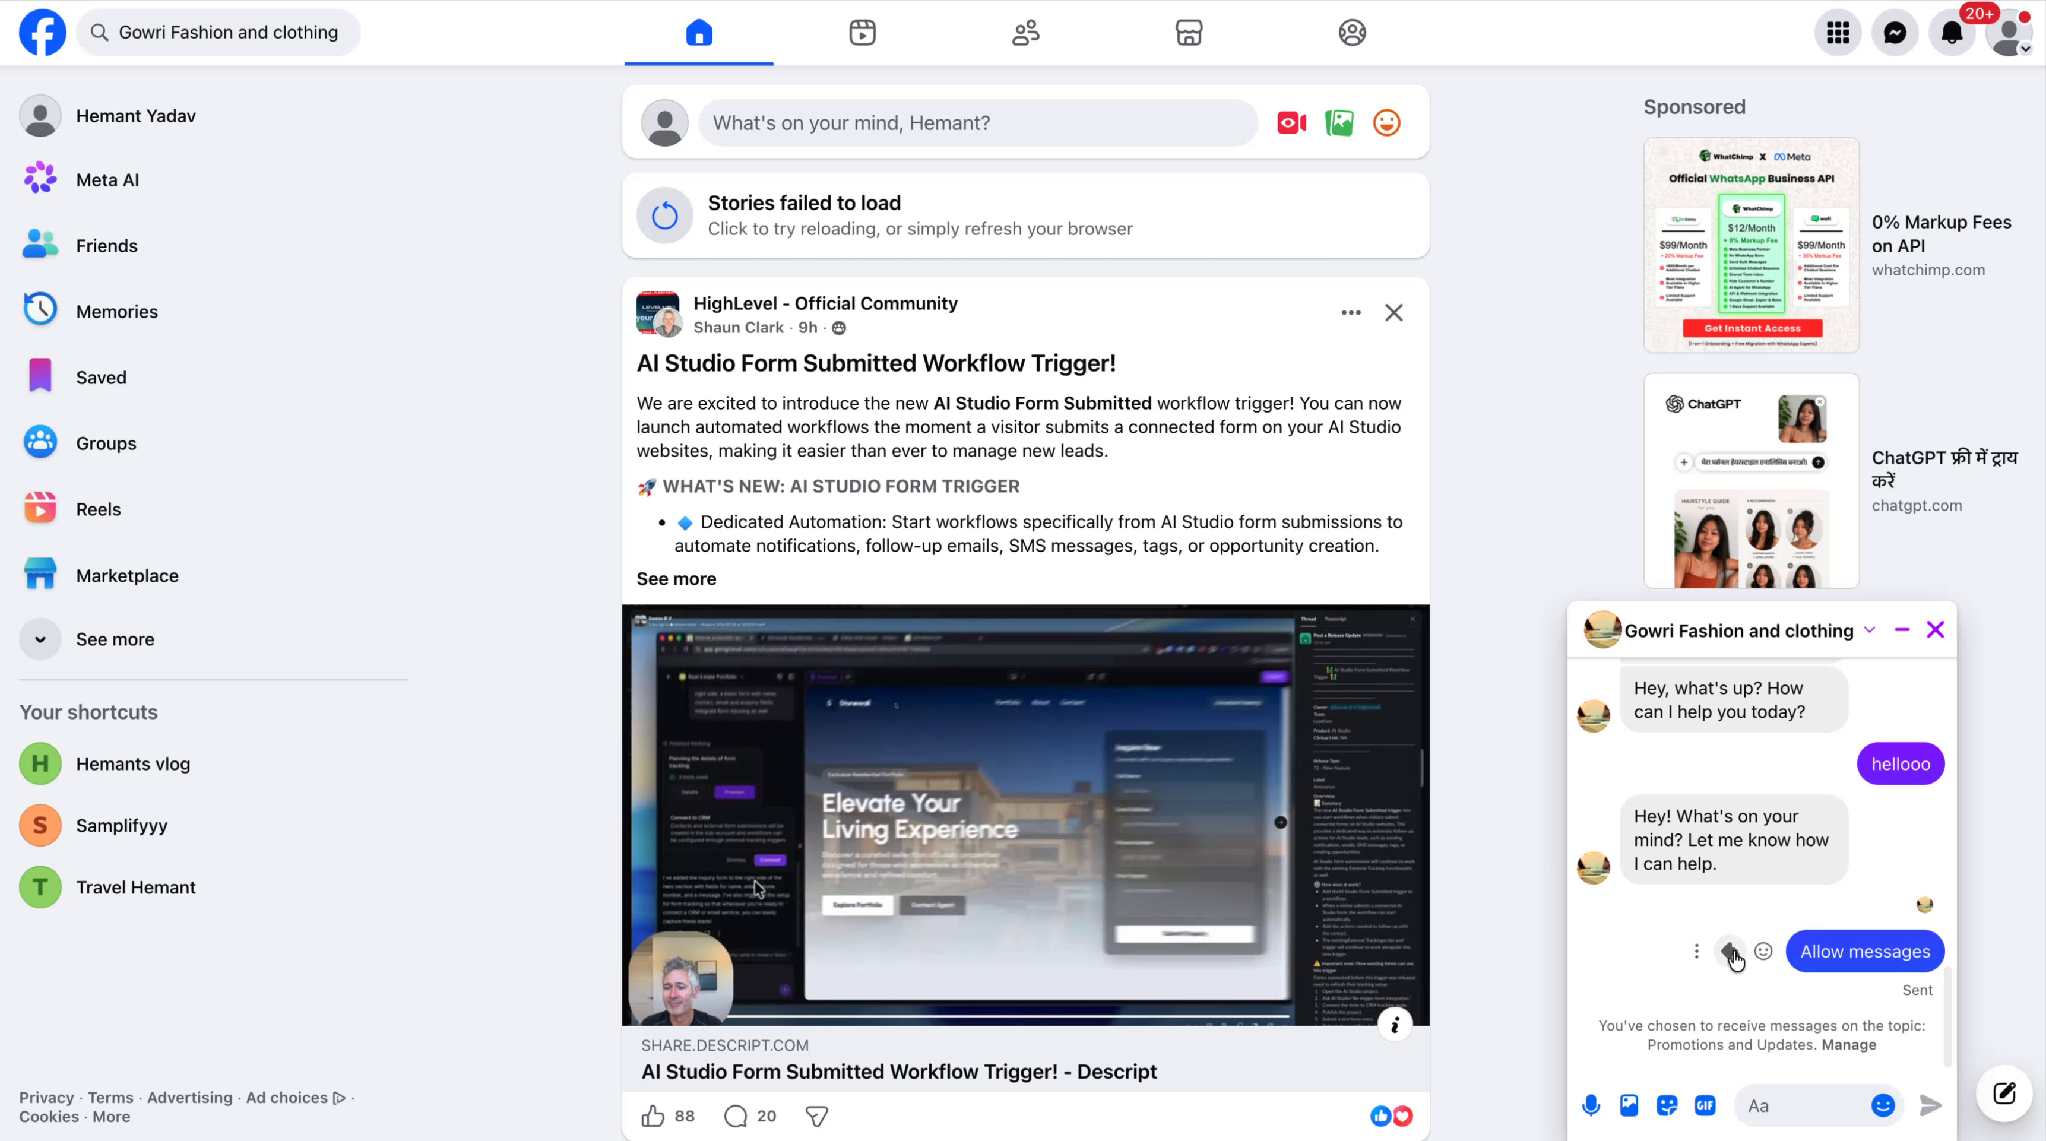
Messenger view — after tapping Allow messages: “You've chosen to receive messages on the topic: Promotions and Updates. Manage.”
Where subscribers appear in CRM
Messenger conversations from the Page sync to Conversations through the Facebook integration, which creates or updates the matching contact.
When the contact accepts the opt-in request, CRM records them as a subscriber of that Facebook Page. Subscriptions are per Page — a subscriber of one Page is not a subscriber of your other Pages.
The current subscribers of a Page are the contacts listed under Select recipients when you create a campaign for that Page (Section 4, Step 6).
Tracking opt-in workflow execution logs
To audit opt-in activity, open the workflow and select the Execution logs tab. Each row shows a contact, the step, its status, and a timestamp. Filter by action, status, or contact, and click View details for more information on a step.
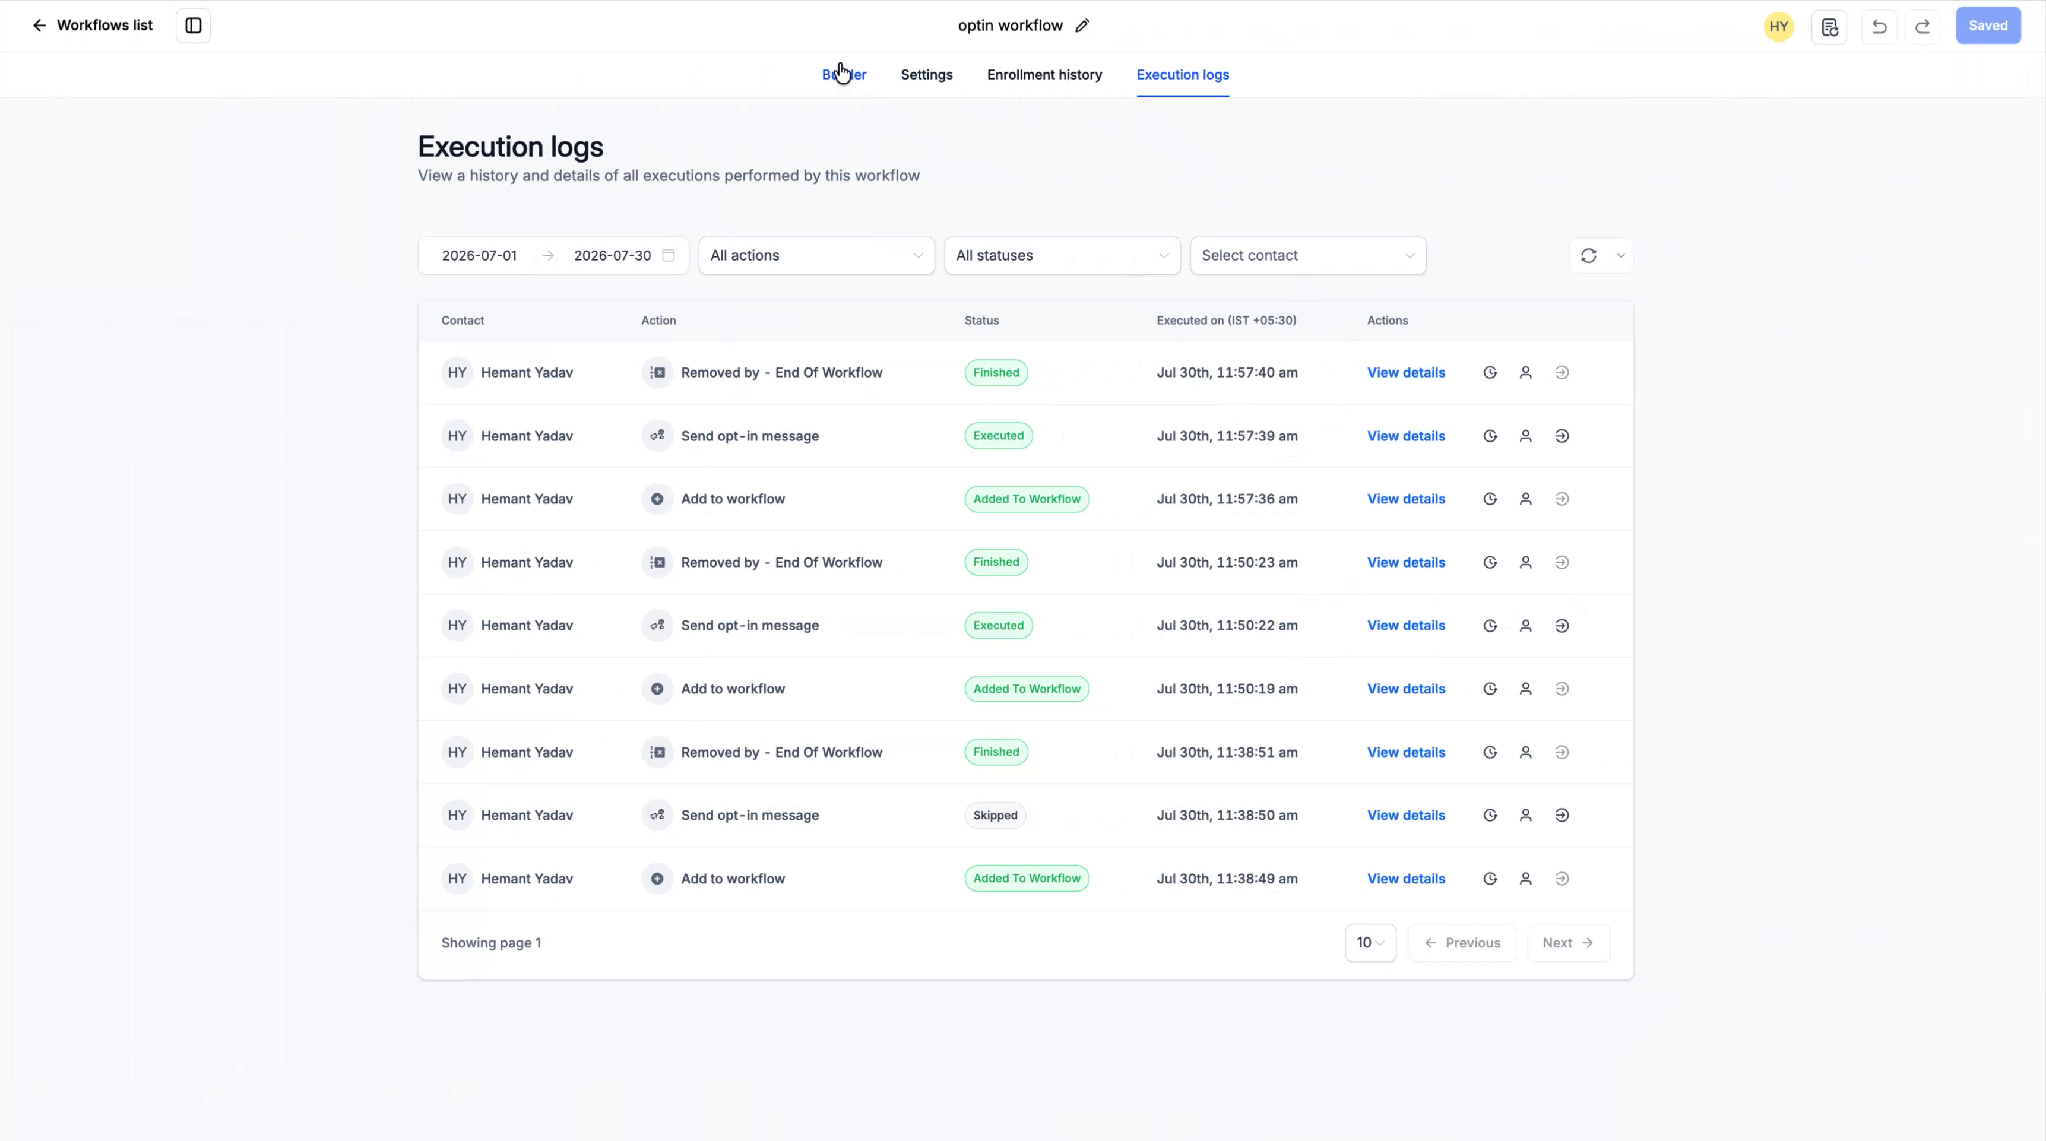
Automation → optin workflow → Execution logs — per-contact history of Add to workflow, Send opt-in message (Executed / Skipped), and Removed by End Of Workflow, with exact timestamps.
Added To Workflow — the contact entered the workflow.
Executed (Send opt-in message) — the opt-in request was sent. This does not mean the contact accepted it.
Skipped (Send opt-in message) — the request was not sent, most often because the contact's last message to your Page was more than 24 hours earlier.
Finished (Removed by - End Of Workflow) — the contact completed the workflow.
If a step shows an error, click View details to see the reason returned by Meta. Common errors are covered in the FAQ below.
3. Subscriber Status and Opt-outs
A contact stays subscribed until they opt out in Messenger. Meta does not notify CRM when this happens, so an opt-out is only reflected in CRM after your next campaign tries to reach that contact. This section explains what that means for your campaigns.
Subscriber statuses
Subscribed — the contact accepted the opt-in request and appears under Select recipients for that Page.
Opted out — the contact opted out in Messenger. Once CRM learns of the opt-out (see below), the contact no longer appears under Select recipients for that Page.
How a contact opts out
Contacts opt out from their Messenger thread by tapping Manage under the subscription confirmation, or the opt-out link Meta includes with every marketing message, and then selecting Don’t get updates.
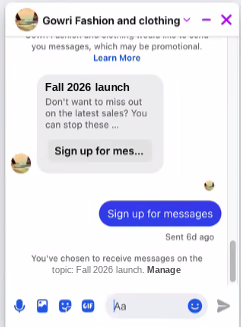
Messenger view — the subscription confirmation with the Manage link.
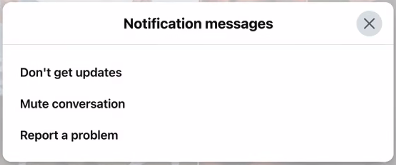
Selecting Don’t get updates opts the contact out of marketing messages from this Page.
Opting out only stops marketing messages from your Page. The contact can still message your Page, and your team can still reply in Conversations within the standard 24-hour window.
How CRM handles opt-outs
Meta does not send opt-out notifications to partner platforms (see Meta's Marketing Messages FAQ), so CRM isn't told right away when a contact opts out. Instead:
The contact still appears under Select recipients in the next campaign you create for that Page.
If you include them, Meta does not deliver the message. Meta bills only for delivered messages, so the undelivered send isn't charged.
Meta's response to that send tells CRM the contact has opted out, and they are removed from Select recipients for all later campaigns.
A gap between Total recipients and Messages delivered in campaign statistics (Section 5) often means some recipients had opted out.
4. Meta Marketing Campaign Creation Flow
Campaigns are built in two steps: first the account, budget, and message; then the recipients and send time.
Step 1 — Open Marketing Messages and start a campaign
Go to Marketing → Marketing Messages. The list shows each campaign's name, Facebook page, ad account, execution date, number of recipients, status, and an Action icon. Click Create a campaign.
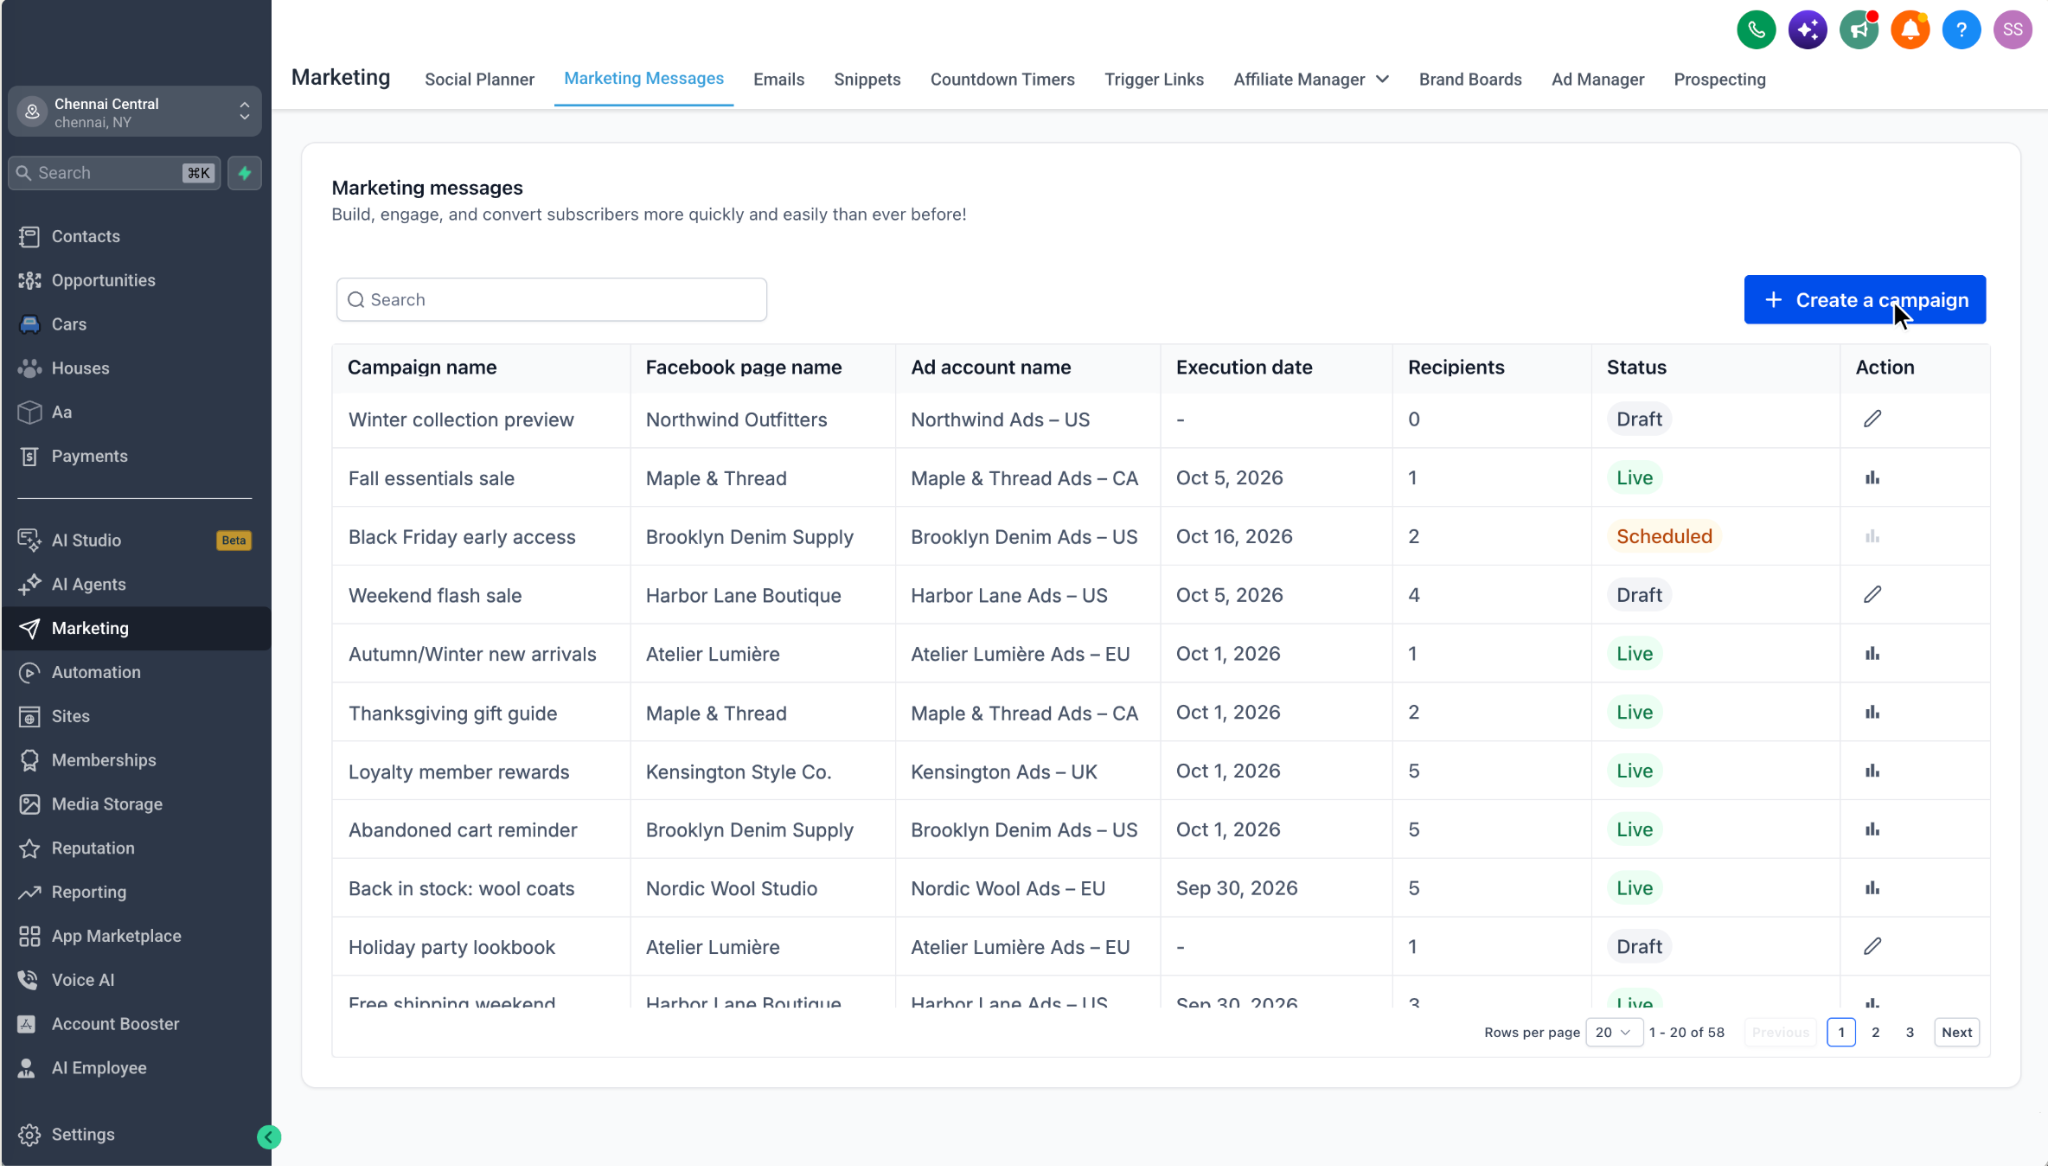
Marketing → Marketing Messages — the campaign list, with Create a campaign in the top right.
Step 2 — Set up account & campaign configuration
In the Create Marketing messages campaign step, name the campaign and choose the Facebook Page and ad account it runs through. You can click Save as draft at any point and finish later.
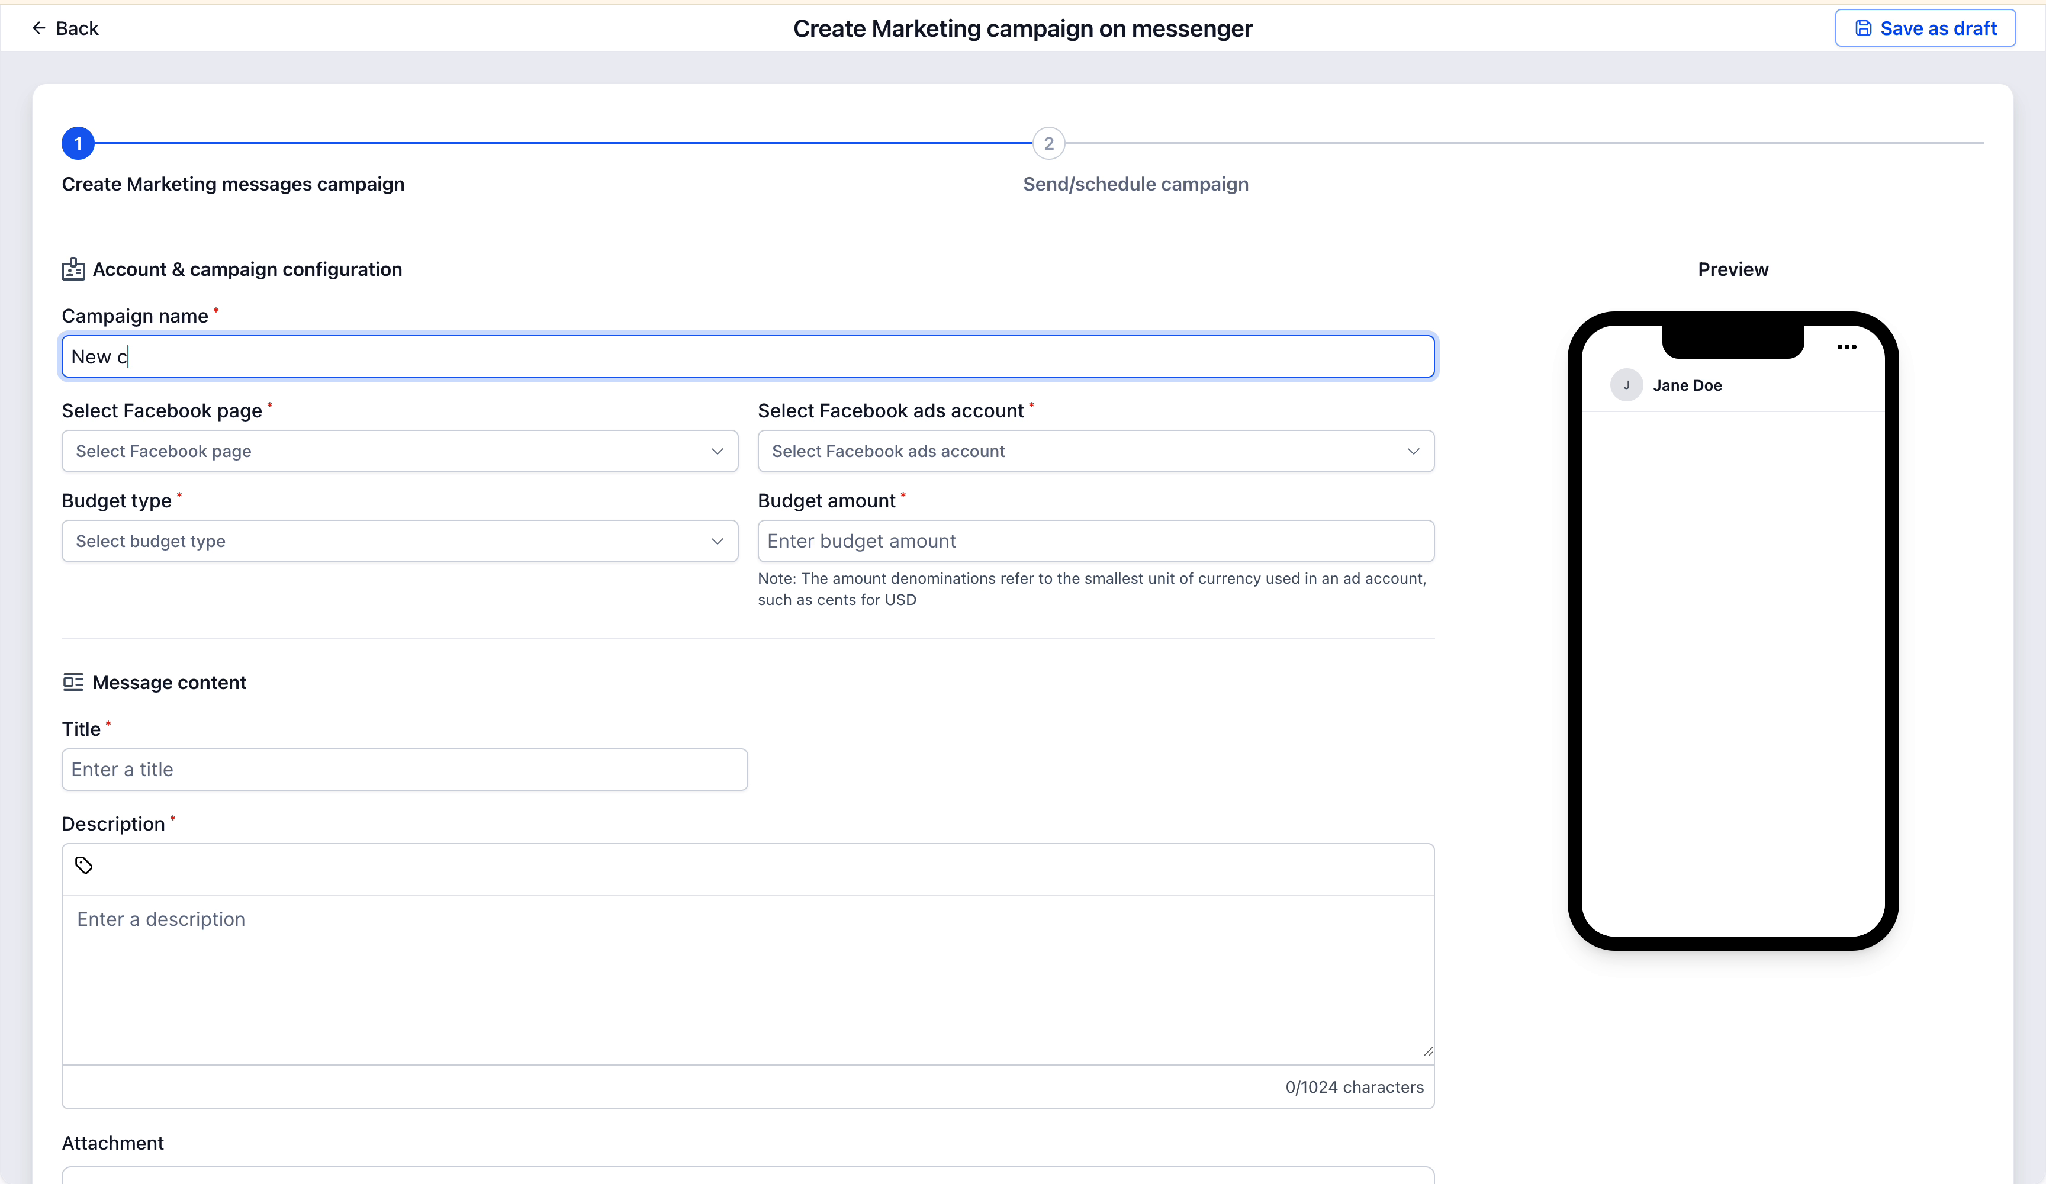
Create Marketing campaign on messenger — Account & campaign configuration, with a live phone preview on the right.
Campaign name — an internal label; recipients never see it.
Select Facebook page — the Page the message is sent from. Only this Page’s subscribers can be selected as recipients in Step 6.
Select Facebook ads account — the connected ad account that pays for this campaign.
Step 3 — Choose a budget type and amount
Choose a Budget type and enter a Budget amount. The budget is the most Meta can spend on this campaign. Once it's reached, Meta stops sending, and recipients who haven't received the message yet won't get it.
Daily — caps spend per day.
Lifetime — caps total spend across the campaign's run.
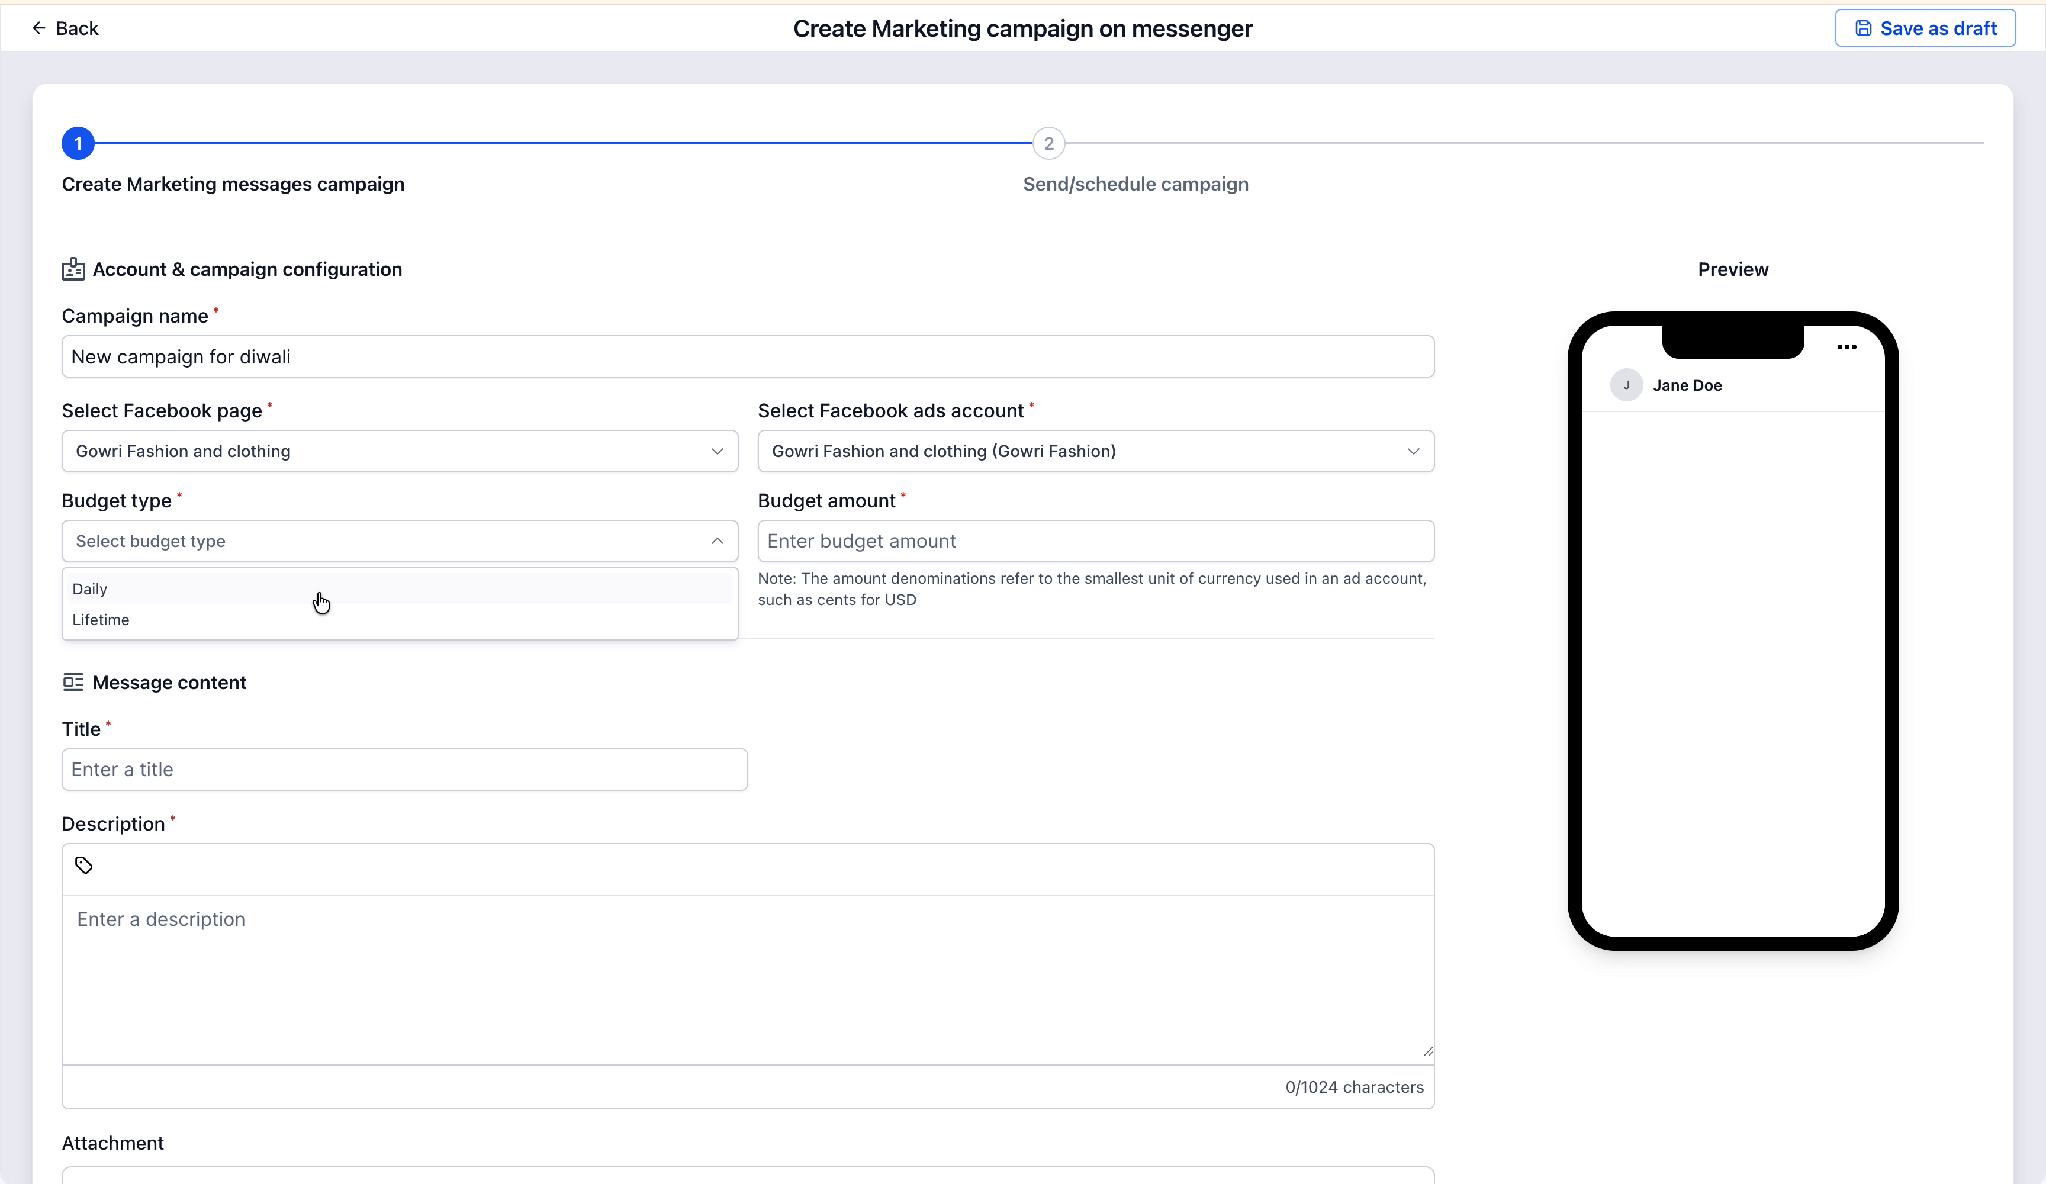
Budget type dropdown — Daily vs. Lifetime, with the Facebook page and ads account already selected.
Step 4 — Write the message content
Enter a Title and a Description (both required). The description is plain text — formatting such as bold or inline links isn’t supported — with a limit of 1,024 characters; use CTA buttons (Step 5) for links. Optionally upload an image (JPG or PNG) under Attachment. The Preview on the right shows the message as it will appear in Messenger.
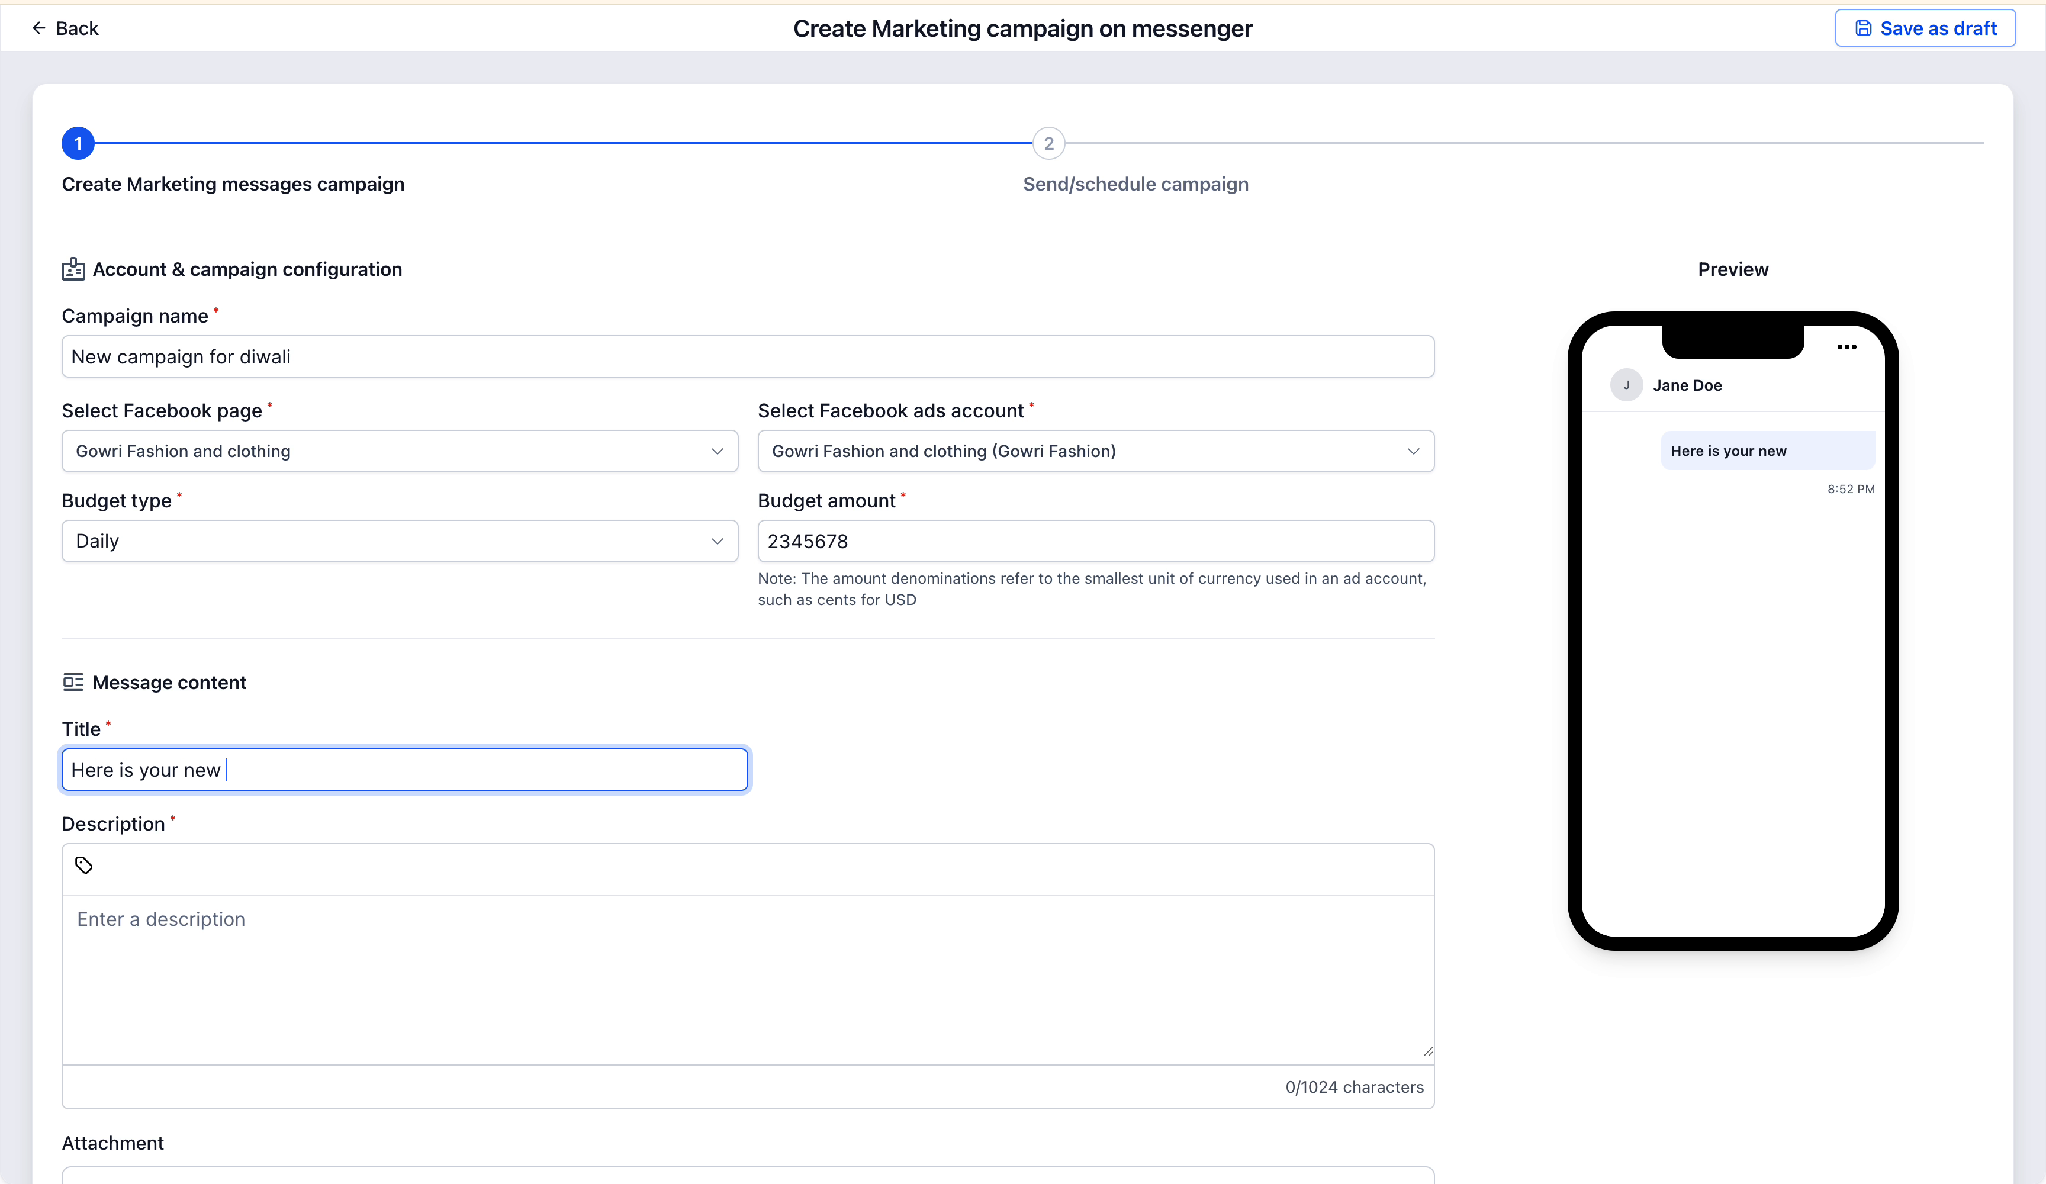
Message content — Title and Description fields with the Messenger-style preview updating in real time.
Step 5 — Configure call-to-action buttons
Under Configure CTA, select the Number of CTAs (1, 2, or 3). For each CTA, enter a short CTA label and a Destination URL. Enter the full URL, including https:// (for example, https://example.com/offer).
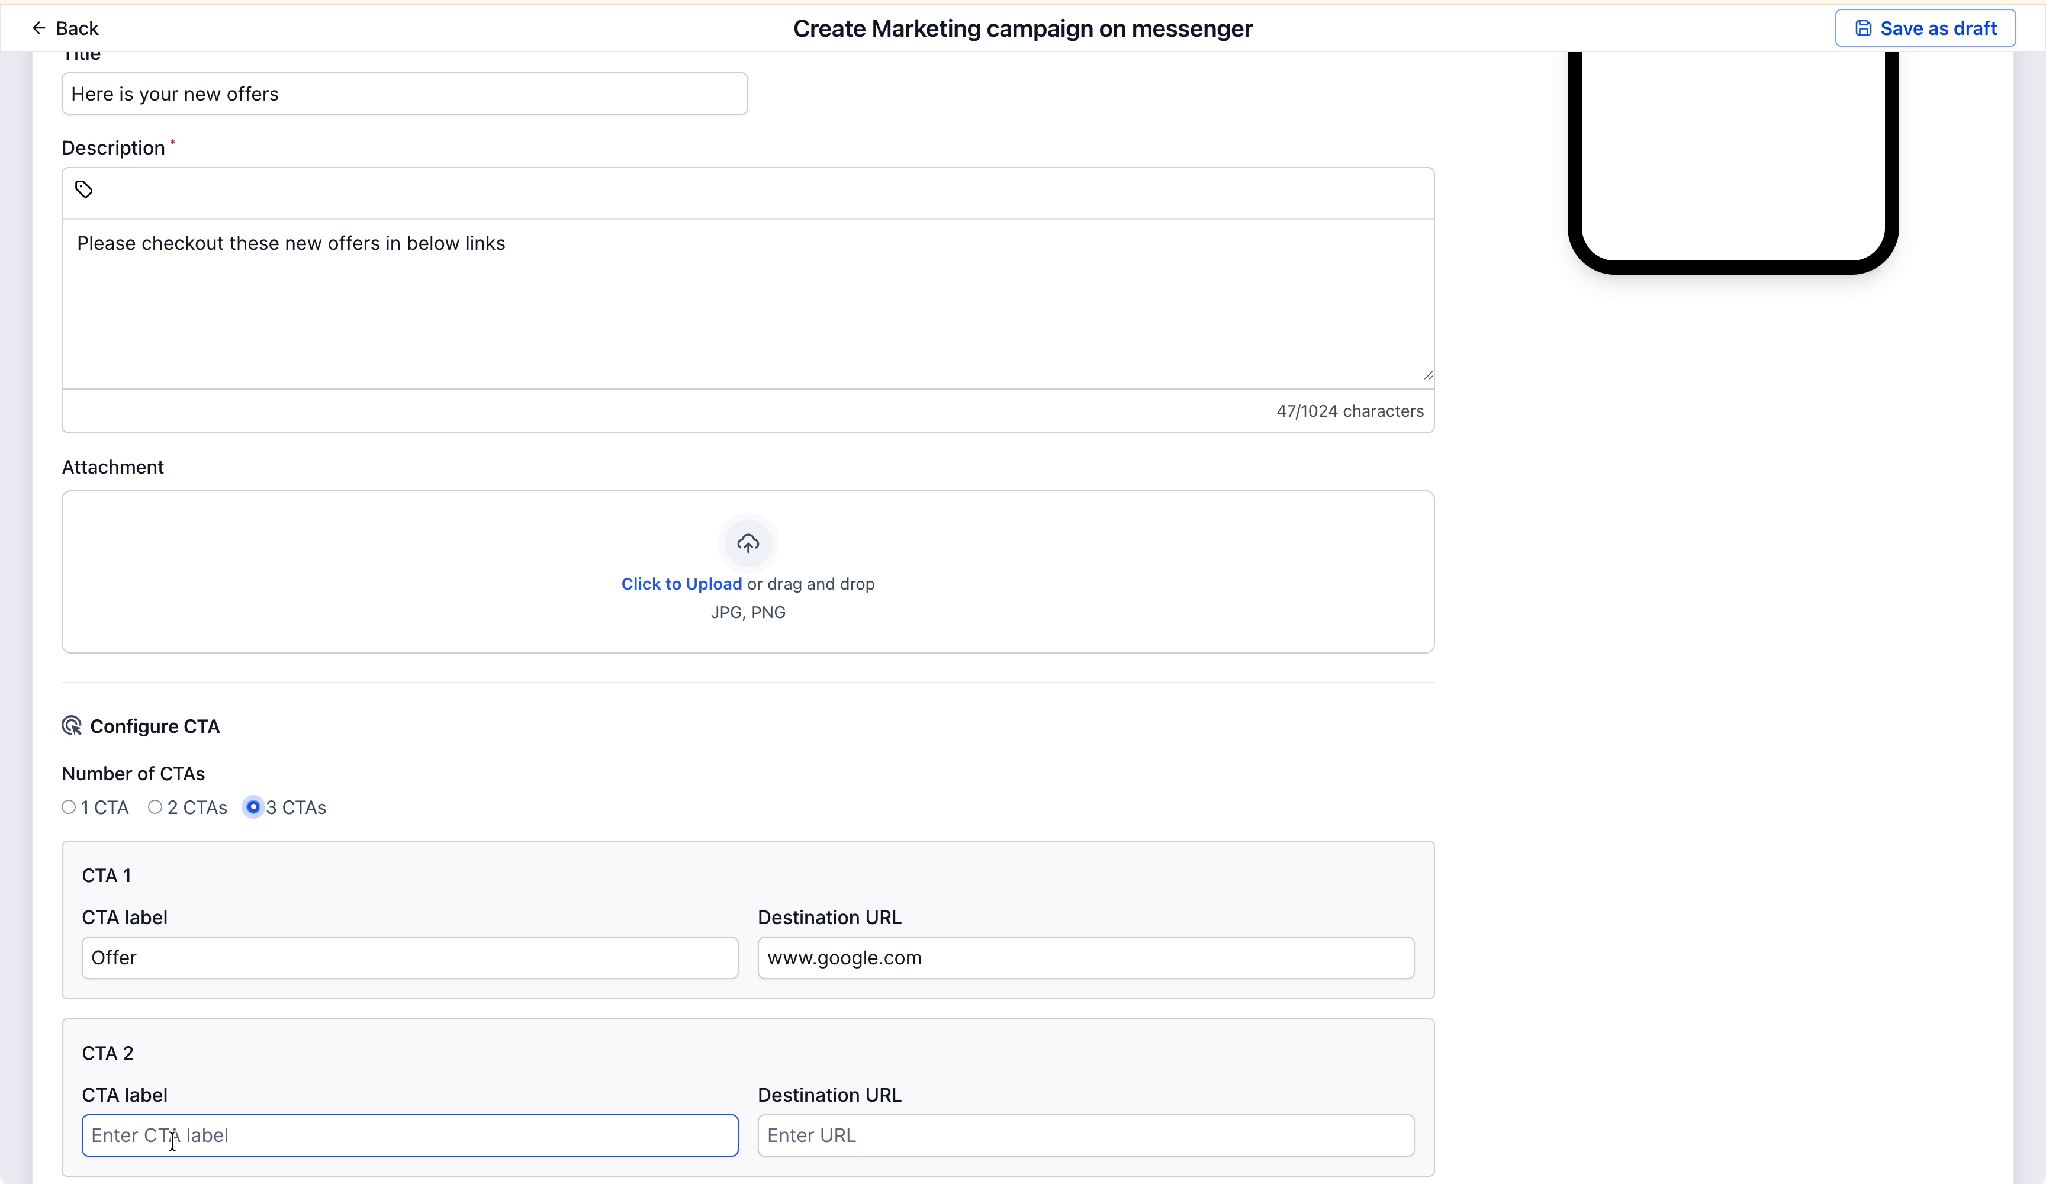
Configure CTA — 3 CTAs selected, with the first CTA's label and destination URL already filled in.
1 CTA works well for a single clear offer or link.
2–3 CTAs let you split traffic — for example, one button for “See offer” and another for “Price details.”
Click Save and Continue once every CTA has a label and a valid URL.
Step 6 — Select recipients and send or schedule
In the Send/schedule campaign step, open Select recipients and choose the contacts to send to. The list contains only contacts subscribed to the Page you selected in Step 2. If it’s empty, no one has opted in to that Page yet (Section 2).
To send later, check Schedule for later and choose a date and time. Scheduling uses your sub-account's business time zone. Meta delivers at most one marketing message per contact per day from the same Page.
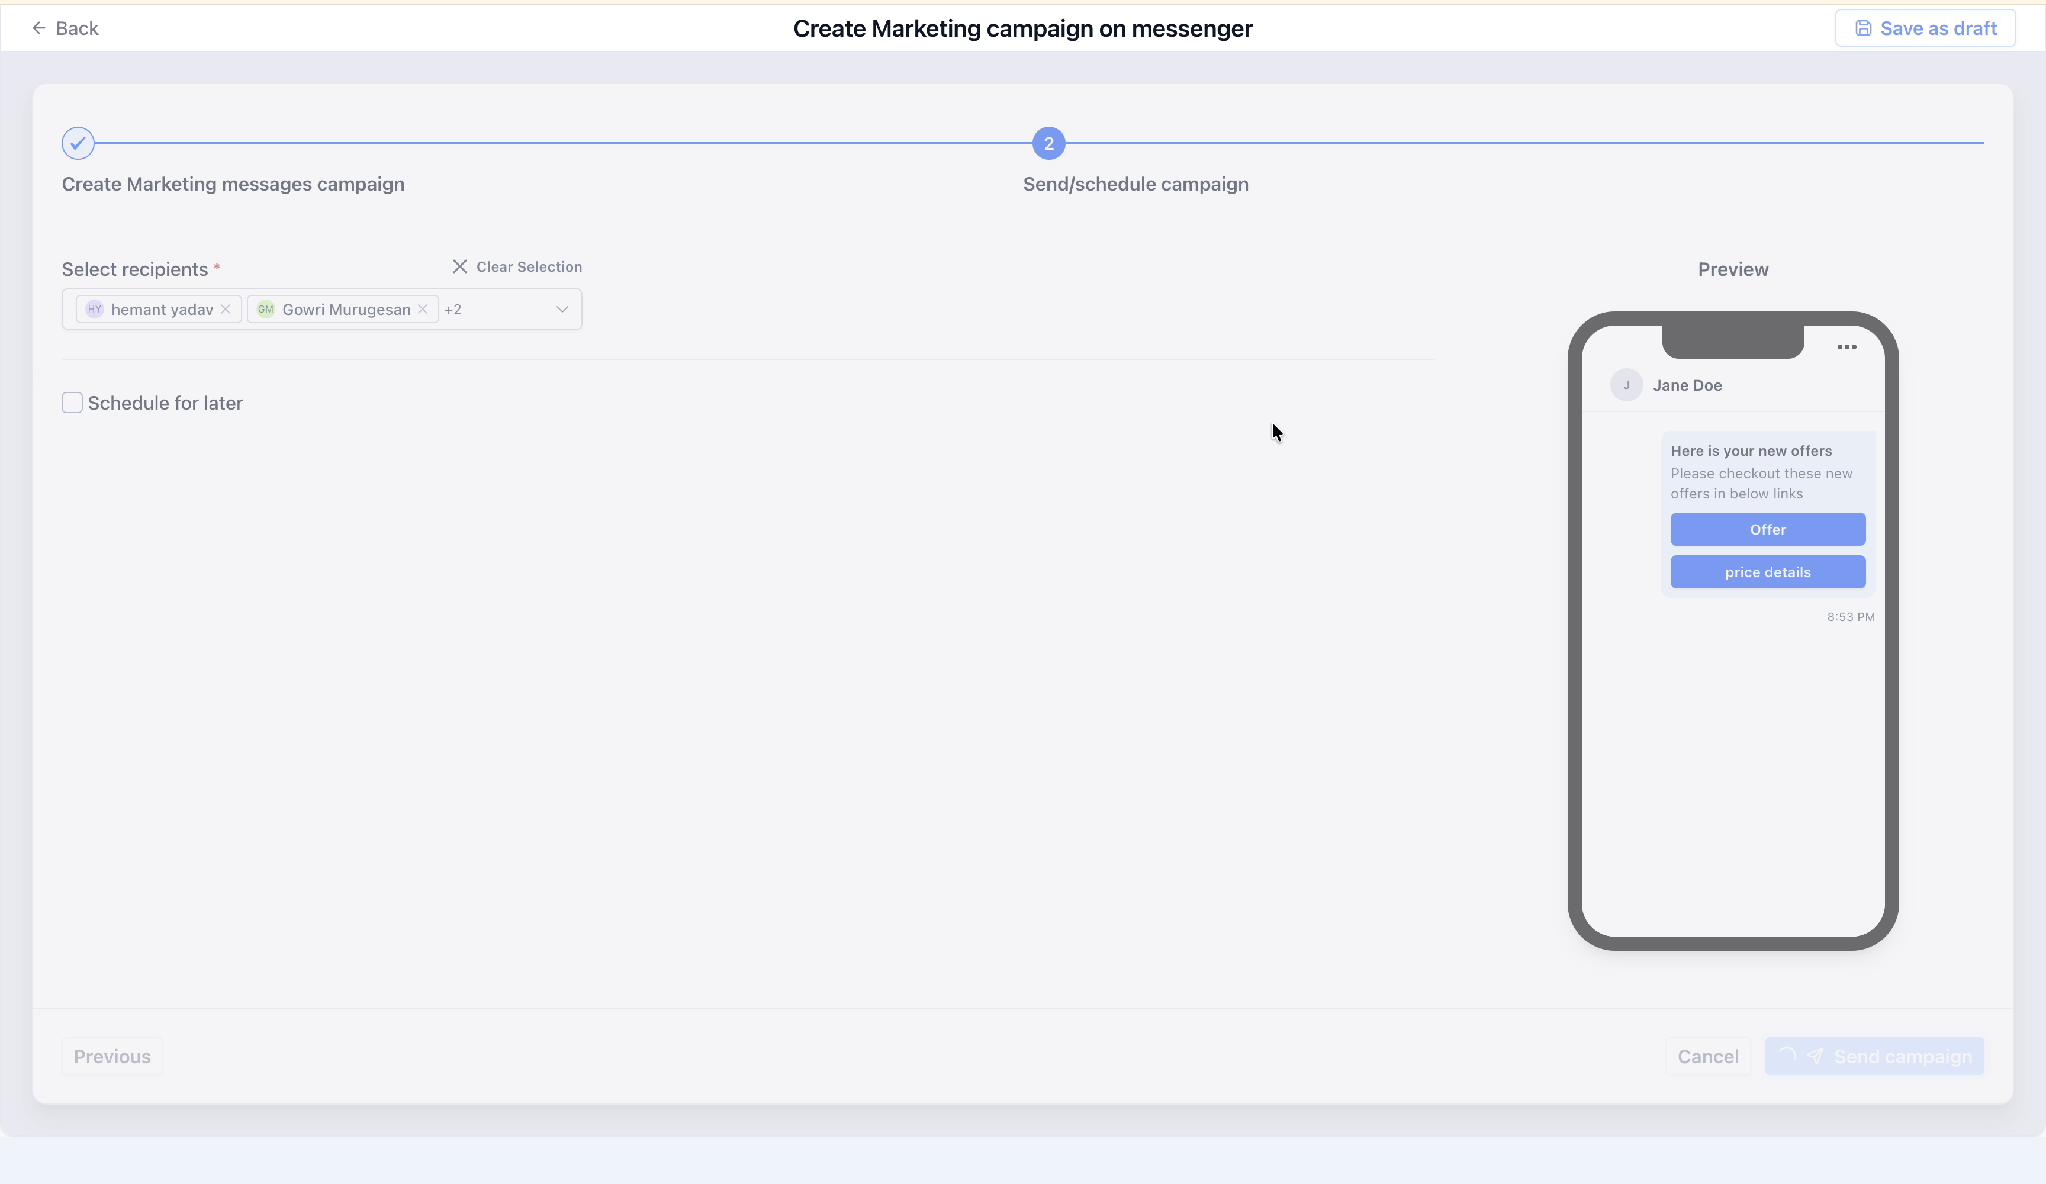
Send/schedule campaign — recipients selected, with the preview now showing both configured CTA buttons.
Step 7 — Send the campaign
Click Send campaign. CRM confirms that the campaign has been submitted and returns you to the Marketing Messages list, where the campaign shows Scheduled until Meta starts sending it, and then Live.
Note — Meta applies an operational delay of roughly 30 to 60 minutes between submission and delivery. This applies to scheduled sends as well: a campaign scheduled for 3:00 PM begins going out after 3:00 PM, not exactly at it. Meta needs time to prepare each new campaign before it can send (see Meta’s Marketing Messages FAQ), so allow for this delay when timing a campaign around an offer deadline.
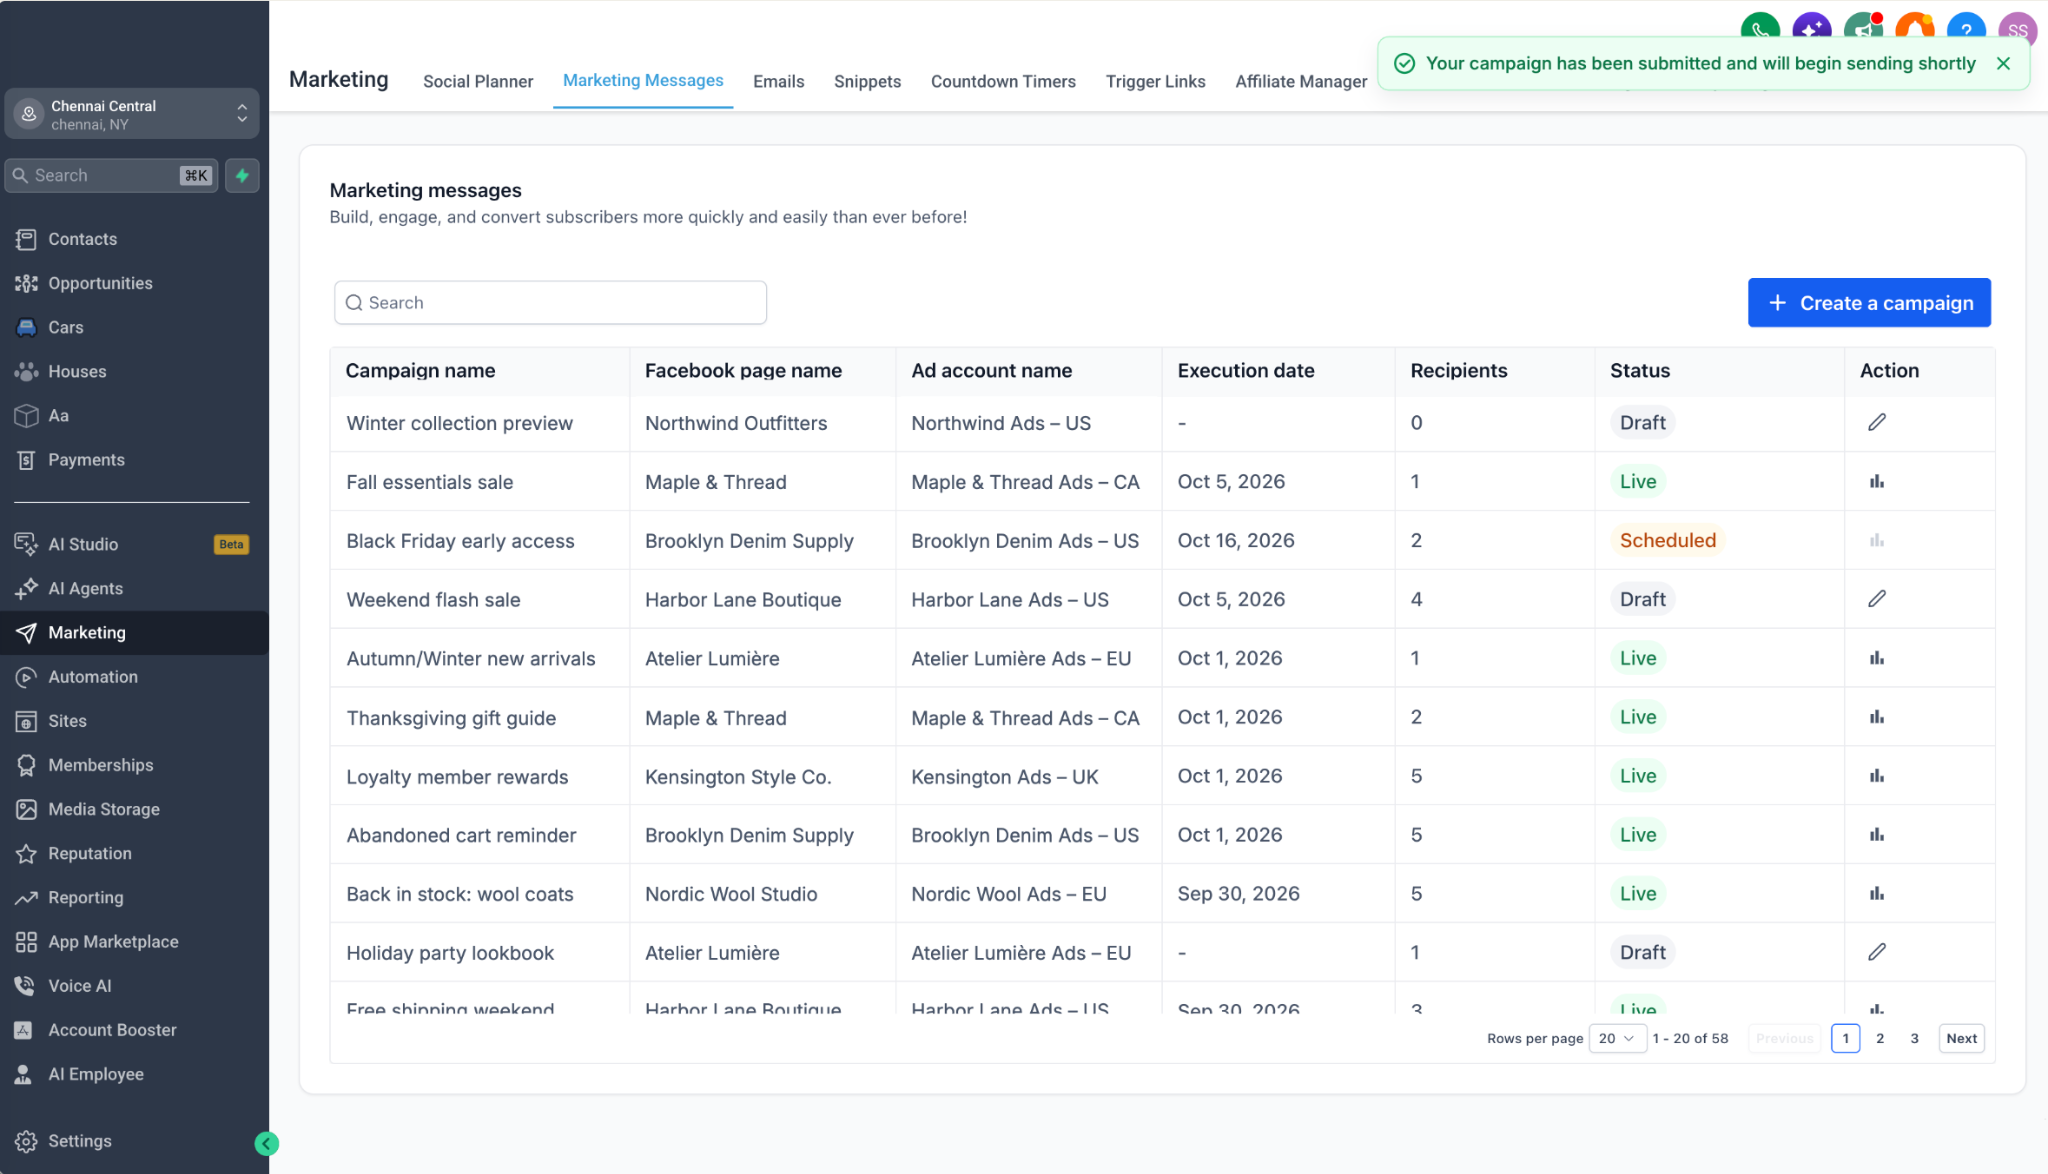
Confirmation banner — “Your campaign has been submitted and will begin sending shortly,” with the new campaign now listed as Scheduled.
Campaign statuses
Draft — saved but not sent. Click the pencil icon to finish and send it.
Scheduled — submitted and waiting to send, either for its scheduled time or while Meta prepares the campaign.
Live — Meta is sending or has sent the campaign. Statistics are available.
Failed — the send didn't complete. CRM doesn't yet show the reason; see the FAQ for what to check.
5. Meta Marketing Campaign Analytics Flow
Once a campaign has gone out, CRM surfaces delivery and engagement metrics right from the same Marketing Messages list so you can gauge performance without leaving the app.
Accessing campaign analytics
Go to Marketing → Marketing Messages.
Find the campaign and look at the Action column. The bar-chart icon is active once the campaign is Live and greyed out while it is Scheduled. Draft campaigns show a pencil (edit) icon instead.
Click the bar-chart icon to open the campaign's statistics panel.
Metrics available
The statistics panel shows the campaign's Status and Execution date, its performance metrics, and a preview of the message. Metrics come from Meta and can take some time to update after a campaign goes live.
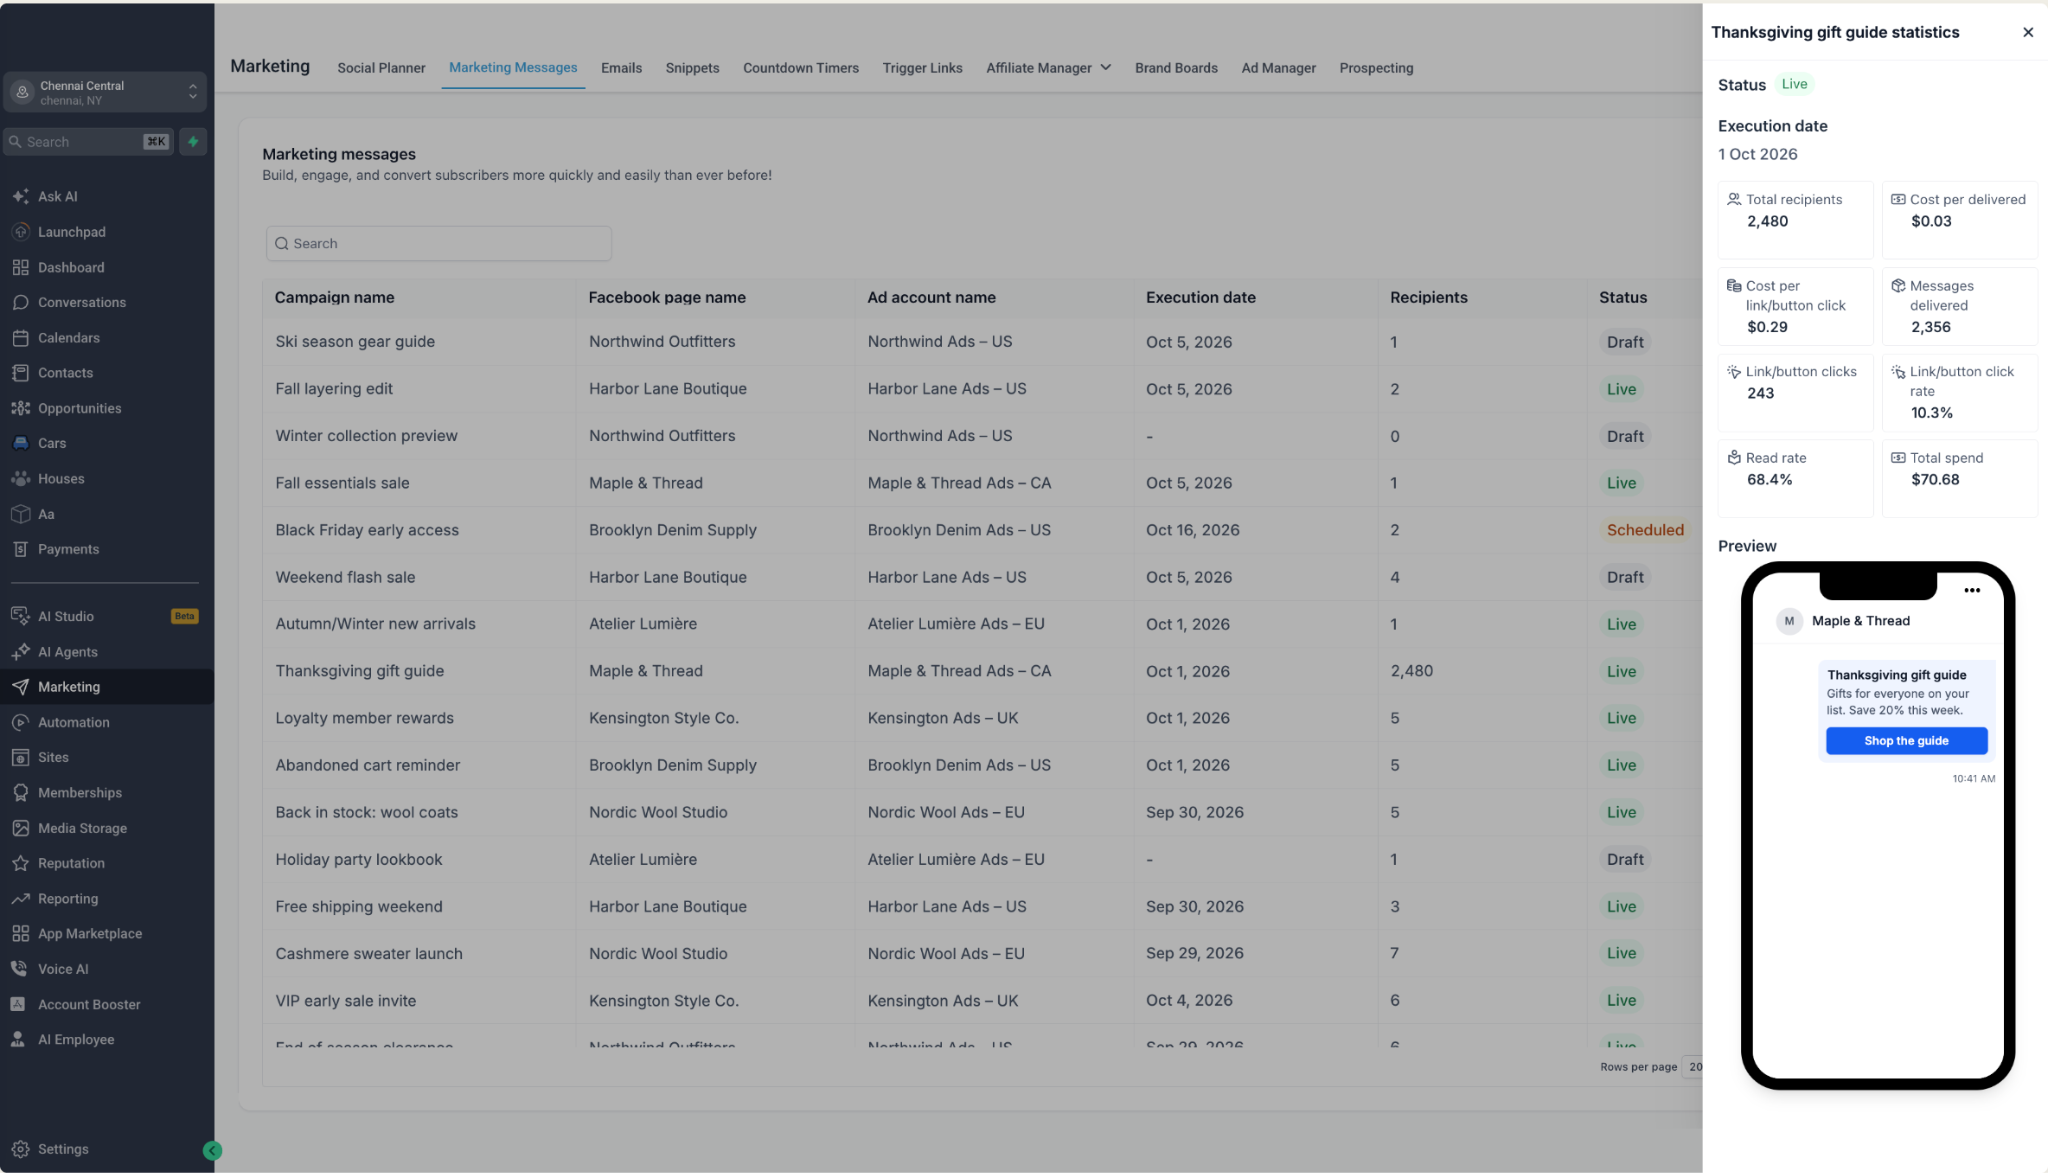
Campaign statistics panel — Status, execution date, total recipients, cost per delivered, messages delivered, link/button clicks and click rate, read rate, and total spend, alongside the message preview.
Total recipients — the number of contacts selected for the campaign.
Messages delivered — messages Meta delivered to recipients' Messenger. This can be lower than Total recipients, for example when some recipients had opted out (Section 3).
Read rate — the share of delivered messages that recipients opened.
Link/button clicks and Link/button click rate — clicks on your CTA buttons, and clicks as a share of delivered messages.
Cost per delivered and Cost per link/button click — what each delivered message and each click cost.
Total spend — the amount charged to the connected ad account for this campaign. Meta charges only for delivered messages.
Frequently Asked Questions
Q: Which countries can use Meta Marketing Messages?
Meta offers Marketing Messages to businesses in Australia, Brazil, Chile, Colombia, Hong Kong, India, Indonesia, Israel, Malaysia, Mexico, New Zealand, Peru, the Philippines, Saudi Arabia, Singapore, Taiwan, Thailand, the United Arab Emirates, the United States, and Vietnam. Meta maintains this list in its Marketing Messages FAQ.
Q: How am I charged for marketing messages?
Meta charges per message delivered to a subscriber's device; undelivered messages aren't charged. Charges go to the ad account you connected and appear on the same Meta bill as your ads. Use the campaign budget (Section 4, Step 3) to cap spend.
Q: My Facebook Page or ad account doesn't appear when I connect. What should I check?
Make sure you selected the Business Portfolio that owns both the Page and the ad account, and that you are a Business Admin of that portfolio. If the Page is only shared with your portfolio — for example, an agency managing a client's Page — the client's Business Admin must complete the connection.
Q: I see a “Payment method is missing!” banner. What should I do?
Add a valid payment method to the connected ad account in Meta, then click Resolve on the banner. Campaigns can be drafted in the meantime, but they won't send.
Q: Why is the Select recipients list empty?
The list only shows contacts subscribed to the Page selected in Step 2 of campaign creation. Check that the opt-in workflow is published, that the same Page is connected through the Facebook integration, and that contacts have tapped the opt-in button. A contact who received the request but didn't accept it is not a subscriber.
Q: The opt-in step shows Skipped in the execution logs. Why?
Meta only delivers an opt-in request if the contact messaged your Page within the previous 24 hours. Make sure the Send opt-in message action comes right after the Customer Replied trigger, with no Wait step before it.
Q: The opt-in step failed with “Opt-in request for this topic was already sent to this contact” or “Calls to this API have exceeded the rate limit.” What does this mean?
On the Send opt-in message step, either message means the contact was already sent an opt-in request with the same Title. Meta allows one request per topic per contact, so it rejected the new one and the contact's status didn't change. Turn off Allow re-entry for the workflow, and use a different Title if you need to ask this contact again.
Q: A contact opted out. Can they subscribe again?
Yes. Send them an opt-in request from a Send opt-in message action with a new Title — Meta rejects a repeat request with a Title they've already received. The contact must have messaged your Page within the last 24 hours for the request to be delivered.
Q: Will contacts who opted out still receive my campaigns?
No. Meta doesn't deliver marketing messages to contacts who opted out, and undelivered messages aren't charged. Because Meta doesn't notify CRM of opt-outs, the contact can still appear under Select recipients until the first campaign that tries to reach them; after that, CRM removes them from the list (Section 3).
Q: Why didn't my campaign send at the exact time I scheduled it?
Meta needs time to prepare each new campaign before it can deliver messages, so sending typically begins 30 to 60 minutes after the scheduled time, or after you click Send campaign. Schedule campaigns early enough to arrive before any offer deadline.
Q: A campaign won’t send and shows “The message must be in active status before it can be sent.” What should I do?
This error comes from Meta when a message is sent before the campaign has finished setting up on Meta's side, which Meta says can take up to 60 minutes after the campaign is created. Wait and check the campaign status again. If it shows Failed, create a new campaign and schedule it at least 60 minutes ahead.
Q: My campaign shows Failed. How do I find out why?
CRM doesn't yet display Meta's failure reason. Check that the ad account has a valid payment method and no restrictions, that the Page and ad account are still connected under Facebook Login for Business, and that the recipients are still subscribed. Then create a new campaign. If it fails again, contact support with the campaign name and sub-account.
Q: How often can I send marketing messages to the same contact?
Meta delivers at most one marketing message per contact per day from the same Page.
Q: Can I format the message text or add links in the description?
No. The description is plain text, up to 1,024 characters. Use CTA buttons (up to three) to link to web pages.
Q: What happens when a subscriber replies to a marketing message?
The reply arrives like any Messenger message from that contact and appears in Conversations. It opens a standard 24-hour window in which your team can respond at no charge, and any Messenger automations you've set up for the Page apply.
Q: What's the difference between Daily and Lifetime budgets?
A Daily budget caps how much Meta can spend on the campaign per day. A Lifetime budget caps total spend across the campaign's run. In both cases, Meta stops sending once the cap is reached.
Related Articles
Still stuck?
Reach out through in-app support from within your CRM account, and include the campaign name and sub-account so the team can look into it quickly.