
Learn how to create a one-time invoice, add a customer and products, configure payment schedules and additional options, understand the invoice editor preview, review the accurate final preview, and send the invoice to your customer.
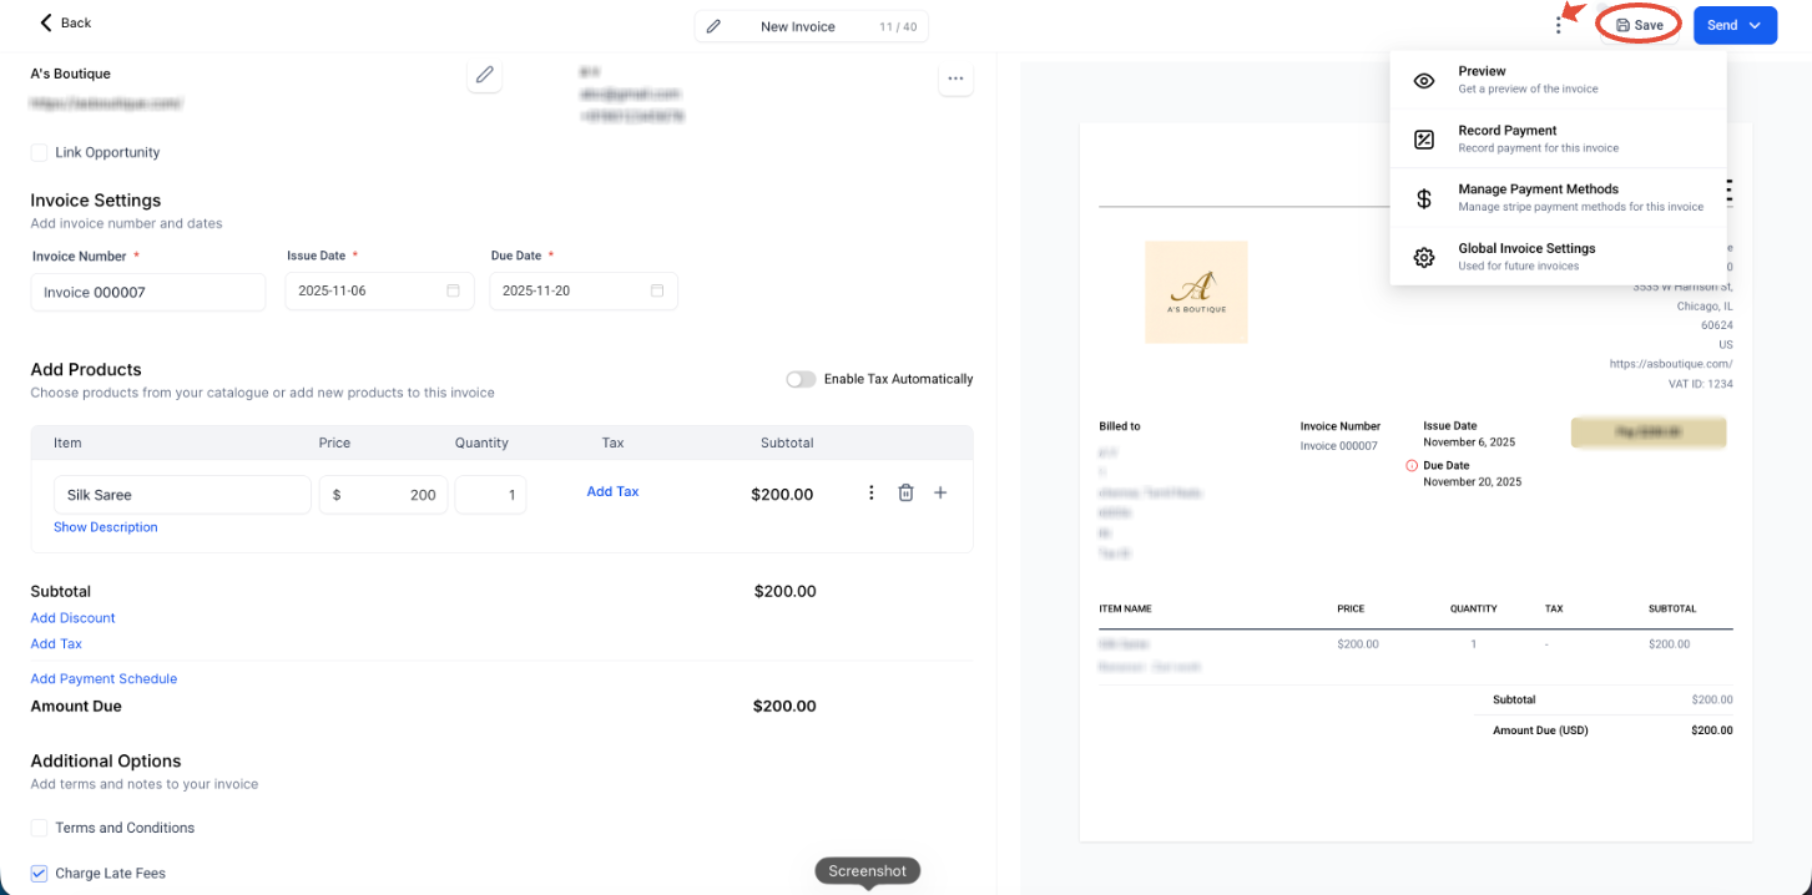
The right-side preview inside the invoice editor is not a WYSIWYG customer preview and can contain placeholder sample data. Save the invoice, open the three dots (⋮) next to Save, and select Preview when you need to review the accurate invoice layout before sending.
What Are Invoices?
Invoices let you bill customers for products or services while keeping customer information, products, pricing, payment options, invoice details, and delivery in one workflow.
A one-time invoice is intended for a single billing event. After adding the customer and invoice items, you can apply eligible discounts, taxes, payment schedules, fees, tips, terms, or attachments before saving and sending the invoice.
For billing that needs to repeat on a schedule, use a recurring invoice instead of repeatedly creating one-time invoices.
Key Benefits of Invoices
The invoice editor brings invoice configuration, pricing controls, payment options, and document review into a single billing workflow so you can prepare an invoice before delivering it to the customer.
- Centralized Billing: Manage customer details, products, pricing, dates, and supported payment options from one invoice.
- Flexible Product Entry: Select existing products or create a product while building the invoice.
- Payment Flexibility: Configure supported discounts, taxes, payment schedules, late fees, processing fees, tips, terms, and attachments.
- Save Before Sending: Store invoice changes before delivering the invoice to the customer.
- Accurate Final Preview: Use the dedicated Preview action to review the complete invoice before sending it.
Prerequisites and Limitations
Reviewing your invoice type and payment configuration before you begin helps you choose the correct billing workflow and understand which payment features will be available.
- Use a one-time invoice for a single billing event.
- Use New Recurring Invoice when invoices need to be generated repeatedly on a defined schedule.
- Configure invoice defaults when you plan to use features such as partial payments, late fees, tips, reminders, or other invoice settings.
- Electronic payment availability depends on the payment provider and payment methods configured for the account.
- One-time invoices can also be used in supported manual-payment workflows, but the payment must be collected and recorded manually when no supported online payment provider is being used.
- Some invoice payment features depend on the connected provider and account configuration.
How To Create and Send an Invoice
Creating a one-time invoice starts from the Payments area. Build the invoice by selecting a client, reviewing dates, adding products, configuring any required payment options, saving the invoice, previewing the completed document, and then sending it.
Step 1: Start a New Invoice
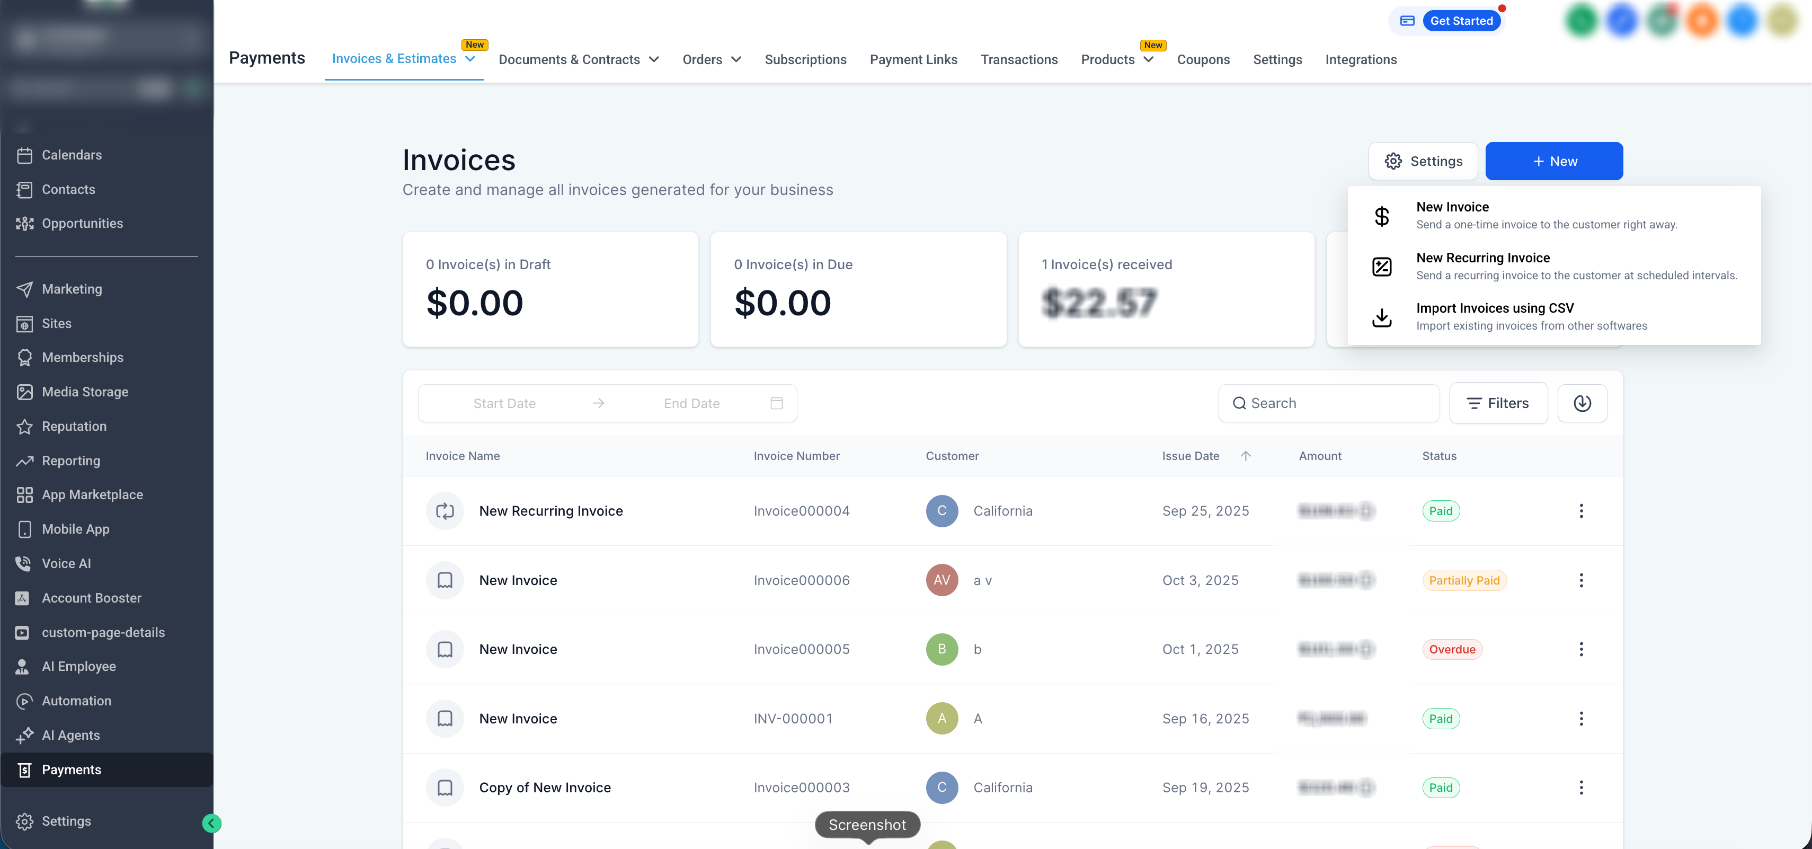
Start from the All Invoices view so you can choose between a one-time invoice, recurring invoice, or other available invoice actions.
- From the account view, select Payments.
- Open Invoices & Estimates.
- Select All Invoices.
- Click + New.
- Select New Invoice.
Step 2: Add the Client and Invoice Details
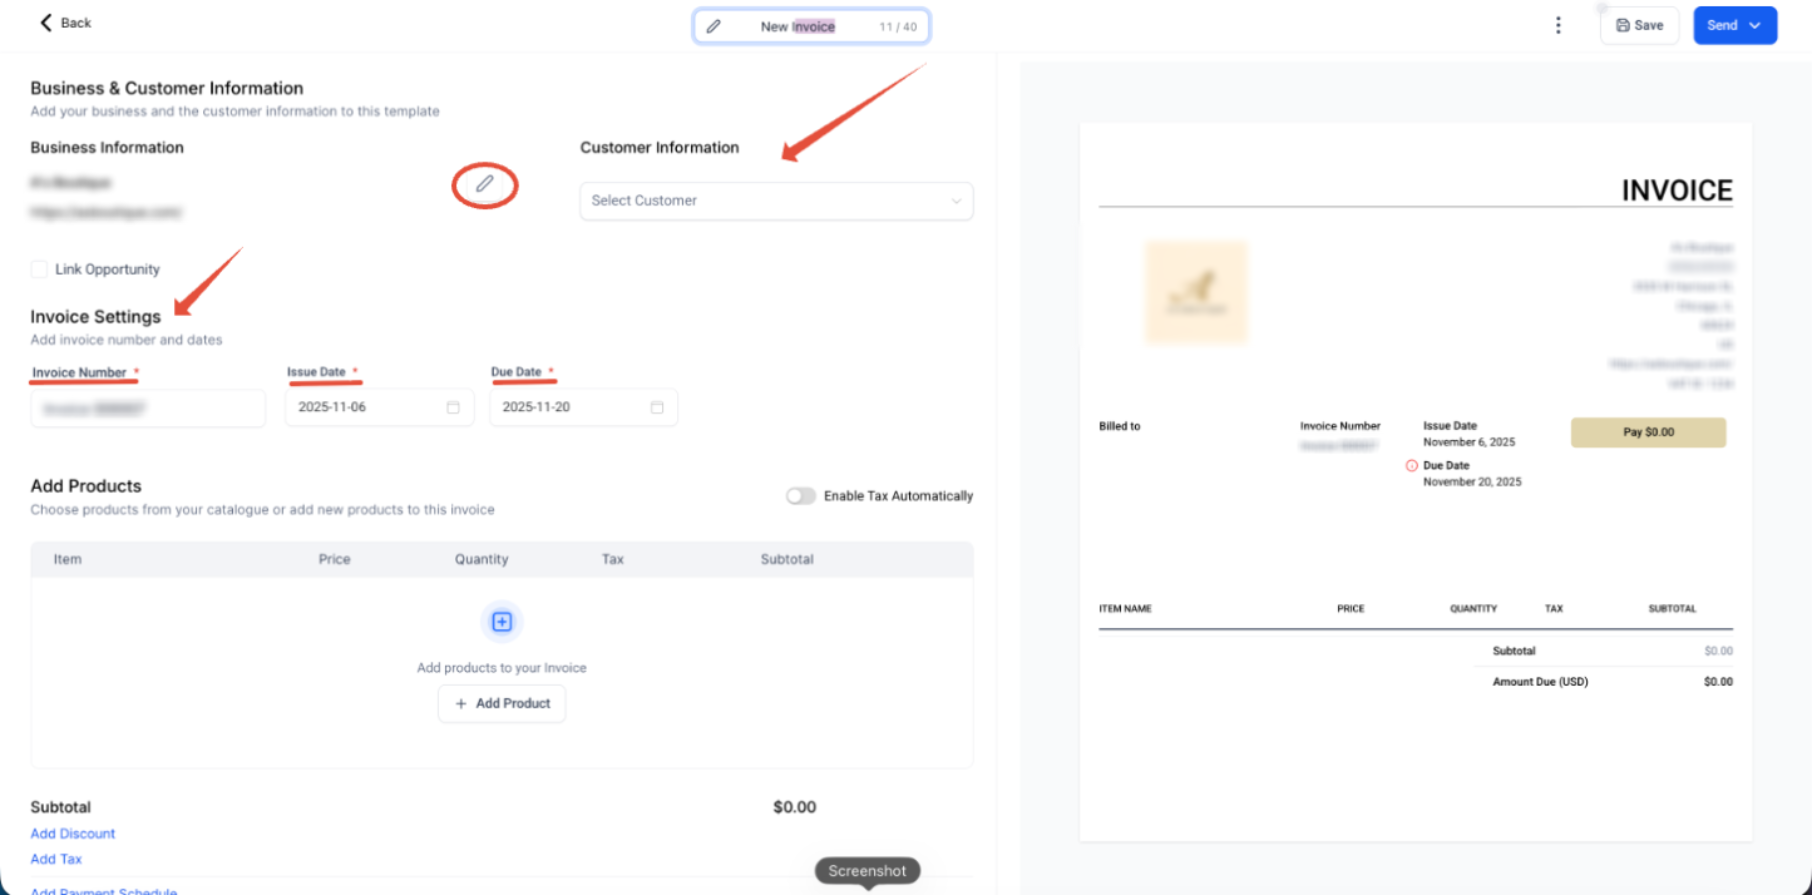
Customer, business, and scheduling information identifies who receives the invoice and controls the primary dates displayed on the document.
- Select the customer who should receive the invoice.
- Review or edit the Invoice Number.
- Review the Issue Date.
- Review the Due Date.
- Edit the business information when needed.
- Save any business-information changes before continuing.
Step 3: Add Products or Services
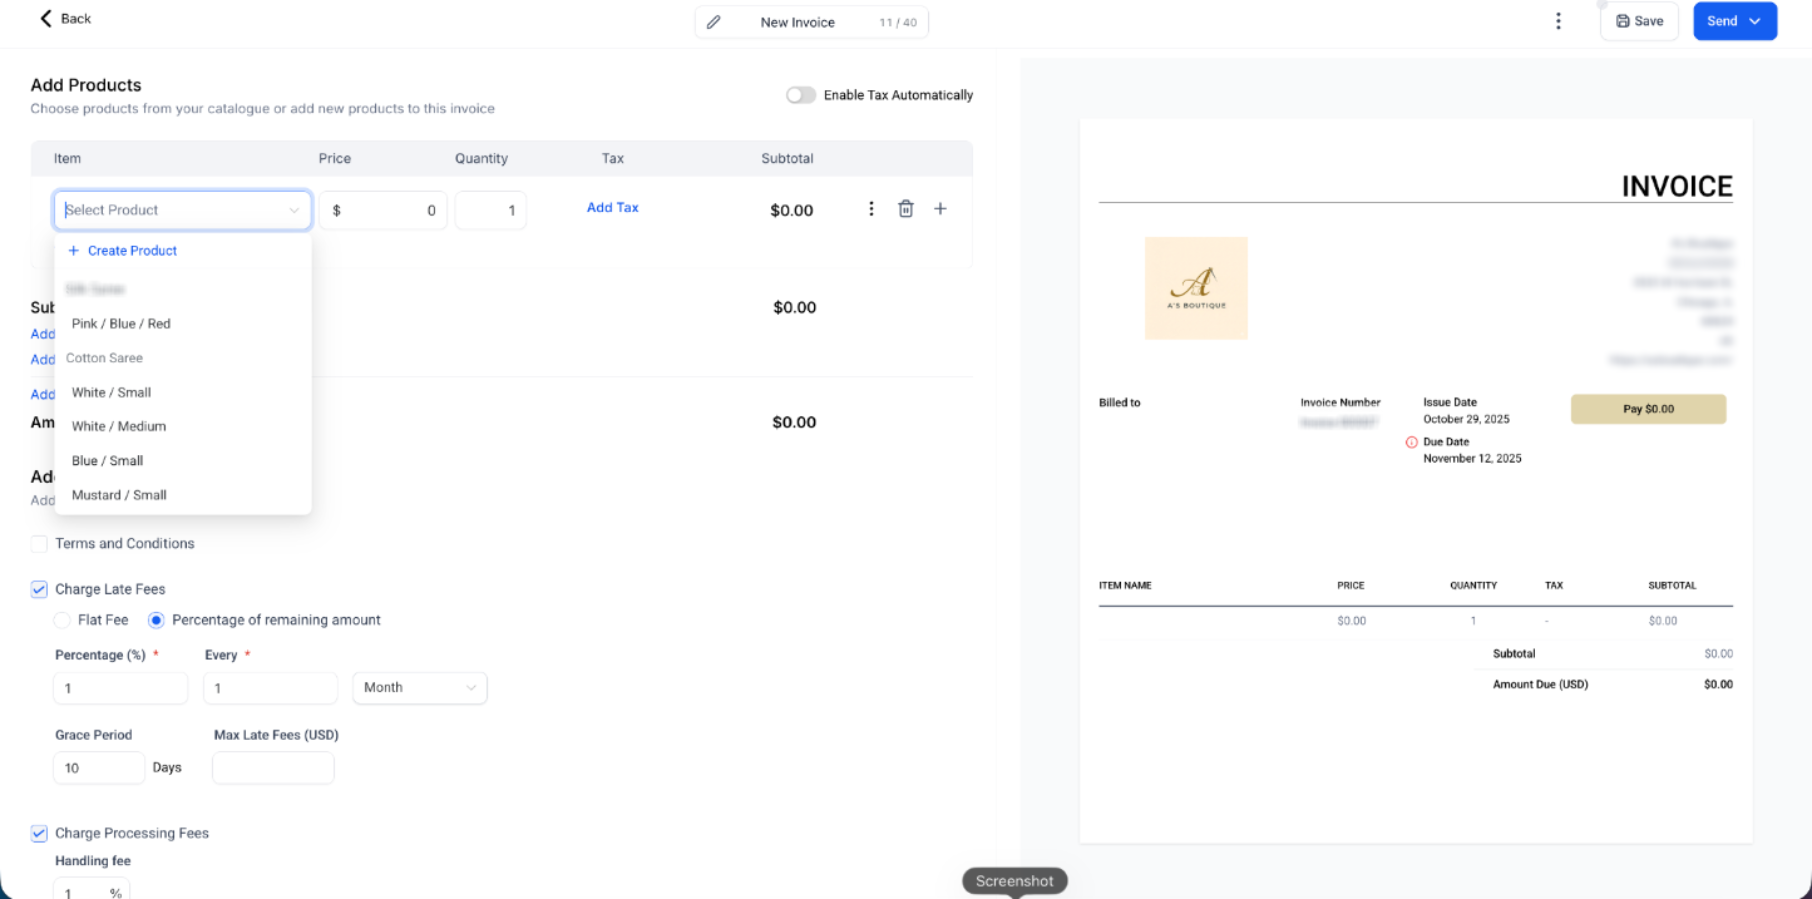
Invoice items define what the customer is being billed for. You can select an existing product or create a product while building the invoice.
- In the Add Products area, click Add Product or the item selector.
- Choose an existing product from the list.
- If the product does not exist, select + Create Product and enter the required product information.
- Add the item to the invoice.
- Update the price or quantity on the invoice line when needed.
Step 4: Configure Invoice Options
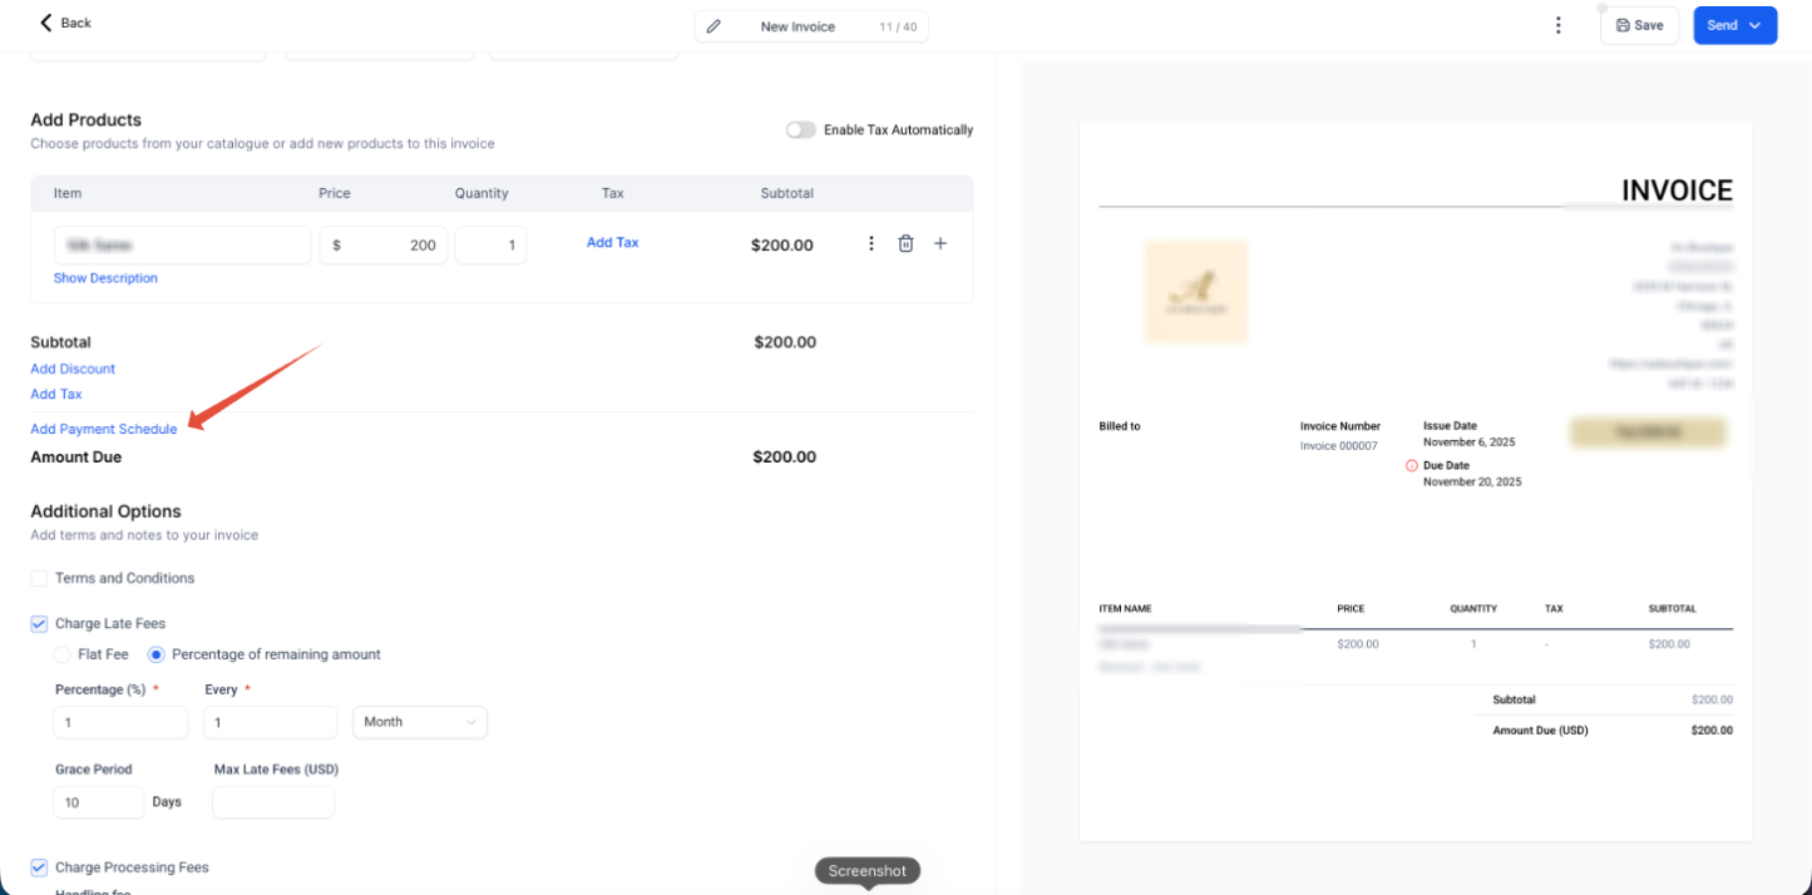
Invoice options let you adjust the balance and apply supported billing rules before the invoice is delivered.
Depending on your account and payment configuration, available controls can include:
- Add Discount: Apply an eligible flat or percentage discount.
- Add Tax: Apply the applicable configured tax.
- Add Payment Schedule: Divide the amount into percentage-based or fixed-amount installments with due dates.
- Additional Options: Configure supported settings such as terms, late fees, processing fees, tipping, or attachments.
Step 5: Save and Preview the Invoice
Saving stores the current invoice configuration. The dedicated Preview action should be used when you want to review the accurate customer-facing layout.
- Review the invoice details and click Save.
- Click the three dots (⋮) next to Save.
- Select Preview.
- Review the accurate invoice in the browser tab that opens.
- Return to the original invoice editor tab when you are ready to make changes or send the invoice.
Step 6: Send the Invoice
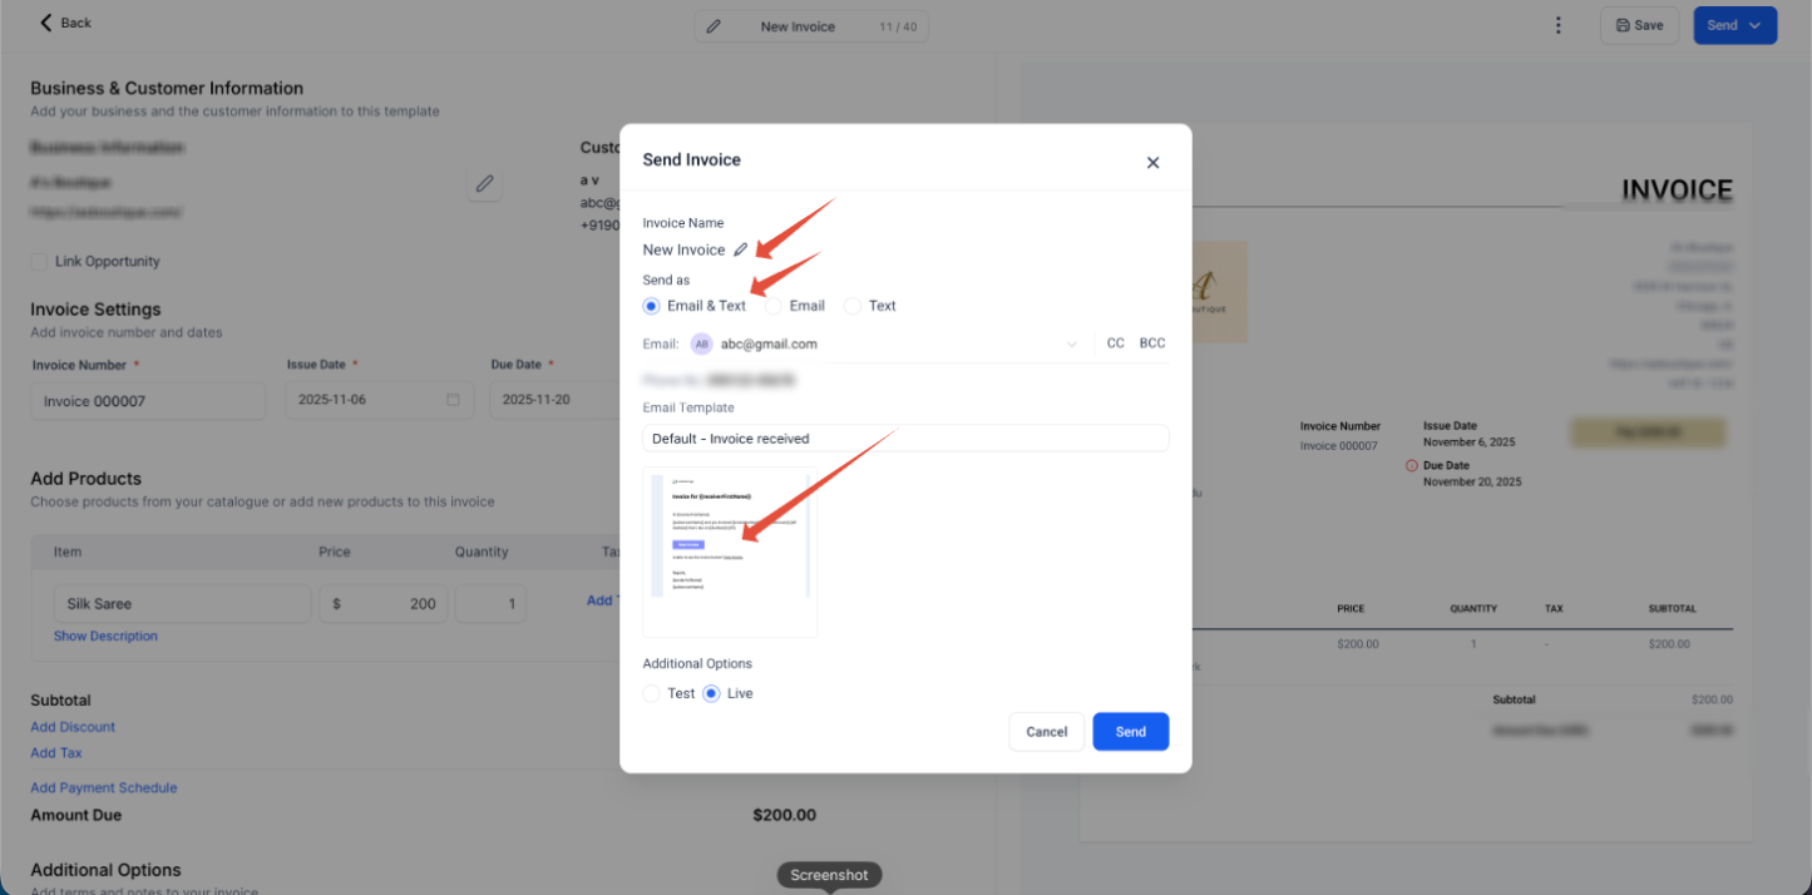
Sending delivers the completed invoice through the delivery methods available for the selected customer and invoice configuration.
- Return to the invoice editor after reviewing the final preview.
- Click Send.
- Review the invoice name.
- Choose the available delivery option, such as Email & Text, Email, or Text.
- Review the recipient information and message or email template.
- Review any applicable Additional Options, including Test or Live mode when shown.
- Complete the send action.
Invoice Options and Payment Features
Invoice options provide additional control over how much the customer pays, when payments are due, and what supporting information accompanies the invoice. Feature availability can depend on invoice settings and the connected payment provider.
| Option | What It Does |
|---|---|
| Discount | Reduces the invoice by the configured flat amount or percentage. |
| Tax | Applies the applicable configured tax to eligible invoice items. |
| Payment Schedule | Splits the invoice into percentage-based or fixed-amount installments with defined due dates. |
| Terms & Conditions | Adds invoice-specific terms or notes for the customer. |
| Late Fees | Applies the configured late-fee behavior when the feature is enabled and supported. |
| Processing Fees | Adds supported processing-fee behavior according to the payment configuration. |
| Tipping | Allows eligible customers to add a tip when paying the invoice. |
| Attachments | Adds supporting files to the invoice email sent to the customer. |
Configuration matters: Features such as partial payments, late fees, and tipping may need to be enabled in the invoice payment settings before they can be used on an individual invoice.
Understand the Invoice Editor and Preview
The editor keeps invoice controls and a visual layout reference side by side, but the right-side editor preview and the dedicated Preview action have different purposes.
| View | Purpose |
|---|---|
| Invoice Editor | Manage customer details, dates, products, prices, quantities, taxes, discounts, schedules, and other invoice options. |
| Right-Side Preview | Provides a structural layout reference while editing. It can contain placeholder sample data and is not the exact final invoice. |
| Three Dots → Preview | Opens the accurate invoice preview in a new browser tab so you can review the final formatting before sending. |
Do not rely on the editor preview as the final customer view. Save the invoice and use the dedicated Preview action when invoice formatting must be verified before sending.
One-Time vs. Recurring Invoices
Choosing the correct invoice type is important because one-time and recurring invoices use different creation and billing flows.
| Invoice Type | Use It When | Creation Option |
|---|---|---|
| One-Time Invoice | You need to bill the customer once for a product, service, setup fee, or other single charge. | + New → New Invoice |
| Recurring Invoice | Invoices should be generated and sent repeatedly according to a configured billing schedule. | + New → New Recurring Invoice |
Frequently Asked Questions
Need Help?
- The invoice preview looks different from the editor: Save the invoice and use three dots (⋮) → Preview. The right-side editor preview is only a layout reference and can contain placeholder information.
- A product is missing: Open the product selector and choose an existing product or use + Create Product to add a new item.
- A payment option is unavailable: Review the invoice payment settings, connected provider, and whether the feature must be enabled before it can be used.
- The invoice was saved but not delivered: Remember that Save and Send are separate actions. Open the invoice and complete the Send workflow.
- The customer should be billed repeatedly: Use + New → New Recurring Invoice instead of creating multiple one-time invoices.
- You are collecting payment outside the platform: Collect the payment separately and record the manual payment according to your billing process.
- Still unresolved: Record the affected invoice number, invoice type, connected payment provider, expected behavior, actual behavior, and screenshots before contacting support. Do not include passwords, card details, API keys, or other sensitive credentials.