
Learn how to create Text and Email Snippets, manage user permissions, organize reusable content, and insert Snippets directly into Conversations.
The current HiRise Snippets experience is automatically enabled. Users accessing Snippets through Conversations need Conversations → View & manage conversation permission.
What Are Snippets in Conversations?
Snippets are reusable text or email messages that can be quickly inserted into customer conversations. Separate Text Snippets and Email Snippets let teams prepare content for the channel where it will be used.
Snippets can also include supported personalization such as Custom Values and Trigger Links.
Common uses include:
- Appointment reminders and follow-ups
- Frequently asked questions
- Lead follow-ups
- Support responses
- Business hours and instructions
- Frequently reused email content
Key Benefits of Using Snippets
Snippets reduce repetitive typing while giving teams a centralized library of reusable messaging that can be updated as communication needs change.
- Save Time: Reuse common responses instead of rewriting them.
- Improve Consistency: Give team members access to standardized messaging.
- Personalize Responses: Add supported Custom Values to reusable content.
- Stay Organized: Use folders, search, and filters to manage Snippets.
- Edit Before Sending: Review and adjust inserted content before sending it to a contact.
Prerequisites and Permissions
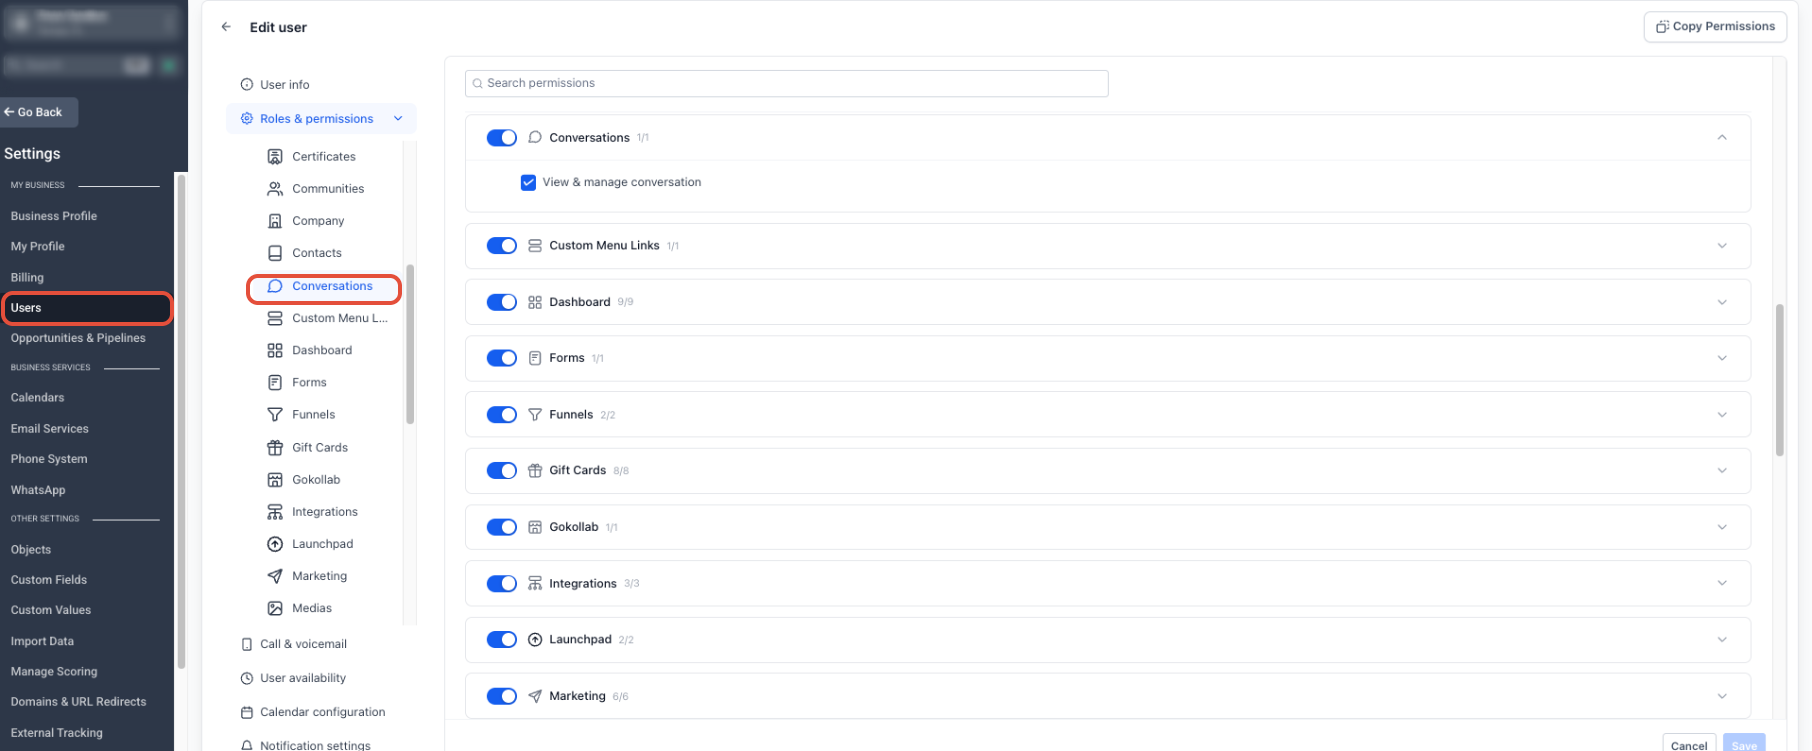
Snippets inside Conversations depend on the user's Conversations permission. Checking this setting first can quickly resolve cases where the Snippets tab or composer option is missing.
- Snippets are managed within the relevant Sub-Account.
- The HiRise Snippets interface is automatically enabled.
- Users need Conversations → View & manage conversation permission.
Give a User Access to Snippets
Conversations permissions control whether a user can access the Conversations workspace and its Snippets tools.
- From the Sub-Account View, click Settings.
- Select Users.
- Select the team member you want to update.
- Open Roles & Permissions.
- Select Conversations.
- Enable View & manage conversation.
- Click Save.
How To Create a Snippet
Creating a Snippet gives your team reusable content that can be searched, organized, and inserted whenever the same type of communication is needed.
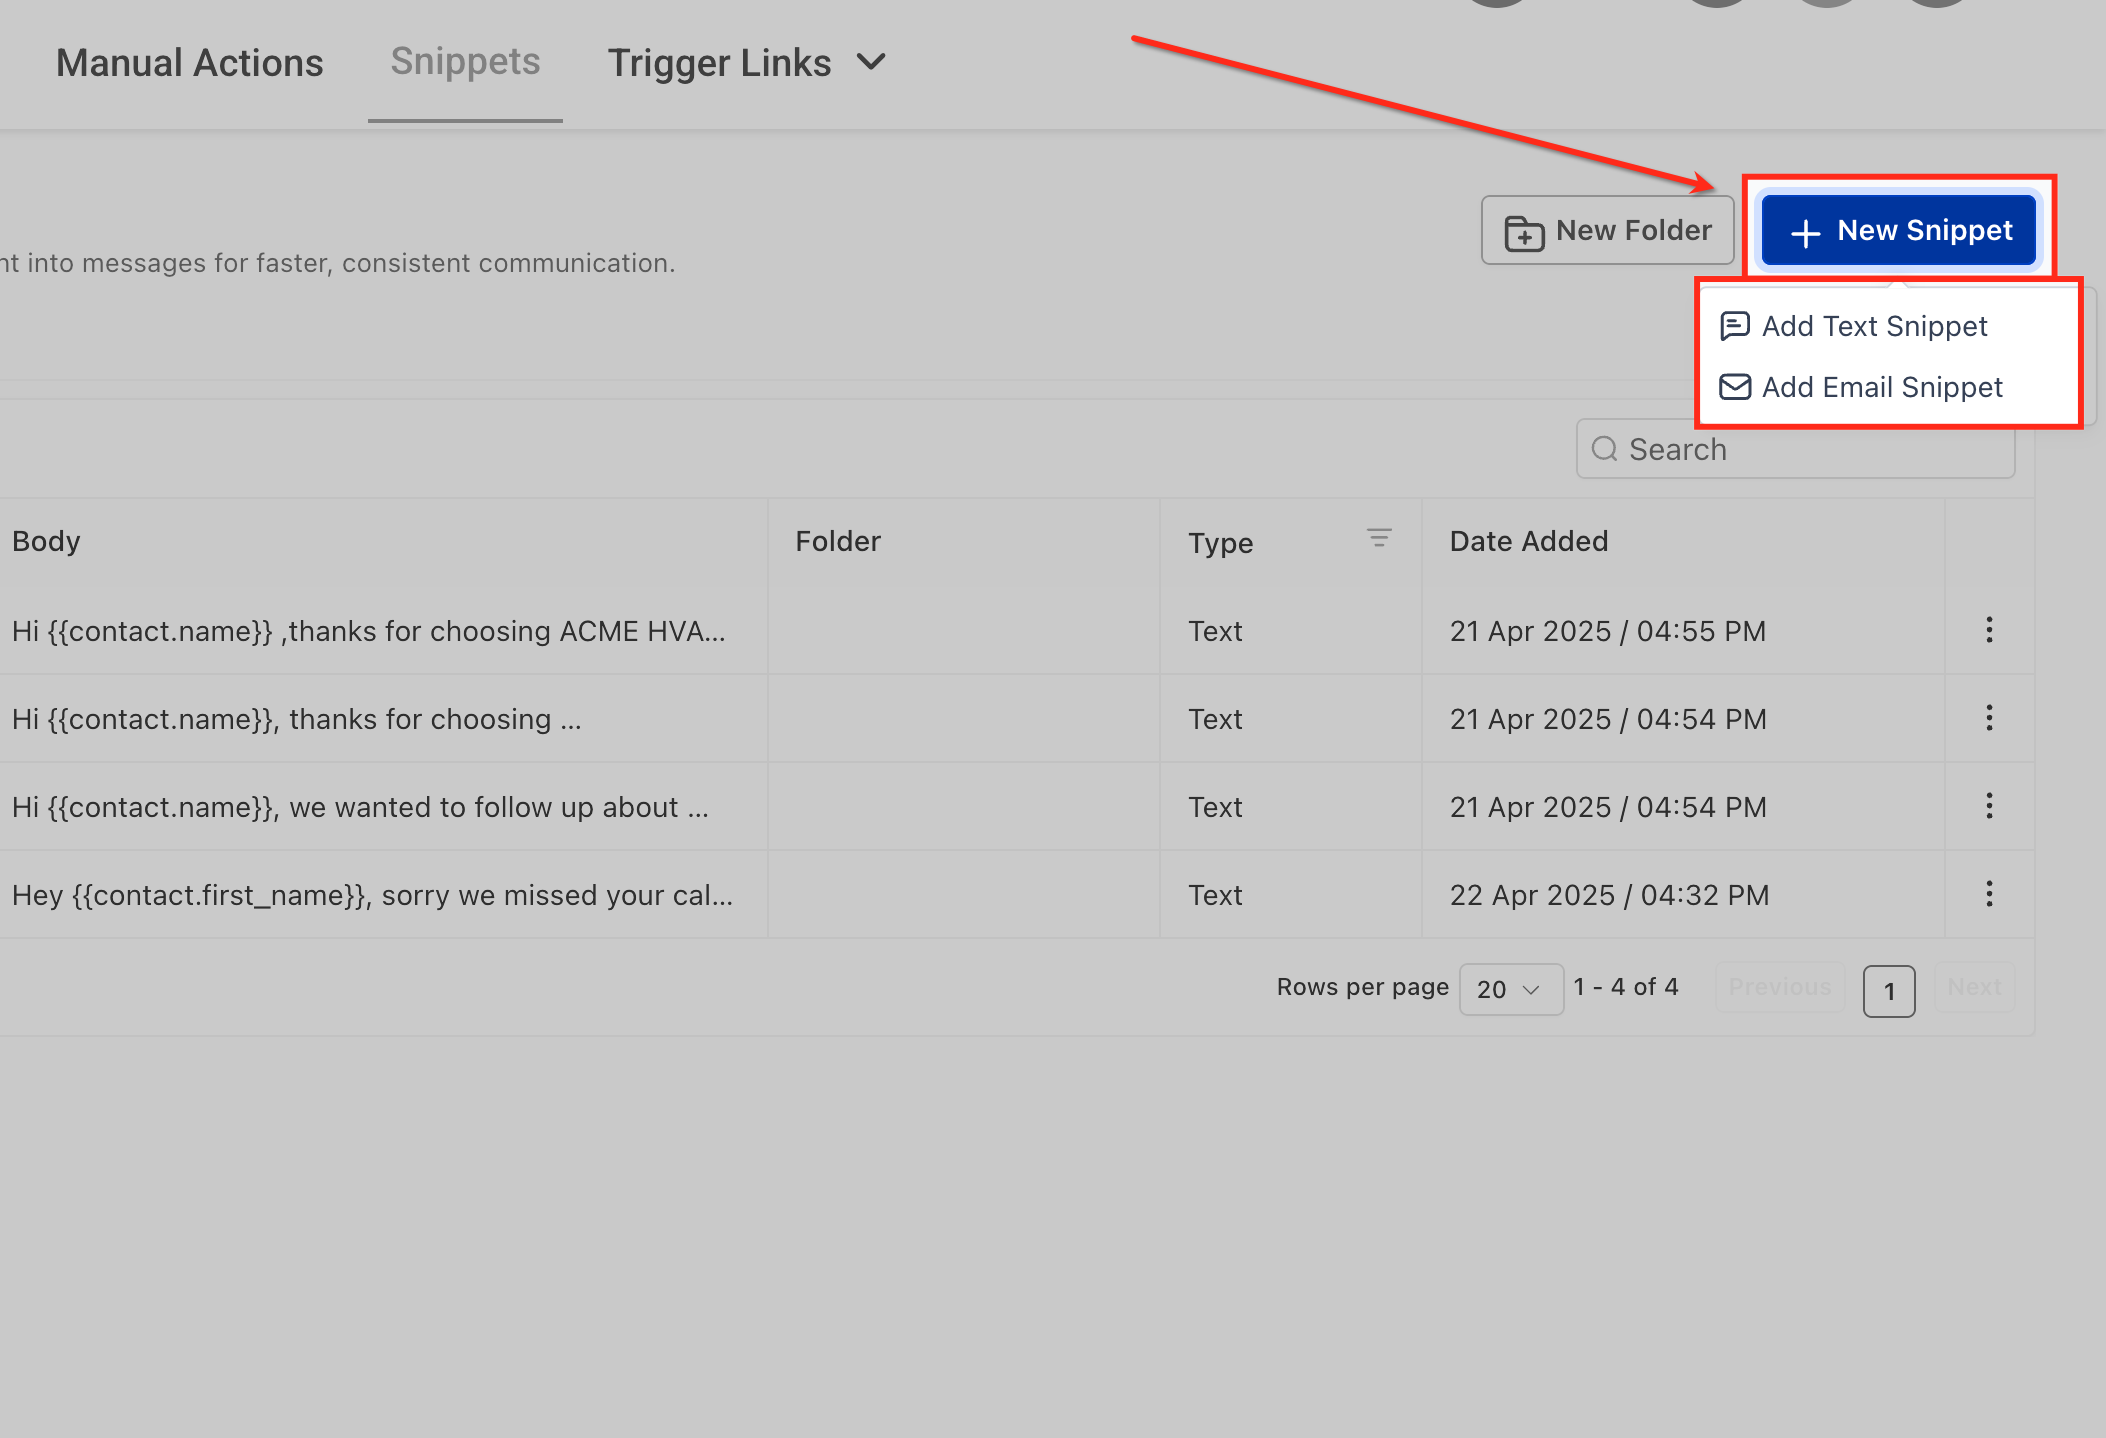
- From the Sub-Account View, click Conversations.
- Select Snippets at the top of the page.
- Click + New Snippet.
- Select Add Text Snippet or Add Email Snippet.
- Enter a descriptive name.
- Add the message content.
- Add supported Custom Values or a Trigger Link when needed.
- Review the available preview or test option.
- Click Save.
Alternate Access: Snippets can also be accessed from Marketing → Snippets.
How To Organize and Manage Snippets
Keeping your Snippet library organized helps team members find approved content quickly and reduces the chance of outdated or duplicate messages being reused.
From Conversations → Snippets, you can:
- Use Search to find a Snippet by name or keyword.
- Filter the list by supported Snippet type.
- Click New Folder to group related Snippets.
- Use the three-dot menu (⋮) to move, edit, duplicate, or delete a Snippet.
Folders can be organized around areas such as Sales, Support, Appointments, Billing, or FAQs.
How To Use a Snippet in Conversations
Inserting a Snippet quickly populates prepared content while still allowing the user to review, personalize, or edit the message before it is sent.
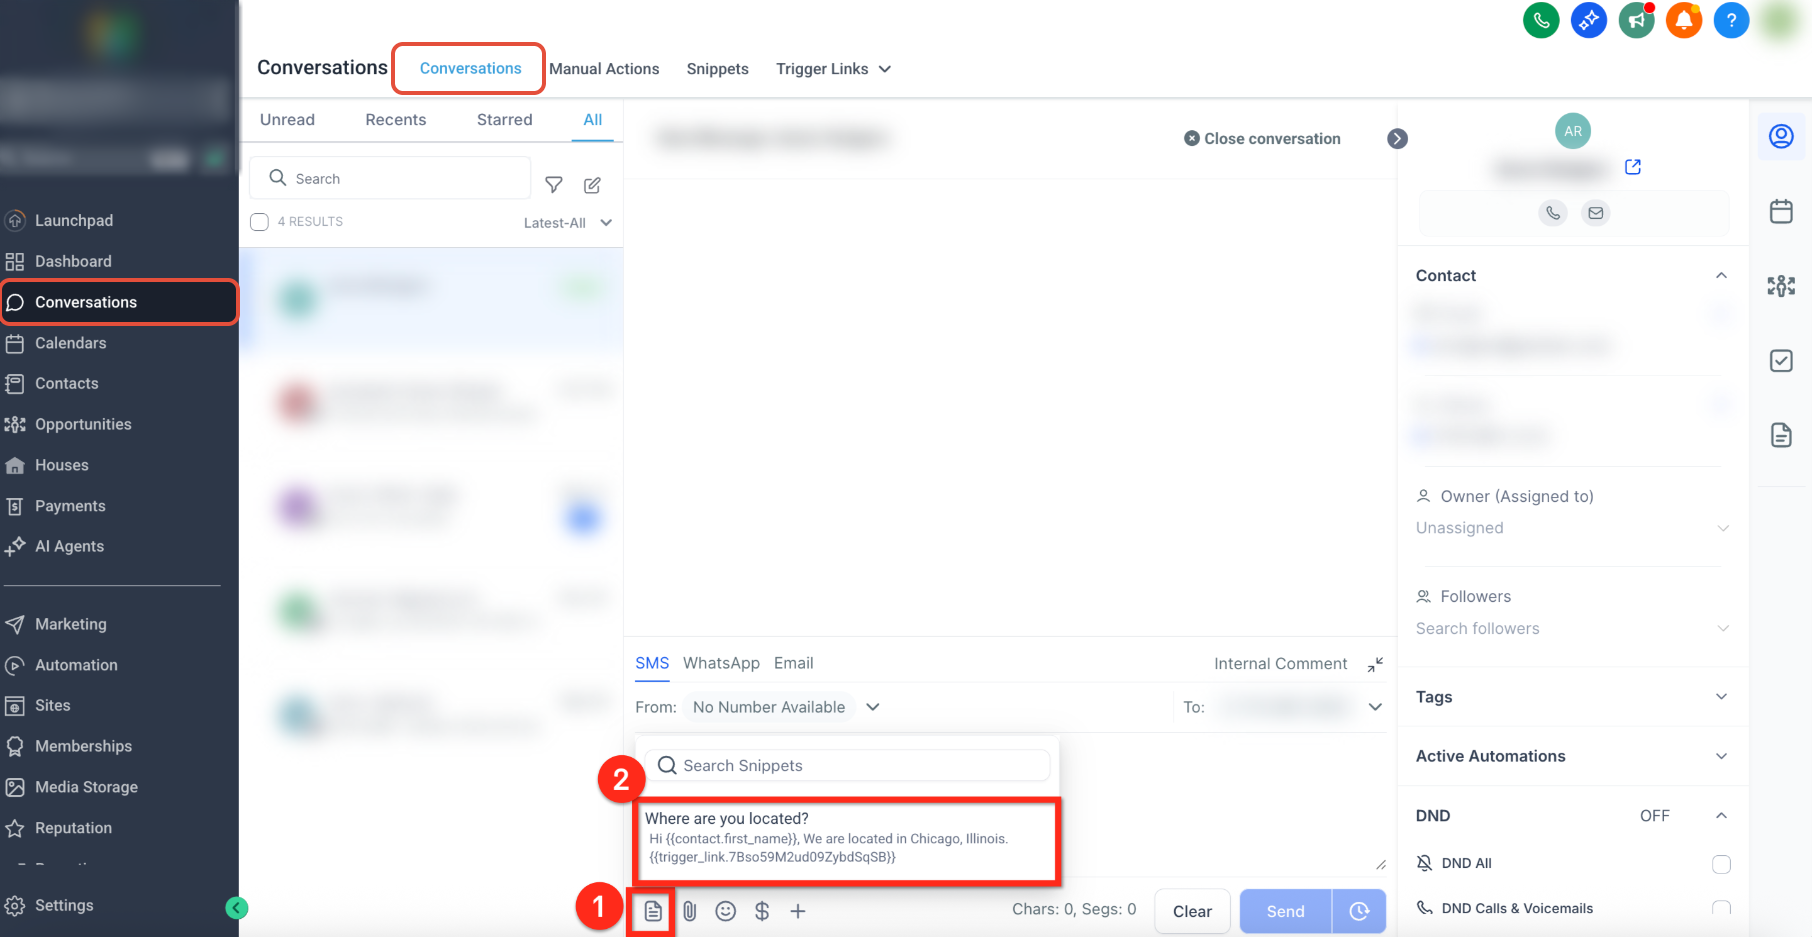
- Go to Conversations.
- Open the contact conversation.
- Select the appropriate messaging channel.
- Click the Snippets icon in the message composer.
- Browse folders or search for the Snippet.
- Select the Snippet.
- Review the populated content and supported dynamic information.
- Make any necessary changes.
- Send the message.
Frequently Asked Questions
Need Help?
- Snippets are missing: Confirm the user has Conversations → View & manage conversation enabled.
- The Snippets picker is not visible: Verify the user can access Conversations and is using a supported messaging channel.
- A Snippet is difficult to find: Use Search or organize related Snippets into folders.
- Dynamic values are blank: Confirm the required contact or account information exists before sending.
- Content needs to change: Edit the inserted message before sending, or update the saved Snippet from the Snippets library.