
A QR code check-in campaign lets visitors scan a code and submit a form when they arrive or request an offer. The form records the submission, while a workflow can organize contacts and notify staff. Staff can review each request before confirming any offer redemption. This guide explains how to create a shared-form check-in, review submissions, and troubleshoot common issues without using unique ticket validation.
TABLE OF CONTENTS
- What Is a QR Code Check-In Campaign?
- Key Benefits of QR Code Check-In Campaigns
- Check-In Requirements and Limitations
- How to Set Up a QR Code Check-In Campaign
- How to Review Check-Ins and Record Redemptions
- Testing and Troubleshooting Check-In Campaigns
- Frequently Asked Questions
- Need Help?
What Is a QR Code Check-In Campaign?
A QR code check-in campaign links a scannable QR code to a shared form. Each visitor opens the form, submits their details, and can be routed through a Form Submitted workflow for contact tagging or staff notification.
The QR code in this setup opens a shared form. It does not issue a unique ticket, verify the visitor's identity, or automatically prevent repeated submissions.
Key Benefits of QR Code Check-In Campaigns
QR codes make it easier for visitors to access a check-in form, while forms and workflows help your team review and organize requests.
- Quick Check-In Access: Open a form by scanning a printed or digital QR code.
- Centralized Records: Review form submissions and matching contact records.
- Staff Notifications: Alert your team when a visitor submits the form.
- Organized Follow-Up: Apply a campaign-specific tag to contacts who request check-in.
Check-In Requirements and Limitations
Choose the right process before building the campaign. A shared form is appropriate for recording a visit or requesting an offer, but it is not a secure single-use redemption system.
- Basic Check-In: Use a form, a QR code, and an optional workflow to collect and organize check-in requests.
- Offer Redemption: Have staff check identity, eligibility, and any prior redemption before approving an offer.
- Unique Event Tickets: Use the in-person Events check-in feature to validate attendee tickets. This feature identifies tickets that have already been checked in or belong to another event.
- Checkout Discounts: Use Coupons for supported redemption limits, including one use per customer.
Important: Do not rely on a hidden form field, URL parameter, or contact tag alone to block repeat redemptions. Avoid putting names, phone numbers, email addresses, or editable redemption statuses in public QR URLs.
How to Set Up a QR Code Check-In Campaign
Create the form first, connect it to a QR code, and then use a workflow to record the request. Keep redemption approval separate from the automatic form-submission process.
- Go to Sites → Forms and select + Create New Form.
- Choose a blank form or an available template. Add only the contact details you need and label the submit button, such as Check In.
- Save and preview the form. Select Integrate to access its direct form link. You can copy this link to test or share the form independently.
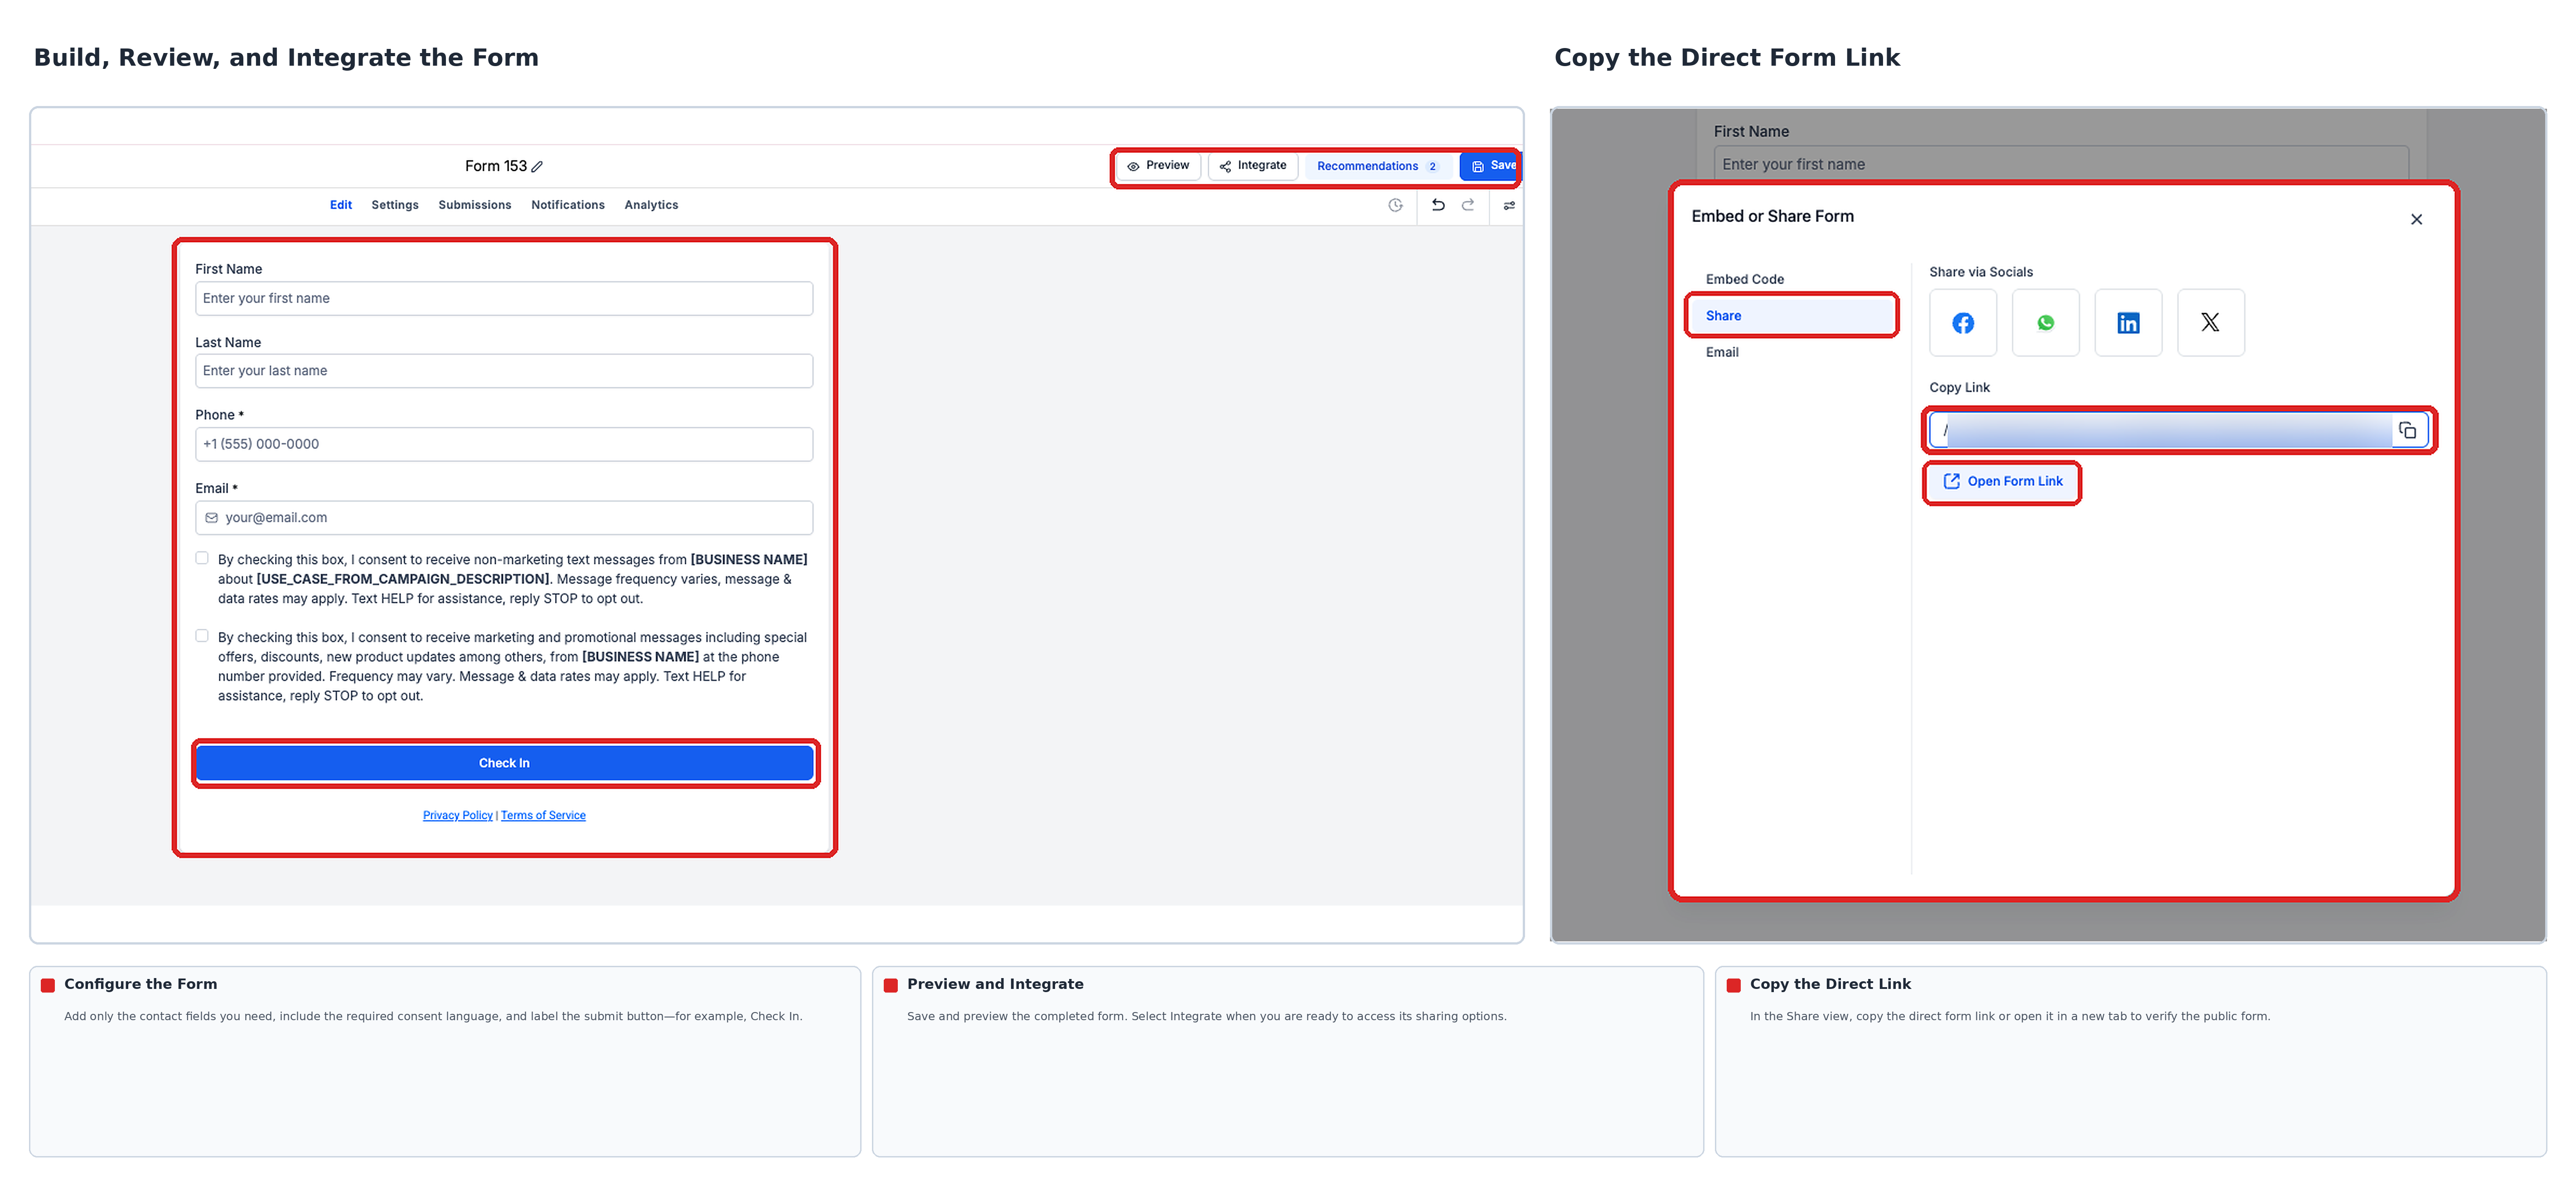
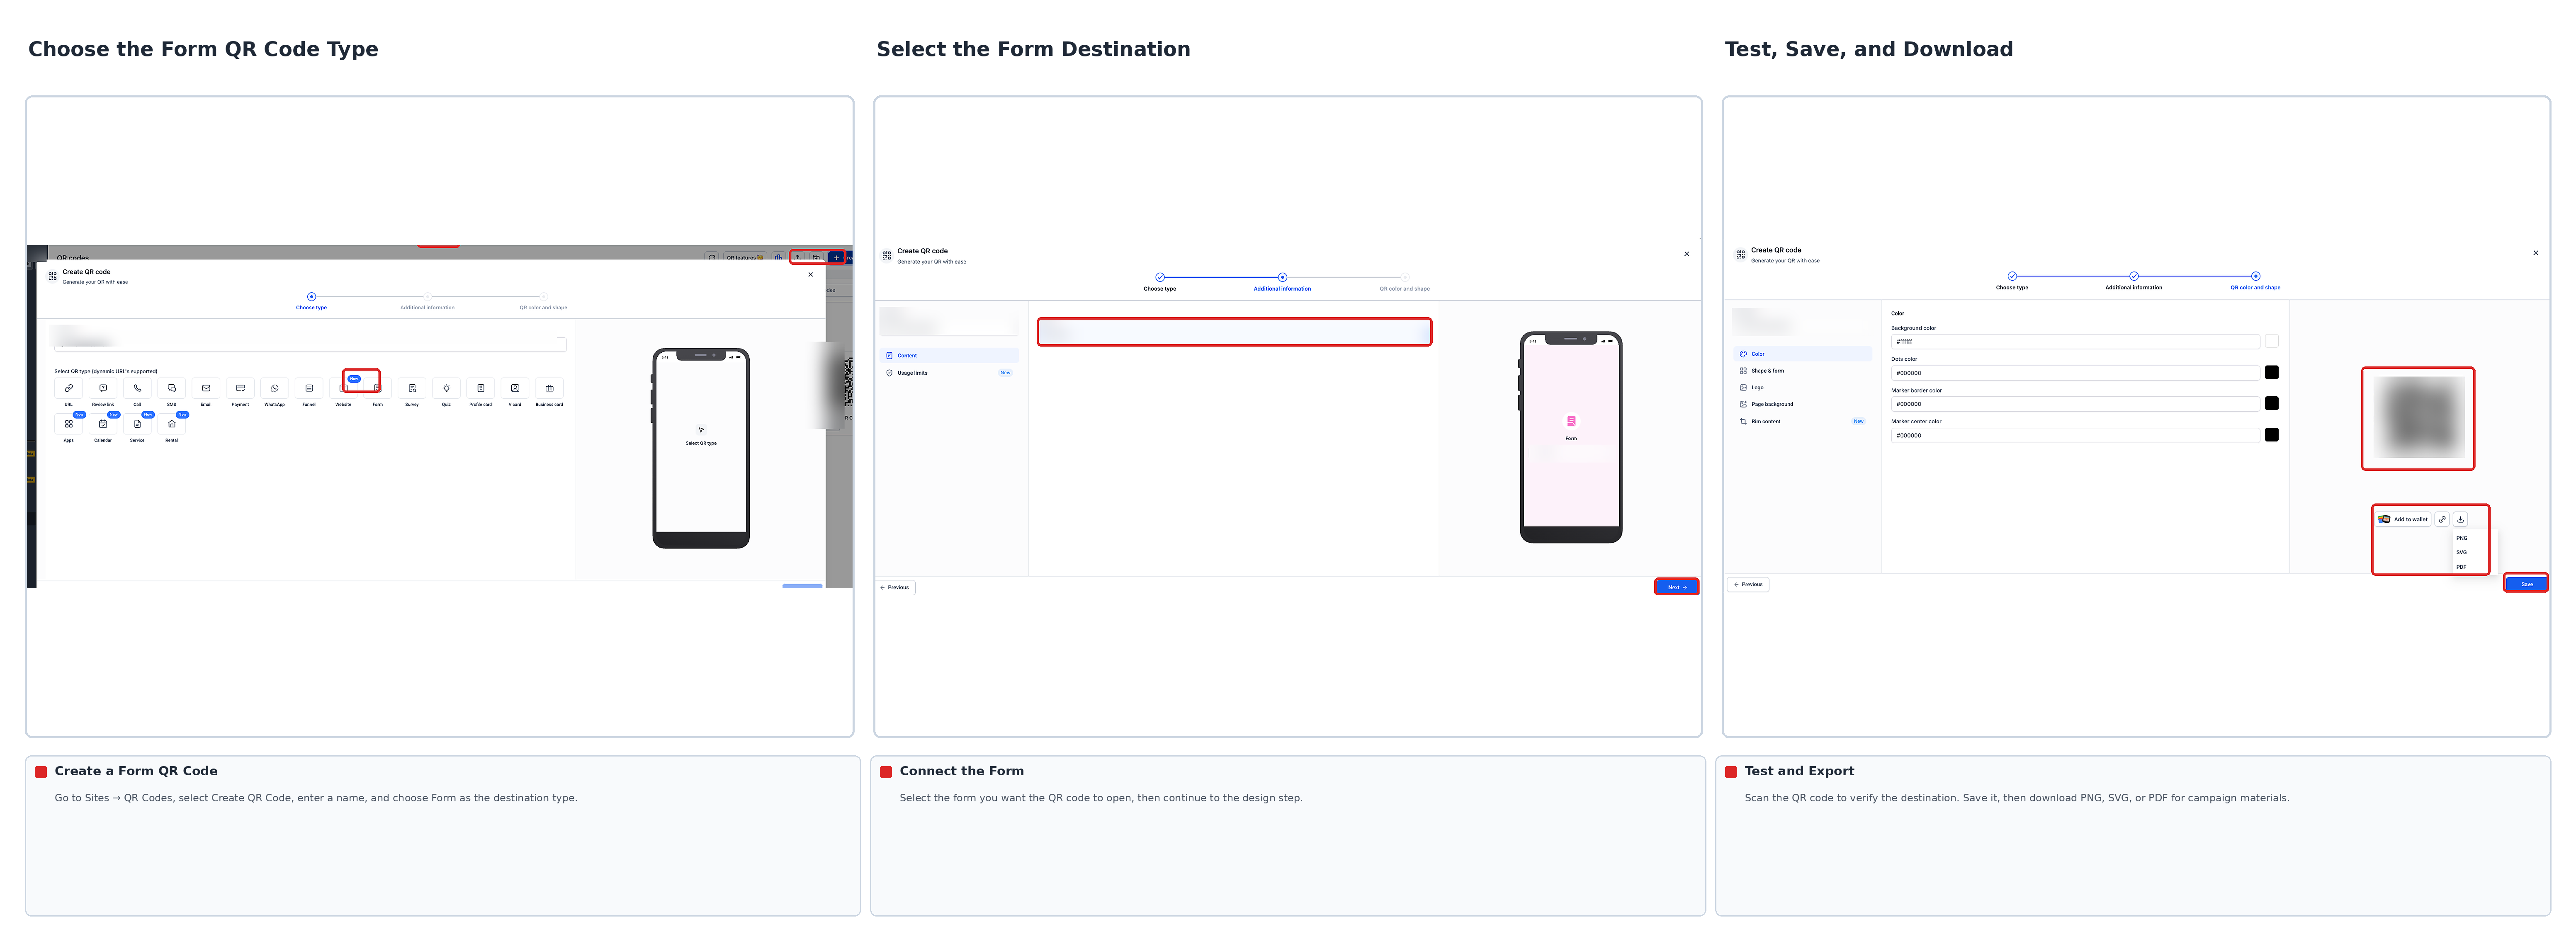
- Go to Sites → QR Codes and select Create QR Code. Enter a name, choose Form as the QR code type, and select your check-in form using the available destination controls.
- Click Save to generate the QR code. Scan it to confirm that it opens the correct form, then download the QR code image for your signage or other campaign materials.
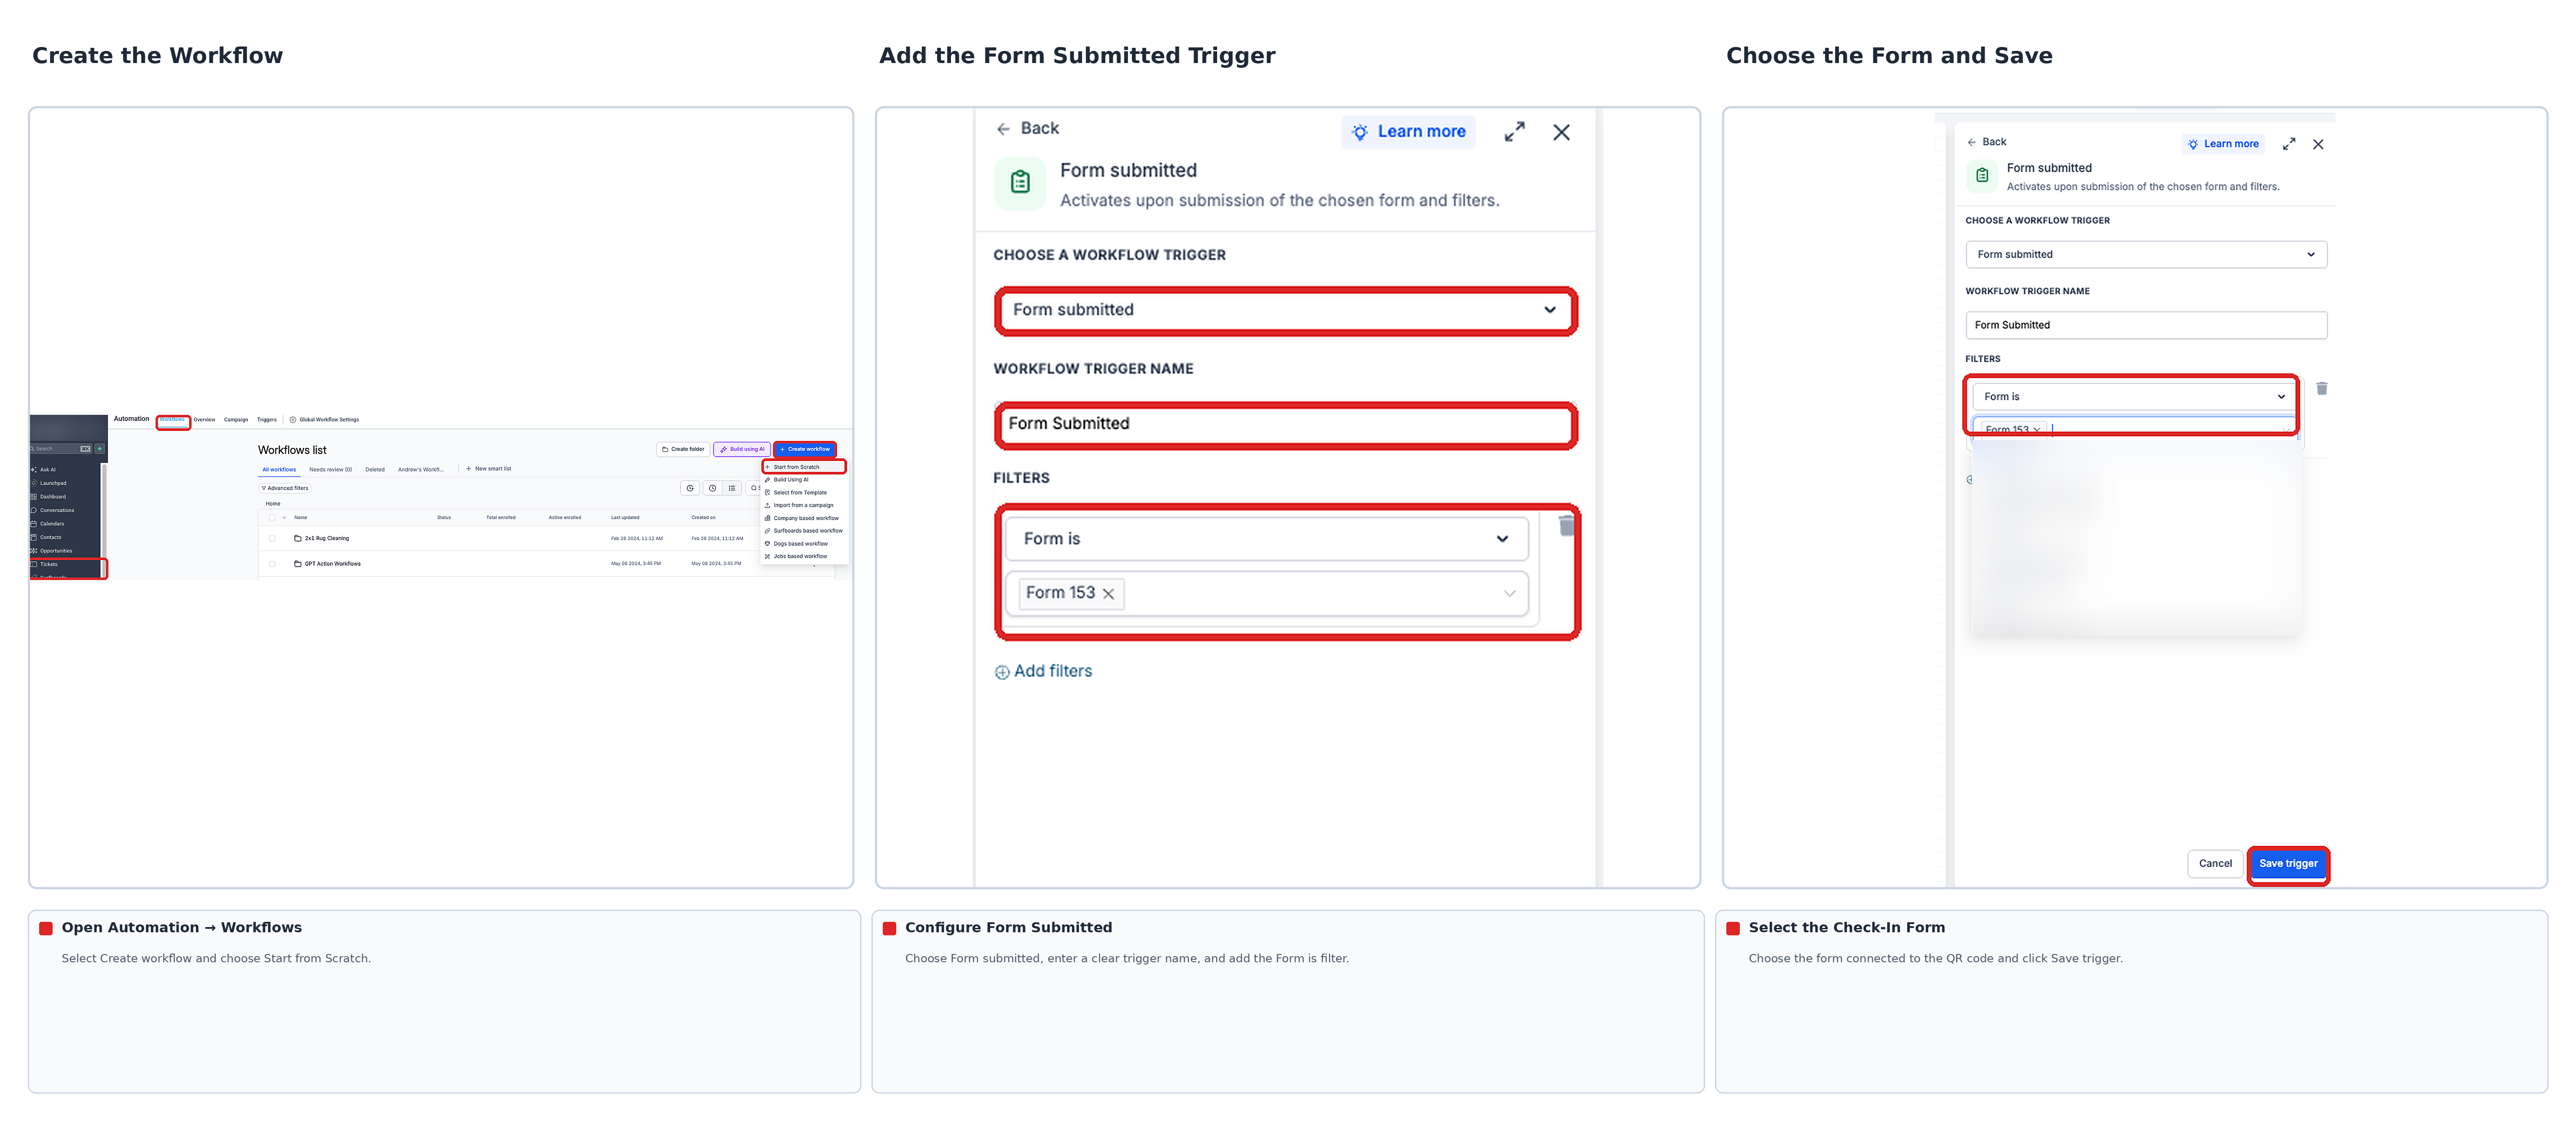
- Go to Automation → Workflows, select Create Workflow, and choose Start from Scratch.
- Add the Form Submitted workflow trigger. Under Filters, select Form Is, choose your check-in form, and click Save Trigger.
- Add an Add Contact Tag action with a descriptive tag, such as Check-In Requested. Optionally, add a Send Internal Notification action to alert staff when the form is submitted. Save the configured actions.
- Save and Publish the workflow. Submit a test form response and verify that the submission is recorded, the contact tag is applied, and any configured staff notification is received.
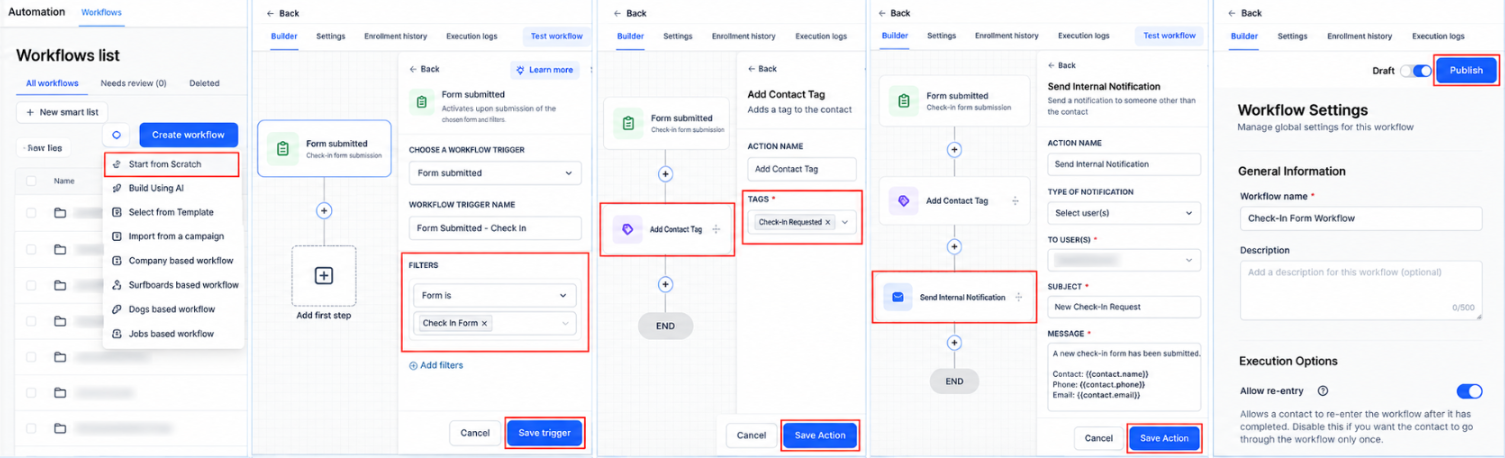
Important: A form submission records a check-in request. It does not automatically confirm that a visitor is eligible for an offer or that an offer has been redeemed. Review eligibility separately before approving redemption.
How to Review Check-Ins and Record Redemptions
A form submission confirms that a request was received; it does not confirm that an offer was valid or used. Review the request before recording a successful redemption.
- Go to Sites → Forms → Submissions, or open the form's Submissions tab. Use the available form selectors, date filters, or search controls to locate the relevant response.
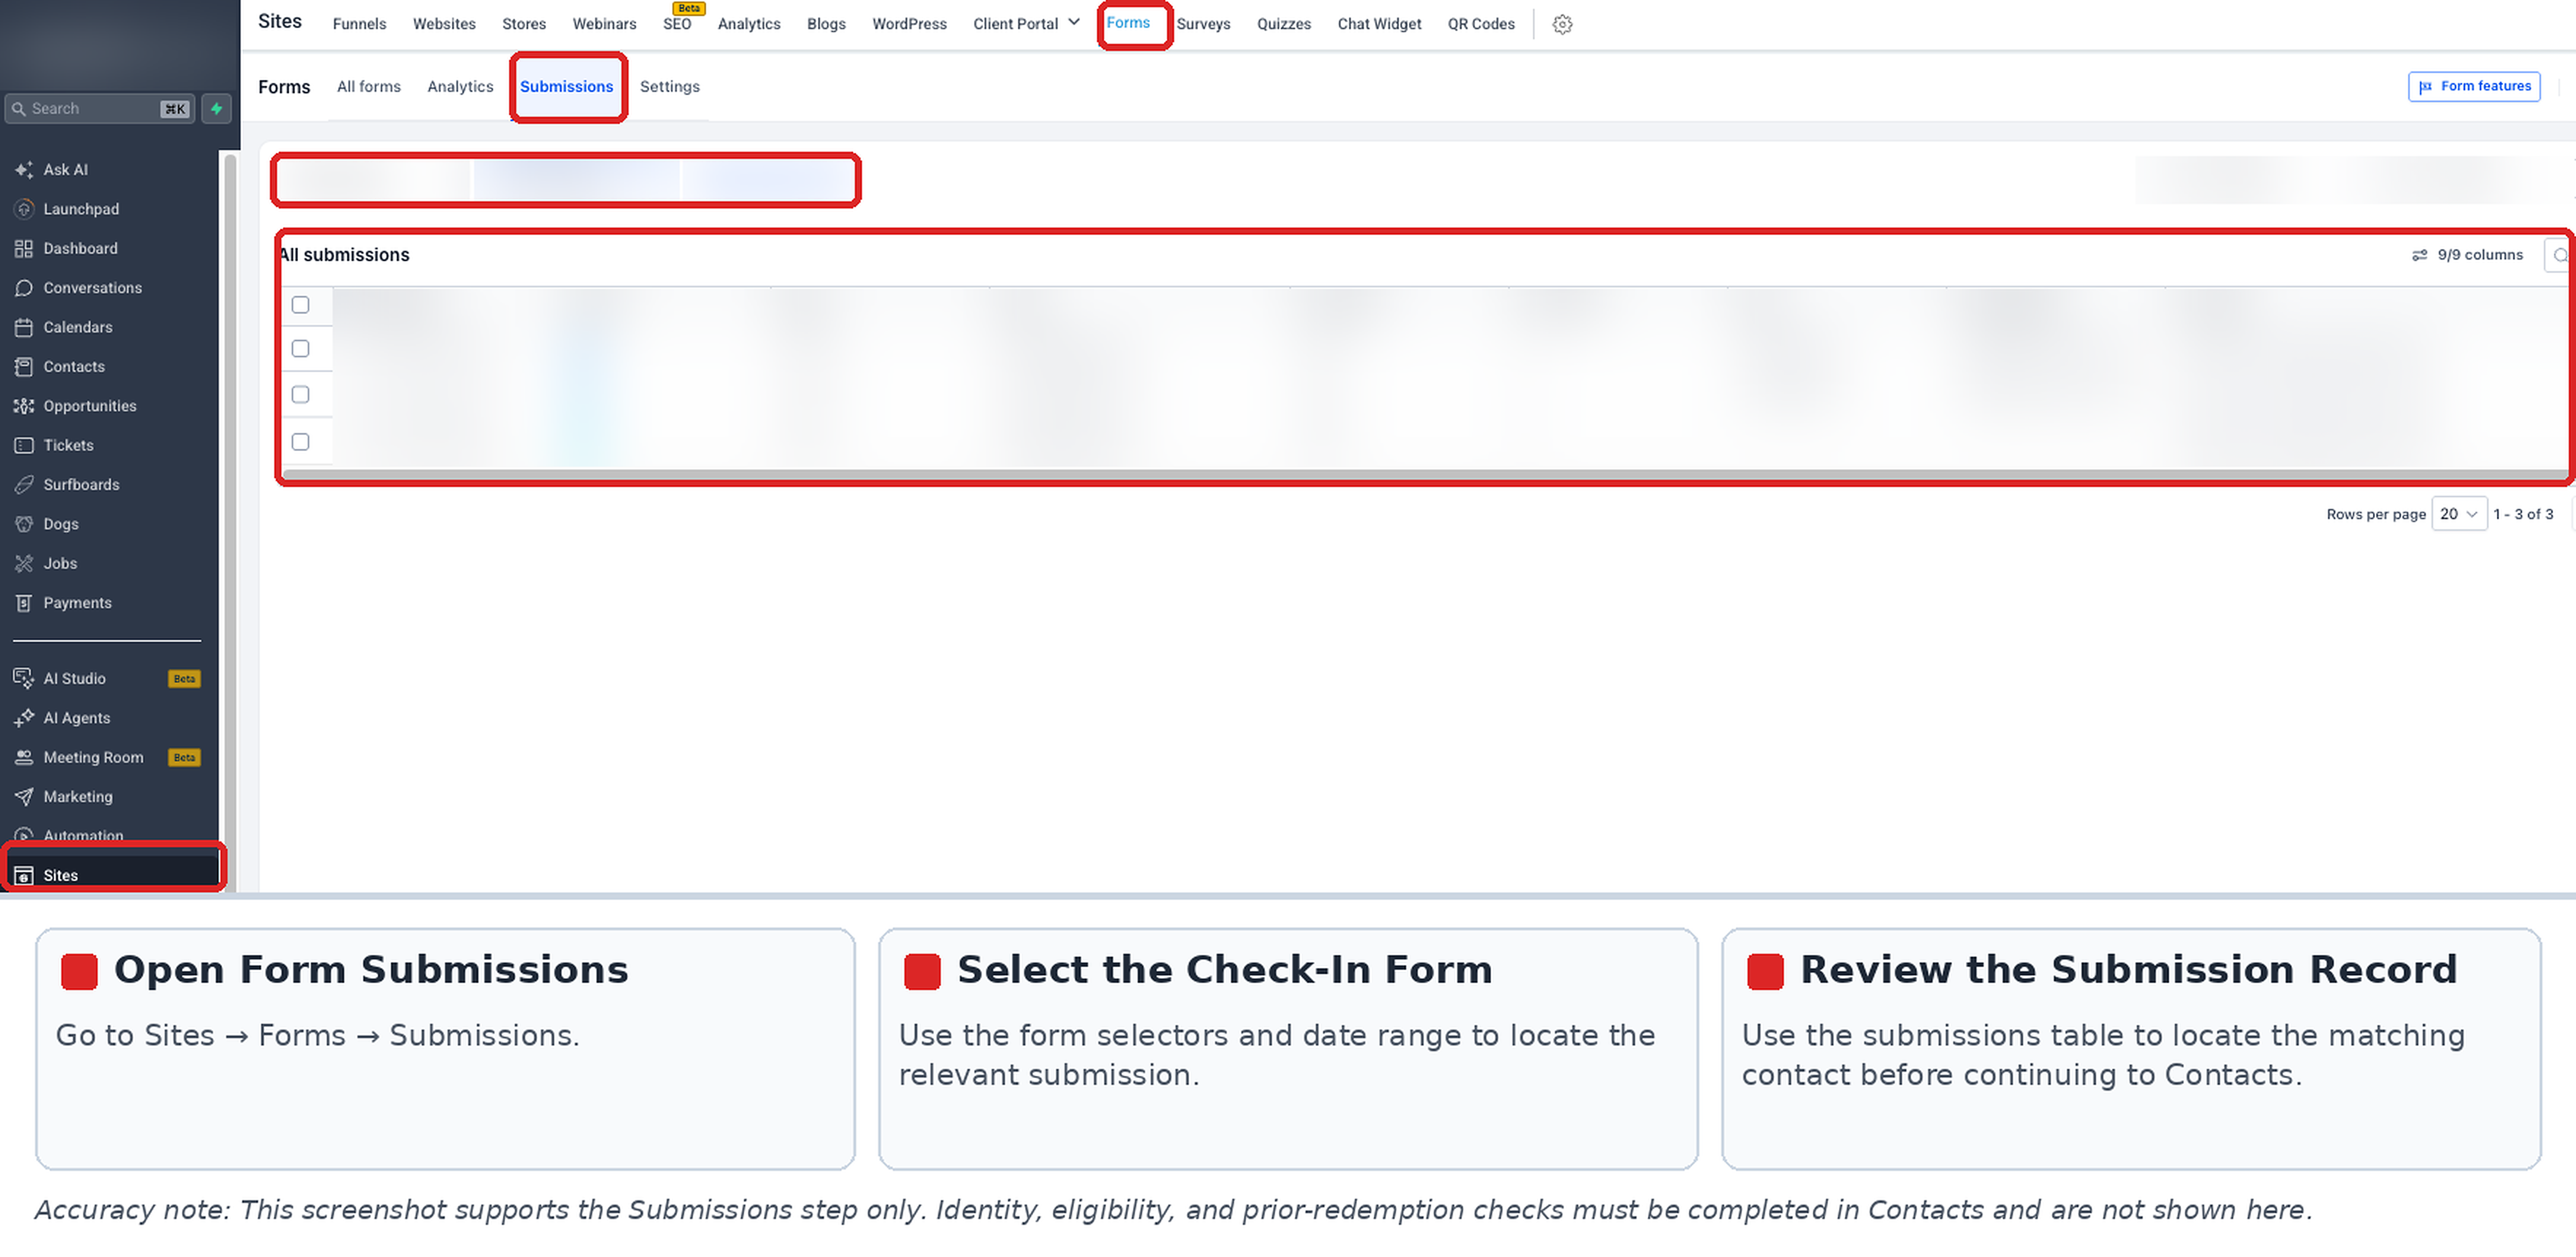
- Go to Contacts and find the matching contact record. Verify the visitor's identity, offer eligibility, and any previous redemption before approving the request.
- If staff approve the offer, record that decision separately. For example, apply a campaign-specific Redeemed tag to the verified contact record.
Note: A manual tag records staff action. It does not automatically enforce single-use redemption or prevent duplicate submissions. Use a separately verified redemption process when strict enforcement is required.
Testing and Troubleshooting Check-In Campaigns
Test the full process before distributing the QR code. A successful scan alone does not confirm that the form submission was received or that the workflow ran.
- Wrong Page Opens: Go to Sites → QR Codes and review the QR code destination. Confirm that the correct form is selected, then scan the code again.
- No Form Response Appears: Open the form's direct link and submit test details. Check Sites → Forms → Submissions to verify that the response was recorded.
- No Tag or Staff Notification Appears: Confirm that the workflow is published, the Form Is filter matches the check-in form, and the Add Contact Tag or Send Internal Notification actions are configured correctly.
- A Visitor Submits Twice: Review both submissions and verify eligibility before approving the offer. A shared form does not automatically reject a second submission.
Frequently Asked Questions
Q: Does this setup issue a unique QR ticket to each person?
No. The QR code opens a shared form. For individual attendee tickets, use the in-person Events check-in feature.
Q: Do I need Trigger Links to build this campaign?
No. The QR Code Builder can link directly to a form. Trigger Links serve a separate click-tracking purpose.
Q: Can I stop visitors from redeeming the same offer twice?
Not with the shared form alone. Staff must check prior redemptions, or you must use a verified system designed to enforce redemption limits.
Q: What if an existing contact submits the form again?
The submission can be recorded again. Whether the system matches an existing contact or creates another record depends on the configured contact deduplication settings.
Q: Can I reuse a QR code for another check-in campaign?
Yes. The QR Code Builder supports changing a saved code's destination. Verify the linked form and workflow before using it for another campaign.
Need Help?
If your QR code check-in campaign is not working as expected, review the QR code destination, form settings, workflow configuration, and submission records before making changes.
- QR Code Opens the Wrong Form: Go to Sites → QR Codes and review the selected Form destination. Update the destination if needed and test the code again.
- Form Does Not Load: Open the form's direct link and confirm that the form is accessible. Review its configuration and test the link independently of the QR code.
- Submission Is Missing: Go to Sites → Forms → Submissions and verify that the correct form and date range are selected.
- Workflow Does Not Run: Confirm that the workflow is published and the Form Submitted trigger uses the correct form under Form Is.
- Staff Notification Is Missing: Review the Send Internal Notification action and confirm that the intended recipients are selected.
- Repeated Check-In Requests: Review previous submissions and contact records before approving redemption. Do not rely on a shared QR code or contact tag to enforce one-time use.
For more information about creating forms and reviewing submissions contact support for assistance. Include the affected QR code, form name, workflow name, approximate submission time, and any relevant error messages or screenshots.