
Ticketing brings customer support requests into your sub-account so your team can track each issue from the first message to resolution. Each ticket keeps the request, customer messages, internal notes, ownership, and progress together.
Use Ticketing to collect requests, organize your support queue, respond to customers, track service targets, and automate routine work. This guide introduces the available capabilities and explains how to start using each one.
Ticketing is available in the Founders plan.
TABLE OF CONTENTS
- What is Ticketing?
- Where to find Ticketing
- What you can use Ticketing for
- Create and receive tickets
- Configure Ticketing for your team
- Set service targets with SLAs and business hours
- Manage your queue from the ticket list
- Work from the ticket details page
- View tickets from a contact record
- Automate routine ticket work
- Use AI and your knowledge base
- Manage access and reuse your setup
- Get started
- Frequently asked questions
- Next steps
What is Ticketing?
A ticket is a record of a specific customer request, such as a billing question, a technical issue, or a service request. It is linked to a contact and has its own ticket ID, name, status, and other details that help your team manage the work.
For example, a billing ticket can hold the customer's question, the agent investigating it, the replies exchanged, and the final resolution. The same customer can have a separate technical support ticket, with its own owner and status.
Where to find Ticketing
Open your sub-account and select Tickets in the left navigation menu, below Opportunities.
When tickets already exist, this opens the ticket list. From here, you can find a request, create a new ticket, or open Settings to configure Ticketing.
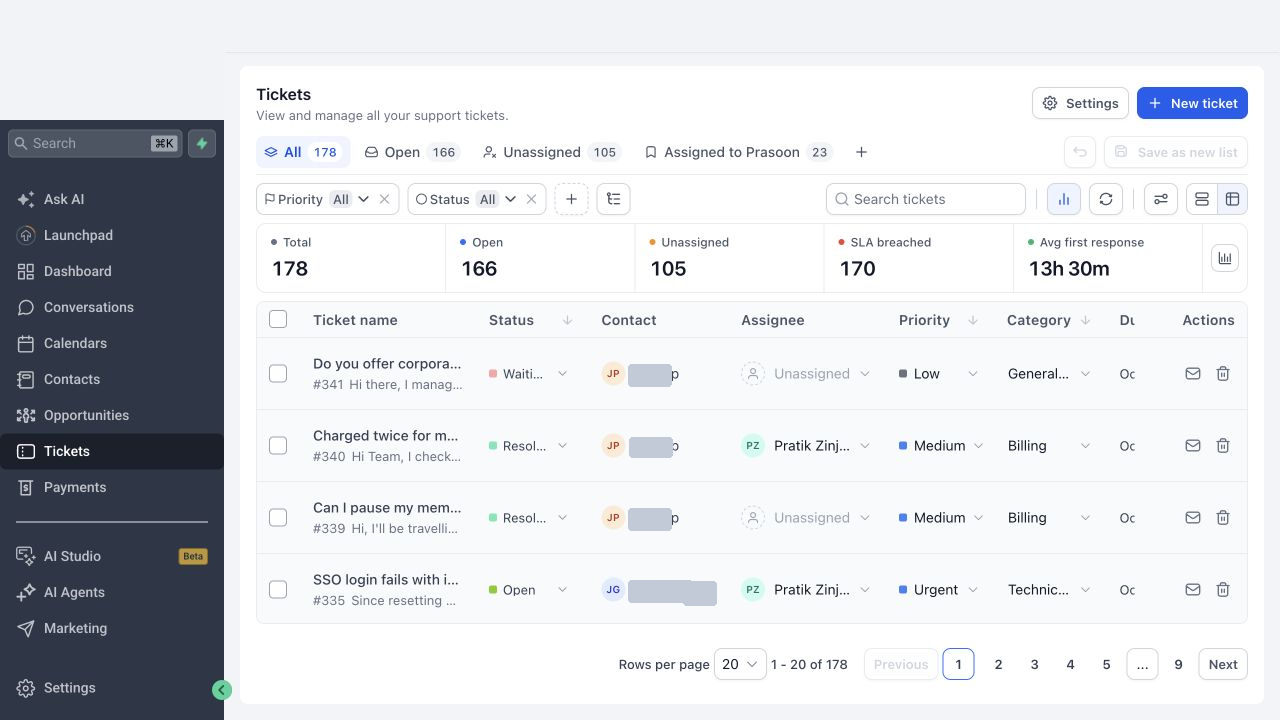
The Tickets page brings your support queue, search, filters, and metrics together.
If you do not see Tickets, ask your administrator to check whether Ticketing is enabled for the sub-account and whether your user has access.
What you can use Ticketing for
Use Ticketing for billing inquiries, technical troubleshooting, onboarding questions, and service requests. Assign an owner to each request, keep messages and internal notes together, and use saved views and metrics to review the team's queue.
A typical process is receive → assign → respond → resolve. Your statuses can also identify tickets waiting on the customer or blocked by another dependency.
Create and receive tickets
Create a ticket manually
Use New ticket on the Tickets page to record a request received by phone, during a meeting, or through another channel. Select the contact, enter the request details, and set the available fields; Create & add new lets you continue entering tickets.
Turn customer emails into tickets
Open Settings → Integrations to configure the default email system support addresses or a supported Gmail connection. Incoming customer emails can create tickets linked to the sender's contact record, giving your team a queue to work from.
Keep email replies with the request
Reply from the ticket to continue the email exchange with the customer. Email threading associates matching replies with the existing ticket, while integration settings let you manage support addresses and block unwanted senders.
Create tickets through workflows
Use the Create ticket workflow action to generate a request as part of an existing process. For example, a workflow can create a support ticket when a customer needs follow-up, with ticket details populated by the automation.
Configure Ticketing for your team
Open Settings from the Tickets page to adapt the fields and reusable responses to your support process.
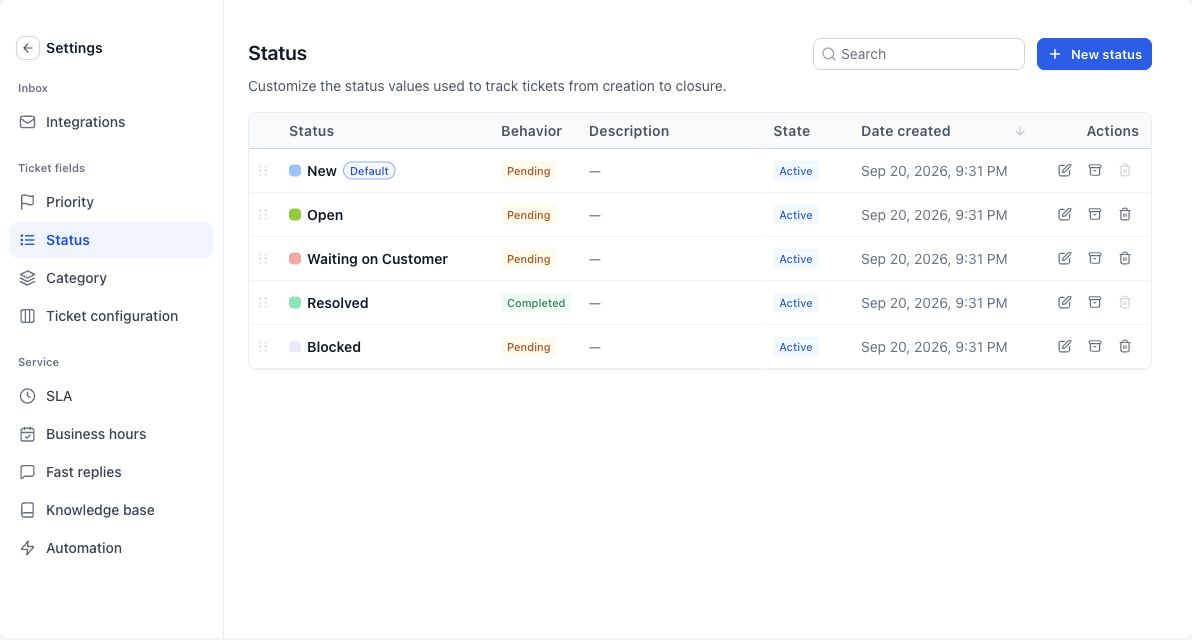
Configure ticket fields and service settings from the menu on the left. The Status page is shown here.
| Capability | What you can do and how |
|---|---|
| Statuses | Define the stages a ticket moves through, such as New, Open, Waiting on Customer, and Resolved. Open Settings → Status to manage the available statuses and the default for new tickets. |
| Priorities | Identify how urgently a request needs attention. In Settings → Priority, customize priority levels, arrange their order, and choose a default. |
| Categories and subcategories | Organize requests by type, such as Billing or Technical Support, with subcategories for more specific issues. Manage these under Settings → Category. |
| Ticket form and custom fields | Capture the information your team needs, such as a reference number or request type. Use Settings → Ticket configuration to add fields, arrange the form, and mark supported fields as required. |
| Fast Replies | Save reusable responses for greetings, common questions, or closing messages. Create them in Settings → Fast replies, then insert one from the ticket editor using the Fast Replies control or the / shortcut. |
Ticket configuration determines the form agents see when creating a ticket. Ticketing configuration is also snapshot-enabled, so agencies can reuse their setup across sub-accounts.
Set service targets with SLAs and business hours
A service-level agreement (SLA) defines how quickly your team should act on a ticket. Open Settings → SLA to create policies for all tickets or for requests that match conditions such as priority and category.
| Capability | What you can do and how |
|---|---|
| Response and completion targets | Set targets for the first reply, the next reply, closure, assignment, or reaching a particular status. Choose the targets your team needs in the SLA policy editor. |
| Different policies for different requests | Give urgent or specialized requests their own targets. Set each policy's matching conditions and arrange the policy order to control which matching policy applies. |
| Business hours and holidays | Count working time according to your support schedule. Create schedules in Settings → Business hours, including the time zone, weekly hours, and holidays, then use business hours in your SLA policy. |
| Pause rules and warnings | Account for periods when work is waiting on someone else and identify approaching deadlines. Set pause statuses and the warning threshold in the SLA policy, then review the ticket's SLA details or use SLA workflow triggers. |
The ticket's due date and SLA targets serve different purposes: the due date records a date for the request, while SLA targets track specific service commitments.
Manage your queue from the ticket list
The ticket list is your day-to-day workspace for finding requests, prioritizing work, and reviewing the queue.
| Capability | What you can do and how |
|---|---|
| List and Card views | Choose a table for comparing ticket fields or cards for scanning individual requests. Use the view controls above the tickets to switch layouts. |
| Built-in lists | Start with All, Open, or Unassigned to review the whole queue, active requests, or work that needs an owner. Select the corresponding tab above the list. |
| Search and filters | Find a particular ticket or narrow the queue by properties such as status, priority, and assignee. Use the search box, quick-filter controls, or Advanced filters for combinations of conditions. |
| Custom Smart Lists | Save a view you use regularly, such as urgent tickets assigned to your team. Apply the relevant filters, then use Save as new list or the + control beside the list tabs. |
| Columns and sorting | Bring the information you need into view and order tickets for review. Open View options to choose and arrange columns and set sorting; supported column headers also offer sorting controls. |
| Inline updates | Triage requests without opening each ticket. Use the status, priority, category, or assignee control on a ticket row to update that property. |
| Bulk actions | Apply an action to several tickets together, including assignment, field updates, workflow enrollment, or deletion. Select tickets using their checkboxes and choose the available bulk action. |
| Metrics | Review queue totals, unassigned tickets, SLA breaches, and response or closure metrics. Use Metrics to show the strip and Configure metrics to choose which cards appear. |
Open a ticket from the list when you need to read its messages or work on the request in detail.
Work from the ticket details page
The ticket details page brings the request and the tools for handling it into three panels: top, main, and right.
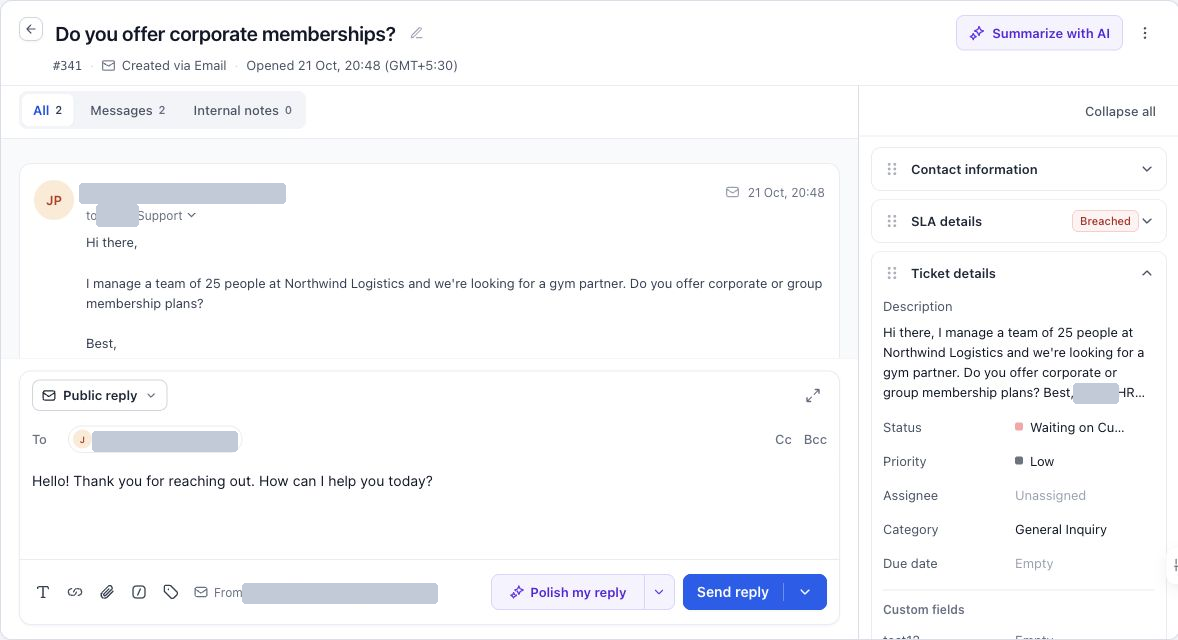
The top panel identifies the ticket, the main panel holds messages and the reply editor, and the right panel provides ticket and customer context.
Top panel — identify the ticket and access actions
Check the ticket name, ID, and source to confirm which request you are working on. You can rename the ticket, return to the list, summarize with AI, or open the ticket actions menu for options such as adding the ticket to a workflow or marking it unread.
Main panel — read messages and respond
Use All, Messages, and Internal notes to focus on the ticket history you need. The All tab brings messages, notes, and activity together, while the other tabs narrow the history.
Choose Public reply to email the customer or switch to an internal note for team-only information. The editor provides formatting, CC, attachments, Fast Replies, and custom values so you can compose a complete response within the ticket.
Right panel — manage the request and review context
Expand Contact information to see the customer and open their contact record. In Ticket details, update properties such as status, priority, assignee, category, and due date as the request progresses.
Use SLA details to check service targets and Recent activity to review changes. The Attachments and Linked tickets sections help you find related files and connect associated requests; expand or collapse sections to focus on what you need.
View tickets from a contact record
Open a contact and select the Tickets panel to review their support requests alongside their CRM information. You can search the contact's tickets, open a request, or use Add to create a ticket for that customer.
A contact can have multiple tickets, allowing separate requests to be tracked individually while remaining connected to the same customer.
Automate routine ticket work
Open Settings → Automation to access workflows that use tickets and create new automations. Ticketing uses Workflows to connect ticket events with actions and conditions.
- React to ticket events: Use ticket creation, ticket updates, customer replies, or SLA warning and breach triggers to start the appropriate workflow.
- Route and update requests: Use ticket actions to assign an owner, update fields, find an existing ticket, or create a new one.
- Send replies and record notes: Add an email reply or an internal note as a workflow action, using ticket values to personalize the content.
- Apply different paths: Use ticket properties in If/Else conditions—for example, route a billing request differently from a technical issue.
For example, a workflow can assign a new ticket, notify the responsible person when the customer replies, or notify a manager when an SLA is breached.
Use AI and your knowledge base
AI tools help agents understand a request and prepare a response while working on the ticket.
- Summarize a ticket: Use Summarize with AI to get a shorter account of the ticket history when you need to catch up on a request.
- Draft or improve a reply: Use the AI controls in the reply editor to prepare suggested content or polish text you have written. Review and edit the result before sending it.
- Use your support content: Open Settings → Knowledge base to connect existing knowledge bases and choose which ones are used for suggested replies.
These tools help with reading and writing; the agent reviews the customer-facing response before sending it.
Manage access and reuse your setup
User permissions: Administrators can control who can view or manage tickets and apply assigned-data visibility restrictions through the staff permissions settings. Use these controls to align ticket access with each team member's role.
Agency controls: Agencies can manage Ticketing availability through sub-account Features and Limits and SaaS plan feature settings. These controls determine whether Ticketing is available to the relevant sub-account.
Snapshots: Include Ticketing configuration in a snapshot to reuse your support setup across sub-accounts. Configure email connections separately for each destination sub-account.
Get started
- Open Tickets → Settings and review your statuses, priorities, categories, ticket form, and Fast Replies.
- Connect a support email integration, or use New ticket to create your first request manually.
- Configure SLA policies and business hours if your team works to service targets.
- Assign and respond to tickets, then save useful views as Smart Lists.
- Add workflows and connect knowledge bases as your support process develops.
Frequently asked questions
Do I need an email integration to create a ticket?
No. Use New ticket to create one manually. An email integration lets incoming customer emails create tickets.
Can customers see internal notes?
No. Internal notes are for your team. Use a public reply when you want to email the customer.
Does switching views or applying a filter change the tickets?
No. These controls change which tickets you see and how they are displayed. Editing a ticket field is a separate action.
Why can I not see Tickets or its settings?
Ask your administrator to check sub-account availability and your user permissions. Ticketing settings are intended for administrators.
Next steps
Continue with Set Up and Configure Ticketing to configure your ticket fields, statuses, priorities, categories, and Fast Replies.
Then use Create Tickets and Connect Email Integrations to start receiving and managing requests.