
Configure Ticketing to match the way your team classifies, assigns, and handles support requests. This guide covers statuses, priorities, categories, the ticket creation form, fast replies, access controls, and reusing configuration through snapshots.
TABLE OF CONTENTS
- Before you begin
- Configure ticket statuses
- Configure priorities
- Configure categories and subcategories
- Edit, archive, or delete field values
- Configure the ticket creation form
- Create and manage Fast Replies
- Manage access and agency availability
- Reuse configuration with snapshots
- Troubleshooting
- Frequently asked questions
- Related guides
Before you begin
Open the correct sub-account and select Tickets → Settings. Use an administrator account to manage Ticketing settings. If Tickets is missing, check the sub-account's feature availability and your user's permissions.
Decide which stages your requests move through, how you define urgency, and which information agents need to collect. A small, clearly named set of values is easier for a team to use consistently.
Configure ticket statuses
Statuses describe progress through your support process. Starter statuses include New, Open, Waiting on Customer, Resolved, and Blocked; your account may already have customized values.
- Open Settings → Status.
- Select New status, or select an existing status to edit it.
- Enter a Name, add a description to explain when to use it, and choose a color.
- Turn on Default status if new tickets should start here.
- Turn on This status means the ticket is resolved only for a status that represents completed work.
- Select Save.
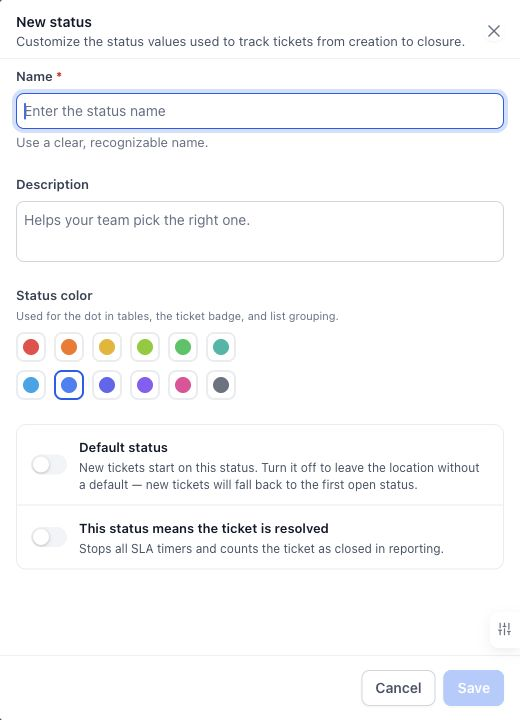
The resolved-status setting determines whether a status represents completed work; the name alone does not.
The resolved-status control is described in the editor as stopping SLA timers and counting the ticket as closed in reporting. For a waiting status, configure any SLA pause separately in the SLA policy.
Use the drag handle beside a status to arrange the order. The Default badge identifies the starting value. The current editor states that removing the default causes new tickets to fall back to the first open status.
Configure priorities
Priorities communicate urgency. The starter set is Low, Medium, High, and Urgent, with Medium as the initial default.
- Open Settings → Priority and select New priority, or open an existing value.
- Enter the name and a description that helps agents choose consistently.
- Choose a color.
- Enable Default priority if this should be preselected for new tickets.
- Select Save and arrange the values using their drag handles.
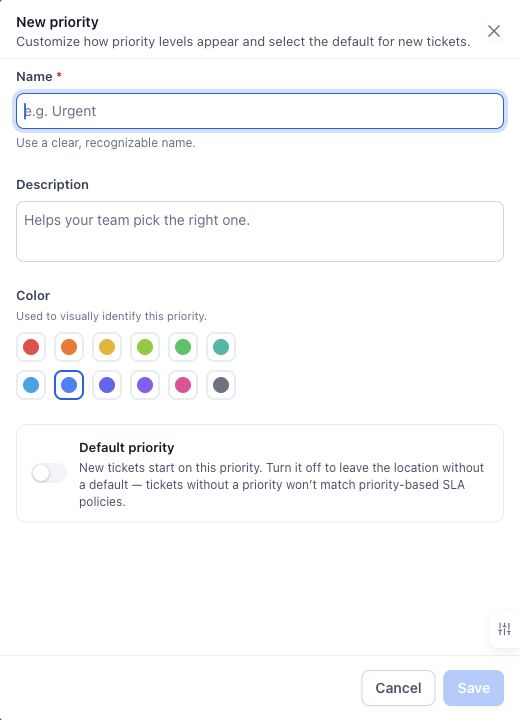
Descriptions can explain the difference between an urgent incident and a routine request.
Only one priority is the default at a time. A ticket without a priority will not match an SLA policy that requires a particular priority. Review your SLA conditions when changing defaults.
Configure categories and subcategories
Categories group requests by type. For example, Billing identifies the area of work, while Refund request can identify a more specific issue within it.
- Open Settings → Category and select New category.
- Enter a name and optional description.
- Enable Default category if it should be preselected on new tickets.
- To add a second classification level, enable Enable sub-categories.
- Enter each subcategory and select Add. Add at least one value when subcategories are enabled.
- Select Save.
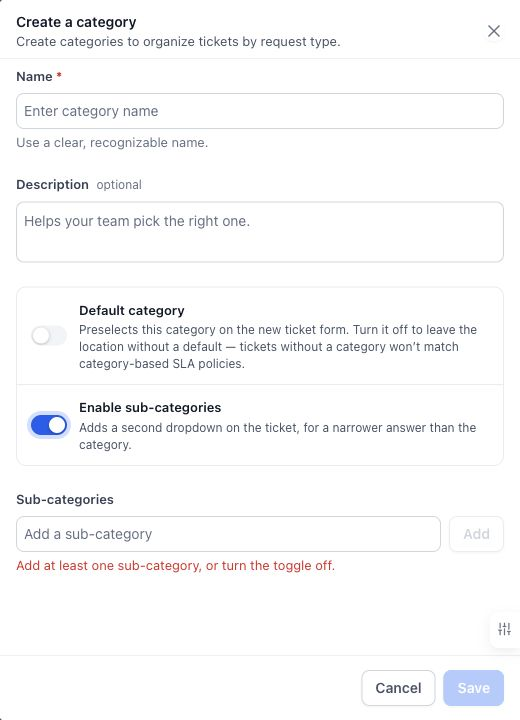
A category with subcategories adds a second dropdown to the ticket.
Manage existing categories through their row controls. If you choose no default category, agents can select the appropriate category when creating or reviewing a ticket. Tickets with no category do not match category-specific SLA conditions.
Edit, archive, or delete field values
The Priority, Status, and Category pages provide search and row actions. Use Edit to update a value, Archive to retire it from active selection, or Delete when the action is available.
Archived values can remain on tickets that already use them. Deletion may be unavailable because a value is protected, is a default, is in use, or is required by the configuration. Read the disabled control's explanation before changing a dependent setting. For a value with historical use, archiving is usually the appropriate way to stop using it on new work.
Configure the ticket creation form
The ticket form determines what agents see when they create a request. Use it to collect the information needed to investigate, such as an order reference, affected product, or issue details.
- Open Settings → Ticket configuration.
- Expand Standard fields or Custom fields in the left panel, or use search to find a field.
- Add the fields you need to the form preview. Drag fields into the desired order.
- Mark supported fields as Required when agents must complete them during creation.
- Remove optional fields from the layout when they are not needed. Protected fields do not offer a removal control.
- Review the preview and select Save. Use Discard to abandon unsaved layout changes.
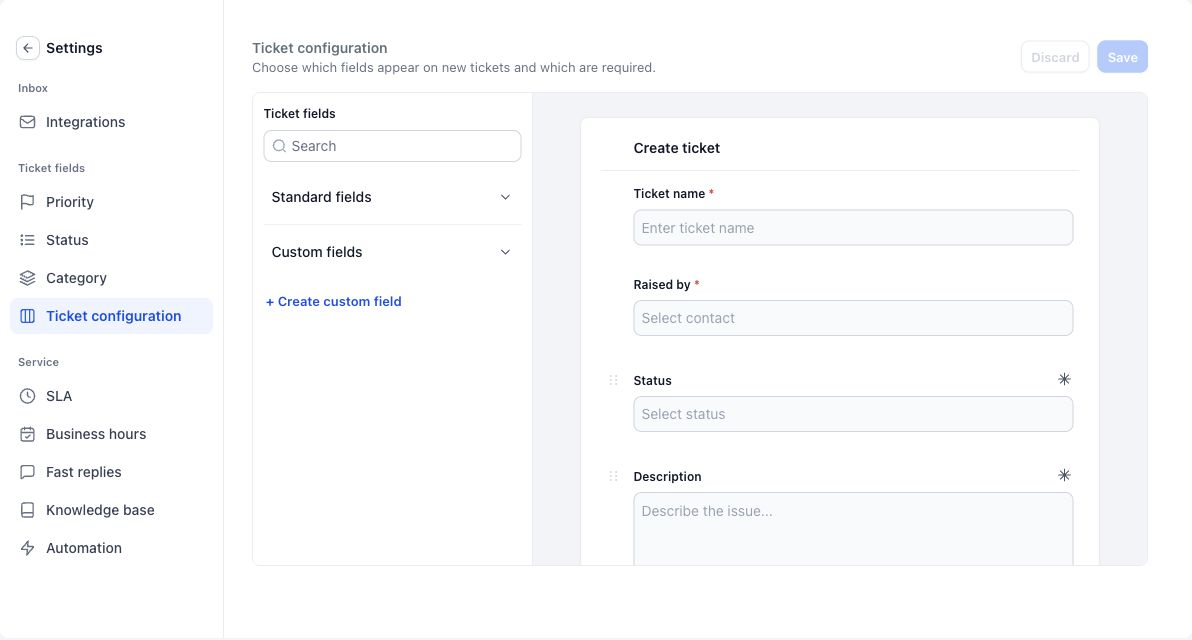
The preview shows the creation form that agents will use.
Ticket name and Raised by identify the request and its contact and are required. Other required indicators depend on your configuration. Requiring a field on the creation form does not establish a separate requirement for resolving a ticket.
To create a new field, select + Create custom field, choose the appropriate type, enter its name and options, and save it. Add it to the form layout where needed. A dropdown is useful for consistent reporting; a text field suits a reference that varies from request to request.
See Create Tickets and Connect Email Integrations for the creation process.
Create and manage Fast Replies
Fast Replies are reusable messages that agents can insert into a ticket and edit before sending. Use them for greetings, requests for missing information, instructions, and closing messages.
- Open Settings → Fast replies.
- Select Create a fast reply.
- Enter a recognizable Name (the response title) and the Message.
- Use formatting and Insert a custom value as needed. Custom values fill in when the reply is inserted into a ticket.
- Under Available to, select specific agents or leave it empty for all agents, including those who join later.
- Select Save.
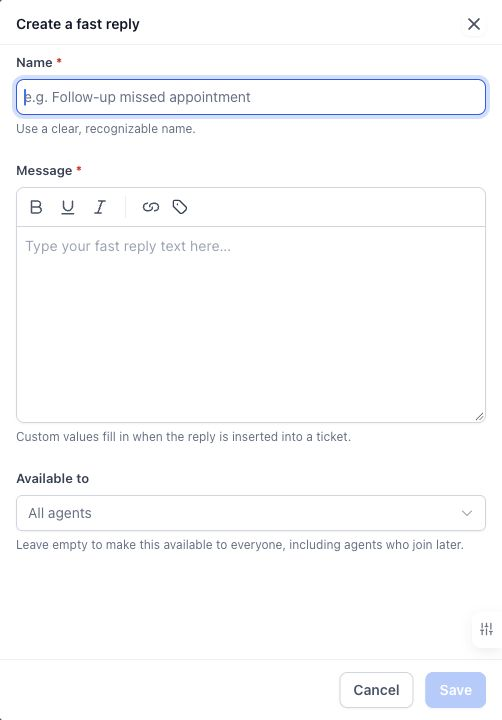
The title helps agents find a reply; availability controls which agents can use it.
In a ticket's editor, open Fast replies or type / and continue typing the title to find a response. Insert it, review the completed custom values, and adapt it to the customer's request before sending.
Use row actions to edit, duplicate, archive, or delete a Fast Reply. Duplicating provides a starting point for a similar message. Archiving retires a reply from normal use.
Manage access and agency availability
In the sub-account's staff settings, open a user under My Staff, then review Roles & Responsibilities → Ticketing. The permission model distinguishes viewing tickets from viewing and managing them. Assigned-data restrictions limit which records a user can access.
Agency administrators manage feature availability through Sub-accounts → Settings → Features and Limits, and through SaaS Configurator → Edit details → Features for plan-based access. Enabling the feature and granting user permissions are separate steps.
Check both layers when a user cannot see Tickets, and review administrator access when they can see tickets but cannot open Ticketing Settings.
Reuse configuration with snapshots
Ticketing configuration is snapshot-enabled. Agencies can include Ticketing configuration in a snapshot and apply it to another sub-account to reuse their support setup.
After applying a snapshot, review the destination's statuses, priorities, categories, field layout, SLA policies, and Fast Replies. Connect the destination's email provider separately; mailbox credentials and connections are specific to the sub-account.
Review user references and local settings at the destination before the team begins working. Do not assume a snapshot also migrates customer tickets or message history.
Frequently asked questions
Do changes to a default update every existing ticket?
Defaults determine initial values for new tickets. Use ticket editing or bulk actions when you want to update existing records.
Does a status named Resolved automatically count as completed?
Use the This status means the ticket is resolved setting. The name alone is not the behavior setting.
Can different agents use different Fast Replies?
Yes. Select the relevant users under Available to, or leave it empty for all agents.
Does a snapshot connect the destination's email account?
No. Configure email connections separately in the destination sub-account.
Related guides
- Create Tickets and Connect Email Integrations
- Configure SLAs and Business Hours
- Work with the Ticket Details Page