
Service-level agreements (SLAs) define how quickly your team should respond, assign, resolve, or move a ticket to a milestone. Business-hour schedules determine when a business-hours SLA clock runs, including time zones, weekly hours, and holidays.
TABLE OF CONTENTS
- Before you begin
- Understand the available targets
- Create a business-hours schedule
- Create an SLA policy
- Choose when the clock runs
- Arrange and maintain policies
- Monitor SLA progress
- Troubleshooting
- Frequently asked questions
- Related guides
Before you begin
Open Tickets → Settings as an administrator. Decide which requests need different targets and whether your team measures time continuously or only while support is open.
If you use business hours, create the schedule first and then select it in the SLA policy. Review your priorities, categories, and statuses before using them in policy conditions.
Understand the available targets
| Target | What it measures |
|---|---|
| Time to first reply | From ticket creation to the first agent reply. |
| Time for next reply | From a customer message to the next agent reply. |
| Time to close | From ticket creation to closure. |
| Time to assign | From ticket creation to assignment to an agent. |
| Time to reach status | Time to reach the selected status milestone. |
Enable only the targets you intend to track. The policy editor requires at least one target and provides a Different targets per priority option when urgency levels need different durations.
A ticket's due date is a separate property. Setting a due date does not replace configuring an SLA policy.
Create a business-hours schedule
- Open Settings → Business hours.
- Select Create schedule.
- Enter a name that identifies the team or working pattern.
- Select the schedule's Time zone.
- Enable the working days and set their start and end times.
- Use + Add hours for split shifts, such as separate morning and afternoon blocks.
- Add holidays as needed, then select Create schedule.
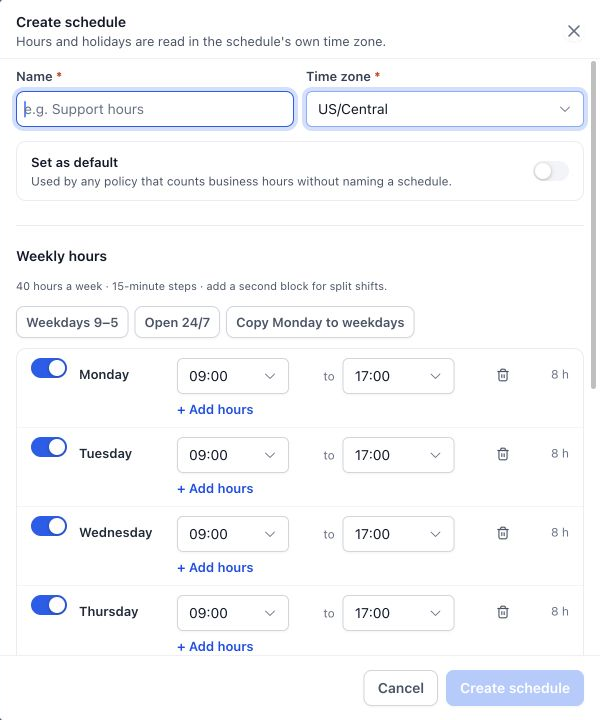
Hours are interpreted in the schedule's own time zone.
The editor provides Weekdays 9–5, Open 24/7, and Copy Monday to weekdays presets. Review the resulting day-by-day hours before saving. Closed days pause clocks for policies using this schedule.
Add holidays
Scroll to Holidays in the schedule editor. Select Add holiday, enter the name and start/end dates, and save the schedule. For a single-day closure, use the same date for both ends.
You can also use Import public holidays… and review the resulting dates. Holiday dates represent whole days during which applicable SLA timers pause.
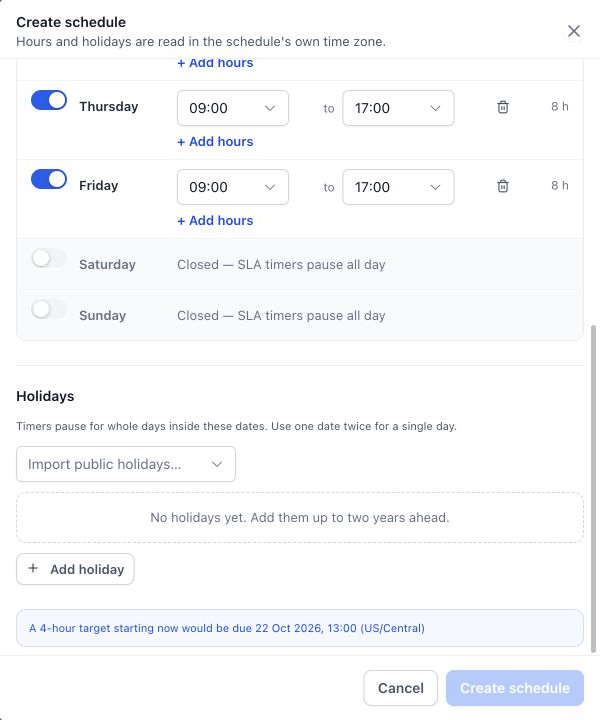
Review holidays in the schedule's time zone and keep the dates up to date.
Choose a default schedule
Use Set as default for the schedule that should be used when a business-hours policy does not name another schedule. The schedule list identifies the default and shows weekly hours, holiday counts, and usage information.
A default schedule cannot simply be deleted while it remains the default. Set another suitable schedule as default first and review the affected policies before making changes.
Create an SLA policy
- Open Settings → SLA and select Create SLA.
- Enter the Policy name and an optional description explaining its purpose.
- Under Applies to, choose Category and Priority values, or leave both as All for broad coverage.
- Use Advanced filters when you need additional conditions, such as status, subject, or assignee.
- Enable at least one target and set its duration. Select the milestone status for Time to reach status.
- Choose the clock settings described below.
- Review the policy summary and select Create policy.
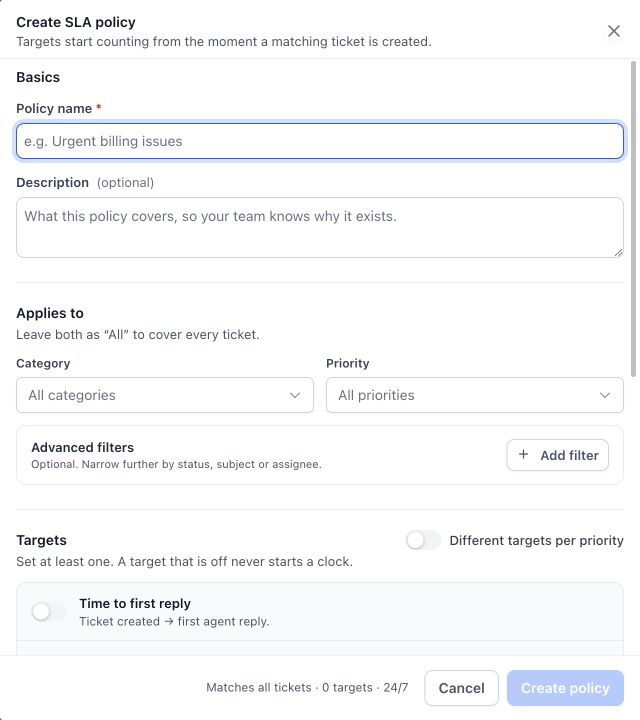
Use a descriptive name such as Urgent billing requests so other administrators understand the policy's purpose.
For example, you might create a priority-specific policy for Urgent requests and a broader policy for other tickets. The actual durations should reflect your team's service commitments.
Choose when the clock runs
In the policy's Clock section:
- Choose 24 / 7 to count elapsed time continuously.
- Choose Business hours to count only the time included in the selected schedule. Review the displayed hours, time zone, and holidays.
- Use Pause when to select statuses that should pause the clock, such as a waiting status.
- Use Warn at to set when the ticket should enter the Due soon state before a breach.
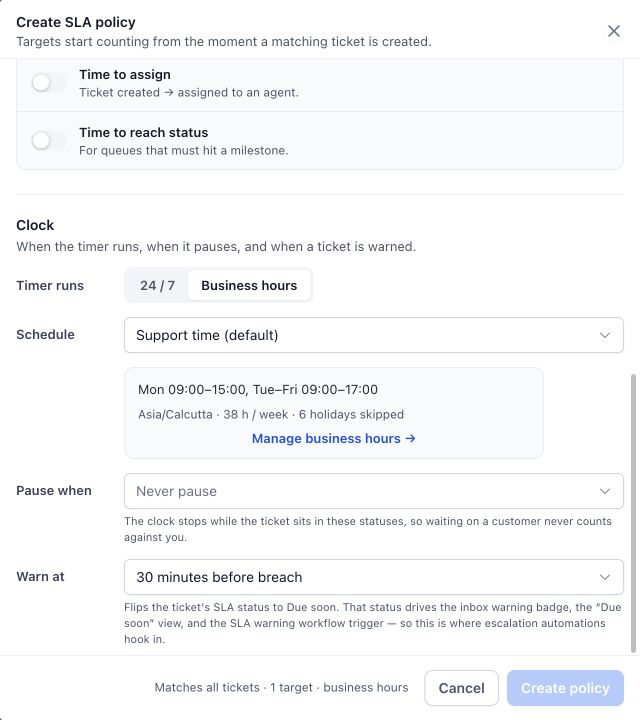
The policy connects the target to its working schedule, pause statuses, and warning threshold.
Naming a status Waiting on Customer does not by itself select it as a pause status in this policy. Add it under Pause when if that matches your process.
Business-hours example
Suppose a schedule is Monday–Friday, 9:00–17:00, with no holidays, and a first-reply target is four business hours. A ticket created Friday at 16:00 uses one hour on Friday and the remaining three hours on Monday, making the target Monday at 12:00 in the schedule's time zone, assuming no other pause applies.
A 24/7 target of four hours would instead fall at 20:00 on Friday.
Arrange and maintain policies
Policies are evaluated in order, and the first matching policy applies. Put specific policies before broad ones so a general match does not take precedence over an urgent or specialized policy.
The Default Policy stays last and covers other tickets. The current interface allows it to be edited or disabled but not deleted. Use the available row controls to enable, disable, duplicate, or remove other policies, and review the conditions after duplicating one.
Changes to an existing policy can affect service expectations. Review active work and the displayed ticket targets after changing conditions, schedules, or durations.
Monitor SLA progress
Open a ticket and expand SLA details in the right panel to see the applied policy and target information. The list page also provides SLA fields and metrics for reviewing the queue.
| State | Meaning |
|---|---|
| No SLA | No applicable SLA is attached. |
| On track | The applicable target is within its allowed time. |
| Due soon | The warning threshold has been reached. |
| Breached | A tracked target has exceeded its allowed time. |
| Met | The applicable target has been satisfied. |
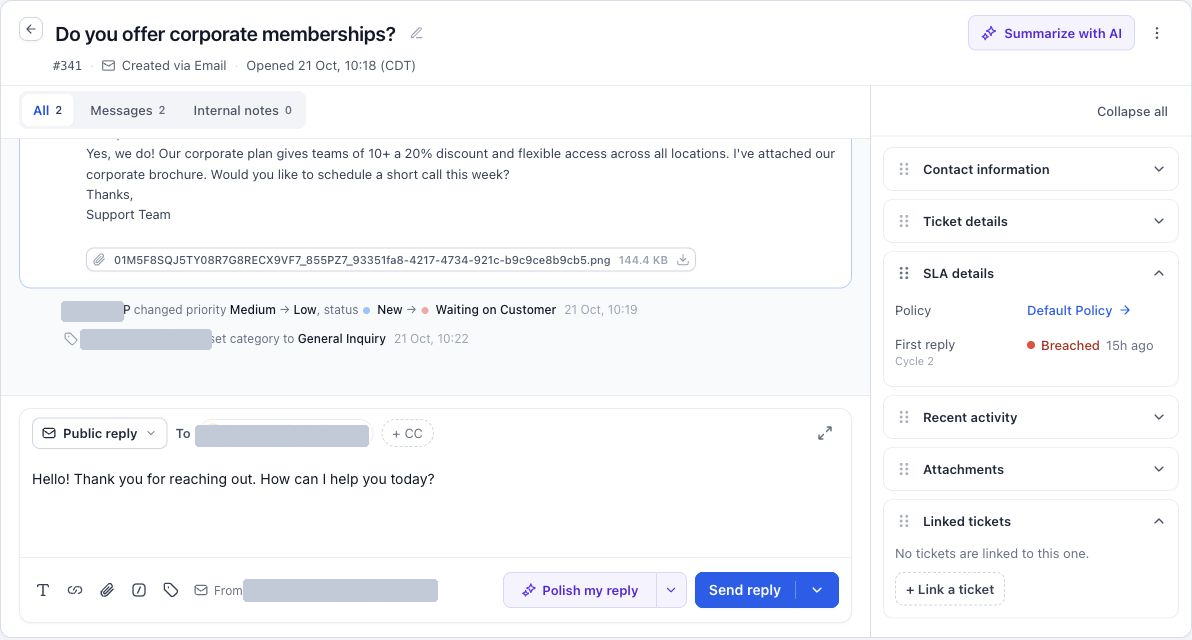
Inspect individual target details when you need to understand which commitment needs attention.
Use SLA Warning and SLA Breached workflow triggers to notify the relevant people. Setting a target alone does not define who receives an escalation; configure that in Automations.
Troubleshooting
| Issue | What to check |
|---|---|
| The expected policy did not apply | Check the ticket's properties, policy conditions, enabled state, and evaluation order. |
| The clock runs outside support hours | Confirm the policy uses Business hours and the correct schedule and time zone. |
| The clock pauses unexpectedly | Check closed days, holidays, and Pause when statuses. |
| An urgent ticket uses a general policy | Move the specific matching policy above the broader one and review its conditions. |
| A breach did not notify anyone | Check the relevant workflow trigger, filters, publication state, and notification action. |
| A policy cannot be created | Enter a name, enable a target, complete its inputs, and resolve validation messages. |
Frequently asked questions
Can I create more than one business-hours schedule?
Yes. Name schedules for their intended use and select the appropriate one in each policy.
Does a holiday affect 24/7 policies?
Holiday exclusions belong to business-hours schedules. Select Business hours when you want the policy to follow that schedule.
Can I stop the clock while waiting for a customer?
Select the relevant status under Pause when in the policy.
Can I set different targets for different priorities?
Use priority matching for separate policies or the policy's Different targets per priority option.
Related guides
- Set Up and Configure Ticketing
- Automate Ticketing with Workflows
- Manage Tickets from the List Page