
The Tickets page is your support queue. Use it to find requests, save useful views, update ticket properties, apply bulk actions, and monitor metrics without opening every ticket.
TABLE OF CONTENTS
- Find your way around the page
- Switch between List and Card views
- Use built-in lists
- Search and apply quick filters
- Build advanced filters
- Save a Smart List
- Choose columns and sorting
- Update tickets from the queue
- Apply bulk actions
- Show and configure metrics
- Refresh the queue
- Troubleshooting
- Frequently asked questions
- Related guides
Find your way around the page
Open Tickets in the sub-account's left navigation. The header provides Settings and New ticket. Below it are your lists, filters, search, view controls, metrics, and ticket results.
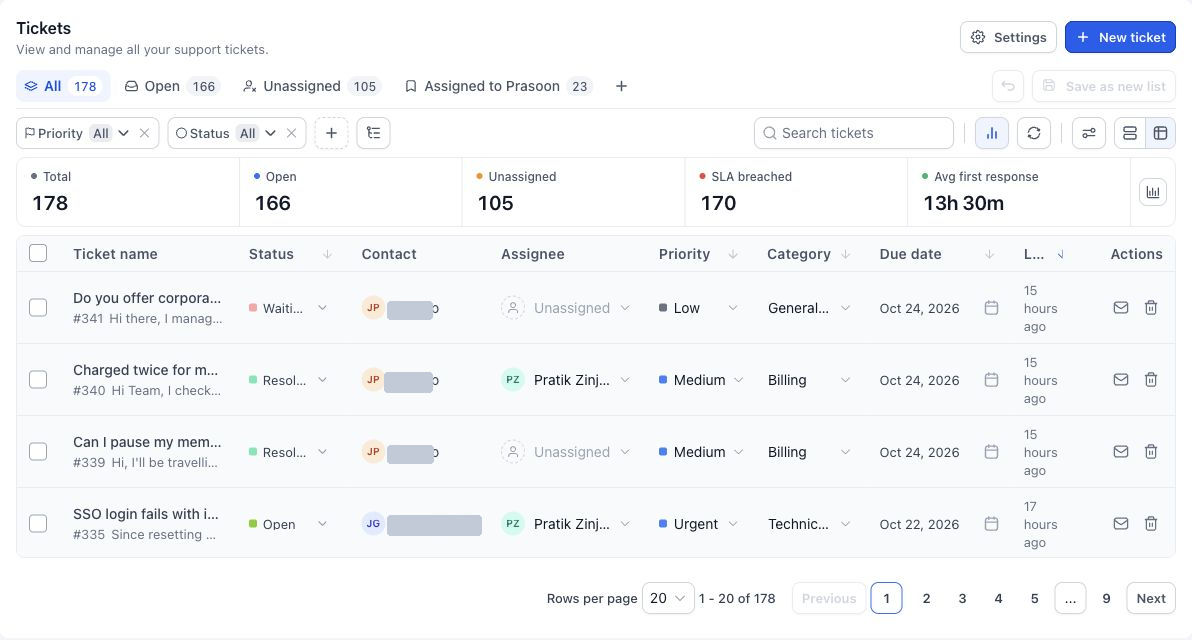
Select a ticket name to open its details. Use the toolbar to organize the queue first.
Only tickets within your access scope are available. If a request is missing, check the active list, filters, and your permissions before assuming it has been deleted.
Switch between List and Card views
Use the List view and Card view controls above the results.
- List view displays tickets as rows, making it useful for comparing properties and selecting several requests.
- Card view gives each ticket more room for its request summary and key properties, making it useful for scanning the queue.
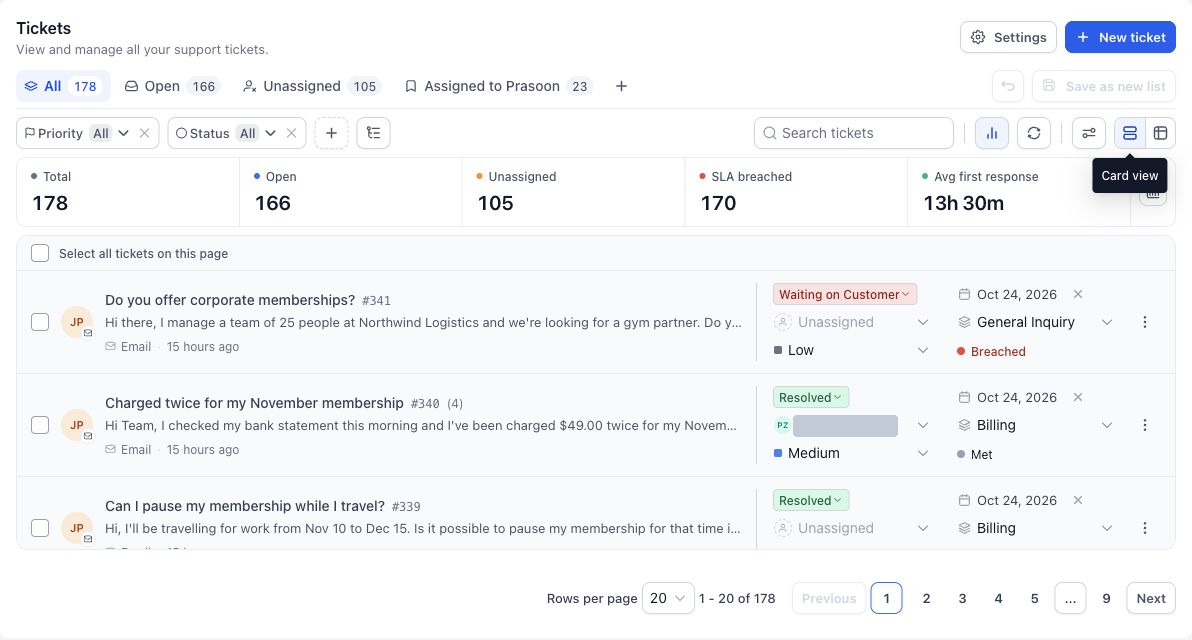
Both layouts show the same underlying tickets. Changing the layout does not create or move tickets.
Use Rows per page, page numbers, and Previous/Next to navigate longer queues.
Use built-in lists
| List | What it is for |
|---|---|
| All | Review the full accessible ticket set. |
| Open | Focus on tickets that are still active. |
| Unassigned | Find tickets that need an owner. |
Custom Smart Lists appear alongside these tabs. A saved list is a view of existing tickets, not a separate container that holds copies of them.
Search and apply quick filters
- Select the list you want to work in.
- Enter a ticket name, contact name, or ticket ID in Search tickets.
- Use the visible quick-filter chips to narrow the results, such as Priority, Status, or Assignee.
- Use Add filter to choose additional quick-filter fields.
- Clear the search or remove filter selections to broaden the results again.
Search and filters work together. If you cannot find a known ticket, return to All and clear the current restrictions before searching again.
Build advanced filters
- Open Advanced filters beside the quick-filter controls.
- Choose All of when every condition must match, or Any of when one matching condition is sufficient.
- Select a field, operator, and value for each condition.
- Use Add condition for another rule or Add group for a grouped set of rules.
- Select Apply.
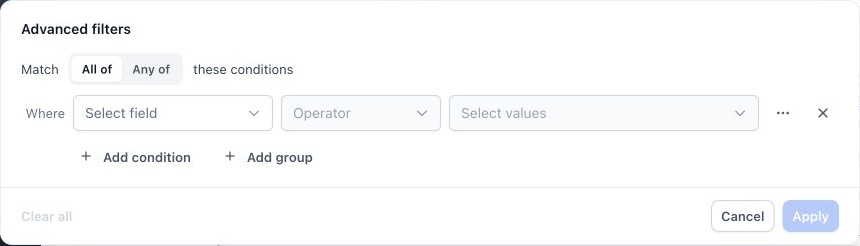
Use All of for a narrow intersection, such as Urgent AND Unassigned; use Any of for alternatives.
For example, use a group for Priority is High OR Urgent, combined with Assignee is unassigned. Review the grouping so the result matches the question you intend to answer.
Use Clear all to remove advanced conditions when available. Cancel closes the editor without applying the current draft.
Save a Smart List
- Set up the filters, columns, and sort you want to reuse.
- Select Save as new list, or the + control beside the list tabs.
- Enter a short, descriptive name.
- Select Create.
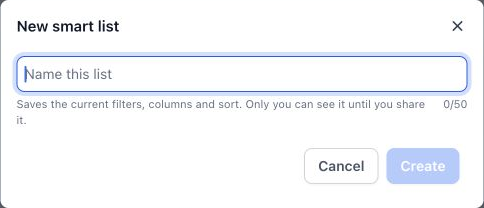
The current dialog saves filters, columns, and sort, and identifies a newly created list as visible only to you until shared.
Use names such as My urgent tickets or Unassigned billing. Select the tab to return to that view. Use the custom list's options menu for the management actions available to you, such as renaming or deleting the saved view.
Deleting a Smart List removes the saved view; it is different from deleting the tickets shown in it. Built-in lists are system views.
Choose columns and sorting
- Switch to List view.
- Open View options.
- Select the sort field and direction.
- Select or clear the column checkboxes to control what appears.
- Use the column drag handles to arrange their order.
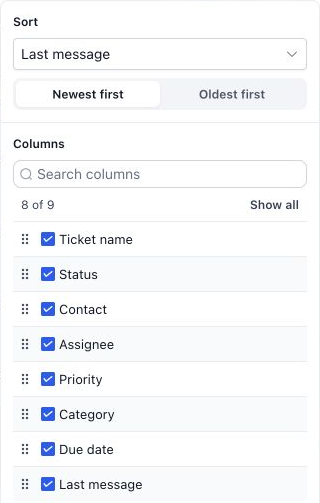
Keep the columns you scan most often visible, such as owner, priority, due date, and SLA.
Supported column headers also provide sorting controls. Check the displayed direction; a date sort and an alphabetical sort answer different questions. For deadline review, choose a due-date order that puts the nearest deadlines first.
Update tickets from the queue
Use the field controls on a row or card to update supported properties such as Status, Priority, Category, and Assignee. Open the ticket details when you need its full history or a field that is not editable in the current view.
Use the envelope control in the row actions or the ticket's actions menu to mark a ticket read or unread. This helps identify work to revisit; it is separate from changing the ticket's status.
Check the selected field value after an edit. Your access level determines whether editing controls are available.
Apply bulk actions
- Select individual tickets with their checkboxes.
- Use the header checkbox to select tickets on the current page.
- If you want the whole matching set, use the separate Select all [count] tickets control in the selection toolbar.
- Check the selected count and choose an action.
- Review the dialog and confirm the operation.
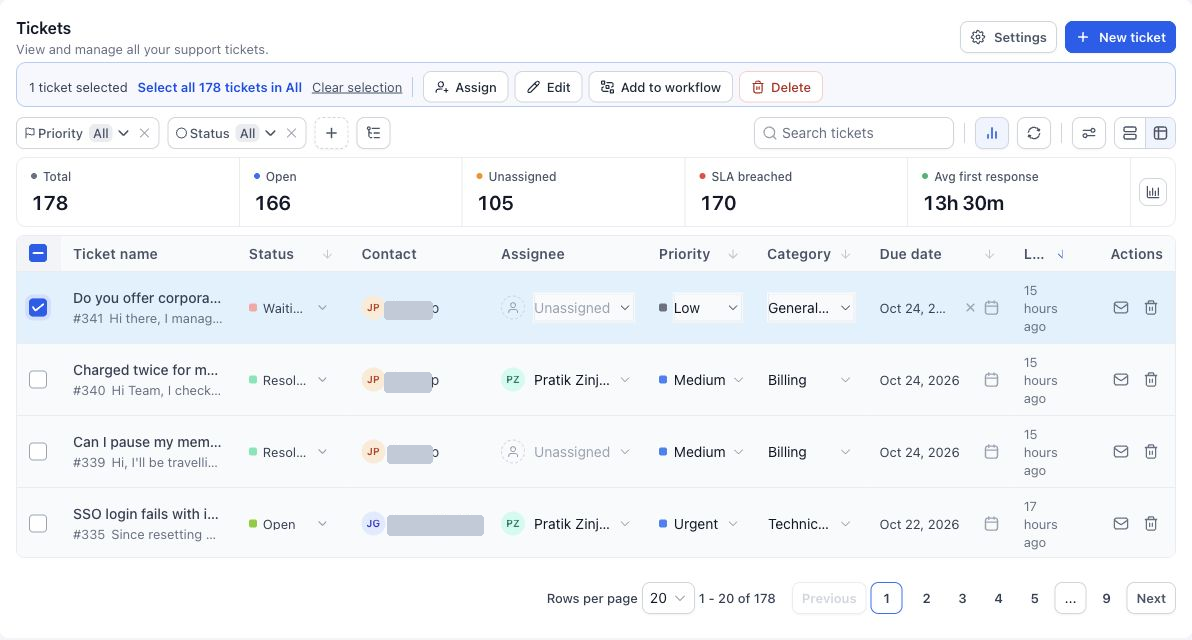
Selecting the visible page and selecting all matching tickets are separate choices. Check the count before confirming.
| Action | How to use it |
|---|---|
| Assign | Choose the intended assignee and confirm the update. |
| Edit | Choose a property, enter or select the new value, and confirm. Available inputs follow the selected field. |
| Add to workflow | Choose the intended published workflow and review enrollment before adding tickets. |
| Delete | Review the selected ticket count and the confirmation carefully before deleting. |
Use Clear selection when you are done or before choosing a different set. If an operation reports failures, review the failed records and reasons rather than repeating the action on every ticket. Do not assume a restore option is available for deleted tickets.
Show and configure metrics
Use Metrics in the toolbar to show or hide the metrics strip. Open Configure metrics at the end of the strip and select the cards you want.
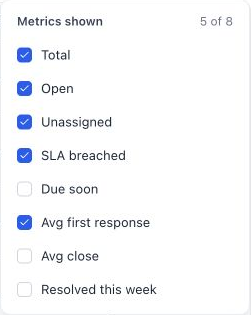
| Metric | What it helps you review |
|---|---|
| Total | The size of the ticket set being viewed. |
| Open | Active requests that still need work. |
| Unassigned | Requests without an owner. |
| SLA breached | Tickets that have missed a service target. |
| Due soon | Tickets approaching a service deadline. |
| Avg first response | How long it takes to provide the first response for eligible tickets. |
| Avg close | How long eligible tickets take to close. |
| Resolved this week | Recent resolutions within the current weekly measure. |
Interpret metrics alongside the active list, filters, permissions, and any time window displayed by the metric. A metric with its own time period should not be compared directly to an all-time count as if the scopes were identical.
Refresh the queue
Use Refresh in the toolbar to request an updated list. If the problem is a disconnected email provider, inspect Integrations; refreshing the list does not replace reconnecting the mailbox.
A filtered view with no results does not mean that the account has no tickets. Clear the filters or return to All to check the broader queue.
Troubleshooting
| Issue | What to check |
|---|---|
| A ticket is missing | Check the list, search, filters, and assigned-data permissions. |
| A bulk action affects fewer tickets than expected | Review whether you selected one page or the full matching set and whether any failures were reported. |
| A saved view does not show the expected requests | Review its saved conditions and the current ticket values. |
| A property cannot be edited | Check permissions and whether that field is editable in the current view. Open ticket details if needed. |
| Metrics differ between users | Compare their filters and access scope before comparing numbers. |
Frequently asked questions
Does a Smart List duplicate tickets?
No. It saves a way of viewing existing tickets.
Does the header checkbox select every matching ticket?
The current header selects the page. Use the separate whole-list selection control and verify its count for a broader selection.
Can I work in Card view without changing the tickets?
Yes. Switching layouts changes presentation, while property edits are separate actions.
Where do I read the full request and send a reply?
Open the ticket name to use the Ticket Details page.
Related guides
- Create Tickets and Connect Email Integrations
- Work with the Ticket Details Page
- Automate Ticketing with Workflows