
Open a ticket to read the request, respond to the customer, add internal notes, and manage its progress. The ticket details page is organized into three panels: top, main, and right.
TABLE OF CONTENTS
- Open a ticket
- Top panel
- Main panel
- Right panel
- Access tickets from a contact record
- Troubleshooting
- Frequently asked questions
- Related guides
Open a ticket
From Tickets, select a ticket name in List or Card view. You can also open a ticket from the Tickets panel on its contact record.
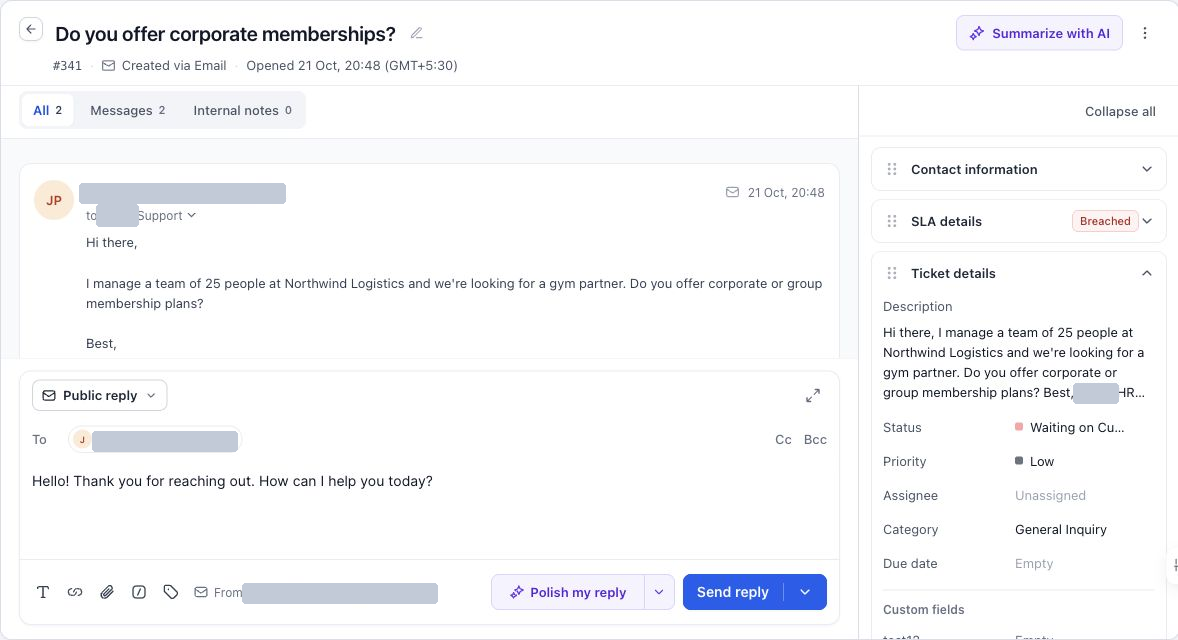
Top: ticket identity and actions. Main: messages and reply editor. Right: customer and request context.
Top panel
The top panel identifies the request and provides navigation and ticket-level actions.
| Control or detail | How to use it |
|---|---|
| Ticket name | Read the request's subject at a glance. Use the rename control to make the internal name clearer. |
| Ticket ID | Reference the specific request when coordinating with your team or searching for it later. |
| Source and opened time | Check how the ticket was created and when it was opened. |
| Back | Return to the ticket list. |
| Summarize with AI | Generate or display a short summary of the ticket. See the AI guide. |
| Ticket actions | Open actions such as Assign to me, Add to workflow, Mark as unread, or Delete, subject to access. |
Rename a ticket
Select the ticket name or rename icon, update the name, and save the edit using the control provided. Use a name that captures the issue rather than a vague label such as Help needed.
Renaming an existing ticket is an internal change. It does not rewrite the established email subject used to keep replies in the same thread.
Use ticket actions
Open the menu at the top right of the ticket. Assign to me can be unavailable when your user is not an assignable member of the sub-account. Use Add to workflow to choose a published workflow, or Mark as unread when you want to revisit the request.
Before using Delete, review the confirmation and the request being affected. Do not assume deleted tickets can be restored.
Main panel
The main panel contains ticket history and the editor used for replies and notes.
Choose a history tab
- All: Review messages, internal notes, and activity together.
- Messages: Focus on customer-facing ticket messages.
- Internal notes: Focus on information saved for your team.
Scroll the history to review earlier exchanges. Use a message's email-details control when you need its sender and recipient information, and open available attachment controls to access files.
Send a public reply
- Select Public reply in the editor's reply-type control.
- Review the To recipient and the displayed From address.
- Use CC if additional recipients should receive the reply.
- Write the response. Use formatting, links, attachments, Fast Replies, or custom values as needed.
- Review the text, recipients, and attached files.
- Select Send reply.
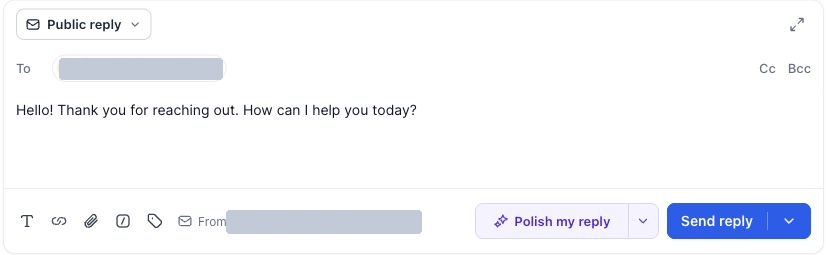
Reply-editor close-up.
Public replies are emailed to the contact and the selected CC recipients. Check the recipient list for each response rather than assuming a previous selection applies.
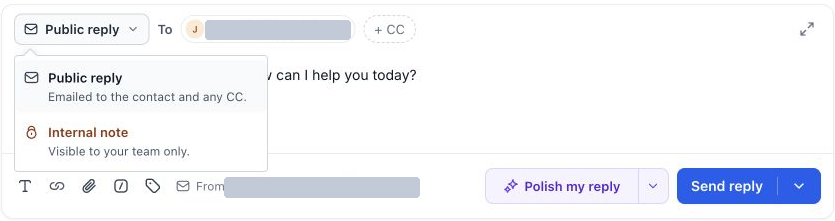
The reply-type control tells you whether the content will be emailed or saved for your team.
Send a reply and update the status
Use More send options beside Send reply when you want to send the reply and set the ticket's status together. For example, an information request may be sent with Waiting on Customer, while a completed answer may be sent with a resolved status.
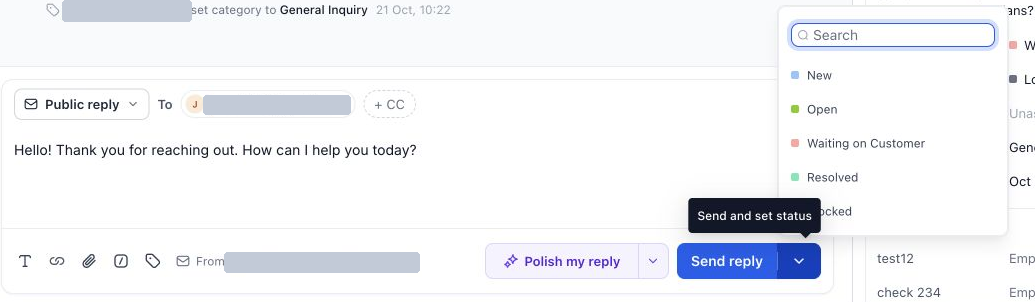
This is a sending action. Finish reviewing the response before selecting the desired status.
Add an internal note
Open the reply-type control and choose Internal note. Write the information your teammates need and use the note's save/post control to add it to the ticket.
Use notes for investigation findings, handoffs, or context that should stay with the support team. Internal notes are not emailed to the customer and should not be treated as a customer-facing reply for response-target purposes.
Use the editor tools
| Tool | How it helps |
|---|---|
| Text formatting | Organize a response with supported formatting so instructions are easier to follow. |
| Insert link | Add a relevant resource or help article. |
| Attach files | Include supporting files; wait for uploads to complete and check the attachment list. |
| Fast replies | Insert a reusable message, then tailor it to the request. You can also type / and search by title. |
| Insert a custom value | Insert a supported ticket or contact value and review the resolved content. |
| Open in a larger window | Expand the editor when a longer response needs more room. |
| AI controls | Prepare a suggested reply or polish your wording, then review it before sending. |
Fast Replies are configured in Ticketing Settings. They provide reusable wording; selecting one is separate from sending the final response.
Right panel
The right panel holds context and editable ticket properties. Select a section heading to expand or collapse it. Use the section handles to arrange the panel where supported, and Collapse all to reduce the visible detail.
Contact information
Review the customer's available contact details. Select View contact or the contact name to open the CRM record when you need more context.
A ticket is linked to a contact, but the ticket's owner and status describe the support request. Updating a ticket should not be confused with changing the contact's broader CRM ownership or lifecycle.
Ticket details
Use this section to review the description and update the request's fields.
| Property | What to do |
|---|---|
| Status | Move the request to the appropriate stage as work progresses. |
| Priority | Set urgency using your team's definitions. |
| Assignee | Choose the person responsible for the request. |
| Category | Classify the issue and select a subcategory when applicable. |
| Due date | Set the date associated with the ticket. |
| Custom fields | Complete the additional information your account uses. |
| Reply information | Review customer and agent reply timing. These are recorded from activity rather than typed as ordinary fields. |
Select the relevant field, choose or enter the value, and complete any save control shown. Confirm that the new value appears on the ticket. Editing requires the appropriate permissions.
SLA details
Expand SLA details to inspect the applied policy, targets, and current state. Use this section to identify whether a response or other milestone is approaching its deadline or has breached.
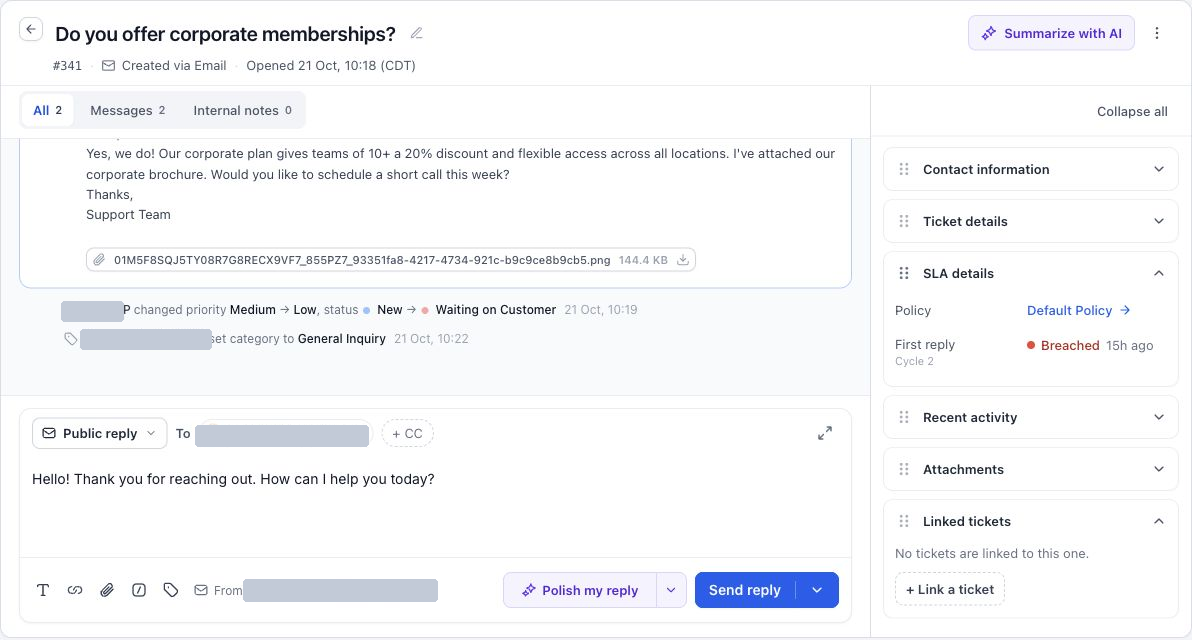
The applied policy and individual target details help explain the ticket's SLA state.
A ticket due date and an SLA target are separate. For the policy settings behind the displayed target, see SLAs and Business Hours.
Recent activity
Expand Recent activity to review the sequence of changes and actions recorded on the ticket. Use it when investigating who changed a property or how the request reached its current state.
Attachments
Expand Attachments to find files associated with the request. Review the filename and message context before downloading or referring to a file in your response.
Linked tickets
Use Linked tickets to associate related requests. Select + Link a ticket and follow the picker to choose the relevant request. Linking provides a relationship between tickets; do not treat it as a replacement for merging their message histories.
Access tickets from a contact record
- Open the relevant contact record.
- Select the Tickets icon in the record's right-side toolbar.
- Review the open count and ticket cards, or use Search tickets.
- Select a ticket to open it, or use its Open in new tab control.
- Select Add when you need to create another ticket for the contact.
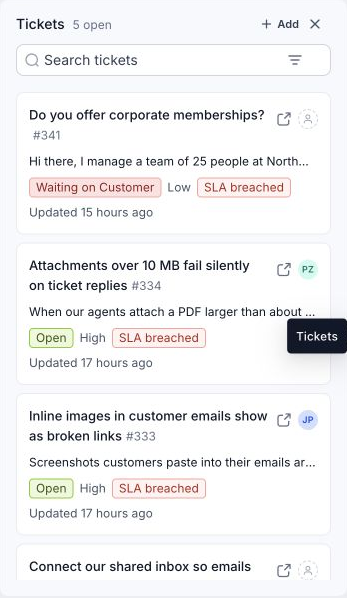
The contact's Tickets panel provides quick access to requests without searching the entire support queue.
Troubleshooting
| Issue | What to check |
|---|---|
| The reply editor is missing or unavailable | Check your manage-ticket permission and the ticket's current loading state. |
| A public reply cannot be sent | Check the recipient, message, attachments, and email integration state. |
| Assign to me is disabled | Check whether your user is an assignable member of this sub-account. |
| A teammate cannot see an internal note | Check ticket access and the history tab they are viewing. |
| A field or section is not visible | Expand the relevant right-panel section and review the configured fields and permissions. |
| An attachment is missing from a reply | Confirm upload completion and review the file controls before sending. |
Frequently asked questions
Are internal notes sent to customers?
No. Public replies are emailed; internal notes are for your team.
Can I resolve a ticket while sending a reply?
Use More send options to choose the appropriate resolved status when that matches the outcome of the request.
Does marking a ticket unread change its status?
Read/unread and ticket status are different controls. Use Status to change the stage of work.
Can I share a link to the ticket?
Open the ticket and copy its browser address. The recipient still needs access to the sub-account and ticket.
Related guides
- Manage Tickets from the List Page
- Use AI in Ticketing
- Create Tickets and Connect Email Integrations